A Shot in the Dark

Picture Specs: ISO 4000, 35mm, f/2.8, 1/13sec

Picture Specs: ISO 4000, 35mm, f/2.8, 1/13sec

Week 4 (8/25/2013 – 8/31/2013): East River, New York, NY
Picture taken on 8/28/2013 at 8:10 PM

Picture Description:

I’m on a Boat!!! Well…I was on Wednesday and that’s where I got the picture for this week’s post.  Hopefully you get the reference and if you don’t shame on you, go watch some SNL highlights.  Unlike the members of “The Lonely Island” I was not on a boat to shoot a music video with T-pain (damn), I was celebrating my parent’s 30th wedding anniversary.  We spent the evening on the Duchess which is part of World Yacht’s fleet of party boats.  Our cruise left from pier 81 at around 7PM and provided us with beautiful views the entire night!  I highly recommend booking a trip on World Yacht if you’re looking for a unique way to celebrate an occasion or trying to plan a memorable night out in the city.

View from the top deck of "Duchess" - World Yacht

View from the top deck of “Duchess” – World Yacht

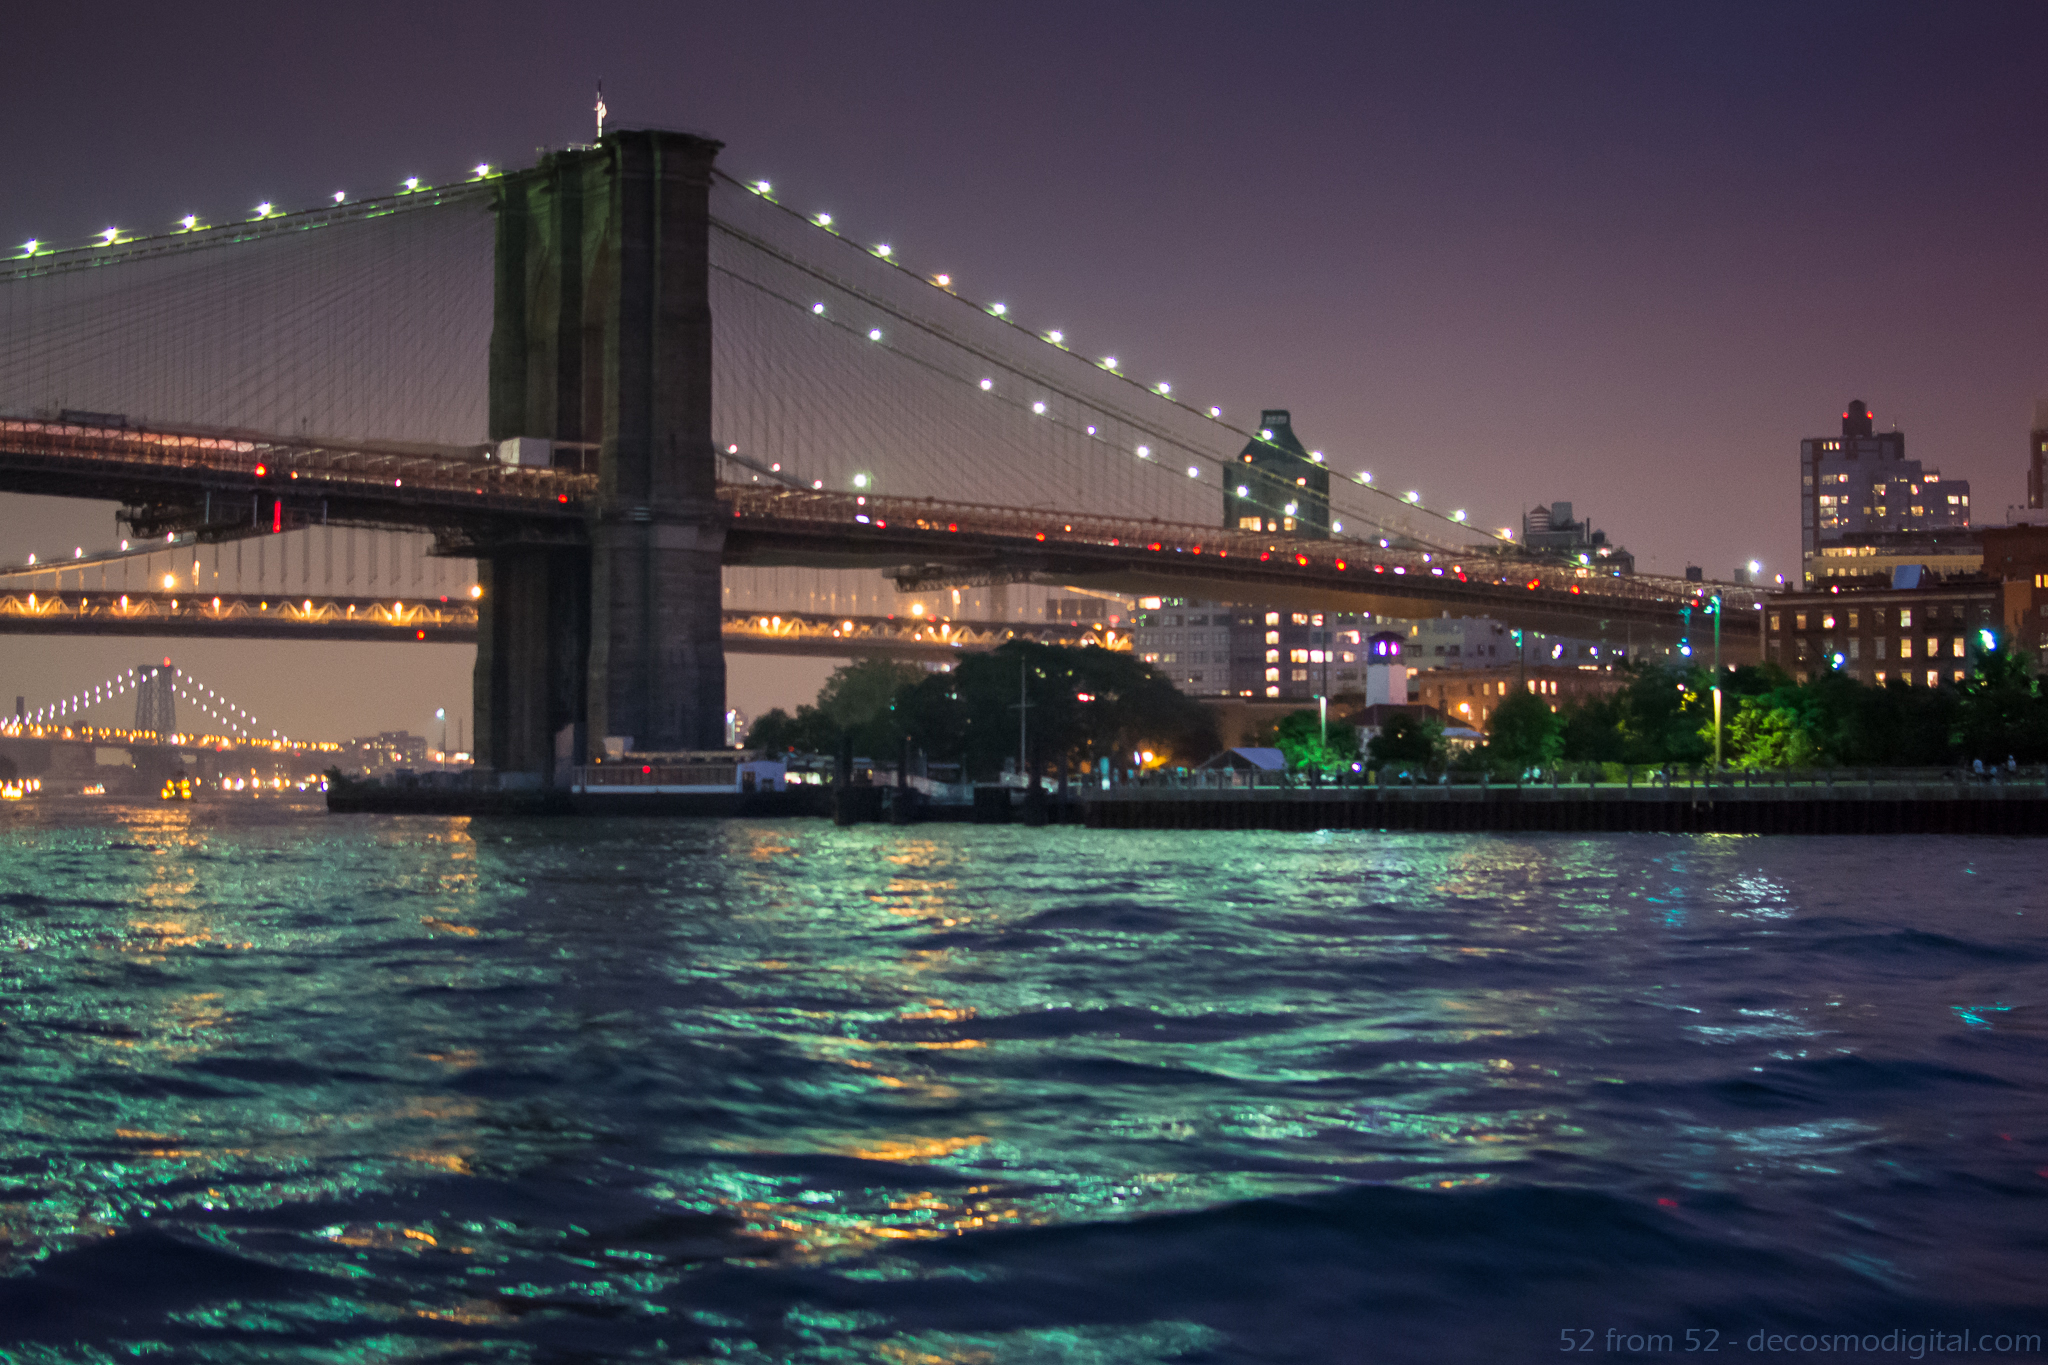
Going into the evening I knew I’d have plenty of scenic picture opportunities but since I was there for my parents the time I could devote to getting a picture was limited.  Luckily I ended up sitting right next to a window which opened and allowed me to lean out and get this week’s picture.  The Brooklyn bridge is one of the most iconic New York City landmarks so when it appeared on the horizon I immediately put my steak knife down and grabbed my Nikon.  The shot I got is of the “BMW” bridges or Brooklyn, Manhattan, and Williamsburg bridges as we traveled North on the East river.

Photography Concepts:

If there was one overall lesson I learned this week, it’s that taking pictures on a boat and at night is VERY difficult.  First, the lighting is inconsistent  (low, high, indoor, outdoor)  which makes it difficult to tune in your exposure.  Second, surprise the boat is moving good luck focusing! Third, if you’re taking pictures of subjects off the boat you have to act fast because you have a very small window to get the shot you just saw.  As a result of hitting moving targets your composition is constantly changing.  Normally when you frame up a picture you’re standing still so you can get a couple pictures, not on a boat, snap fast and often!  In my opinion the combination of moving targets and low light was definitely the hardest aspect of this week.

This picture was tricky and I definitely wish I had a couple more shots at it.  Just like last week I had to use a high ISO but this time it was almost double (4000) which starts to show the negative attributes of a high ISO.  My picture (pre-edit) was a little grainy which is what happens when you use a high ISO.  I won’t try to explain why graininess (aka noise) happens but there are plenty of places to read about it online (one linked below).  While editing my picture in Lightroom I did my best to lessen the graininess by using some noise reduction corrections, which made for a softer (less sharp) image.  This is the first time I’ve mentioned Lightroom but let me tell you, it’s awesome!  I’ll talk more about it another time but I highly recommend it for editing/organizing all your pictures.

Other than a high ISO to make up for the limited amount of light I also had to use a wide aperture (f/2.8) and slow shutter speed (1/13 of a second!).  Now remember slower shutter speeds blurs motion so using one on a moving boat is risky.  I think this picture came in focus enough but if I was on land it would have been a lot sharper and I probably would have used a tripod.  I could have opened my aperture more (max f/1.8) to enable a faster shutter, but the wider the aperture the shallower the depth of field which isn’t ideal for a landscape picture.  As I mentioned earlier the window (especially when shooting through a literal window!) of opportunity for a picture is limited so I didn’t have enough time to work my way up the aperture scale (large to small).  Even if I had more time though a shutter of 1/13 is already too slow so I couldn’t drop that any further which I’d have to do if I shrunk my aperture.   As I said, this was a tricky picture.

One more big lesson that I learned this week (which isn’t really demonstrated in this picture) was the importance of white balancing.  While taking picture inside the boat everything seemed yellowy due to the indoor lighting.  Once the light stabilized inside I took a couple pictures of my white balance cards in the different parts of the boat so I could adjust everything in Lightroom later.  Let me tell you WOW what a difference!! I’ll try to get a picture in the coming weeks to demonstrate the usage of white balancing.  If you’re a beginner like me you’re going to be surprised by the results.

Links:

World Yacht Site: http://bit.ly/14KB8zR

ISO/Noise Article: http://bit.ly/18qN5bB

Unplanned “Destiny”

Picture Specs: ISO 2500, 35mm, f/2.2, 1/4000sec

Picture Specs: ISO 2500, 35mm, f/2.2, 1/4000sec

Week 3 (8/18/2013 – 8/24/2013): Shipyard Park, Hoboken NJ
Picture taken on 8/22/2013 at 6:25PM

Picture Description:

This week’s picture is a perfect example of how sometimes the best things aren’t planned. Opportunities present themselves when you least expect them, don’t get tunnel vision, especially in photography.

All week I planned on getting one of two shots, either a night scene in New York City or a sunset shot in Hoboken at Pier 14. I had a clear picture in mind for both ideas and scouted out locations where I could execute my idea. I was busy in the beginning of the week so I was aiming to take my picture on Thursday.

When I rolled out of bed Thursday morning still recovering from the night before (awesome night! Boozing for charity/Benjamin’s Steakhouse…Google it), I said to myself there is no way I’m going to have the energy to cruise the city streets late at night for the picture I had in mind. Luckily I had a plan B, Pier 14. After work during my run I did a quick drive by of pier 14 to make sure everything was good for later. Upon getting to my spot I noticed that this massive boat called “destiny” (ironic I know) was parked right in the way of what would be my view of the sunset. In addition to the giant boat there were a bunch of workers welding in the area that would be in the background of my shot. I thought to myself “ah maybe it will make for a better picture”….it didn’t.

When I returned about an hour later the picture was nothing like I had planned no matter what angle I shot it from. At this point it would have been too much of a hassle to bolt into the city for my original plan so I decided to start walking around. While wandering around I remembered seeing a fountain in Shipyard Park which could make for a good picture. When I got to the fountain I realized that thanks to “destiny” I stumbled upon the perfect shot!  The sun was at the perfect angle and I had the park all to myself.

Photography Concepts:

The most important part of this picture was capturing it with the fastest shutter speed possible. The quickest my camera can take a picture is in 1/4000 of a second, which compared to your average camera or iPhone is noticeably faster. The high speed shutter is what gave me the ability to freeze the water droplets and splashing. In order for me to use a super fast shutter I had to compensate with a very high ISO of 2500 and almost wide open aperture of f/2.2. Now although I mentioned “boosting” ISO in my previous post I didn’t explain it’s relationship to making your picture brighter. To put it plainly ISO is your camera’s sensitivity to light, lower number = less sensitive which means your sensor needs more light from either a slower shutter speed or wider aperture. The higher the ISO the less light you need from your shutter or aperture. These three aspects of a camera’s settings (ISO/Aperture/Shutter) are commonly referred to as the “Triangle of Photography”. I’ll try to explain this more in another post, but for now if you want to read more about ISO below is a really good article from NIKON. This article also explains the negative aspect of ISO which I’m yet to talk about.

See below for image source

See below for image source

When it came to framing the picture I followed the rule of thirds to position the key elements (bird, sun, water droplets). The bird is just about on the intersection point of the center/right thirds leaving the remaining two thirds of the horizontal space to be filled with splashing. As for the lighting angle back-lit vs front-lit, I took the picture both ways and found that the back-lit (sun/light source behind subject) looked way better because all the light shined through the water droplets. With the sun in the rear, the droplets captured the light and made for a cool almost glowing effect.

The one thing I should have tried but totally forgot was to take a couple pictures with flash. Although it might have lit up the bird too much, based on everything I’ve read flash freezes motion and in this case might have made the water droplets more prominent. On the bright side (pun intended) it’s something to walk away with, I’ll have to mess around with flash for a future post.

Nikon Article: http://bit.ly/1dAdide
Image source – Via Google search http://bit.ly/14pBJ9X

A Day of Reflection

Picture Specs: ISO 500, 35mm, f/9.0, 1/200 sec

Picture Specs: ISO 500, 35mm, f/9.0, 1/200 sec

Week 2 (8/11/2013 – 8/17/2013): Corner of 6th/42nd Bryant Park, New York City
Picture taken: 8/14/2013 at 5:50PM

Picture Description:

If you were to ask me what are my favorite locations in New York City, Bryant Park would absolutely be in my top five.  Although I pass the park almost every day (during my commute to work) I don’t always have the time to stop and enjoy everything it has to offer.  If you’ve spent any amount of time in the park you know it’s a very busy place filled with a diverse group of people.  It’s safe to say there is an activity for almost anyone, year round. One part of the park that I never explored was the New York Public Library.  Yes, for those of you that know me I went into the library, voluntarily!  No I did not borrow any books BUT I did have fun checking out the amazing architecture throughout the building.  At the start of my visit, my plan was to get a picture of the “Rose Main Reading Room” however that didn’t come out as I hoped.  A picture with the 35mm didn’t do the room justice (trust me, Google it) you really need a wide-angle lens, so I decided not to use that picture for this post.

Taken via NYPL’s Photobooth

After exploring the library, I took my adventure outside.  In the heart of the park there were hundreds of people out enjoying the beautiful 70 degree sunny weather.  Both of the park’s restaurants were buzzing and the lawn was littered with people hanging out next to the towering movie screen sitting on the west side of the lawn.  In case you don’t know, HBO has a film festival that runs every Monday during the summer.  The festival makes for a great dinner and a movie idea, but those kind of tips would need a whole other blog so I’ll leave it at that.

After doing a quick walk-through of the park one thing that immediately caught my eye was how most of the buildings surrounding the park were picking up great reflections of one another.  A reflection shot usually makes for an interesting and unique photo so I decided this would be the perfect idea for this weeks post.

Photography Concepts:

There weren’t a lot of technical intricacies to this week’s photo other than timing.  Prior to going to Bryant Park I knew when the sun would be at the right angle (no pun intended) for some nice shots and maybe even a good reflection picture.  I use an APP on my iPhone called “The Photographer’s Ephemeris” which tells me the angle of the sun based on time/day.  If you’re looking to use the sun as a part of your picture or get a reflection shot I highly recommend using this application when planning your shot.

One composition concept that I attempted to use at least subtly is “leading lines”.  When you look at the picture the lines sort of lead you to the corner of the building where you notice you’re not looking at a blurry picture, you’re actually looking at a reflection.  At least that’s the way I saw it.

Last, when shooting during the day even though there is plenty of natural light, at some points I had to slow down my shutter speed or boost my ISO.  I’ll talk about this more when I take a night picture but take note that for a picture like this when you want everything in focus you need to use a smaller aperture.  I used f/9 which is (based on everything I read) a good aperture for landscapes.  Since a smaller aperture means less light, you have to compensate with a higher ISO or slower shutter speed.

Challenges:

I’m only in week two and I can already see how challenging the 52 from 52 concept is going to be.  Luckily I like a challenge, anything worthwhile takes time and effort.  I put a decent amount of thought into what I wanted to photograph this week.  I naturally have lots of ideas but some of them are about timing (weather, time of day, ect.) while others are location based and require traveling.  With a busy schedule, one of my biggest difficulties will be setting aside the time to go out and take pictures each week…but that’s the purpose of this, to force me to get out there and learn!

First Post!

Picture Specs: ISO 100, 35mm, f/1.8, 1/100 sec

Picture Specs: ISO 100, 35mm, f/1.8, 1/100 sec

Week 1 (8/4/2013 – 8/10/2013): Hoboken uptown Pier
Picture taken on 8/6/2013 at 5:45AM

Picture description:

For those of you that follow my instagram or are friends with me on facebook you’ve probably noticed I like to take pictures of the New York City skyline, particularly from the Hoboken piers.  Initially I told myself I wasn’t going to start with a skyline shot but in the end it made the most sense for at least one BIG reason.  Taking skyline pictures is pretty much what got me into photography in the first place. The more skyline pictures I took the more I realized how much I enjoyed taking pictures and that I really needed a better camera.  The second reason this picture is significant is because it’s by far my favorite spot in Hoboken.  I’ve dubbed this “my bench” and usually spend at least one morning/evening a week sitting here soaking in the view.  Whether I’m drinking my morning coffee or taking a breather after a run on the pier, I often find myself back at this bench.  My favorite time to sit here is the early morning for a couple reasons; there are a lot less people walking around, you hear tons of birds chirping and waves crashing during high tide, and you obviously get a great view of the sunrise.  It’s very tranquil and a great way to start out your day.  Trying to capture the feeling of sitting in this bench is why I decided to start out with this picture.

Photography concepts:

First I shot this picture at f/1.8 which is the widest aperture (opening of the lens) and shallowest depth of field I can take.  It might seem odd but the smaller the ‘f’ number the larger the opening of the lens is.  While the larger the ‘f’ number the smaller the opening is and the more things are in focus.  I took this picture with a small ‘f’ (fstop/aperture) of 1.8 initially to put the bench in focus and blur out the skyline but after trying one in reverse with my focus point on the buildings, I liked this one better.  Shallow depth of fields give that blur effect and are hard if not impossible to pull off with a camera phone since you can’t control your camera’s lens opening like with a DSLR.  For my fellow instagramers, the blur feature on instagram is meant to mimic depth of field shots but it’s limited to the circle or straight area.  I felt like by using the shallow DOF in this picture it makes it easier to imagine yourself sitting on the bench.

The second concept in play is the rule of thirds.  In this picture the bench is in the far left/bottom third of the picture with the rest of the scene in the middle/right thirds.  For anyone that doesn’t know about the rule of thirds, it’s just breaking the picture into thirds vertically and horizontally (seen below).  This results in 9 boxes with 4 intersection points.  It’s said that by putting subjects or things such as eyes on these lines makes for more dramatic pictures.  In my picture the bench  is on one of the intersection points and clouds are on two.  Using the rule of thirds in this way helps you focus on the sky and give you the feeling of looking out from the bench from left to right.

DSC_0023-ruleofthirds

The last sort of “concept” that I want to point out is the timing of the shot.  When shooting sunrises or sunsets it’s said that the best light is +/- 30 minutes of the actual sunrise or sunset time.  On the morning of this picture the sunrise was at 5:58 AM.  I got to my spot a little later than I had hoped (hit the snooze a couple times) but I still managed to get the light I was looking for.  Once it got close to and then past the actual sunrise time the colors seemed more washed out.  Overall I’ve learned that my favorite time to take pictures of the sunrise is before the time and for sunsets is after.