The Next Chapter

Picture info: ISO 100, 36mm, f/13, 1/60 second

Picture info: ISO 100, 36mm, f/13, 1/60 second

Week 52 (7/28/2014 -8/3/2014): Central Park, New York City

Picture taken on 8/2/2014 at 3:26PM

Photograph description:

A year ago when I decided to commit to doing this photoblog my goals were simple, shoot a picture each week, and learn photography.  It makes me proud to confidently say that I accomplished both goals, and in doing so accomplished so much more.  Hunting down my weekly pictures took me all over New York, New Jersey, Pennsylvania, Florida and countless more places in between.  Not only did this photoblog take me to new locations, it also helped introduce me to so many new people.  This week was no different, and perhaps it was one of my best experiences yet.

A few week’s ago my brother Ryan mentioned to me that one of his college buddies was looking to propose to his girlfriend.  Ryan had shown his friend some of my pictures, as a result, he asked Ryan if I’d be interested in photographing his proposal.  Initially I was hesitant to say yes, mainly because I don’t have much experience photographing people and I didn’t want to screw up such a special occasion.  After giving it some thought I decided what the heck, I’ll give it a shot.

This week Ryan’s friend reached out to let me know Saturday was the big day, and his location of choice was Central Park.  Coincidentally, Central Park was were I hatched the idea for this photoblog so it seemed fitting to get my last picture where it all started.

We all met this past Thursday to discuss the logistics for pulling off our covert mission.  Ryan’s friend was a military officer for 5 years so of course he showed up to the meeting with a map in hand and a plan for concealing our identity from his girlfriend.  We came up with a solid plan in a matter of minutes, the only thing left was for us to execute!

Our basic plan was to link up with my brother’s friend at the Southeast corner of the park, then follow him and his girlfriend North to the Bethesda Fountain.  Once at the fountain, the two would flip some coins into the fountain and make a wish.  They would both then walk towards the Bethesda Terrace, and just as they crossed under the inner arches Ryan’s friend would drop to a knee and tell his girlfriend what he wished for, that she would marry him.

52from52-wk52(2)

Bethesda Fountain

Saturday played out like a movie, we linked up with the couple and trailed them undetected while watching the plan play out.  Once it came time for Ryan’s friend to pop the question, I moved in for the shot.  As I crouched down to take the picture something new happened, my adrenaline pumped?  It was part nerves, part excitement but absolutely a new experience for me while taking pictures.  After taking the pictures my brother and I congratulated the newly engaged couple, took some more posed picture, then were on our way.

Bethesda Terrace

Bethesda Terrace: Proposal Location

As Ryan and I worked our way south towards Columbus circle we came across some large rocks that jutted out of the ground.  Ryan decided to climb on top of one of the rocks to get a better vantage point.  Once Ryan was at the top of the rocks I directed him to look out towards the city skyline so I could take a picture.  As Ryan turned towards the skyline, I saw it, the perfect shot, the perfect picture to close out my 52 week series.

You’re probably asking, why was the picture so perfect and what did I see?  It all happened so fast that it’s hard to describe, but as I took the picture I realized Ryan was inadvertently acting out how I was feeling.  Ryan climbing the rock represented me accomplishing my goal of completing my 52 week series.  Ryan turning around towards the city represented the idea that although I just accomplished my goal, in doing so it revealed a much bigger world full of new challenges just ahead. My unique experience while taking the proposal pictures, along with the previous 52 weeks made me realize that this is not the end of my photography journey.  Simply put, this was chapter one, and now it’s time for the next chapter.

Photography Concepts:

If someone asked me, “what do you think are the most valuable lessons that you learned of the past 52 weeks”, my answer would have to be my understanding of exposure and composition.  Understanding exposure enables you to take pictures that capture scenes as you see them.  Highlights, shadows, blacks and whites are the building blocks of a good exposure, they’re also what makes up a histogram.  Without explaining the histogram, I’ll show you how taping into the power of these attributes unlocks endless creative freedom.  If however you want to learn about the histogram, check out the link below.

Using this week’s picture as my example, in camera I wasn’t able to capture the full spectrum of highlights and shadows.  What I’ve learned to do in this situation is to take an evenly exposed picture in camera, then rework the highlights and shadows in lightroom.  Below is a split screen before and after of my picture.  In order to bring back the blue and detail of the clouds I had to almost completely drop the highlights to -90.  To compensate for dropping the highlights I raised my whites, this made sure I didn’t totally darken my image.  Next I lowered my shadows and blacks to make the trees and rocks darker, and emphasise the contrast between the city and the view inside the park.  Knowing the effect of highlights, shadows, blacks and whites is what gave me the knowledge to mold the image into exactly what I wanted.

Before and After Lightroom Edit

Before and After Lightroom Edit

Just like with exposure, understanding composition enables you to capture a scene and pass on what you see to a viewer.  As I talked about in the photograph description, the site of Ryan up on the rock was very symbolic to me.  Much of what created the symbolism was the composition of the picture.  Ryan’s position in the image, and orientation of his body were the two keys to creating the powerful image.  As I’ve talked about countless times over the past 52 weeks, the rule of thirds is what guides most of my composition decisions.  I’ve practiced the rule of thirds so much that I lined Ryan up on intersection point between the right and middle thirds basically without even thinking.  Next, when I told Ryan to turn and face the buildings, I shot my picture before he completely turned and presented me with his whole back.  To me , this half turned orientation gives the feeling that he just got to the top and is just looking out for the first time.  As a comparison, I took a picture of Ryan with his back completely turned to me, and for me that seemed like the body language of someone that was deep in thought.  He might have been standing on that rock for minutes, hours or even days?  His body orientation doesn’t show motion so it seemed boring.  These are just a few examples of things to think about when you’re lining up your subjects.

Rule of Thirds Applied

Rule of Thirds Applied

Now that I explained some of the ways that I use exposure and composition to get creative, it’s your turn. I’ve spent the past 52 weeks showing you my perspective, perhaps it’s time you get out there and show me yours.  Start a blog, post more actively on Instagram, shoot YouTube videos explaining how and why you take pictures.  Do whatever it takes to share your creativity and I guarantee, you won’t regret it, I know that I don’t.

Alternate view: Ryan's back turned

Alternate view: Ryan’s back turned

Links: 

Histogram Article – Click here


Circling Back

Picture Info: ISO 100, 36mm, f/20, 20 Second

Picture Info: ISO 100, 36mm, f/20, 20 Second

Week 43 (5/26/2014 -6/1/2014): Uptown Hoboken

Picture taken on 5/30/2014 at 9:49 PM

Photograph description:

Hoboken is a great place to live if you enjoy running.  Hoboken has countless running routes to choose from, most of which are accompanied by an amazing view.  Since moving to Hoboken over a year ago I’ve mapped out a few of my own running routes.  Each route presents a different physical challenge along with the constant mental challenge of fighting the urge to stop and take pictures every few steps.  Out of all the routes I run, my favorite is what I refer to as my “uptown route.”  My uptown route starts at Maxwell Park and hugs the water line all the way into Weehawken.  Eventually I circle back to Hoboken the same way I came, with my finish line being the path featured in this picture.  The reason this route is my favorite is because typically there aren’t many other joggers to get in my way and of course having this view as my finish line is a nice perk.

I run a few times per week so I’ve seen this view countless times and countless times I’ve said to myself that would make for a great picture.  Not only is this a beautiful site, it also reminds me to always finish what I start.  Each time I get to this point of my run I’m usually tired and ready to stop, but instead of slowing down I usually kick up the intensity for this last straight away. Typically I wait until some other runner makes it about halfway then I chase them down and try to finish ahead of them.  I believe that the more you train yourself to push through hard situations, the more it becomes second nature and the stronger you’ll be both physically and mentally.  This is the code that I live by and this picture reminds me to practice this each and every day.  Always finish and always finish strong!

Photography concepts:

One of the reasons this view always draws me in is because of the natural “Leading Lines” composition.  The lights and trees that line the path converge and take your eyes straight towards the Empire State Building.  Year round this is a powerful view but the conditions never seemed right for me to get a good picture.  Additionally the street lights always presented glare issues that took away from the picture.  Recently I figured out the right camera settings and editing techniques to eliminate the glare issues so I finally decided to give this picture a shot.

The camera setting that has helped the most with photographing strong light sources (e.g. the sun, street lights, ect.) has been a small aperture.  The smaller the aperture the less bleeding light and the cleaner it looks.  For night photography f/18 and above is a great aperture to use.  If you’re using this small of an aperture at night it’s more than likely that you’ll be hitting some slow shutter speeds so don’t forget your tripod.

When it came time to edit this picture there were two adjustments that were key.  First, to bring out the detail in the Empire State Building I dropped the highlights of the area surrounding the building.  I’ve found that dropping the highlights of buildings at night makes them look very crisp.  The second adjustment was to lower the saturation all colors in the image except green.  What this did was eliminate any of the lens glare that showed up as random colors, and it made the leading lines composition of the trees even more of a focal point.  As a result the not only does the composition of the image take you down the path but the isolation of the green color also acts as a guide for your eyes too.

The last aspect of this picture that helped enhance the composition was the size of the Empire State Building.  If you’re a Hoboken local and you’ve taken this picture before chances are the Empire State Building was much smaller than in this picture.  Why is that? It’s because of my focal length 36mm x 1.5 = 54mm.  Most phones shoot at around 30mm and since focal length essentially equates to zoom so when I use ~54mm the building is larger.  The thing that’s interesting about zoom is if you stand further back your foreground will be scaled regular, but whatever is in the background (e.g. the Empire State Building) will appear larger than usual.  You see this technique a lot when people photograph the moon and get that insanely large moon backdrop.  Although I shot with a greater zoom then people do with phones, my image resembles how this path looks like to the naked eye.  Had I stood further back and zoomed in with 80mm+ the Empire State Building would have looked massive.  I’m limited to the 35mm range for this blog but I encourage you to try zoomed focal lengths to scale up your backdrop subjects.  Experiment with your camera’s settings and new focal lengths, it’s the only way you’ll learn!

Reflecting on Goals

Picture info: ISO 100, 34mm, f/2.8, 1/500sec

Picture info: ISO 100, 34mm, f/2.8, 1/500sec

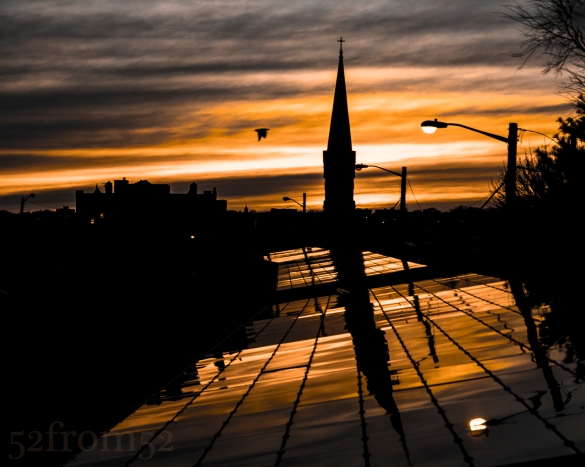
Week 37 (4/14/2014 -4/20/2014): 8th Street, Hoboken

Picture taken on 4/19/2014 at 7:33 PM

Picture description:

What do I want to accomplish? This is a question that often keeps me awake at night.  I’m all about setting goals and  doing whatever it takes to complete them.  Step one of having a goal oriented mindset is obvious, set some kind of goal.  If you don’t know what you want to accomplish, how can you achieve it?  This “goal oriented process” is the concept I applied after purchasing my camera, my goal was to learn photography.  After setting my goal, step two was figuring out a way to achieve my goal, which led me to create this photoblog.  With the end of this photoblog quickly approaching, I’ve been spending time thinking about what will be my next step in achieving my overall goal of learning photography.   Learning photography is hard to measure though, one can argue that you can never fully learn photography.  There will always be  some new camera, some new technique or just something new to learn.  Knowing that I’ll never be able to measure my original goal has made me think, perhaps it’s time I expand my goal and decide what I’d like to do with my newly found photography knowledge?  I’m now asking myself, what do I want to use my photography to accomplish?  Is my passion for photography just a hobby, or do I want to take it further?

This past weekend I set aside some time to think about the questions I’ve raised about my next steps.  While kicking around ideas I decided to throw on a YouTube video from one of my favorite photography resources, “CamerRec Toby.”  Toby is a photography pro out in Vermont with his own YouTube channel devoted to reviews and tips about photography gear and techniques .  I’ve cited Toby’s videos before but this week one of his videos really caught my attention.  In the video (link below) Toby and his co-host Christina discussed an article “7 Reasons why most Photographers and Videographers don’t Reach their Goals” (link below).  The article was so relevant to what I was currently thinking about it almost seemed like it was targeted directly at me.  In the article the author talks about photographers setting too general of goals  (e.g. Learning photography), and how it’s important to have measurable goals. The article helped put things in perspective and made me realize it’s time for me to set some measurable goals.  The article and Toby’s video also motivated me to push forward on one of the smaller goals that I’ve been toying with.  As of this past weekend, I’ve decided that I’m going to participate in the next Hoboken Art & Music festival in September.  My main goal isn’t to make money (though that’s always a bonus), my main goal is to meet lots of people and seeing who and what might help me decide where to take my photography next.

With a new goal (participate in the Art & Music Festival) set, step two was to figure out a way to accomplish it.  There are many things that will go into preparing for the festival, but one of the most basic things is having plenty of pictures.  As a result, this weekend I also decided to start a new project called “Hoboken Streets.”  Since the festival is held in Hoboken, it seems logical to think many of the attendees will be Hoboken residents.  Having a geographically targeted audience means I should have geographically targeted pictures, hence my “Hoboken Street” idea.

If you’re still with me, you’re probably asking, “how in the world does all this related to this week’s picture?”  Well, even before officially deciding on the idea of doing a “Hoboken Streets” project, I wanted to explore more of Hoboken.  Over the past few weeks I’ve changed up my nightly running route and began zig zagging around town looking for pictures.  This past week one of my runs led me up 8th street towards Stevens around sunset, where I found this location.  It might come as a surprise but I don’t run with my camera, so a few days later I circled back with my Nikon and got the shot.

Photography concepts:

I wrote a little too much in the previous section, and the article I referenced could somewhat fall into this section so this week I’ll keep this section short.  Two keys to this picture were composition and editing.  In terms of composition, I wanted to have an equal balance between the sky/silhouette and the solar panels which were reflecting the sky/silhouettes.  Instead of following the usual rule of thirds guidelines I split my image in two halves horizontally (top/bottom).  The bottom half was focused on the reflection which was meant to lead your eyes down the path to the top half, which was meant to feature the sky and silhouettes.

Editing was key for this image because I wanted to emphasize the contrast between the dark silhouettes and light from the sunset.  In order to do create a nice contrast, I dropped the overall vibrancy of the image while boosting the saturation of specific colors.  After my color adjustments, I was left with the contrasting image that I was looking for.  Of course there were some other adjustments (e.g spot adjustments, highlights, clarity, ect.) but nothing more than I’ve talked about in previous weeks.  If you haven’t already, circle back and read some of my earlier weeks posts to get some more in depth tips on editing and composition.

Article:

http://theslantedlens.com/2014/7-reasons-photographers-videographers-dont-reach-goals/

CameraRec Toby Video:

https://www.youtube.com/watch?v=IhGUyD2g7Eo


Step forward by stepping back

52from52 - Week 19

Picture info: ISO 3200, 35mm, f/1.8, 1/200sec, -1 Exposure step

Week 19 (12/9/2013 – 12/15/2013): Top of the Rock Observation Deck

Picture taken on 12/12/2013 at 5:15 PM

Picture description:

This week I finally got the chance to make a return visit to Top of the Rock.  My first visit was six months ago and was only two weeks after I purchased my Nikon.  Since my last visit I’ve often looked back at the pictures I took and thought about the many things that I could have done better.  I’ve learned many lessons over the past six months, in part because of this blog but also because I’ve immersed myself in photography.  Articles, YouTube tutorials and experimenting with different  techniques have been my main sources for learning.  One other source of learning that might surprise you is instagram.  I often flip through different hashtags looking for ideas of what to shoot or to see how people photograph certain subjects or places.  Instagram has photographers of every level ranging from the professional to amateur, and or dare I say serial selfie taker.  Before and after my trip I looked through the hashtag #topoftherock to see the kind of pictures people took during their visit.  Besides the selfies and couple pictures I noticed that nearly all of the pictures looked identical with the exception of changes to the sky or filter the person used on the picture.  After seeing how people have been over-sharing the same picture I knew that I had to find some way to differentiate mine from the rest.

During my visit even though my goal was to take an original picture, I couldn’t help myself from taking the classic Top of the Rock picture.  I found myself taking the same kind of picture over and over again partially to make sure I got a good one, but also because in person it’s just that hypnotizing of a view.  After about an hour of scanning the horizon for a unique view I came to the conclusion that from my vantage point there really was none.  It didn’t matter where I aligned the buildings, I had already seen that picture, or one very similar, shared countless times.  At that moment I decided to take a step back from my coveted position to see what new perspectives I could find.  Within a matter of seconds I was rewarded for my decision.  After stepping back I saw that all the people taking pictures were casting silhouettes in front of the very same view I was just photographing.  I spent the next couple of minutes wading in and out of the crowd to try and get the a picture that met my satisfaction.  Eventually the 20 degree weather got the best of me and I decided to call it a night.  On my way home while thinking about my night, I realized the valuable lesson that I just learned.  It’s very easy to get drawn into taking the obvious picture. The only way my photography is going to continue to improve or “move forward” is if I regularly remind myself to take a “step back” and find a new perspective on what’s right in front of me.

Photography Concepts:

Although I used the previous section to talk about avoiding the obvious shot, it doesn’t mean the classic Top of the Rock pictures aren’t good ones.  For the purpose of this blog I wanted to challenge myself to get something unique but it leaves the question, how do you take a good picture at Top of the Rock?  As I mentioned earlier I often look back at the pictures I took during my first visit and dwell on what I could have done better.  Let me share with you some of the lessons I learned between my two visits in terms of taking pictures at Top of the Rock.

Example of the classic Top of the Rock Pic

Example of the classic Top of the Rock Pic

The first thing you have to ask yourself is what kind of picture are you looking to take?  Do you want take pictures of only the buildings or are you planning on featuring yourself or friends in the picture with the buildings in the background?  Knowing your subject is important to so you can determine the time you’re going to go and where you should set up shop once you’re there. Let’s start with talking about taking pictures of people.  If you’re taking pictures that will feature yourself or your friends the location is less critical but the time that you arrive is important.  In this case you’ll want to go about an hour before sunset this way you have time to take nice pictures in softer light and without flash.  In my opinion flash is the worst when taking pictures at Top of the Rock.  Unless you’re an absolute pro and know how to compensate correctly flash tends to wash out the city backdrop, which is one of the main reasons you’re at Top of the Rock right?  In order to feature the cityscape behind you, don’t use flash, especially if you’re taking pictures on the 68-69th floor behind the glass.  Once you find a nice location play around, take pictures of you subjects looking out towards the buildings or doing some forced perspectives (google it).  If you want to get more original, take pictures of your subjects from a distance.  Perhaps have your subject stand looking out towards the city and snap your picture focusing on them through the busy crowd? As was the theme of this blog, once you take a step back you’ll be surprised what new perspectives you’ll see.

Example of a unique Top of the Rock Picture

Example of a unique Top of the Rock Picture

What about the settings to use or not use when taking pictures of people, other than flash?  One option is to use the smallest aperture your camera will allow which will give you nice background blur and permit you to use a low ISO.  The negatives of this is the exposure of your cityscape background might be overexposed.  The solution, shoot your picture in such a way that you’ll be able to only edit the background later to correct the overexposure (don’t forget to shoot in RAW to enable this).  Option two in terms of aperture would be to use a small aperture which if you took my advice and came close to sunset, is going to force you to use a high ISO.  The negatives, you’ll have a grainer photo but the positive is you will have a more detailed cityscape background.  If you’re only looking to share this picture on something like instagram a high ISO image is fine.  Even with the wide aperture you still might have an issue with overexposure for the background so compose your picture accordingly.  The last setting I mention is try to use a focal length of 50mm+, I won’t go into detail about why but if you want to know why check out the video below from one of my favorite YouTube sources.

Now let me talk about what to do if you’re looking to take pictures of the buildings.  First, I recommend going to the 70th floor and trying to lock down a position in the center area where you don’t have the bottom floors jutting into your picture.  Getting this prime location is even more important if you’re using a wide angle lens.  Just like shooting people, I think the best time to take pictures of buildings is right before and during sunset but you can go any time especially if there are nice mid-day clouds.  For now I’ll talk about what to do at sunset.  Going at sunset or at night really forces your hand in terms of camera settings.  Unlike taking pictures of people, when you use a small aperture there aren’t many positives.  Your plane of focus is going to be narrow even with the buildings being far away.  What’s going to happen is one building might appear in perfect focus while the others are a little blurry.  You can still take a good picture using small apertures but if your goal is to get a crisp image that you can blow up on perhaps a canvas,  I don’t recommend using small apertures.  What are your options then?  Option one, you can boost your ISO but this is going to still leave you with the problem of not having a crisp image for enlarging later.  Option two, bring a tripod and shoot with a small aperture and slow shutter speed.  This seems simple right? Well tripods are not allowed at Top of the Rock but there are ways around this rule.  As you can see in this week’s featured picture people bring tripods.  The key is to bring one small enough to fit in your bag, and one that has a small leg spread so it can sit on top of the cement pillars.  This is also why getting a good location is critical, there are a limited number of cement pillars and or locations that can facilitate the use of a tripod.  I’m not going to go into the all settings specific to tripods because if it’s pretty simple, small aperture, low ISO, slow shutter.  Two things I will recommend though  is use the multiple focus point setting which will grab more buildings in focus, and underexpose your image.  One thing not to do, which believe it or not I saw someone do, don’t use flash while you’re shooting buildings on a tripod.  Maybe I’m missing something and if I am please comment and correct me, but I don’t see any positive in using flash on a tripod when you’re not taking pictures of motion or people.

ISO 2500, 35mm, f/7.1, 1/40 sec, no tripod

ISO 2500, 35mm, f/7.1, 1/40 sec, no tripod

These are some of the lessons/tips I’ve learned from my two trips to Top of the Rock.  I still haven’t gotten what I would consider a great classic Top of the Rock picture, but that’s mainly because I haven’t brought a tripod or wide angle lens.  I think I’ll take at least one more trip in a few months and try my hand using more than just my 35mm lens and perhaps a tripod.  Until then I hope the lessons I’ve learned and shared so far help you shoot some great pictures at Top of the Rock, have fun and remember take a step back!

Big Head Focal Length by CameraRecToby:

Night Light

ISO 100, 35mm, f/8.0, 4 sec

ISO 100, 35mm, f/8.0, 4 sec

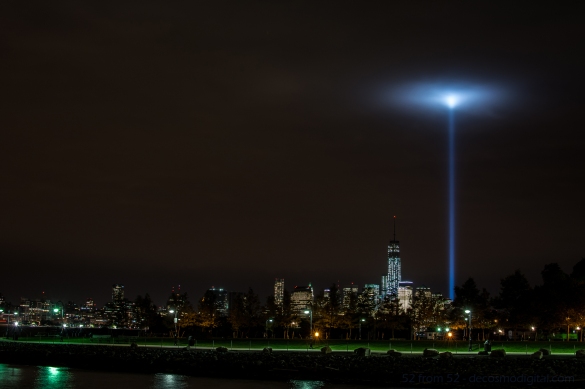
Week 6 (9/8/2013 – 9/14/2013): Shipyard Marina, Hoboken NJ
Picture Taken on 9/9/2013 9:11PM

Picture Description

Going into this week my goal was to create a multiple exposure photograph or light trail night picture.  As a possible secondary option I bookmarked the possibility of photographing the freedom tower.  On Monday night I went out around 6ish to mess around with my new Nikon ML-L3 remote.  I was aiming for either a double/triple exposure of the Hoboken ferry or some kind of sunset shot.   After messing around for about an hour I went back to my apartment to eat some dinner, review my pictures, and wait until the sun was totally down so I could try for a night picture.  Unfortunately after reviewing the pictures on my computer none of them worked out as I planned so I was going to have to go back out for the night shot.

After dinner as I stepped outside of my apartment my eyes were instantly drawn to the distant southeastern skyline.   What I was looking at was simply amazing, the 9/11 memorial lights were getting trapped in some low thick clouds and forming this surreal spherical glow.  All of my other night picture plans went out the window at that point, I had to take a picture of this unique occurrence.

After taking the picture I thought it was good (not great) but didn’t want to use it as my picture for this week.  As I do with most unused pictures I posted it up on Facebook to share with my friends.  To my surprise this picture got more activity than any other one I’ve posted.  Coming up with a picture to top this one, at least this week would have been hard so in the end I decided to use this picture.

 Photography Concepts 

To get this picture I had to apply many of the tricks I’ve learned over the past couple of months. In some of my previous long exposure pictures I noticed a slight camera shake.  To prevent getting shaky images I’ve moved towards using either a 2 second delayed shutter release or in this case a remote.  Next I regularly use a UV filter on all my camera lens to prevent any wear and tear.  Over time I noticed that at night using a filter increases the amount of light distortion and bleed, so prior to this picture I removed the UV filter.  The last two keys to this photo, which I’ll talk about in a little more detail, are the exposure settings I used and editing in Lightroom.

The exposure I used was -2 (stops) which for anyone that doesn’t know, it’s an underexposure.  The reason I underexposed was because after taking other nighttime city shot I’ve noticed that with so many lights from all the buildings my pictures tend to get overexposed.  There are lots of negatives with overexposing, in terms of my city pictures the most noticeable is the change in the sky color.  After messing around with different exposures I’ve settled on -2 for my go to exposure setting.

Now it’s hard to describe all the different tweaking I did in Lightroom but one of the main fixes was the white balance setting.  I forgot my white balance cards when I went out to shoot this picture so I had to do it after the fact.  I also made some moderate adjustments to the Highlights, shadows, whites, blacks and clarity to get the picture to look like what I saw in person.  If you want to learn about Lightroom I highly recommend going on youtube and watching some tutorial videos.  There is so much information out there to support learning photography (and most other hobbies) it’s just about finding it.

Before and After Editing in Lightroom

Before and After Editing in Lightroom

Since I originally did not want to use this picture let me quickly explain why and what I could have done better.  For starters if I remembered my white balance cards I would not of had to do so much editing in Lightroom.  I rather get a good picture in camera rather than edit it especially for this photoblog. I also wasn’t happy about my composition, the green in the picture is really nice but I was made I cut off some of the left side of the peninsula that is shipyard park.  I wish that I would have stepped back another 30-50 ft to get more into the picture.  Last I wish I found something interesting to put into the foreground of the picture, it just makes for a more interesting picture.

Article about Exposure
http://bit.ly/1eOEzt8

Lightroom Video’s
http://bit.ly/140WqbT
http://bit.ly/1ddxPTS

A Day of Reflection

Picture Specs: ISO 500, 35mm, f/9.0, 1/200 sec

Picture Specs: ISO 500, 35mm, f/9.0, 1/200 sec

Week 2 (8/11/2013 – 8/17/2013): Corner of 6th/42nd Bryant Park, New York City
Picture taken: 8/14/2013 at 5:50PM

Picture Description:

If you were to ask me what are my favorite locations in New York City, Bryant Park would absolutely be in my top five.  Although I pass the park almost every day (during my commute to work) I don’t always have the time to stop and enjoy everything it has to offer.  If you’ve spent any amount of time in the park you know it’s a very busy place filled with a diverse group of people.  It’s safe to say there is an activity for almost anyone, year round. One part of the park that I never explored was the New York Public Library.  Yes, for those of you that know me I went into the library, voluntarily!  No I did not borrow any books BUT I did have fun checking out the amazing architecture throughout the building.  At the start of my visit, my plan was to get a picture of the “Rose Main Reading Room” however that didn’t come out as I hoped.  A picture with the 35mm didn’t do the room justice (trust me, Google it) you really need a wide-angle lens, so I decided not to use that picture for this post.

Taken via NYPL’s Photobooth

After exploring the library, I took my adventure outside.  In the heart of the park there were hundreds of people out enjoying the beautiful 70 degree sunny weather.  Both of the park’s restaurants were buzzing and the lawn was littered with people hanging out next to the towering movie screen sitting on the west side of the lawn.  In case you don’t know, HBO has a film festival that runs every Monday during the summer.  The festival makes for a great dinner and a movie idea, but those kind of tips would need a whole other blog so I’ll leave it at that.

After doing a quick walk-through of the park one thing that immediately caught my eye was how most of the buildings surrounding the park were picking up great reflections of one another.  A reflection shot usually makes for an interesting and unique photo so I decided this would be the perfect idea for this weeks post.

Photography Concepts:

There weren’t a lot of technical intricacies to this week’s photo other than timing.  Prior to going to Bryant Park I knew when the sun would be at the right angle (no pun intended) for some nice shots and maybe even a good reflection picture.  I use an APP on my iPhone called “The Photographer’s Ephemeris” which tells me the angle of the sun based on time/day.  If you’re looking to use the sun as a part of your picture or get a reflection shot I highly recommend using this application when planning your shot.

One composition concept that I attempted to use at least subtly is “leading lines”.  When you look at the picture the lines sort of lead you to the corner of the building where you notice you’re not looking at a blurry picture, you’re actually looking at a reflection.  At least that’s the way I saw it.

Last, when shooting during the day even though there is plenty of natural light, at some points I had to slow down my shutter speed or boost my ISO.  I’ll talk about this more when I take a night picture but take note that for a picture like this when you want everything in focus you need to use a smaller aperture.  I used f/9 which is (based on everything I read) a good aperture for landscapes.  Since a smaller aperture means less light, you have to compensate with a higher ISO or slower shutter speed.

Challenges:

I’m only in week two and I can already see how challenging the 52 from 52 concept is going to be.  Luckily I like a challenge, anything worthwhile takes time and effort.  I put a decent amount of thought into what I wanted to photograph this week.  I naturally have lots of ideas but some of them are about timing (weather, time of day, ect.) while others are location based and require traveling.  With a busy schedule, one of my biggest difficulties will be setting aside the time to go out and take pictures each week…but that’s the purpose of this, to force me to get out there and learn!

First Post!

Picture Specs: ISO 100, 35mm, f/1.8, 1/100 sec

Picture Specs: ISO 100, 35mm, f/1.8, 1/100 sec

Week 1 (8/4/2013 – 8/10/2013): Hoboken uptown Pier
Picture taken on 8/6/2013 at 5:45AM

Picture description:

For those of you that follow my instagram or are friends with me on facebook you’ve probably noticed I like to take pictures of the New York City skyline, particularly from the Hoboken piers.  Initially I told myself I wasn’t going to start with a skyline shot but in the end it made the most sense for at least one BIG reason.  Taking skyline pictures is pretty much what got me into photography in the first place. The more skyline pictures I took the more I realized how much I enjoyed taking pictures and that I really needed a better camera.  The second reason this picture is significant is because it’s by far my favorite spot in Hoboken.  I’ve dubbed this “my bench” and usually spend at least one morning/evening a week sitting here soaking in the view.  Whether I’m drinking my morning coffee or taking a breather after a run on the pier, I often find myself back at this bench.  My favorite time to sit here is the early morning for a couple reasons; there are a lot less people walking around, you hear tons of birds chirping and waves crashing during high tide, and you obviously get a great view of the sunrise.  It’s very tranquil and a great way to start out your day.  Trying to capture the feeling of sitting in this bench is why I decided to start out with this picture.

Photography concepts:

First I shot this picture at f/1.8 which is the widest aperture (opening of the lens) and shallowest depth of field I can take.  It might seem odd but the smaller the ‘f’ number the larger the opening of the lens is.  While the larger the ‘f’ number the smaller the opening is and the more things are in focus.  I took this picture with a small ‘f’ (fstop/aperture) of 1.8 initially to put the bench in focus and blur out the skyline but after trying one in reverse with my focus point on the buildings, I liked this one better.  Shallow depth of fields give that blur effect and are hard if not impossible to pull off with a camera phone since you can’t control your camera’s lens opening like with a DSLR.  For my fellow instagramers, the blur feature on instagram is meant to mimic depth of field shots but it’s limited to the circle or straight area.  I felt like by using the shallow DOF in this picture it makes it easier to imagine yourself sitting on the bench.

The second concept in play is the rule of thirds.  In this picture the bench is in the far left/bottom third of the picture with the rest of the scene in the middle/right thirds.  For anyone that doesn’t know about the rule of thirds, it’s just breaking the picture into thirds vertically and horizontally (seen below).  This results in 9 boxes with 4 intersection points.  It’s said that by putting subjects or things such as eyes on these lines makes for more dramatic pictures.  In my picture the bench  is on one of the intersection points and clouds are on two.  Using the rule of thirds in this way helps you focus on the sky and give you the feeling of looking out from the bench from left to right.

DSC_0023-ruleofthirds

The last sort of “concept” that I want to point out is the timing of the shot.  When shooting sunrises or sunsets it’s said that the best light is +/- 30 minutes of the actual sunrise or sunset time.  On the morning of this picture the sunrise was at 5:58 AM.  I got to my spot a little later than I had hoped (hit the snooze a couple times) but I still managed to get the light I was looking for.  Once it got close to and then past the actual sunrise time the colors seemed more washed out.  Overall I’ve learned that my favorite time to take pictures of the sunrise is before the time and for sunsets is after.