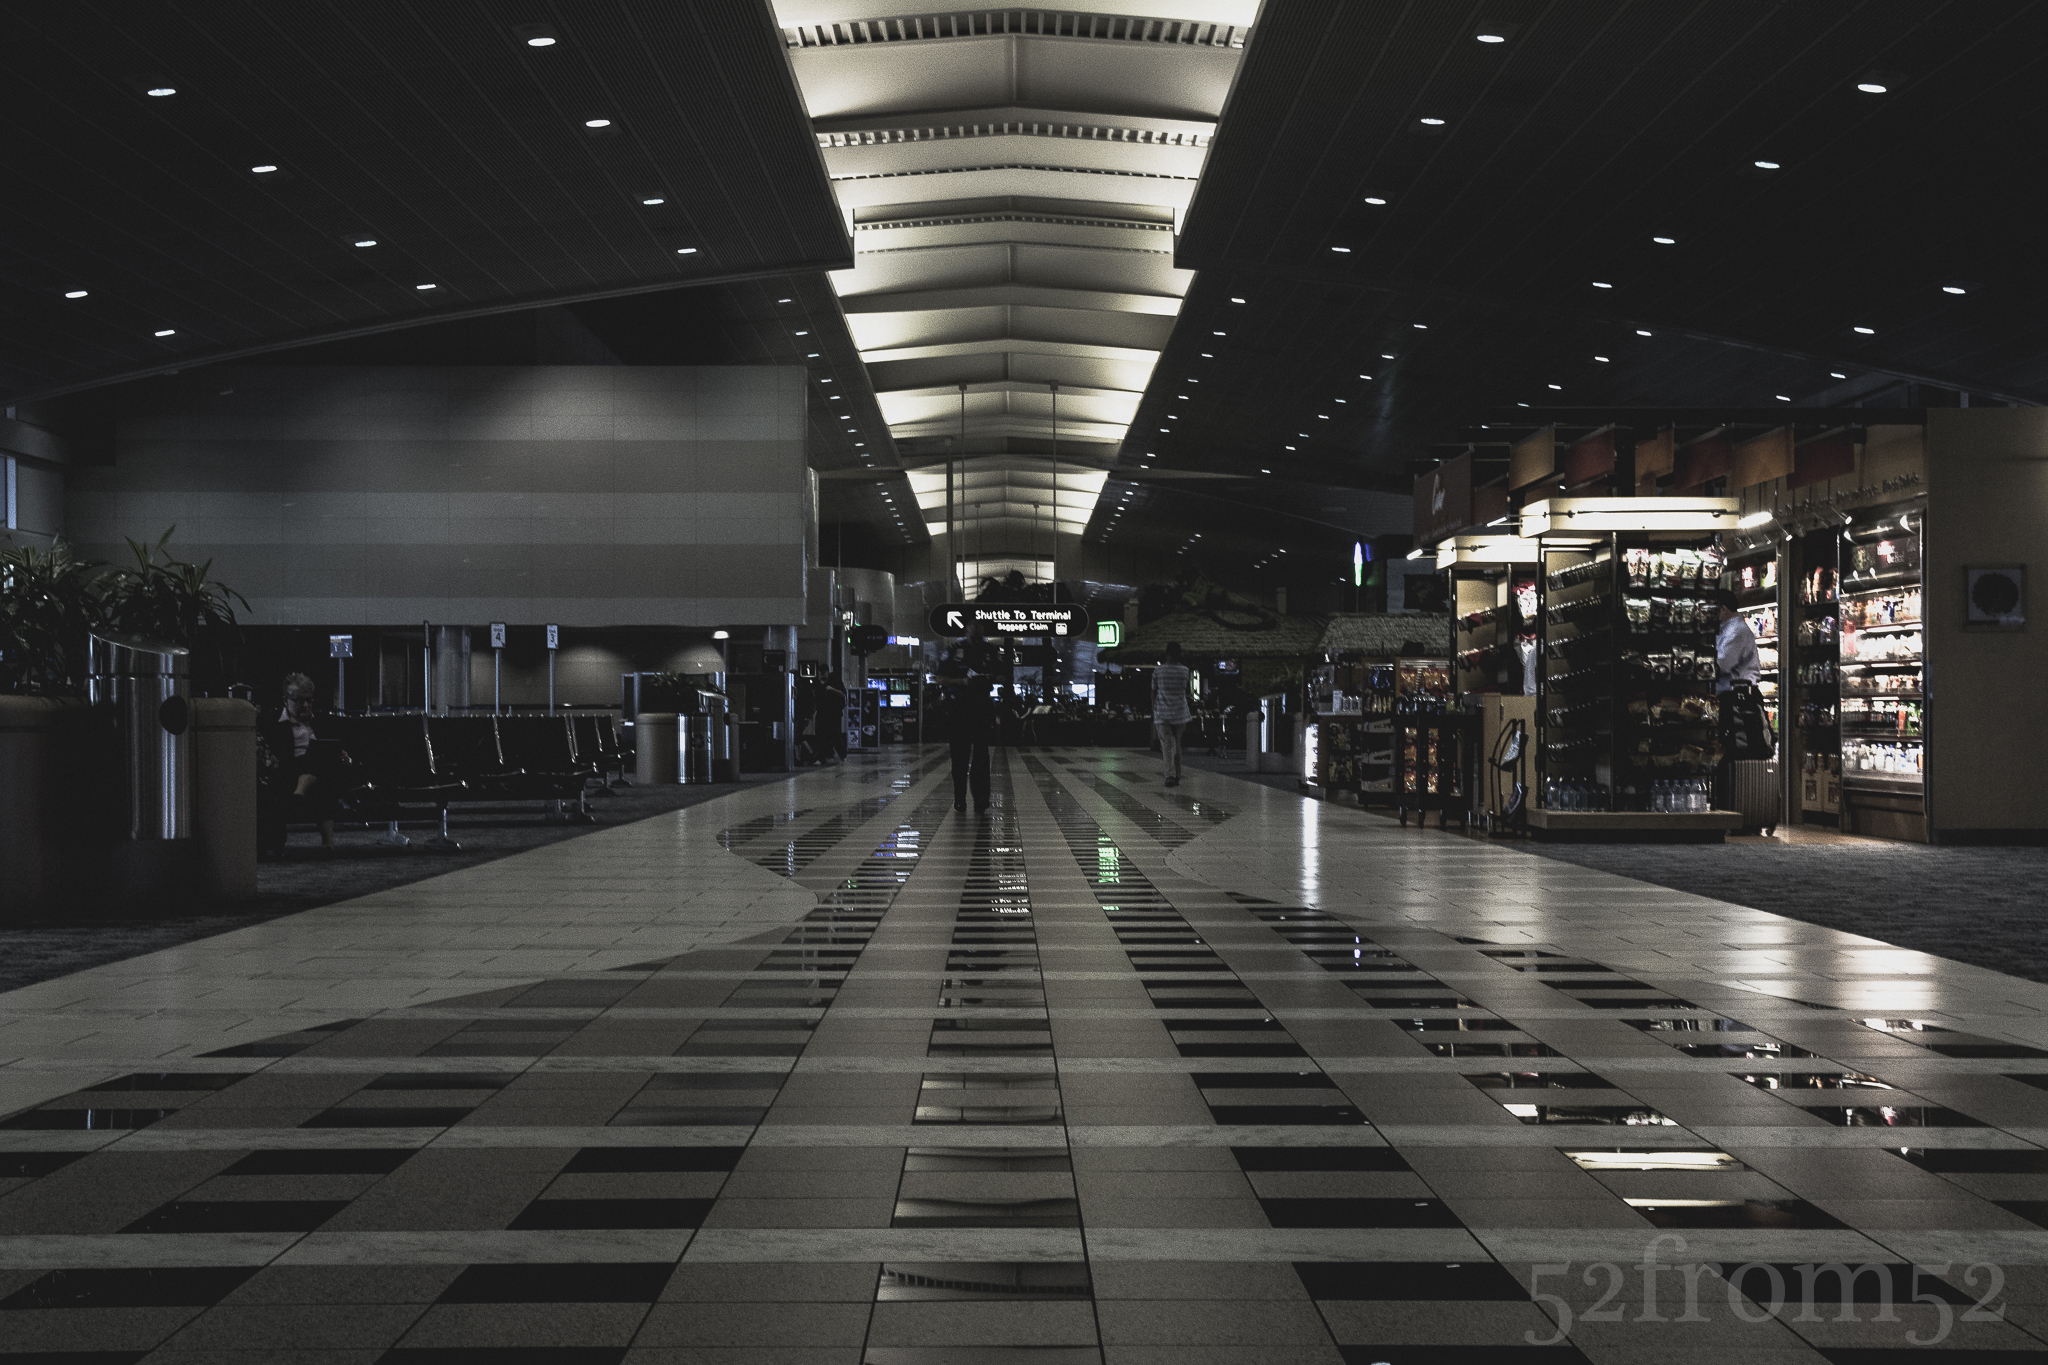
Picture Info: ISO 1600, 36mm, f/11, 1/30 sec
Week 36 (4/7/2014 -4/13/2014): Tampa International Airport, Terminal A
Picture taken on 4/8/2014 at 6:37 PM
Photograph description:
While traveling it’s nearly impossible to avoid standing in lines. Typically a trip starts with the traffic you always seem to hit on your way to the airport. Once you arrive at the airport, there is bag check, security and finally the line for boarding. In addition to the standard lines you might also stand in line for a snack, the bathroom or perhaps to gain access to the highly sought after charging station. For so many lines, there is an equal amount of solutions that people come up with for dealing with them. Some people bring a travel buddy, some depend on an unhealthy amount of electronics (my father), while others simply pop a pill and fall into a manufactured state of calm. No matter how you slice it, everyone has to deal with lines.
Just like in traveling, in photography we all have to find a way to deal with lines. I was reminded of this topic while killing time in the airport waiting on my delayed flight. As you likely guessed my entertainment of choice while waiting was taking pictures. From a visual standpoint Tampa is one of the more interesting airports that I’ve flow into. Terminal A, my usual turnstop, is a long continuous room split by the Green Iguana bar. When you stand on either of the extreme ends of the terminal you’re provided a nice visual. There are many “Leading Line” types of visuals. Looking down you’re taken through the terminal via winding tiles, while looking up will provide you with a super straight light formation. All of these lines have always made it an interesting challenge to try and get everything lined up. This time around I decided to make good use of my delay time and try my best to properly line up the shot. Let me just say this week’s photo was the result of more than a few attempts.
Photography concepts:
As mentioned in this weeks description section, this week was all about dealing with lines. When you’re dealing with lines and multiple points of symmetry things tend to get complicated. There are a couple adjustments that all need to be balanced properly. First you need to center your picture, which if you’re observant doesn’t look like I did. Although the light was centered I was a few inches off with my physical alignment with the center tile. I wanted to use my mistake to illustrate the difficulty of dealing with so much symmetry. Through mistakes such as this, I’ve found what I believe to be the main adjustments to focus on while lining up a shot.
First, as I said center your image to the best of your ability, and more importantly make sure your camera’s lens is in the right position (where I failed). You don’t have to be perfect because once you start making other adjustments you’re going to lose the perfect center. The important thing it to take note of whatever you central reference points are (top and bottom). Second adjust your left to right tilt which is done by pushing either side of the camera more forward. While doing this try to recenter your image again using two center reference points. The third and last adjustment is your camera’s up/down tilt. Tilting your camera pointing up will forced 90 degree horizontal lines (such as buildings) to lean back, while tilting down will lean things forward. Completing all of these adjustments is a juggling act and may take a couple times of cycling through your steps doing minor tweaks. If you have a tripod, I highly recommend using one for these precise shots. Take your time and get the shot right. That was my issue, I couldn’t take my time. I rushed my shot a little because of the fact that I was in an airport. Sometimes people get odd when you’re using a DSLR in certain places such as airports or train stations. In fact, the person walking towards me in this week’s shot was a security guard. Luckily he wasn’t coming to yell at me.
Right after taking the picture I saw that it wasn’t perfectly lined up but I figured that was the best I’d get, and thought I could fix it via lightroom’s perspective editing. After importing my image into lightroom I realized that even though the perspective editor is good, you can’t fix everything. Because I positioned myself wrong there wasn’t much I could do. Based on this realization I’d say although you need to focus on all three adjustments (center, left/right tilt, down/up tilt) the most important is center setting that central pivot point (the line between your two center points). The down/up and right/left tilt perspective are easier to fix after the fact. This just goes to show you, you’re always better off getting it right “in camera.”