Shoot for the Moon

Picture Info: ISO 100, 36mm, f/16, 30sec

Picture Info: ISO 100, 36mm, f/16, 30sec

Week 49 (7/7/2014 -7/13/2014): Pier A, Hoboken NJ

Picture taken on 7/13/2014 9:42PM

Picture description:

No matter how many times it happens, a full moon always seems to invoke a certain amount of awe after it emerges from the horizon.  This past Saturday I was out camping for paintball in Pennsylvania when I first spotted the orange full moon.  Although I was in a magnificent location to capture the moon in all it’s glory, I did not have my Nikon with me.  It was hard not being able to photograph the rare event but in a way I was glad.  Not having my camera forced me to sit back and just appreciate the moon in the raw, not through a lens, not on the back of a LCD screen, but through my own two eyes.  As I gazed upon what seemed like a giant orange in the sky, I couldn’t help but think how I would compose a  picture feature the moon once back home.  I spent the rest of the evening kicking back with friends reminiscing about our glory days in college, knowing that tomorrow I’d have my shot at the moon.

After getting home from my trip to PA, I quickly gathered my gear and set out for the waterfront to get in position to shoot for the moon.  It was cloudy on Sunday but I remained optimistic that the moon would find a way to peek through the clouds.  After arriving at Pier A, I scouted a few spots for my picture then patiently waited for the moon to rise from the Western horizon.  The predicted moonrise time came and went, and there was still no sign of the moon.  After about 15 minutes doubt started to creep into my mind and I began to think that perhaps the clouds were just too thick to see the moon.  Once 20 minutes hit I started to head back uptown feeling very defeated.  As I walked past Pier C I took a quick glance at the horizon and much to my surprise I saw an orange glow starting to burst through the clouds.  Could it be?!  Yes it was, it was the orange mood that I was eagerly waiting for.  I quickly ran back to my spot at Pier A, composed my picture and the rest is history.

Photography Concepts

When it comes to composing a picture featuring a full moon, or even the sun, one of the keys is knowing where your subject (the moon/sun) will be and when.  Although the moon popped out later than I originally expected, I still had a good idea about when it would rise and where I should look for it.  I’m sure there are plenty of options out there for figuring out the moon’s location but my information source is typically an iPhone application called “The Photographer’s Ephemeris.”  I’ve mentioned this application in the past, but it’s so valuable that it’s worth a second shout out.  Below is an example of how I planned the composition of my picture based on where the moon would be.

iPhone App Screen Shot

iPhone App Screen Shot

The reason I chose this location was because the trees lining Pier A created  a natural leading lines composition, drawing your eyes down the pier towards the moon.  I knew my focal length would leave the moon looking tiny, so I had to give the moon a boost a good composition to make it stand out.   Other than the trees, I also used the light reflections in the water to naturally point towards the moon.  In order for me to get the water looking as smooth as it did, I had to shoot a long exposure.  The trade off of shooting a long exposure was the moon wasn’t as in focus as I would have liked.  In hindsight I wish that I shot a few pictures using a quicker shutter to capture more detail in the moon.  The next full moon like this is on August 10th which leaves me plenty of time to plan out my next shot.  Mark it on your calendar, pick a location and shoot for the moon!

Redux


Picture Info: ISO 100, 36mm, f/9, 1/40 sec

Picture Info: ISO 100, 36mm, f/9, 1/40 sec

Week 48 (6/30/2014 -7/6/2014): Shipyard Park, Hoboken NJ

Picture taken on 7/6/2014 at 6:29 PM

Photograph description:

With the summer now in full swing, it’s become difficult to find the time to shoot new locations.  Don’t get me wrong, I’ve spent plenty of time outside of Hoboken, but I’m not always in a position to take my camera.  The past few weekends have brought me to places like Atlantic City, to the beach aka “DTS” for you locals, Pennsylvania, and lots of places in between.  All of these places offered plenty of great photographic opportunities, but bringing my camera would have added a layer of complexity I wasn’t comfortable with.  One of the few negatives of having a nice camera, is that it’s a nice camera, and you don’t want to risk messing it up or getting it stolen.  Luckily not every trip I have planned for this summer falls into ‘danger’ category,  I have a few trips in August that I’ll be able to bring my Nikon on.  This 52 week photoblog might be coming to an end, but that doesn’t mean I’ll stop posting once I’ve completed the year commitment.  I’m still kicking around ideas for my next theme but you can bank on the fact that I’ll still be posting and sharing my photography long after this photoblog theme wraps up.

Since I haven’t had time to  get out and explore new places with my Nikon, I thought it might be a good idea to revisit the locations of my earlier posts.  If you’ve been with me since the beginning you might remember my week three post “unplanned destiny” where I photographed the same fountain as this week’s picture.  If you missed it here is your chance to go check it out!

Photography concepts:

In my week three post I talked about the settings I used in order to achieve my camera’s fastest shutter speed of 1/4000 of a second.  Previously I chose a fast shutter speed so that I could freeze the water droplets that were spraying from the fountain.  This time around I decided to go with the opposite strategy and slow my shutter down so I would catch more of the water’s motion.

Just like in my week three post I had a regret after shooting my picture.  This time around rather than wishing I used flash to freeze the water’s motion, I regretted not using my ND filter to help slow my camera’s shutter down and pick up even more of the water’s motion.  You might have noticed the aperture I chose (f/9) and said well if you wanted a slower shutter you could have shrunk your aperture down beyond f/9.  If that was your thought, you were right, however the reason I stuck with f/9 was so the sun’s flare would stay relatively blown out and soft.  If you remember back in my week 38 post “beaming” I talked about how the aperture you choose when shooting into the sun has a big effect on the way the sun’s flares look.  Check out “beaming” if you want to get a better understanding about why I didn’t choose a smaller aperture.

Besides my shutter speed, the other big change I made from my week three post was the composition of my picture.  This week I took about 20 steps back from my original spot, and placed my camera on the ground while shooting.  In part, I used the ground to help stabilize my camera since I was shooting with a slow shutter.  I also wanted to make sure the clearing between the trees which the sun was shining through was lined up directly behind the fountain to backlight everything.  I may have looked like a fool getting so low, but I was very happy with the end result.


Rethink

Picture info: ISO 3200, 36mm, f/2.8, 1/60 Sec

Picture info: ISO 3200, 36mm, f/2.8, 1/60 Sec

Week 46 (6/16/2014 -6/22/2014): Pier C, Hoboken NJ

Picture taken on 6/16/2014 at 9:05 PM

Photograph description:

If you took a step back and evaluated your life, what would you see?  One thing that I often notice about myself is that I have a tendency to fall into a routine.  I’ll make a decision that sets a precedent, then intentionally, or sometimes unintentionally, follow that precedent.  Routines can be good, but sometimes falling into a routine can limit the experiences or results that you get out of life.

Over the past few weeks as I’ve identified some of my different routines, I’ve intentionally set out to shake things up.  For example, every morning I pick up a hot coffee on my way to work.  To mix things up I started drinking iced coffee in the morning instead of my usual grande dark roast.  Another example, usually I go running in the evening, instead I’ve switched things up and have been going in the early AM.  These are just a few small examples which might seem trivial, but when you start to add up all the small changes, they make a big difference.  As with the saying “change begets change,” so the more routines that I’ve changed, the more I’ve rethought other aspects of my daily routine. As you’ve probably guessed, eventually this change made it’s way into my photography.

After analyzing my photography I noticed my tendency or “routine” was to shoot symmetrical photographs.  If my photograph had lines, they typically were level on a x/y axis.  The composition of my images was good, but as a whole my photographs were lacking some diversity.  The conclusion, rethink my usual composition style by, flipping, tilting, blurring and or anything that would bring a new composition look to my photographs.  The result, this week’s picture.

Photography concepts:

This week marked the first time I opened myself up for some image critiquing prior to posting.  Usually I commit to my image and don’t budge after selecting and editing my photograph.  As I said earlier, I’ve been mixing things up so after showing my brother-in-law (also Anthony) this week’s picture I reworked my photograph based on his critique.  After showing Anthony this week’s original image he pointed out how the railing was distracting and sort of made your eye stop look in confusion rather than continue down the path towards the blurry one world trade.  With Anthony’s comments in mind, I re-edited my photograph cutting some of the blurry railing out, while also darkening the rest so it was less distracting.  The next twist, literally, was I rotated the axis of my whole image so I no longer had a level shot.  The last major re-edit was to bring some subtle color back the image, this also helped the railing distraction by reducing the contrast of white on pure black.

Original Edit

Original Edit

After reworking my photograph I again sent it to Anthony for some critiquing.  He was in agreement that my re-edits were a good improvement to the image.  Anthony’s only remaining criticism was that the “in focus” portion of my image was a small portion of the railing, which was on the lower part of the image and not really featured in the image.  Although I saw the flaw that Anthony pointed out, the location of my focus was a necessary tradeoff to get the image I wanted.  While shooting this week’s photo my intention was to blur out the World Trade building enough so it had nice bokeh, but was still recognizable.  In order to get the bokeh I wanted, I needed to shoot with a wide aperture (my lenses widest f/2.8), which left me with a small plane of focus.  After selecting the appropriate aperture, I flipped my lens to manual focus and slowly twisted the focus ring until I got the right amount of bokeh.  Had I shot with a smaller aperture I would have gotten more of the railing in focus, but it would have been harder to get the same amount of bokeh.  As I hinted about earlier in the week, this week’s picture was all about the bokeh!

Afternoon Shading


Picture info: ISO 100, 36mm, f/13, 1/60 sec

Picture info: ISO 100, 36mm, f/13, 1/60 sec

Week 45 (6/92014 -6/15/2014): My Apartment

Picture taken on 6/15/2014 at 6:05 PM

Photograph description

A recent YouTube video gave me the idea about trying to photograph things in my everyday life.  The challenge with photographing everyday life is finding ways to creatively photograph your surroundings.  This past sunday, as I laid on my couch post Father’s day brunch thinking about what I could photograph, I realized my subject was literally right in front of me.  Right next to the couch in my room is a 6 foot high inset window that captures the most amazing afternoon light.  The time and angle of which the sun hits my window varies throughout the year, but during the summer it’s light starts around 5PM and lasts until about 630PM.  As the sun moves left to right across the sky it’s light bleeds through the cracks of room’s blinds creating different shades of light minute to minute.  Adding to the shading complexity is a tree that sits in my backyard.  Depending on the day’s wind, the tree’s leaves are typically swaying creating a constantly shifting wave of shaded patterns.  This daily afternoon dance of shade and light has captured my attention countless times and is ultimately why I chose to feature it as this week’s picture.

Photography concepts

Manual, manual, manual, that is how I was able to shoot this week’s image.  Shooting in manual over the past few months has unlocked a whole new world when it comes to photographing light.  It took a few times of shooting then adjusting to find the exposure that I thought best captured the moment.  The tricky part was not moving away from an aperture that captured the sun’s light appropriately.  In week’s past I’ve often spoken about what apertures are best for making the sun look a certain way.  This week I didn’t wanted the sun to softly peak form the blinds so kept my aperture in the range of f/11-f/15.  I’ve found that those apertures produce nice soft sun beams.  Anything larger (f/1.8-f/10) starts to make the sun look like one giant blob of light, and anything smaller (f/16+) make the sun’s beam have a sharpness to them.  I’ve taken a picture of the sun peaking through my blinds at f/22 and it didn’t create an image that’s true to the way I see it.

Old picture using f/22

Old picture using f/22

The second half of creating this week’s image was done in lightroom.  Raising the Highlights, Contrast, Whites, and Clarity while lowering Shadows, and Blacks is how I achieved this week’s image.  The more you play with these settings the better you will become with knowing what to raise or lower to achieve your look.  It can be intimidating the first time you use Lightroom when you see all of the adjustments at your fingertips, but trust me before you know it you’ll be flying through them and wish you had more ways to tweak your image.  Lightroom has become my greatest tool for fine tuning an image to be exactly what I want.  The only way you’ll learn is through practice, I’ve edited 1000’s of images since starting this blog and I’m still learning new tricks.  If you haven’t already I highly recommend purchasing lightroom and trying it out today!


Circling Back

Picture Info: ISO 100, 36mm, f/20, 20 Second

Picture Info: ISO 100, 36mm, f/20, 20 Second

Week 43 (5/26/2014 -6/1/2014): Uptown Hoboken

Picture taken on 5/30/2014 at 9:49 PM

Photograph description:

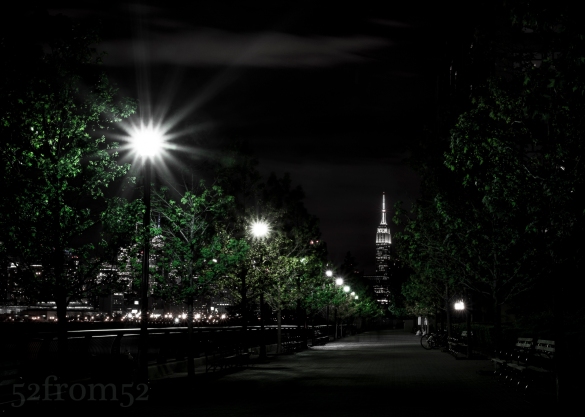
Hoboken is a great place to live if you enjoy running.  Hoboken has countless running routes to choose from, most of which are accompanied by an amazing view.  Since moving to Hoboken over a year ago I’ve mapped out a few of my own running routes.  Each route presents a different physical challenge along with the constant mental challenge of fighting the urge to stop and take pictures every few steps.  Out of all the routes I run, my favorite is what I refer to as my “uptown route.”  My uptown route starts at Maxwell Park and hugs the water line all the way into Weehawken.  Eventually I circle back to Hoboken the same way I came, with my finish line being the path featured in this picture.  The reason this route is my favorite is because typically there aren’t many other joggers to get in my way and of course having this view as my finish line is a nice perk.

I run a few times per week so I’ve seen this view countless times and countless times I’ve said to myself that would make for a great picture.  Not only is this a beautiful site, it also reminds me to always finish what I start.  Each time I get to this point of my run I’m usually tired and ready to stop, but instead of slowing down I usually kick up the intensity for this last straight away. Typically I wait until some other runner makes it about halfway then I chase them down and try to finish ahead of them.  I believe that the more you train yourself to push through hard situations, the more it becomes second nature and the stronger you’ll be both physically and mentally.  This is the code that I live by and this picture reminds me to practice this each and every day.  Always finish and always finish strong!

Photography concepts:

One of the reasons this view always draws me in is because of the natural “Leading Lines” composition.  The lights and trees that line the path converge and take your eyes straight towards the Empire State Building.  Year round this is a powerful view but the conditions never seemed right for me to get a good picture.  Additionally the street lights always presented glare issues that took away from the picture.  Recently I figured out the right camera settings and editing techniques to eliminate the glare issues so I finally decided to give this picture a shot.

The camera setting that has helped the most with photographing strong light sources (e.g. the sun, street lights, ect.) has been a small aperture.  The smaller the aperture the less bleeding light and the cleaner it looks.  For night photography f/18 and above is a great aperture to use.  If you’re using this small of an aperture at night it’s more than likely that you’ll be hitting some slow shutter speeds so don’t forget your tripod.

When it came time to edit this picture there were two adjustments that were key.  First, to bring out the detail in the Empire State Building I dropped the highlights of the area surrounding the building.  I’ve found that dropping the highlights of buildings at night makes them look very crisp.  The second adjustment was to lower the saturation all colors in the image except green.  What this did was eliminate any of the lens glare that showed up as random colors, and it made the leading lines composition of the trees even more of a focal point.  As a result the not only does the composition of the image take you down the path but the isolation of the green color also acts as a guide for your eyes too.

The last aspect of this picture that helped enhance the composition was the size of the Empire State Building.  If you’re a Hoboken local and you’ve taken this picture before chances are the Empire State Building was much smaller than in this picture.  Why is that? It’s because of my focal length 36mm x 1.5 = 54mm.  Most phones shoot at around 30mm and since focal length essentially equates to zoom so when I use ~54mm the building is larger.  The thing that’s interesting about zoom is if you stand further back your foreground will be scaled regular, but whatever is in the background (e.g. the Empire State Building) will appear larger than usual.  You see this technique a lot when people photograph the moon and get that insanely large moon backdrop.  Although I shot with a greater zoom then people do with phones, my image resembles how this path looks like to the naked eye.  Had I stood further back and zoomed in with 80mm+ the Empire State Building would have looked massive.  I’m limited to the 35mm range for this blog but I encourage you to try zoomed focal lengths to scale up your backdrop subjects.  Experiment with your camera’s settings and new focal lengths, it’s the only way you’ll learn!

Bloomfield in Bloom

Picture info: ISO 250, 36mm, f/11, 1/80sec

Picture info: ISO 250, 36mm, f/11, 1/80sec

Week 39 (4/28/2014 -5/4/2014): 10th & Bloomfield, Hoboken

Picture taken on 5/3/2014 at 9:13 AM

Photograph description

Last week I mentioned that one of the biggest challenges for my Hoboken streets project would be to taking pictures that don’t in some way involve the sun .  Naturally I’m drawn towards taking pictures that utilize some kind of light source to create contrast.  In order to keep improving my photography, it’s important that I constantly challenge myself to go outside of my comfort zone.  It’s as the saying goes, “variety is the spice of life”

This week’s picture was taken while I was on my Saturday morning bagel run…for those of you that don’t know, I’m a bagel addict.  Moving on though. It was still early enough that the sun wasn’t high in the sky but it was still filling the day with plenty of natural light.  Although my usual Hoboken bagel spot is on Washington street, I decided to walk down Bloomfield instead so I could photograph the cherry blossoms that line the street.  It only seemed fitting that bloomfield would be filled with so many blooming trees.  Early into my trip I came across an apartment building that had a pinkish tint which acted as the perfect backdrop for the cherry blossom.  I shuffled around for a few minutes trying to find the best angle to fit everything in frame at ~35mm.  Eventually I found the spot and the here you have it!

Photography concepts:

One of the advantages of taking pictures with even light is that it’s easier to set your exposure for the entire scene.  When you include a bright light source in your picture (e.g. the sun) you have to worry about some or all of the image getting blown out (overexposed) or underexposed.  I usually worry more about overexposing the image because it’s harder to recover overexposed areas, than underexposed areas.  Since this week’s picture had no harsh light source setting my exposure was a breeze!

The hardest part of shooting this picture was capturing what I considered to be the good part of the scene at ~35mm.  The reason I’m saying approximately (~) is because I’ve been shooting more and more with my 17-50mm Sigma lens.  Yes 35mm is within the range of my lens, but for some reason the lens never seems to settle on 35mm exactly.  Any picture I take at 35mm usually reads as 34mm or 36mm when I review the image.  I’m not sure why this happens, but it’s not really a big deal.

If there is one thing I learned this week it’s evenly lit pictures are relatively easy to shoot, if you can find interesting ones.  The last part of that statement is the key, “if you can find interesting ones.”  My usual move in the absence of contrasting light is to find a unique angle or move in close and use a wide aperture to tap into a depth of field element.  I did neither this week and that again plays into my desire to shoot more variety.  Variety should be everyone’s goal.  Flip through the pictures on your computer, facebook or instagram and I bet you’ll see a trend.  Hopefully the trend isn’t selfies, but even if it is, this week try to shoot something new.  Find something you don’t usually photograph and get to it!

Beaming

Picture info: ISO 250, 36mm, f/14, 1/100 second

Picture info: ISO 250, 36mm, f/14, 1/100 second

Week 38 (4/21/2014 -4/27/2014): 9th & Park, Hoboken

Picture taken on 4/22/2014 at 6:40 PM

Photograph description:

If you have ever scrolled through my instagram gallery, you probably noticed that I enjoy taking pictures featuring the sun.  When posting to Instagram, the sun is a little bit of a photo hack. What do I mean by photo hack?  It’s been my experience that people tend to give more likes to pictures that have nice contrast, especially when that contrast is created from the sun’s beaming light.  Featuring the sun might be a bit of a cheat, but there still is an art to it.  I’ll give some tips on how I feature the sun with my phone and camera in the next section.

This week’s picture was shot while I was out hunting down material for my “Hoboken Streets” project.  The biggest challenge of the project will be to find unique ways to photograph the “streets,” without featuring the sun in each picture.  On top of avoiding too many sun shots I’m also going to avoid taking any of the pictures along the waterfront.  Yes the waterfront is still in Hoboken, but I’d like this project to feature more of the interior sections of Hoboken.  If you have any suggestions for locations shoot me an email.  This project is all about exploring the streets so the more unique the better!

Photography Concepts:

The main thing you have to think about when you’re taking pictures directly into the sun is setting the right exposure.  When you’re shooting the sun with your phone your exposure is typically locked to wherever your focus point is.  My recommendation is to set your pictures exposure on a darker area.  When you select a darker area your phone’s sensor will adjust the exposure to make the dark area evenly exposed.  With the darker area exposed properly the sun should be overexposed and appear to be very bright.  If you want to apply some kind of HDR setting to your picture in post, then meter the pictures exposure by focusing on the sun.  This will make your image look very dark but the HDR will bring back most of the detail.  I recommend going with the first exposure setup, overexposing the sun makes it look better.

Setting your exposure is obviously different with a DSLR and is done by making adjustments to your ISO, Shutter speed and aperture.  When shooting the sun with a DSLR your ISO should be as low as it can go, which is typically 100.  Choose your aperture based on how you want the sun to look in the picture.  If you use an aperture of f/22 the sun will look almost like a star with very sharply pointed flares.  The wider the aperture the softer the flares will become.  This week’s picture was shot at f/14 which is a good middle ground.  My beams (flares) have nice lines that fade into the picture smoothly.

Selecting your shutterspeed is easy if you’re in aperture priority, because the camera will do it for you.  If you’re shooting in manual, like I did for this picture, then you should start with a quick shutter and work your way down until your image is exposed to your liking.  The reason you should start with a quick shutter is so you don’t burn out your sensor with the sun.  I can only imagine the damage that would be done to your sensor with a 30 second sun exposure….ouch.

Two more quick tips.  One when you’re lining everything up, try to put the sun on either the left or right thirds intersection line.  This not only follows the rule of thirds, it also will make for better sun beams shooting through your picture.  My second tip is to find something like a tree, flower or cloth material that you can backlight with the sun.  Backlighting things that let some light through give your picture some nice texture.  If you backlight something that lets no light through, as in people, walls or buildings you’re left with a nice silhouette.  The choice is up to you, get creative and more importantly have fun!

Reflecting on Goals

Picture info: ISO 100, 34mm, f/2.8, 1/500sec

Picture info: ISO 100, 34mm, f/2.8, 1/500sec

Week 37 (4/14/2014 -4/20/2014): 8th Street, Hoboken

Picture taken on 4/19/2014 at 7:33 PM

Picture description:

What do I want to accomplish? This is a question that often keeps me awake at night.  I’m all about setting goals and  doing whatever it takes to complete them.  Step one of having a goal oriented mindset is obvious, set some kind of goal.  If you don’t know what you want to accomplish, how can you achieve it?  This “goal oriented process” is the concept I applied after purchasing my camera, my goal was to learn photography.  After setting my goal, step two was figuring out a way to achieve my goal, which led me to create this photoblog.  With the end of this photoblog quickly approaching, I’ve been spending time thinking about what will be my next step in achieving my overall goal of learning photography.   Learning photography is hard to measure though, one can argue that you can never fully learn photography.  There will always be  some new camera, some new technique or just something new to learn.  Knowing that I’ll never be able to measure my original goal has made me think, perhaps it’s time I expand my goal and decide what I’d like to do with my newly found photography knowledge?  I’m now asking myself, what do I want to use my photography to accomplish?  Is my passion for photography just a hobby, or do I want to take it further?

This past weekend I set aside some time to think about the questions I’ve raised about my next steps.  While kicking around ideas I decided to throw on a YouTube video from one of my favorite photography resources, “CamerRec Toby.”  Toby is a photography pro out in Vermont with his own YouTube channel devoted to reviews and tips about photography gear and techniques .  I’ve cited Toby’s videos before but this week one of his videos really caught my attention.  In the video (link below) Toby and his co-host Christina discussed an article “7 Reasons why most Photographers and Videographers don’t Reach their Goals” (link below).  The article was so relevant to what I was currently thinking about it almost seemed like it was targeted directly at me.  In the article the author talks about photographers setting too general of goals  (e.g. Learning photography), and how it’s important to have measurable goals. The article helped put things in perspective and made me realize it’s time for me to set some measurable goals.  The article and Toby’s video also motivated me to push forward on one of the smaller goals that I’ve been toying with.  As of this past weekend, I’ve decided that I’m going to participate in the next Hoboken Art & Music festival in September.  My main goal isn’t to make money (though that’s always a bonus), my main goal is to meet lots of people and seeing who and what might help me decide where to take my photography next.

With a new goal (participate in the Art & Music Festival) set, step two was to figure out a way to accomplish it.  There are many things that will go into preparing for the festival, but one of the most basic things is having plenty of pictures.  As a result, this weekend I also decided to start a new project called “Hoboken Streets.”  Since the festival is held in Hoboken, it seems logical to think many of the attendees will be Hoboken residents.  Having a geographically targeted audience means I should have geographically targeted pictures, hence my “Hoboken Street” idea.

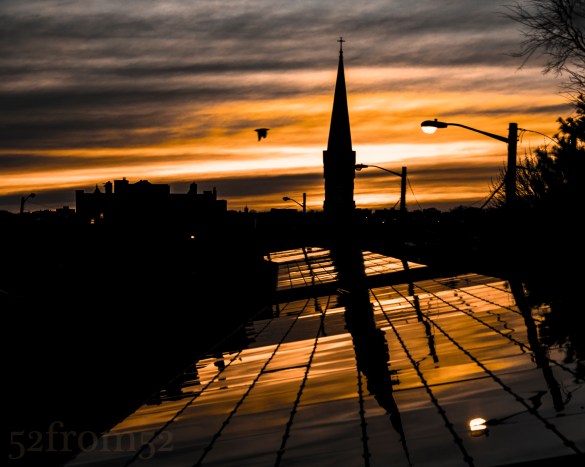
If you’re still with me, you’re probably asking, “how in the world does all this related to this week’s picture?”  Well, even before officially deciding on the idea of doing a “Hoboken Streets” project, I wanted to explore more of Hoboken.  Over the past few weeks I’ve changed up my nightly running route and began zig zagging around town looking for pictures.  This past week one of my runs led me up 8th street towards Stevens around sunset, where I found this location.  It might come as a surprise but I don’t run with my camera, so a few days later I circled back with my Nikon and got the shot.

Photography concepts:

I wrote a little too much in the previous section, and the article I referenced could somewhat fall into this section so this week I’ll keep this section short.  Two keys to this picture were composition and editing.  In terms of composition, I wanted to have an equal balance between the sky/silhouette and the solar panels which were reflecting the sky/silhouettes.  Instead of following the usual rule of thirds guidelines I split my image in two halves horizontally (top/bottom).  The bottom half was focused on the reflection which was meant to lead your eyes down the path to the top half, which was meant to feature the sky and silhouettes.

Editing was key for this image because I wanted to emphasize the contrast between the dark silhouettes and light from the sunset.  In order to do create a nice contrast, I dropped the overall vibrancy of the image while boosting the saturation of specific colors.  After my color adjustments, I was left with the contrasting image that I was looking for.  Of course there were some other adjustments (e.g spot adjustments, highlights, clarity, ect.) but nothing more than I’ve talked about in previous weeks.  If you haven’t already, circle back and read some of my earlier weeks posts to get some more in depth tips on editing and composition.

Article:

http://theslantedlens.com/2014/7-reasons-photographers-videographers-dont-reach-goals/

CameraRec Toby Video:

https://www.youtube.com/watch?v=IhGUyD2g7Eo


Fighting Light

Picture info: ISO 100, 35mm, f/22, 6 seconds

Picture info: ISO 100, 35mm, f/22, 6 seconds

Week 34 (3/24/2014 -3/30/2014): Lincoln Tunnel, NJ Exit

Picture taken on 3/28/2014 at 4:44 PM

Photography description:

Long exposure photography has been a passion of mine since day one of purchasing my Nikon DSLR.  Most recently, my favorite subject for long exposures have been tunnels.  The effects that result from shooting with slow shutter speeds while driving in a tunnel are truly amazing.  My interest in tunnel/driving long exposures started after seeing a stunning picture posted on Instagram.  Some photographer wedged his DSLR in the back of his car and triggered it remotely.  The final image looked like something out of Star Wars.  All of the lights streaked, giving the feeling of motion to the viewer.  The concept captured my attention not only because it was visually beautiful, but because I like the idea of portraying a feeling through photography.  After seeing the picture on Instagram I knew that I had to try my hand at that type of picture.

Over the past couple of months I’ve had a couple opportunities to try out a tunnel long exposure.  Thus far I’ve only experimented in the Lincoln and Battery tunnels, but both have provided great images.  I haven’t strapped my camera to the back of the car yet, instead I came up with my own method.  I sit in the passenger seat and use a mini tripod to stabilize my camera on the dashboard.

Prior to this week, most of my tunnel pictures were shot using aperture priority, with an exposure time of under one second.  As I’ve mentioned over the past few weeks one of my new goals is to shoot in manual more often, so this weeks tunnel picture was shot in manual.  I’ll talk more about why I chose specific settings in the photography concepts section.

This week’s capture was the last picture I took before exiting the Lincoln tunnel during my Friday commute home.  I previously shot a picture that I really liked at the exit of the Battery tunnel, so my goal was to shoot something similar inn the Lincoln.  The contrasting or “fighting light” (dark/bright) that exists at a tunnels exit presents the perfect scenario for an interesting photograph.

Battery Tunnel Long Exposure

Battery Tunnel Long Exposure

Photography concepts:

As the end of the tunnel approached, it felt like a race to get my camera’s settings right for my photograph.  The stress and potential for a mistake that exists while shooting is the main negative about being in manual mode, but the risk is worth the reward.  Shooting in manual was the key to this week’s picture because I didn’t want to lose control of my shutter speed.  In order to get the picture looking as I imagined, I needed a slow shutter and for it to close right as I exited the tunnel.  Had my shutter stayed open too long after exiting, my entire image would have been blown out.  The aperture I selected (f/22) was more of an experiment than something I knew would work.  Previously I shot most of my tunnel pictures with a wide aperture, the smallest being about f/7.  Post picture, I’m happy with the look that f/22 generated.  Although mostly everything is blurred, the texture of the road at the tunnel exit is still visible, and that’s due to shooting at f/22.  Shooting at such a small aperture also enabled me to hit a slower shutter while maintaining the exposure that I wanted.  In my mind I wanted the exit of the tunnel to be completely blown out (white) so I purposely overexposed my image.  The result of all these things turned out to be almost exactly what I was looking for.

This week was the first time that my post production led me to doing photoshop manipulation.  I’m not a fan of “editing” an image in the way of changing what you originally shot.  I don’t mind editing the raw images attributes (contrast, clarity, hue, ect.) to modify an image, but I usually feel changing the structure of an image in photoshop is cheating.  In my opinion once you start changing your image, you move out of the photography world, and more into the art realm of painting and or drawing.  This week however I made an exception to my rule.  As a result of my longer shutter speed, some of the light blur in my image became choppy.  The choppiness was due to the car’s vibrations which usually aren’t as obvious with quicker shutters ( < 1 second).  What I decided to do was use the smudge and blur tools in photoshop to smoothing things out.  The result of my photoshop manipulations left my image looking more like a painting than an actual photograph.  As I said I’m usually not a big fan of doing this, but I’m really happy with the way this image came out this week.  I’m not planning on making a habit of manipulating my photo’s like this, but it’s nice knowing that I can with some sort of success.

The right spot

Picture Info: ISO 640, 38mm, f/22, 1/400sec

Picture Info: ISO 640, 38mm, f/22, 1/400sec

Week 33 (3/17/2014-3/23/2014): Hoboken NJ

Picture taken on 3/22/2014 at 6:08 PM

Photography description:

Late again, but just with the post.  I got this picture over the weekend which was within my self imposed weekly deadline.  Usually missing my deadline (or any deadline) would drive me absolutely nuts, but I decided that I wouldn’t beat myself up about it this time.  Lately I’m trying to be more relaxed and not stress myself out over little things.  Although my stress free mentality was partially  why I missed my posting deadline, the main reason for the latent post was because last week was one hell of a week.  It was my turn again to provide support coverage for work, and let’s just say the luck of the Irish was not on my side.  Every time I tried to venture out to get a picture my phone buzzed.  The constant interruption, or threat of one, didn’t allow me to get more than a few blocks from my apartment.  Although my localized limitation still would have permitted me to visit the Hoboken waterfront, I didn’t want to feature another skyline picture this week.  There are a lot of techniques that I’m still exploring and to do so I need to find something beyond the skyline to experiment on.

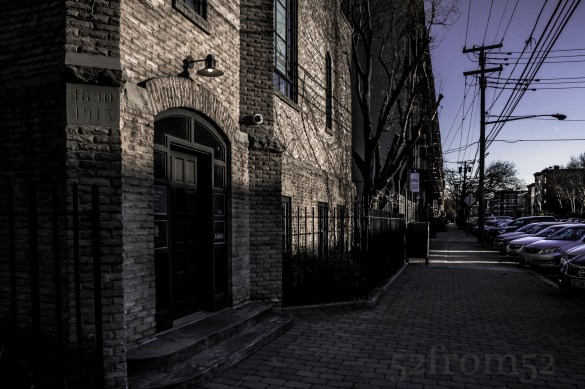
After walking around for about an hour I got a couple good pictures which I thought would potentially work as a featured photo but nothing made me too excited.  On my way back to my apartment I stumbled upon a church with this beautiful stone front exterior.  The masonry was looking exceptionally nice because of the way it was catching the fading light of twilight.  I reached back into my bag pulled out my camera and began the result is what you see here.

Photography concepts:

Last week I threw out a challenge to try and shoot more pictures in “manual” mode.  Unfortunately this week’s photograph was not shot in manual, but it was a step in the right direction.  After spotting how the light was getting captured along the church’s jagged stone edges, I knew that I couldn’t let my camera make the exposure decision.  As good as my camera is, the human eye is better at judging exposure.

When I pulled out my camera it was in aperture priority with spot metering turned on, so I stuck with that setting.  In case you didn’t know, spot metering mode allows you to set (or “meter”) the exposure of your image from a specific point.  Usually if you leave your camera on the default mode, which for my Nikon is “matrix metering” (the name varies by camera brand), the camera will inspect what’s in frame and choose what it thinks is the best overall exposure.  The important part of that statement is the word “overall.”  What I’ve noticed is that when a picture has lots of variance in shading sometimes the camera will try to compensate for the darker areas such as shadows and overexpose the image.  The image won’t be overexposed to the level that there is damage done, but it doesn’t look like what you see with the naked eye.  One way to prevent your camera’s miscalculation is to shoot in manual, which as I said I did not do this time.  The other is to use a more manual metering method, which is what I did with spot metering.  For this picture I metered my exposure off of the top of the image.  The top had the most amount of light so I wanted to make sure that stayed exposed just right, with the rest of the image fading into shadow.  The difference in lighting a little more obvious in a zoomed out version of my picture.

Picture Info: ISO 640, 17mm, f/22, 1/400sec

Picture Info: ISO 640, 17mm, f/22, 1/400sec

As you can see spot metering allows you to get a very natural look with the shadows.  This is a mode that I’ve been experimenting a lot with lately, the hardest part is having the time to select the exposure point and recompose.  In the coming weeks I’ll continue to work spot metering into my photography and try to point it out whenever I do.