No matter how many times it happens, a full moon always seems to invoke a certain amount of awe after it emerges from the horizon. This past Saturday I was out camping for paintball in Pennsylvania when I first spotted the orange full moon. Although I was in a magnificent location to capture the moon in all it’s glory, I did not have my Nikon with me. It was hard not being able to photograph the rare event but in a way I was glad. Not having my camera forced me to sit back and just appreciate the moon in the raw, not through a lens, not on the back of a LCD screen, but through my own two eyes. As I gazed upon what seemed like a giant orange in the sky, I couldn’t help but think how I would compose a picture feature the moon once back home. I spent the rest of the evening kicking back with friends reminiscing about our glory days in college, knowing that tomorrow I’d have my shot at the moon.
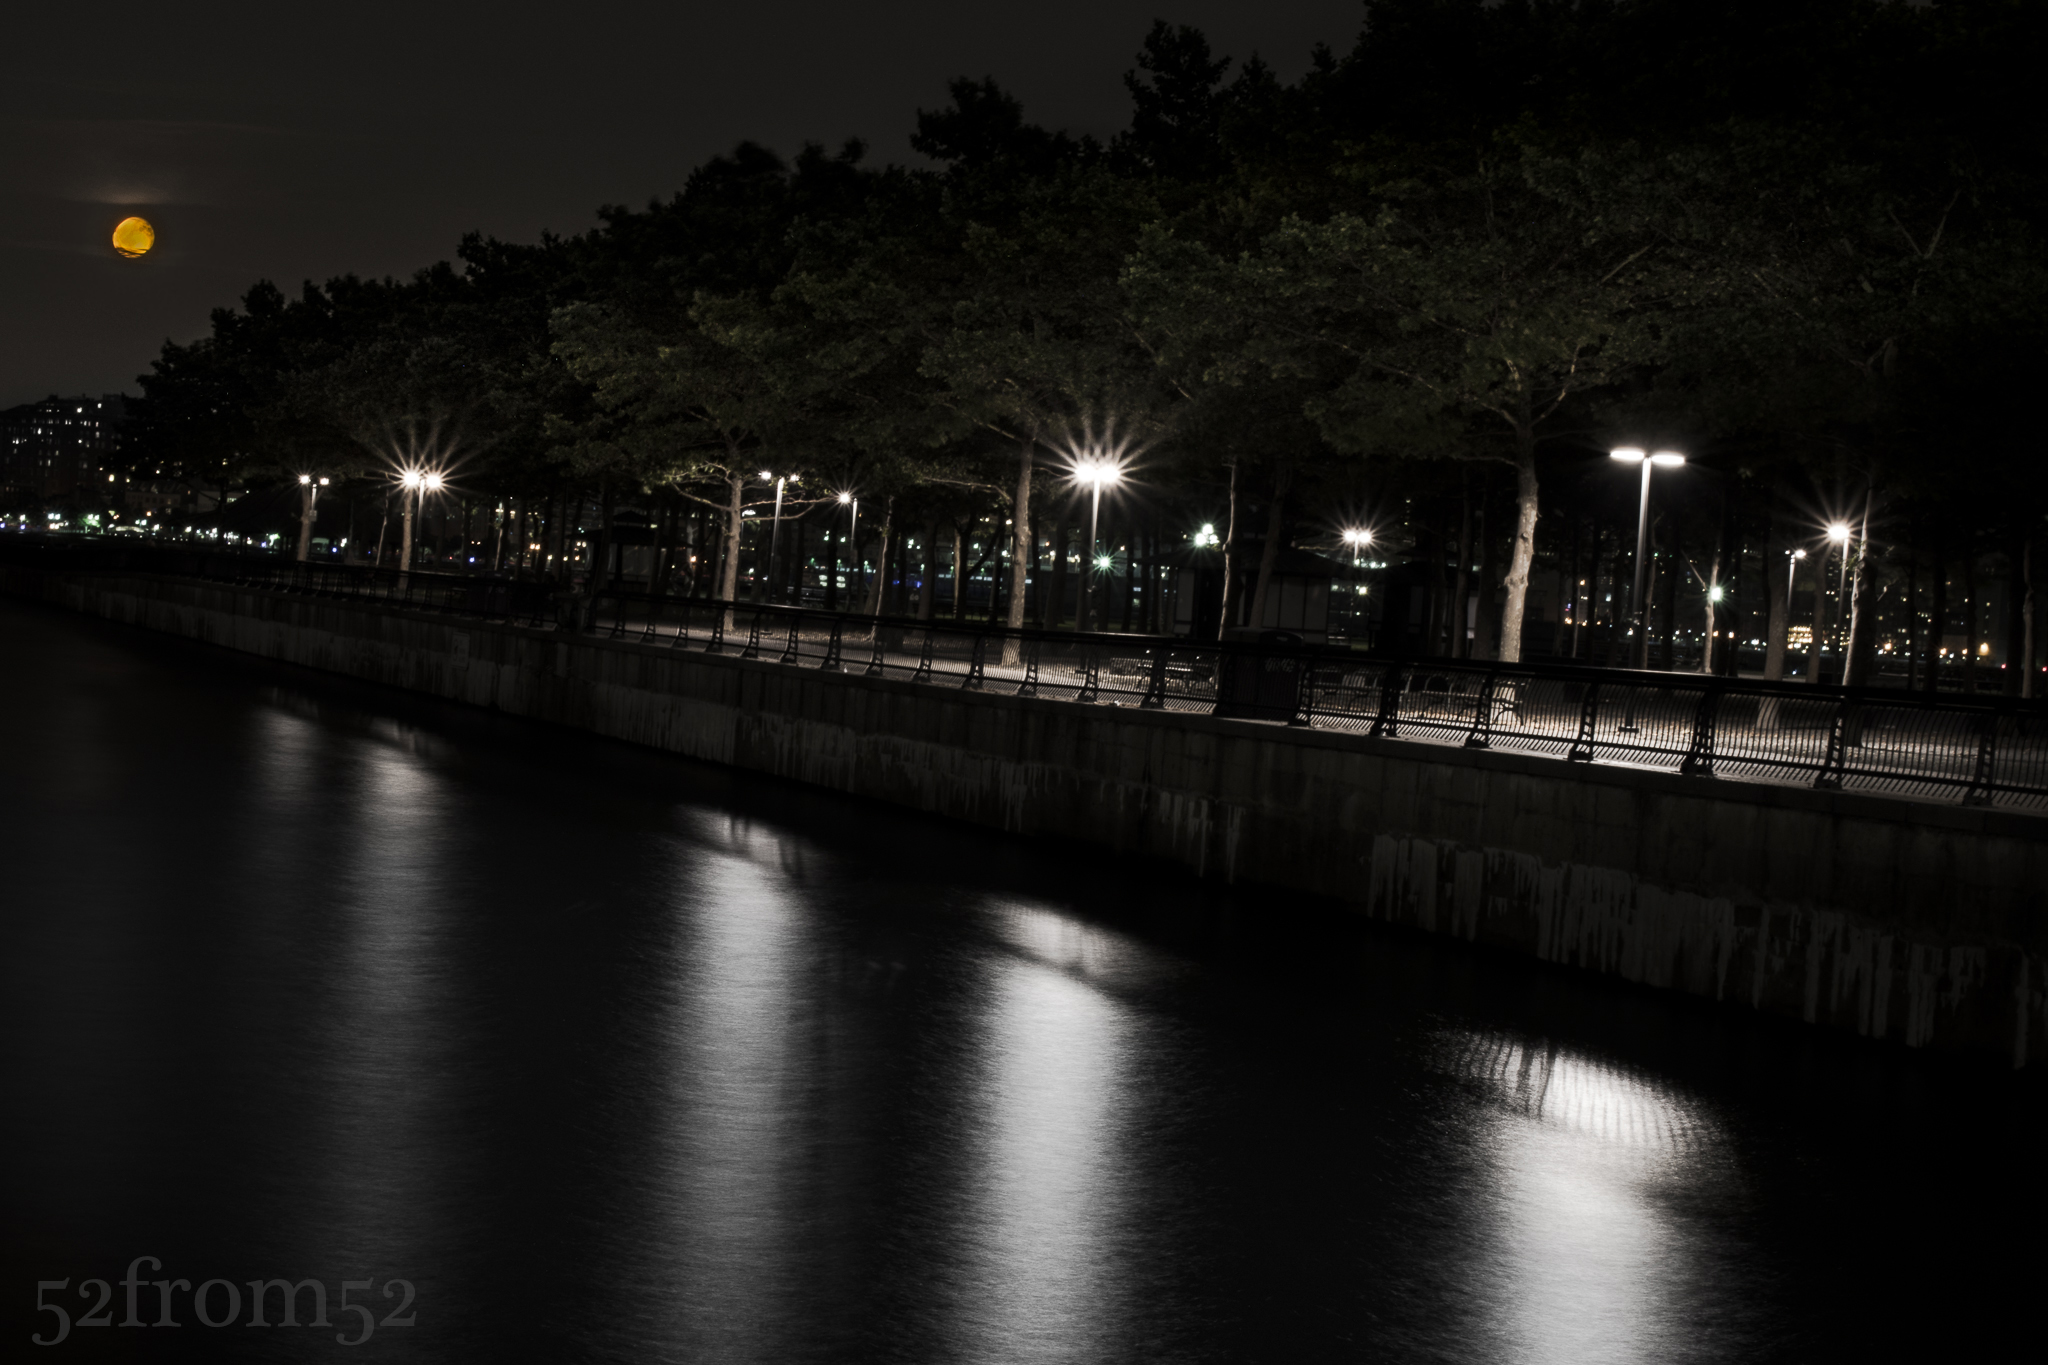
After getting home from my trip to PA, I quickly gathered my gear and set out for the waterfront to get in position to shoot for the moon. It was cloudy on Sunday but I remained optimistic that the moon would find a way to peek through the clouds. After arriving at Pier A, I scouted a few spots for my picture then patiently waited for the moon to rise from the Western horizon. The predicted moonrise time came and went, and there was still no sign of the moon. After about 15 minutes doubt started to creep into my mind and I began to think that perhaps the clouds were just too thick to see the moon. Once 20 minutes hit I started to head back uptown feeling very defeated. As I walked past Pier C I took a quick glance at the horizon and much to my surprise I saw an orange glow starting to burst through the clouds. Could it be?! Yes it was, it was the orange mood that I was eagerly waiting for. I quickly ran back to my spot at Pier A, composed my picture and the rest is history.
Photography Concepts
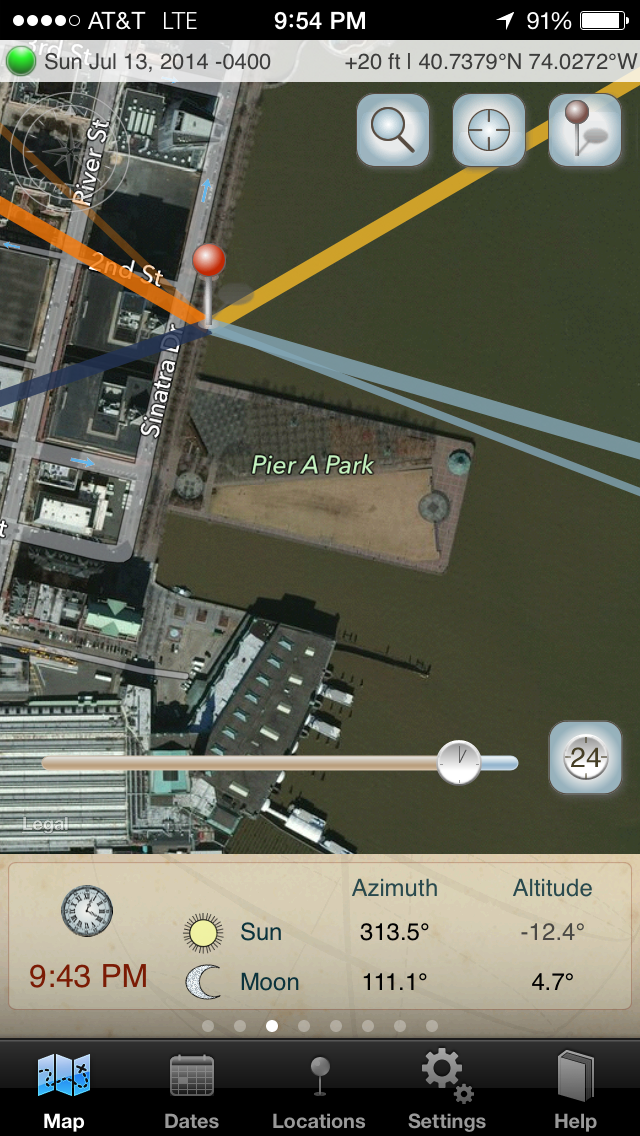
When it comes to composing a picture featuring a full moon, or even the sun, one of the keys is knowing where your subject (the moon/sun) will be and when. Although the moon popped out later than I originally expected, I still had a good idea about when it would rise and where I should look for it. I’m sure there are plenty of options out there for figuring out the moon’s location but my information source is typically an iPhone application called “The Photographer’s Ephemeris.” I’ve mentioned this application in the past, but it’s so valuable that it’s worth a second shout out. Below is an example of how I planned the composition of my picture based on where the moon would be.
iPhone App Screen Shot
The reason I chose this location was because the trees lining Pier A created a natural leading lines composition, drawing your eyes down the pier towards the moon. I knew my focal length would leave the moon looking tiny, so I had to give the moon a boost a good composition to make it stand out. Other than the trees, I also used the light reflections in the water to naturally point towards the moon. In order for me to get the water looking as smooth as it did, I had to shoot a long exposure. The trade off of shooting a long exposure was the moon wasn’t as in focus as I would have liked. In hindsight I wish that I shot a few pictures using a quicker shutter to capture more detail in the moon. The next full moon like this is on August 10th which leaves me plenty of time to plan out my next shot. Mark it on your calendar, pick a location and shoot for the moon!
If you took a step back and evaluated your life, what would you see? One thing that I often notice about myself is that I have a tendency to fall into a routine. I’ll make a decision that sets a precedent, then intentionally, or sometimes unintentionally, follow that precedent. Routines can be good, but sometimes falling into a routine can limit the experiences or results that you get out of life.
Over the past few weeks as I’ve identified some of my different routines, I’ve intentionally set out to shake things up. For example, every morning I pick up a hot coffee on my way to work. To mix things up I started drinking iced coffee in the morning instead of my usual grande dark roast. Another example, usually I go running in the evening, instead I’ve switched things up and have been going in the early AM. These are just a few small examples which might seem trivial, but when you start to add up all the small changes, they make a big difference. As with the saying “change begets change,” so the more routines that I’ve changed, the more I’ve rethought other aspects of my daily routine. As you’ve probably guessed, eventually this change made it’s way into my photography.
After analyzing my photography I noticed my tendency or “routine” was to shoot symmetrical photographs. If my photograph had lines, they typically were level on a x/y axis. The composition of my images was good, but as a whole my photographs were lacking some diversity. The conclusion, rethink my usual composition style by, flipping, tilting, blurring and or anything that would bring a new composition look to my photographs. The result, this week’s picture.
Photography concepts:
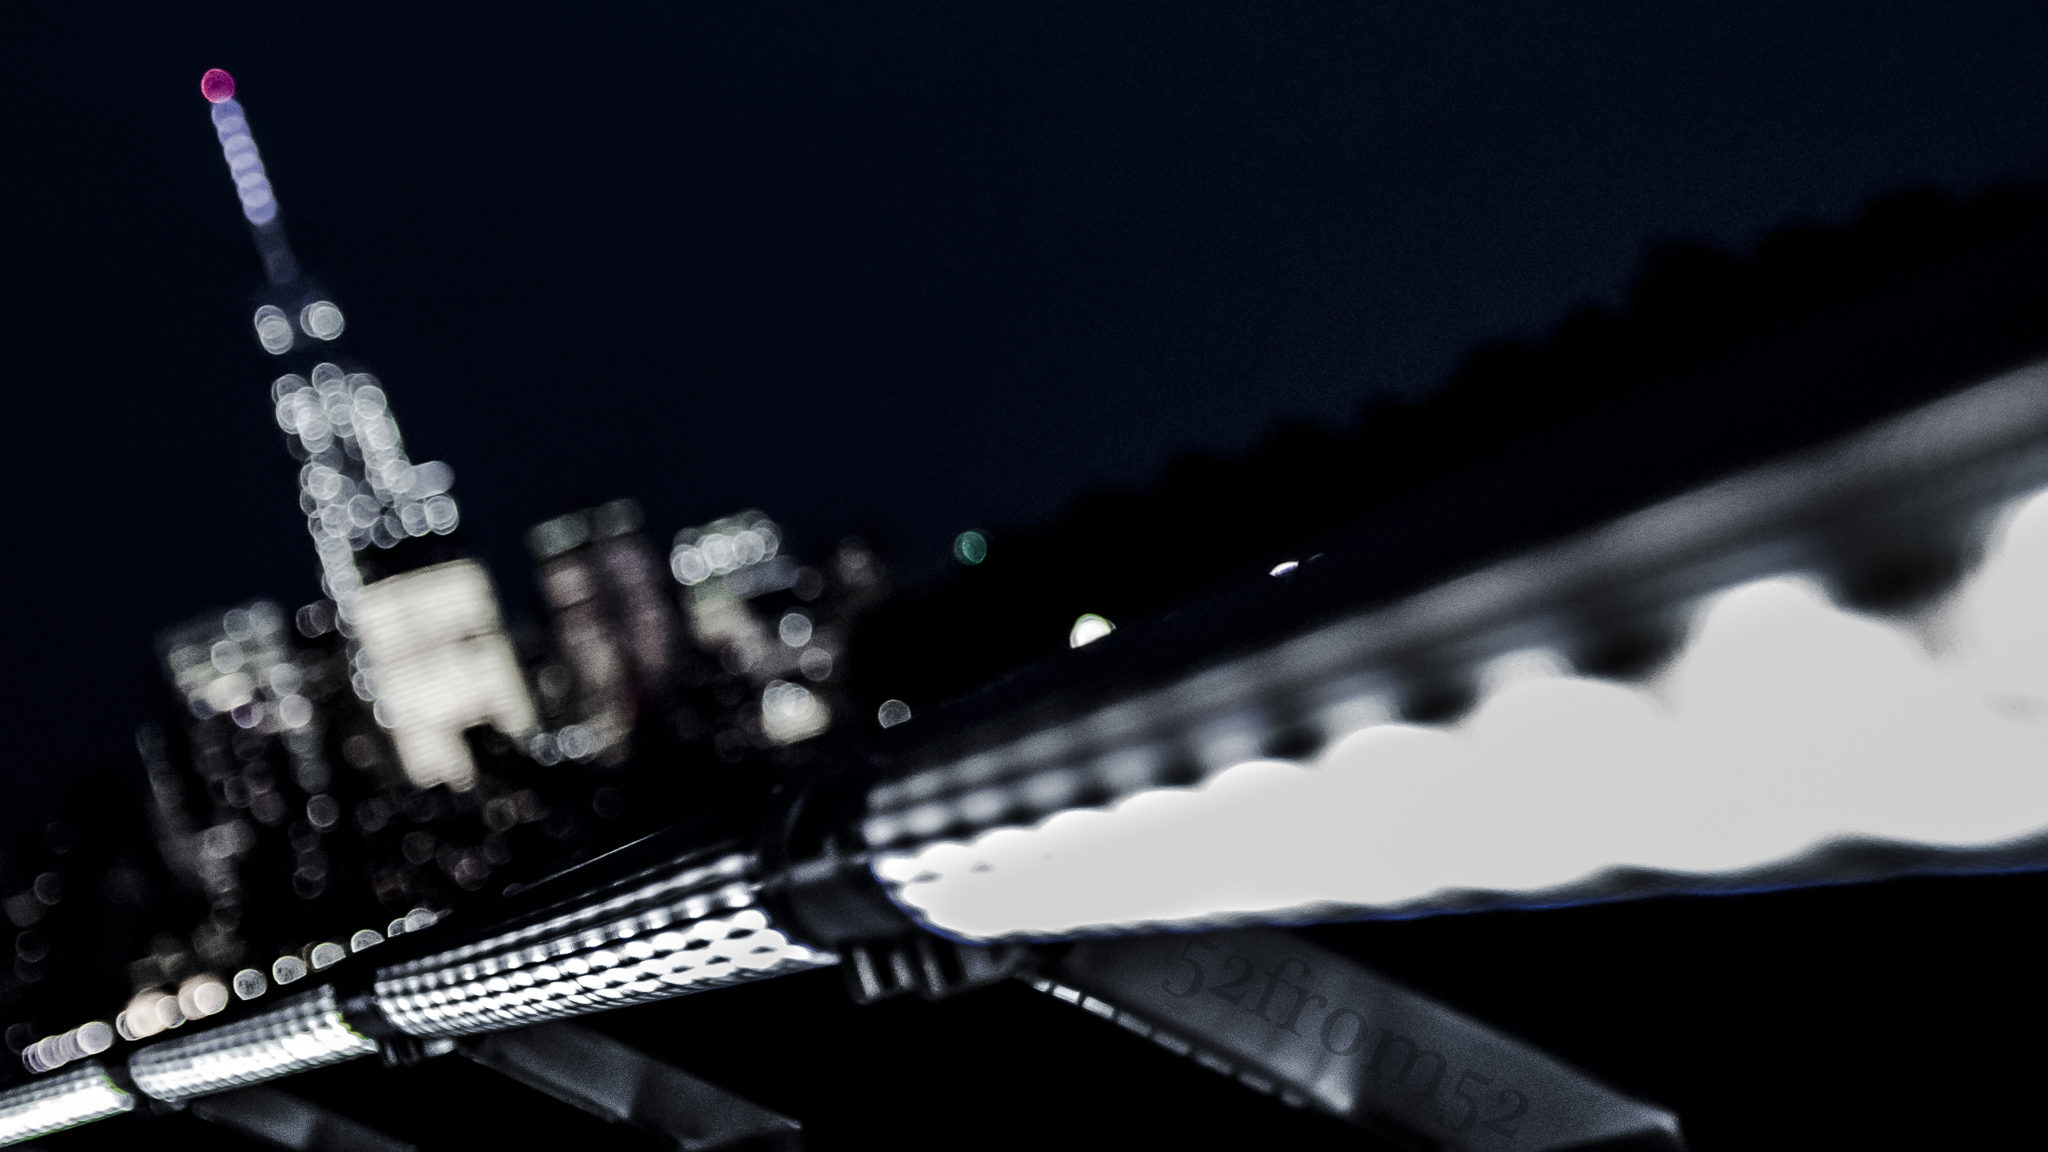
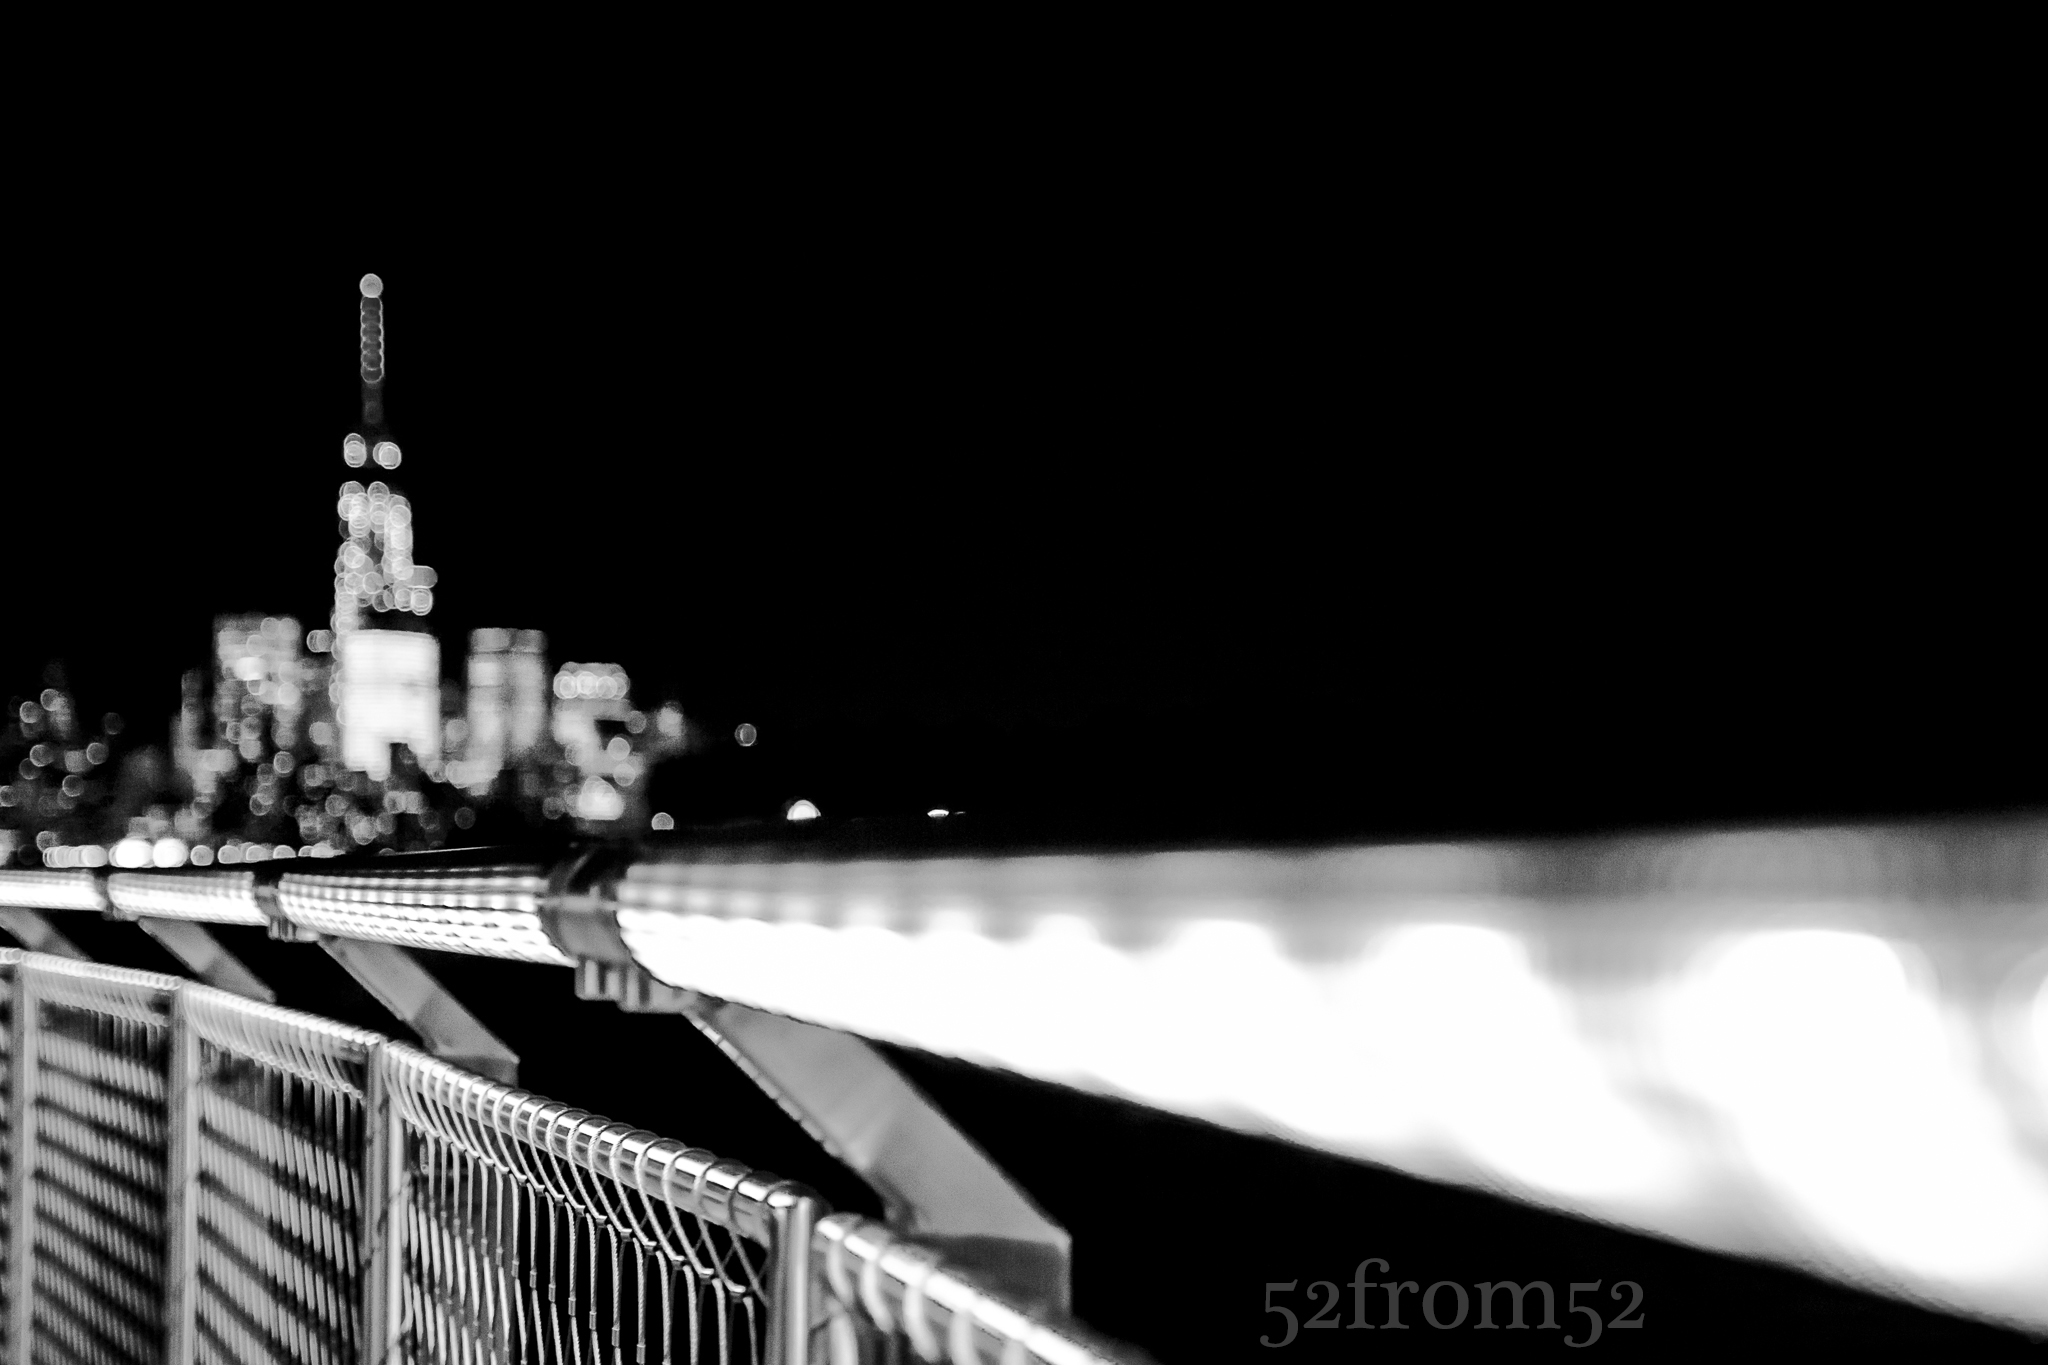
This week marked the first time I opened myself up for some image critiquing prior to posting. Usually I commit to my image and don’t budge after selecting and editing my photograph. As I said earlier, I’ve been mixing things up so after showing my brother-in-law (also Anthony) this week’s picture I reworked my photograph based on his critique. After showing Anthony this week’s original image he pointed out how the railing was distracting and sort of made your eye stop look in confusion rather than continue down the path towards the blurry one world trade. With Anthony’s comments in mind, I re-edited my photograph cutting some of the blurry railing out, while also darkening the rest so it was less distracting. The next twist, literally, was I rotated the axis of my whole image so I no longer had a level shot. The last major re-edit was to bring some subtle color back the image, this also helped the railing distraction by reducing the contrast of white on pure black.
Original Edit
After reworking my photograph I again sent it to Anthony for some critiquing. He was in agreement that my re-edits were a good improvement to the image. Anthony’s only remaining criticism was that the “in focus” portion of my image was a small portion of the railing, which was on the lower part of the image and not really featured in the image. Although I saw the flaw that Anthony pointed out, the location of my focus was a necessary tradeoff to get the image I wanted. While shooting this week’s photo my intention was to blur out the World Trade building enough so it had nice bokeh, but was still recognizable. In order to get the bokeh I wanted, I needed to shoot with a wide aperture (my lenses widest f/2.8), which left me with a small plane of focus. After selecting the appropriate aperture, I flipped my lens to manual focus and slowly twisted the focus ring until I got the right amount of bokeh. Had I shot with a smaller aperture I would have gotten more of the railing in focus, but it would have been harder to get the same amount of bokeh. As I hinted about earlier in the week, this week’s picture was all about the bokeh!
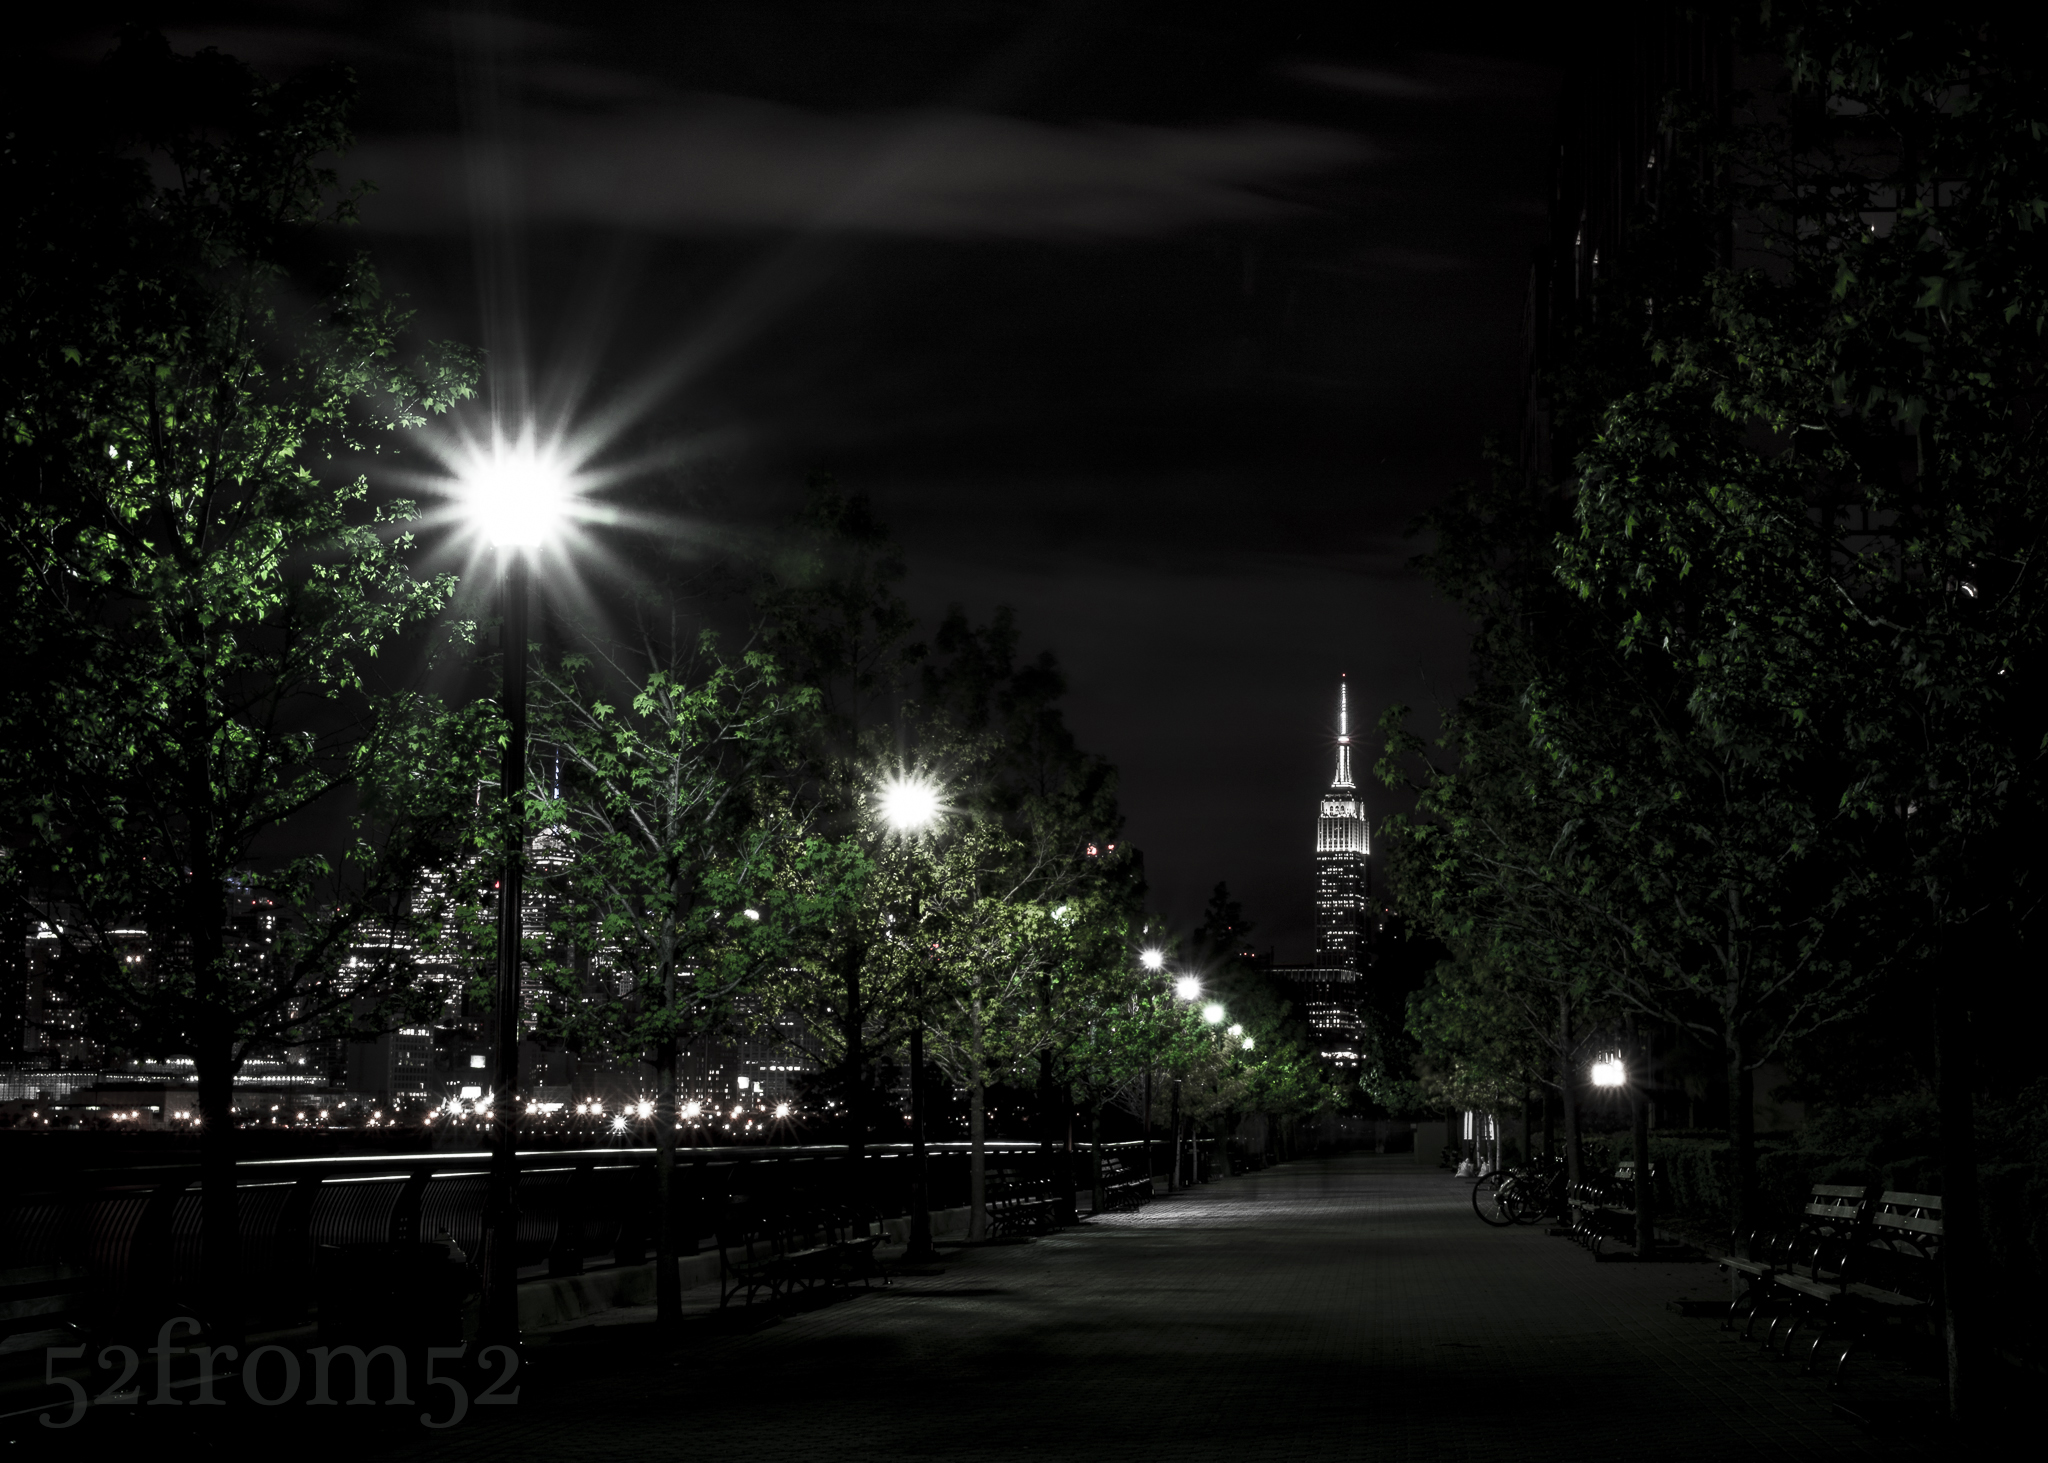
Hoboken is a great place to live if you enjoy running. Hoboken has countless running routes to choose from, most of which are accompanied by an amazing view. Since moving to Hoboken over a year ago I’ve mapped out a few of my own running routes. Each route presents a different physical challenge along with the constant mental challenge of fighting the urge to stop and take pictures every few steps. Out of all the routes I run, my favorite is what I refer to as my “uptown route.” My uptown route starts at Maxwell Park and hugs the water line all the way into Weehawken. Eventually I circle back to Hoboken the same way I came, with my finish line being the path featured in this picture. The reason this route is my favorite is because typically there aren’t many other joggers to get in my way and of course having this view as my finish line is a nice perk.
I run a few times per week so I’ve seen this view countless times and countless times I’ve said to myself that would make for a great picture. Not only is this a beautiful site, it also reminds me to always finish what I start. Each time I get to this point of my run I’m usually tired and ready to stop, but instead of slowing down I usually kick up the intensity for this last straight away. Typically I wait until some other runner makes it about halfway then I chase them down and try to finish ahead of them. I believe that the more you train yourself to push through hard situations, the more it becomes second nature and the stronger you’ll be both physically and mentally. This is the code that I live by and this picture reminds me to practice this each and every day. Always finish and always finish strong!
Photography concepts:
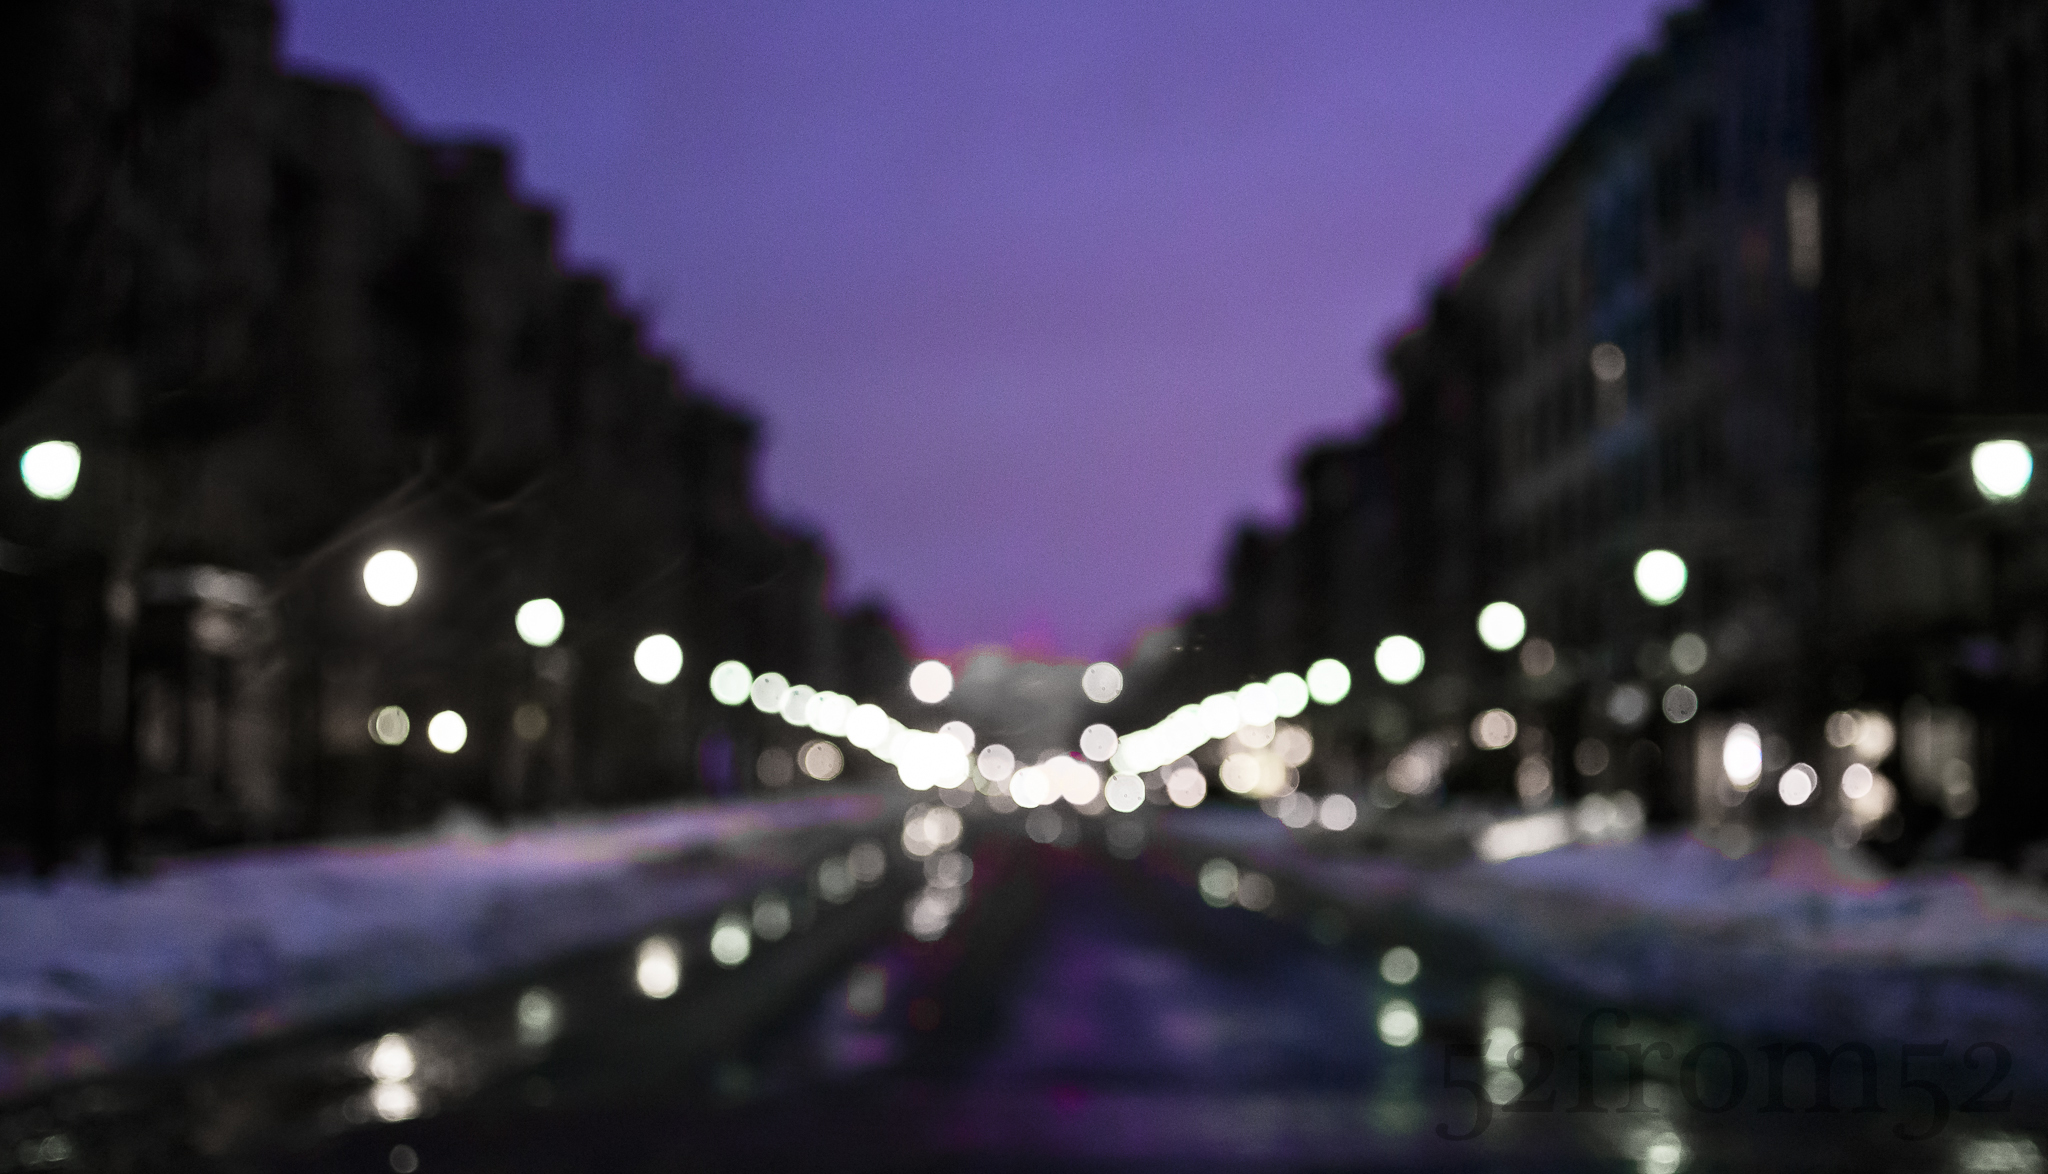
One of the reasons this view always draws me in is because of the natural “Leading Lines” composition. The lights and trees that line the path converge and take your eyes straight towards the Empire State Building. Year round this is a powerful view but the conditions never seemed right for me to get a good picture. Additionally the street lights always presented glare issues that took away from the picture. Recently I figured out the right camera settings and editing techniques to eliminate the glare issues so I finally decided to give this picture a shot.
The camera setting that has helped the most with photographing strong light sources (e.g. the sun, street lights, ect.) has been a small aperture. The smaller the aperture the less bleeding light and the cleaner it looks. For night photography f/18 and above is a great aperture to use. If you’re using this small of an aperture at night it’s more than likely that you’ll be hitting some slow shutter speeds so don’t forget your tripod.
When it came time to edit this picture there were two adjustments that were key. First, to bring out the detail in the Empire State Building I dropped the highlights of the area surrounding the building. I’ve found that dropping the highlights of buildings at night makes them look very crisp. The second adjustment was to lower the saturation all colors in the image except green. What this did was eliminate any of the lens glare that showed up as random colors, and it made the leading lines composition of the trees even more of a focal point. As a result the not only does the composition of the image take you down the path but the isolation of the green color also acts as a guide for your eyes too.
The last aspect of this picture that helped enhance the composition was the size of the Empire State Building. If you’re a Hoboken local and you’ve taken this picture before chances are the Empire State Building was much smaller than in this picture. Why is that? It’s because of my focal length 36mm x 1.5 = 54mm. Most phones shoot at around 30mm and since focal length essentially equates to zoom so when I use ~54mm the building is larger. The thing that’s interesting about zoom is if you stand further back your foreground will be scaled regular, but whatever is in the background (e.g. the Empire State Building) will appear larger than usual. You see this technique a lot when people photograph the moon and get that insanely large moon backdrop. Although I shot with a greater zoom then people do with phones, my image resembles how this path looks like to the naked eye. Had I stood further back and zoomed in with 80mm+ the Empire State Building would have looked massive. I’m limited to the 35mm range for this blog but I encourage you to try zoomed focal lengths to scale up your backdrop subjects. Experiment with your camera’s settings and new focal lengths, it’s the only way you’ll learn!
What do I want to accomplish? This is a question that often keeps me awake at night. I’m all about setting goals and doing whatever it takes to complete them. Step one of having a goal oriented mindset is obvious, set some kind of goal. If you don’t know what you want to accomplish, how can you achieve it? This “goal oriented process” is the concept I applied after purchasing my camera, my goal was to learn photography. After setting my goal, step two was figuring out a way to achieve my goal, which led me to create this photoblog. With the end of this photoblog quickly approaching, I’ve been spending time thinking about what will be my next step in achieving my overall goal of learning photography. Learning photography is hard to measure though, one can argue that you can never fully learn photography. There will always be some new camera, some new technique or just something new to learn. Knowing that I’ll never be able to measure my original goal has made me think, perhaps it’s time I expand my goal and decide what I’d like to do with my newly found photography knowledge? I’m now asking myself, what do I want to use my photography to accomplish? Is my passion for photography just a hobby, or do I want to take it further?
This past weekend I set aside some time to think about the questions I’ve raised about my next steps. While kicking around ideas I decided to throw on a YouTube video from one of my favorite photography resources, “CamerRec Toby.” Toby is a photography pro out in Vermont with his own YouTube channel devoted to reviews and tips about photography gear and techniques . I’ve cited Toby’s videos before but this week one of his videos really caught my attention. In the video (link below) Toby and his co-host Christina discussed an article “7 Reasons why most Photographers and Videographers don’t Reach their Goals” (link below). The article was so relevant to what I was currently thinking about it almost seemed like it was targeted directly at me. In the article the author talks about photographers setting too general of goals (e.g. Learning photography), and how it’s important to have measurable goals. The article helped put things in perspective and made me realize it’s time for me to set some measurable goals. The article and Toby’s video also motivated me to push forward on one of the smaller goals that I’ve been toying with. As of this past weekend, I’ve decided that I’m going to participate in the next Hoboken Art & Music festival in September. My main goal isn’t to make money (though that’s always a bonus), my main goal is to meet lots of people and seeing who and what might help me decide where to take my photography next.
With a new goal (participate in the Art & Music Festival) set, step two was to figure out a way to accomplish it. There are many things that will go into preparing for the festival, but one of the most basic things is having plenty of pictures. As a result, this weekend I also decided to start a new project called “Hoboken Streets.” Since the festival is held in Hoboken, it seems logical to think many of the attendees will be Hoboken residents. Having a geographically targeted audience means I should have geographically targeted pictures, hence my “Hoboken Street” idea.
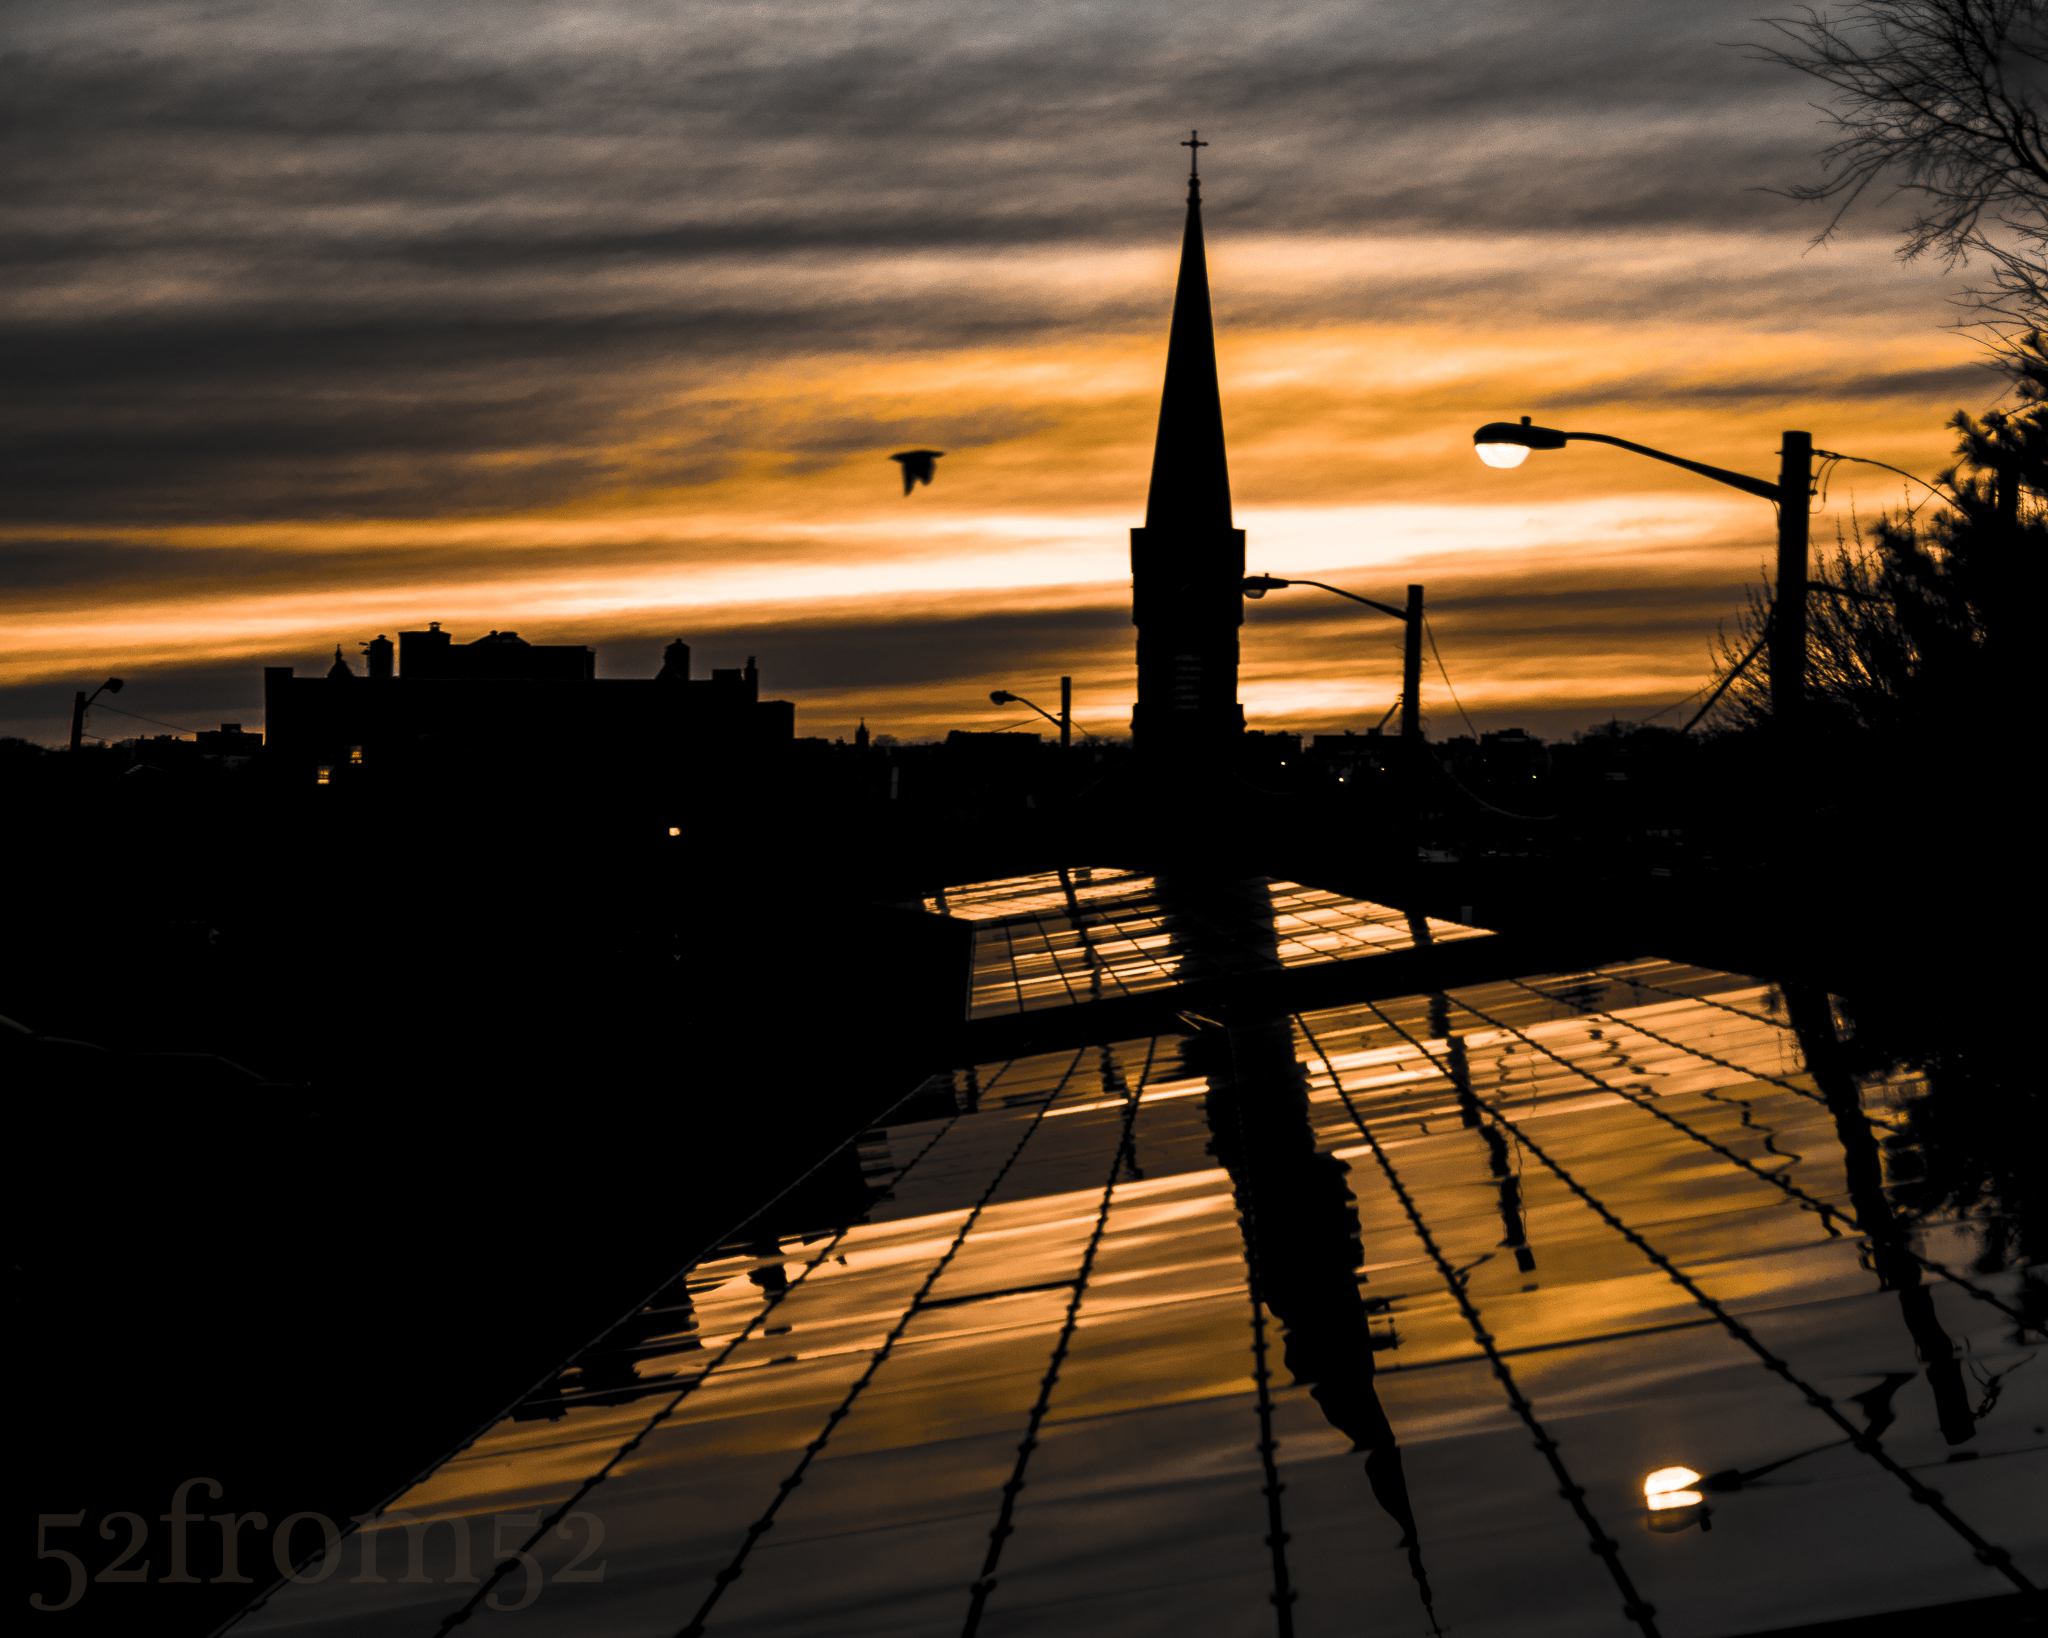
If you’re still with me, you’re probably asking, “how in the world does all this related to this week’s picture?” Well, even before officially deciding on the idea of doing a “Hoboken Streets” project, I wanted to explore more of Hoboken. Over the past few weeks I’ve changed up my nightly running route and began zig zagging around town looking for pictures. This past week one of my runs led me up 8th street towards Stevens around sunset, where I found this location. It might come as a surprise but I don’t run with my camera, so a few days later I circled back with my Nikon and got the shot.
Photography concepts:
I wrote a little too much in the previous section, and the article I referenced could somewhat fall into this section so this week I’ll keep this section short. Two keys to this picture were composition and editing. In terms of composition, I wanted to have an equal balance between the sky/silhouette and the solar panels which were reflecting the sky/silhouettes. Instead of following the usual rule of thirds guidelines I split my image in two halves horizontally (top/bottom). The bottom half was focused on the reflection which was meant to lead your eyes down the path to the top half, which was meant to feature the sky and silhouettes.
Editing was key for this image because I wanted to emphasize the contrast between the dark silhouettes and light from the sunset. In order to do create a nice contrast, I dropped the overall vibrancy of the image while boosting the saturation of specific colors. After my color adjustments, I was left with the contrasting image that I was looking for. Of course there were some other adjustments (e.g spot adjustments, highlights, clarity, ect.) but nothing more than I’ve talked about in previous weeks. If you haven’t already, circle back and read some of my earlier weeks posts to get some more in depth tips on editing and composition.
Week 29 (2/17/2014 -2/23/2014): Wagner Park, New York, NY
Picture taken on 2/23/2014 at 5:13 PM
Photograph description:
There is a first for everything, and this week was a feast of firsts. For starters, this week was the first time that I didn’t post within my weekly deadline. After a busy weekend when it came time to write my post on Sunday night, I couldn’t resist collapsing face down on my plush tempurpedic. Other than my latent post, this week also marked the first time that my post’s picture was shot with something other than my Nikon 35mm f/1.8 lens. I still shot my picture at ~35mm but this time it was with a new Sigma 17-50mm f/2.8. I had been tussling with whether or not to buy a new lens for a couple of weeks. Last week I was finally able to validate purchasing a new lens. One of my stocks recently started to take a hit so I decided to cut bait and divert those funds to the investment of a new lens. Hopefully the lens will pay better dividends.
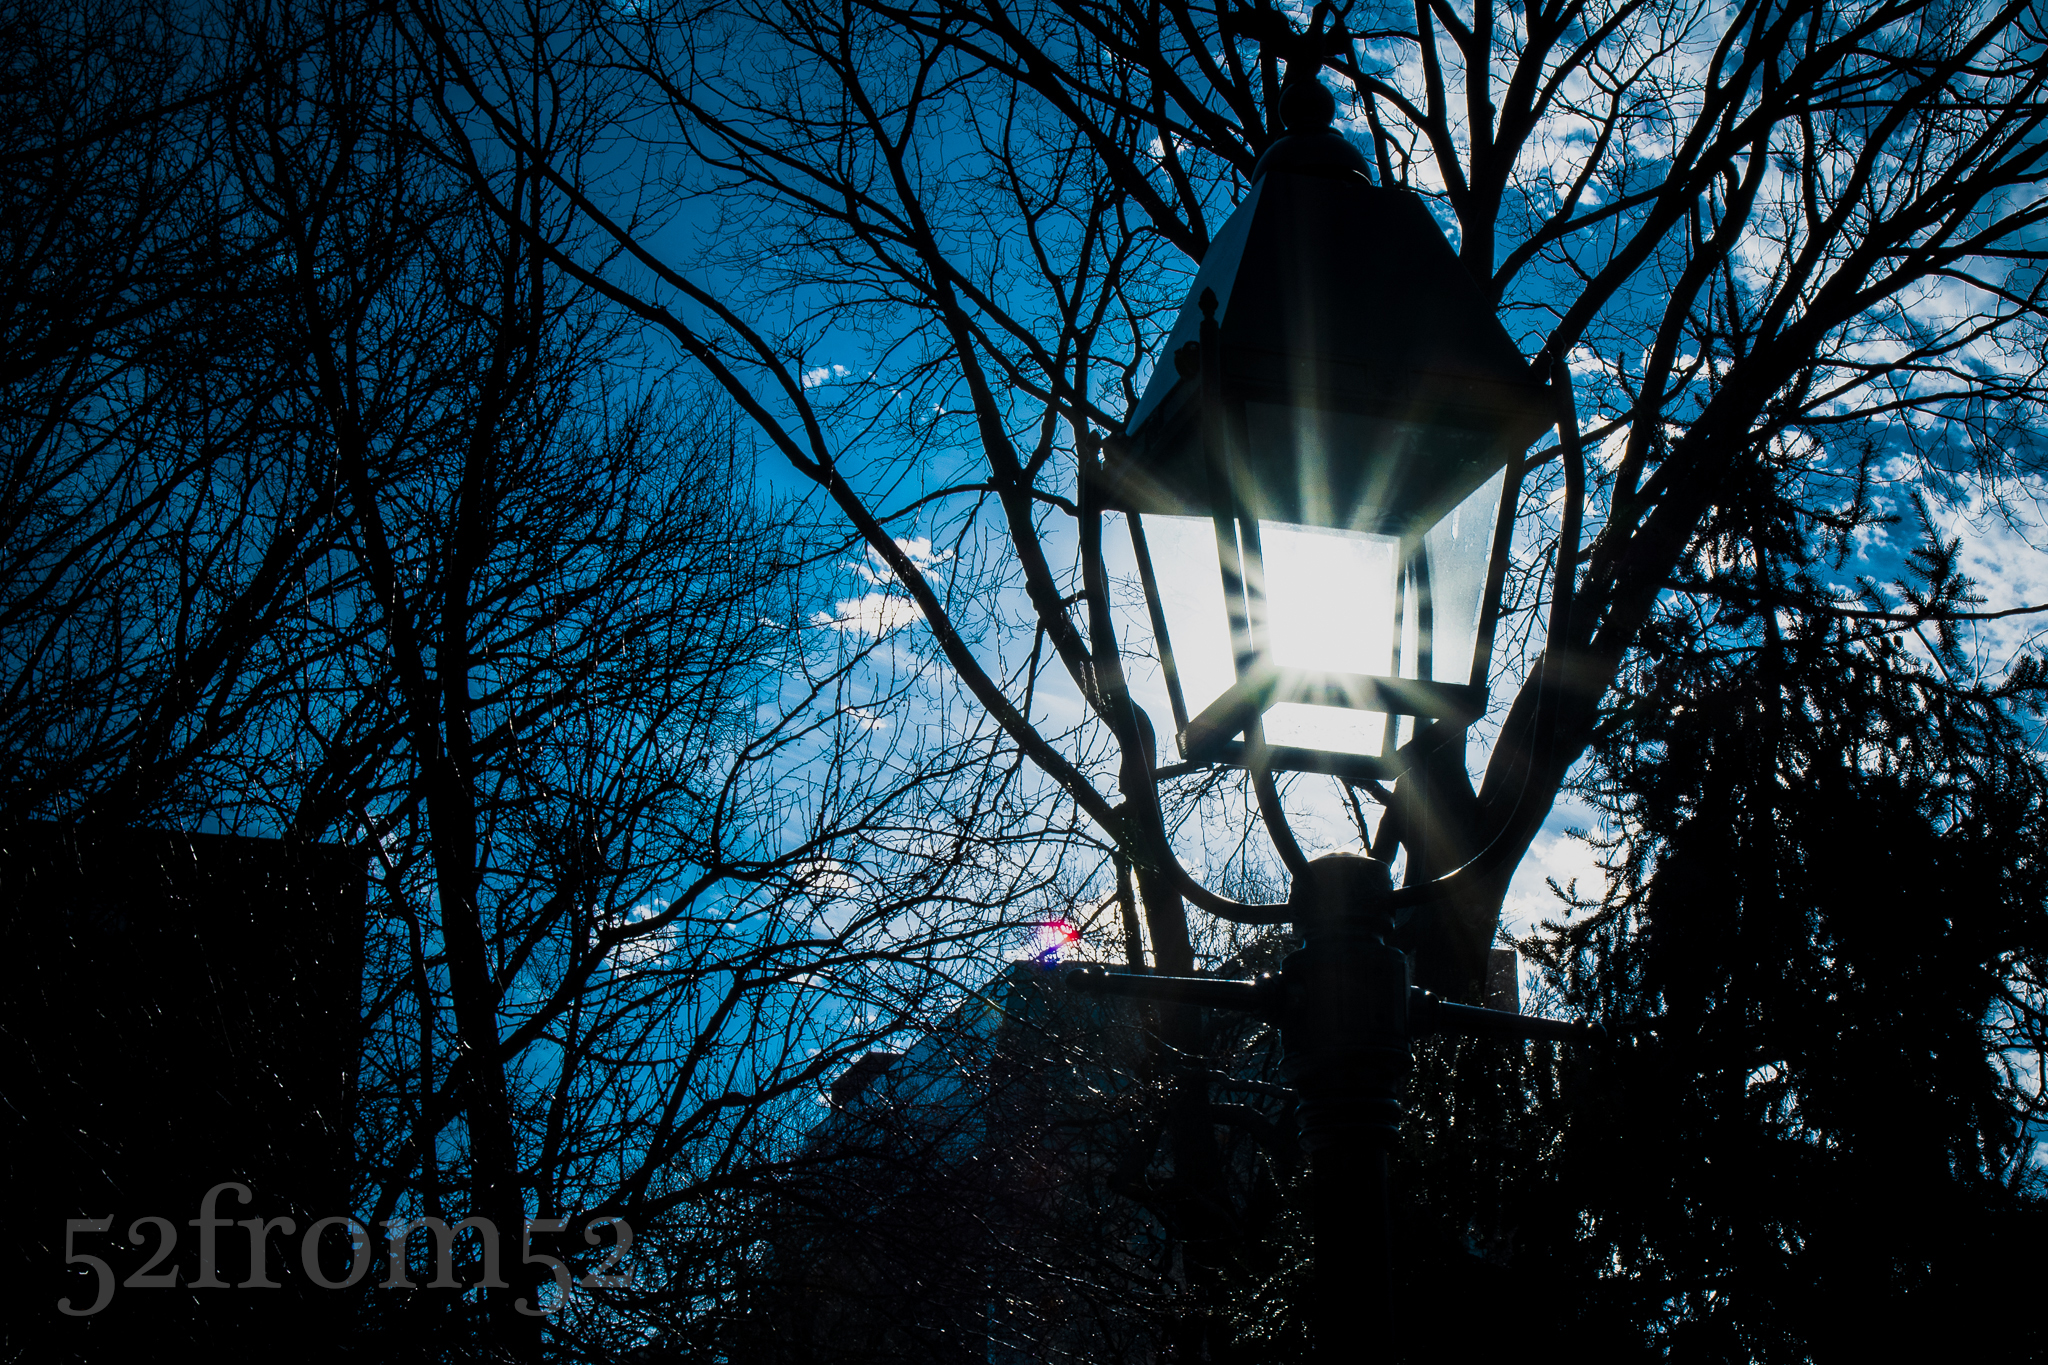
The last two “firsts” worth noting are locations based. This week was the first time that I visited Washington Square park and the nearby Stumptown coffee shop. I’ve been to the Stumptown on 29th street a few times but never the second and smaller location by Washington Square park. It was nice finally checking out the park even if it wasn’t the best time of the day for pictures. The sun was at about 45 degrees and blindingly bright. After walking around the park for a few minutes with my friend that tagged along we decidle split off from one another so we could each focus on finding the best shot. As I moved away from the park’s iconic arch I found a couple ways to use to the sun’s harsh angle. One was to shoot some reflection pictures using the wet ground. The second idea I had was to line the sun up within the street lights that littered the park so it looked like they were glowing in the daylight. Although both were fun ideas, they quickly grew old so I decided to find my friend and search for a better location.
Washington Square Park Light Post
With sunset approaching we decided to head to Wagner Park located at the southern tip of Manhattan. I shot at that location once before during week 16 but since it provides great sunsets, I knew there was no harm in taking a return visit.
While on our way south we seemingly stopped every couple of feet to take pictures. Since the purpose of our trip was to take pictures, frequently stopping wasn’t a problem, but it was threatening our chances of getting to the park at the right time. Eventually we decided to jump on the 1 train to expedite our journey.
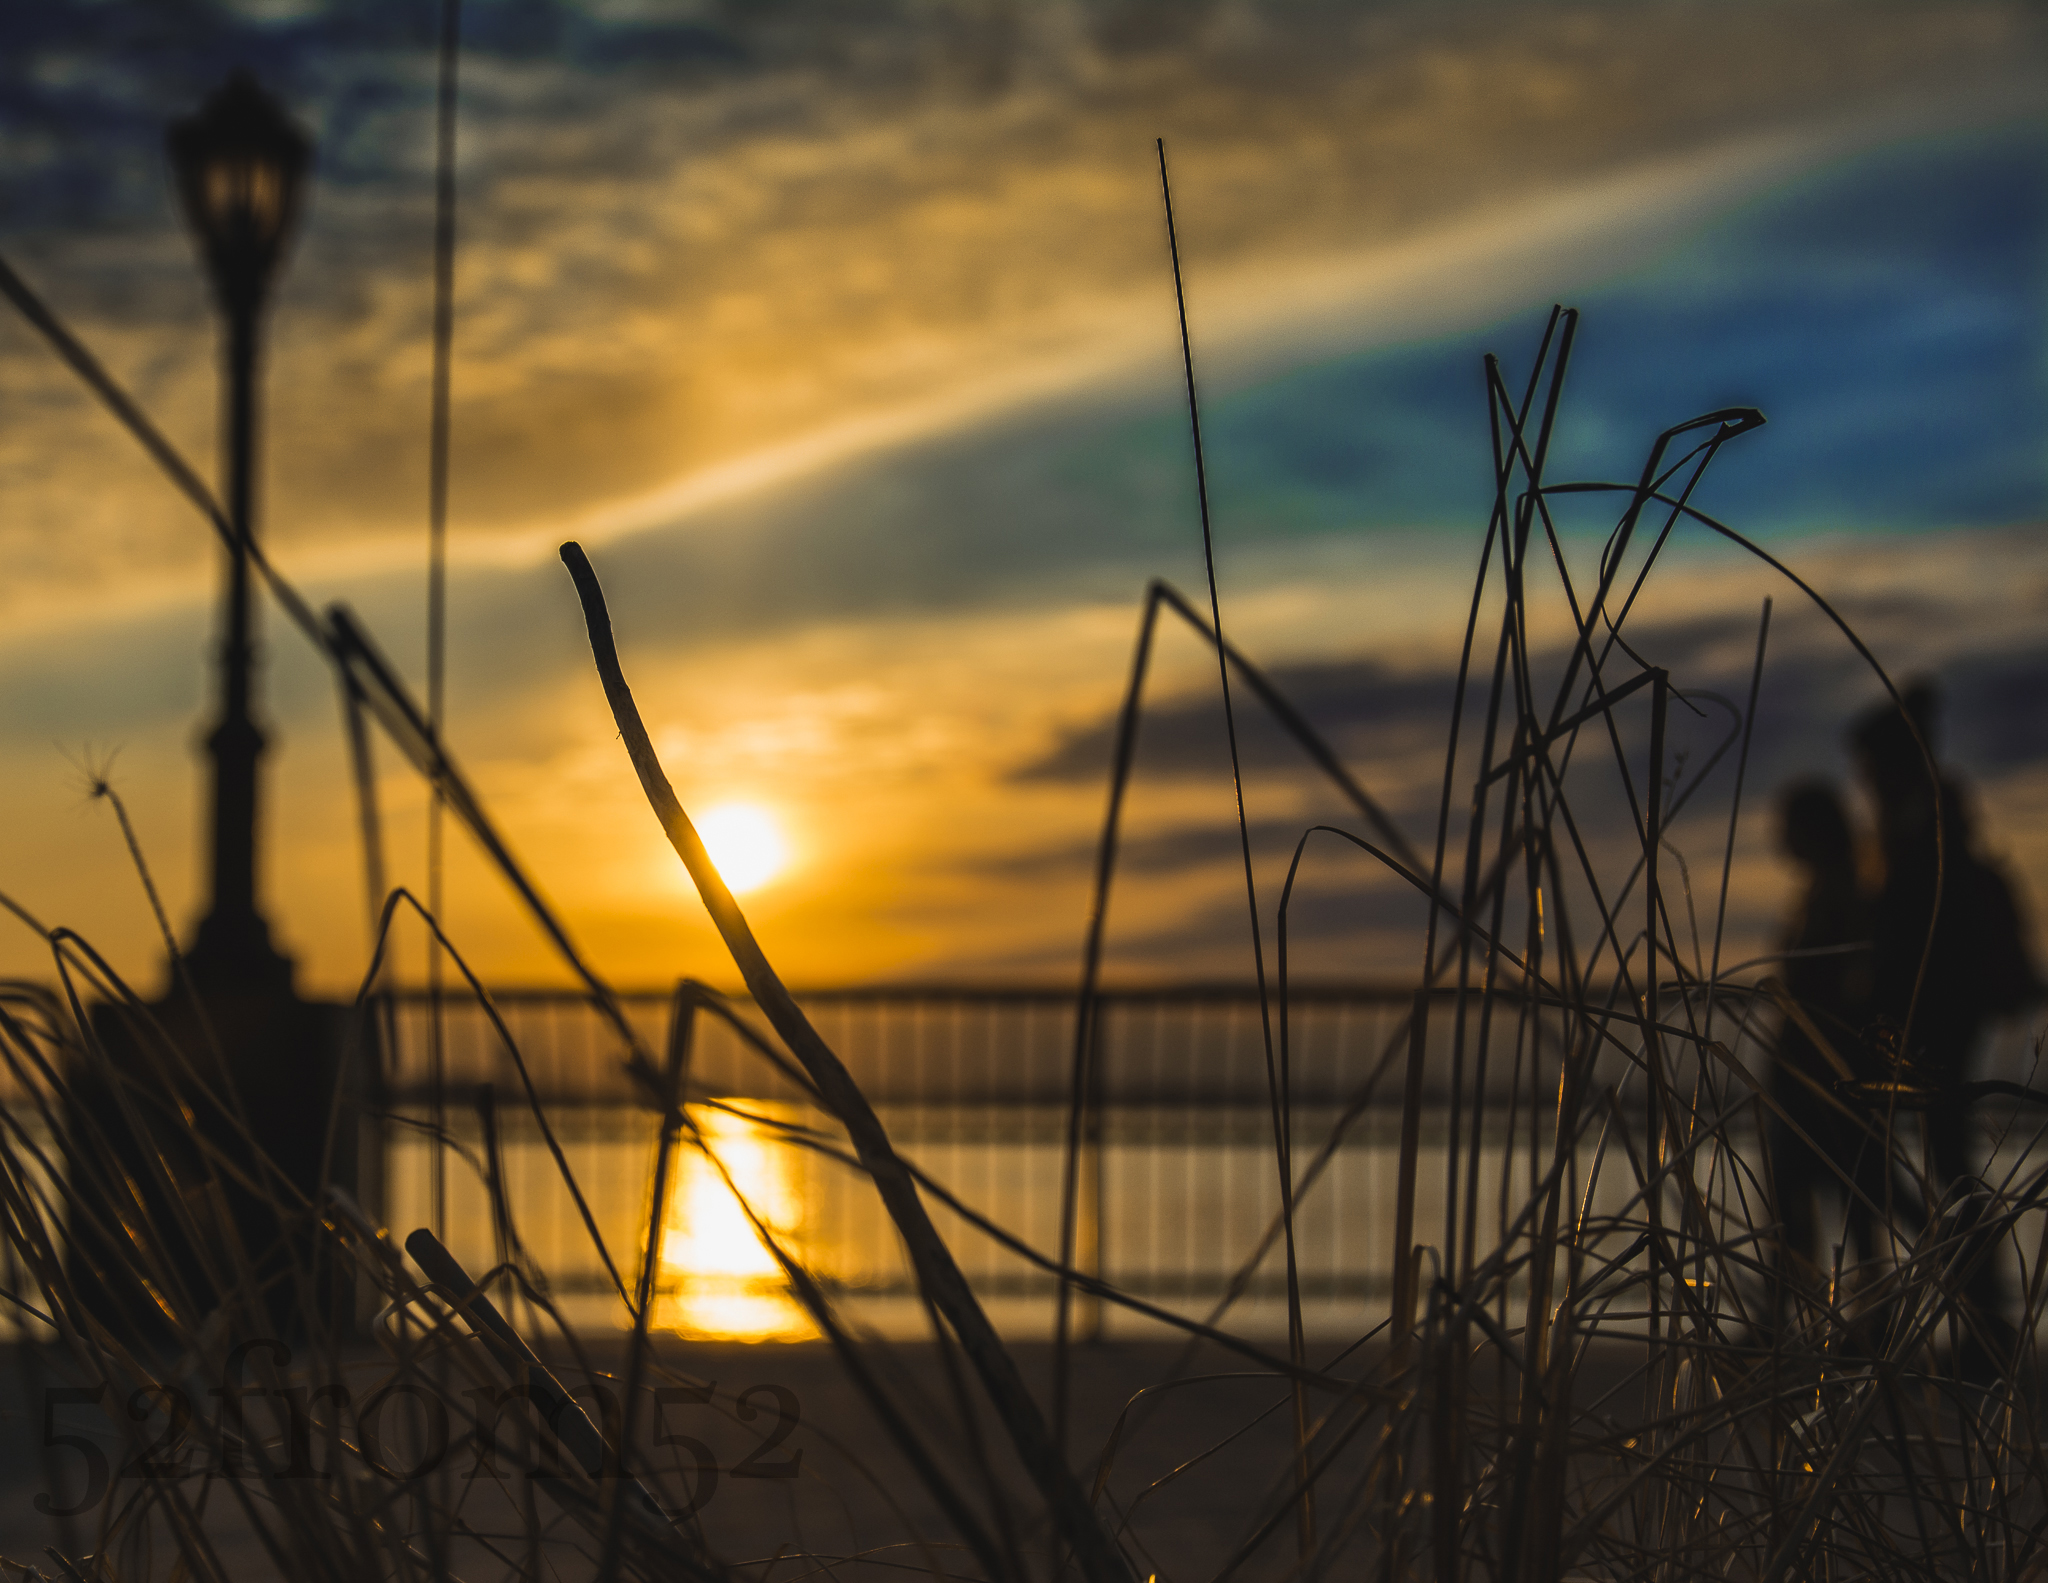
Once we got out of the subway we made a beeline towards the park. When we finally cleared the tall buildings of the financial district, I yelled out “boomshakalaka” in excitement once I saw the beautiful evening sky. For the next hour or so my friend and I were treated to one of the better sunsets I’ve seen in a while. We both shuffled around the park trying to find the best shot. I eventually spotted a patch of tall grass which provided me with a good foreground subject and sealed the deal for this week’s picture.
Photography concepts:
Since this week is the first time shooting with my new Sigma lens it makes sense for me to talk about some of the advantages it provides. One of the advantages which benefited this week’s picture is the Sigma’s nice bokeh. As I talked about last week, bokeh is the part of the picture that’s out of focus. One thing I recently learned is that with nicer lenses the bokeh is smoother and although it’s a little bit of an oxymoron, the out of focus images are sharper. The nice bokeh worked well for creating silhouettes of the lamp post, railing and couple walking.
Another advantage the Sigma has is a low fixed aperture of f/2.8. Although the Sigma doesn’t beat my Nikon 35mm’s f/1.8 aperture it’s still large enough to make shooting indoor and night pictures easier. The Nikon beats the Sigma aperture but the Sigma has a 4-stop Anti-Shake feature which allows for slower shutter speeds. This means that although the Nikon can let in more light via a wider aperture, the Sigma can let in more light via slower shutters (without using tripods). The term 4-stops means I can go 4 stops lower than the recommended shutter speed for a specific focal length. When shooting at 35mm (52 with a crop sensor) it’s recommended that I stay at or above 1/100 of a second. Thanks to the anti-shake feature I can hit a shutter speed of 1/40 of a second, and possibly slower if I have any added stabilization. This is a moot point if you’re using a tripod but it’s very relevant when you’re shooting indoors or at night.
The last advantage I’ll quickly mention because it’s not one that can help me during my 52from52 photoblog series is that the Sigma is a zoom. The advantage of having a zoom lens is pretty obvious. With a zoom you’re able to recompose your picture without moving and hit targets that a 35mm prime can’t. Because it’s a zoom I might use my Sigma again in some upcoming posts, not to shoot my picture from another focal length, but so that I have some flexibility for the pictures not meant for this blog. The Sigma’s focal length range 17-50mm ( ~25-75mm) is very versatile. The lens moves from wide angle to a nice focal length for taking pictures of people, especially when I can maintain a f/2.8 aperture. The possibilities this lens has is exciting so stay tuned!
Like many people my age, on a usual Saturday night there is a good chance you’ll find me out at a bar with friends. This past Saturday night however was not my usual evening. This weekend was different because I was providing 24/7 support for work. Working in IT has it’s perks but it also occasionally carries some unique responsibilities, one of those being support coverage. This weekend was the first time I held this role in a long time and it’s not one that I take lightly. While covering support I need to maintain my wits and have a quick response time if I get any calls, therefor going out to a bar isn’t on my social menu.
Original “accidental” picture
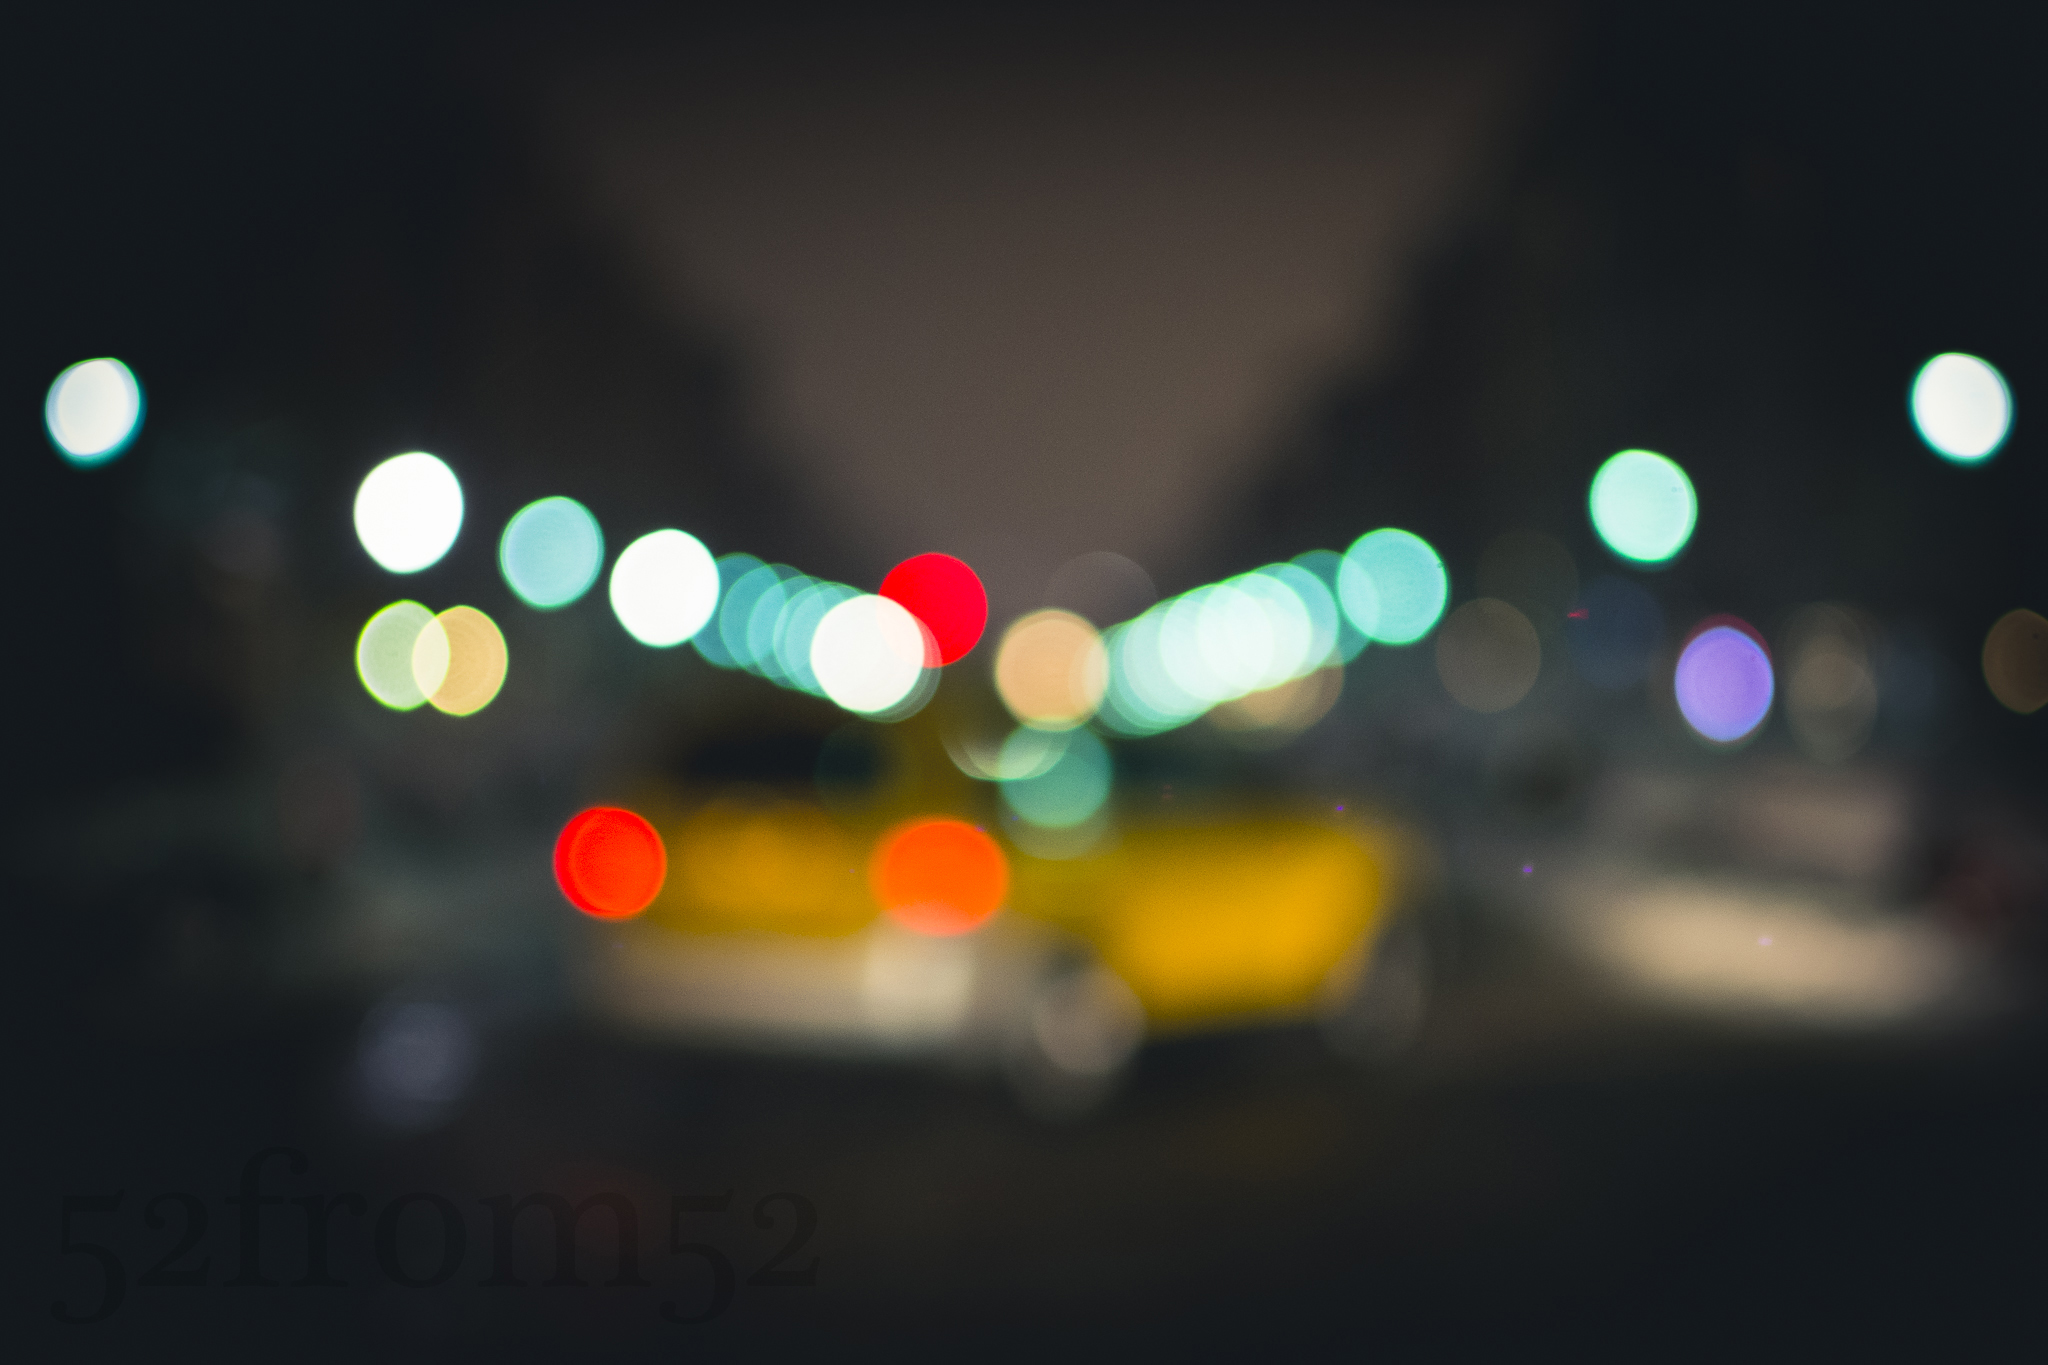
Coincidentally this weekend the newest season of “House of Cards” released on Netflix so that provided the perfect means to pass my Saturday night. Though I had a good TV binge in the queue, I decided to pop outside for a little with my camera. Earlier in the week I took a picture which I planned to use as this week’s post. My goal for Saturday night’s picture hunt was to try my hand at recreating and or improving my previous picture. The original picture was shot on Washington street and was more of an accident than a planned image. When you’re attempting to take a picture in the middle of the street you can imagine how one might feel rushed. It could be the possibility of getting hit, or just the fact that people gaze upon you like you’re crazy. Regardless of the reason, while shooting my original picture from the middle of the street I felt rushed and thus fired off some quick pictures, a few of which were not in focus. After reviewing the unfocused batch of pictures, I actually liked the way the blurred imaged looked. Fast forward to Saturday night, my goal was to not leave this round of pictures to chance. My plan was to use the manual focus of my camera to create a “controlled” blurred image.
My chosen spot was at the corner of 13th/Washington. As I stood at the corner waiting for the light to turn red, I fiddled with my focus to get a blurry but clear enough to see image. During one of my practice pictures I accidently got a taxi in frame which triggered the idea of creating an picture that represented how I usually recall Saturday nights. I waited a couple of light cycles until again having a taxi staged for the picture. Once the light turned red I darted out into the street and captured this week’s image.
Photography concepts:
The more I learn about my camera, the more artistic freedom I have to create the images that are in my head. Although this week’s picture wasn’t an exact representation of what I mentally saw, it was close. This is the first time I used manual focus for a featured post and I’m happy with the result. Manual focus gives you the freedom to choose the exact focus you want rather than relying upon the camera to make the decision. It would have been nearly impossible to shoot this picture if I only relied on my camera for focusing. When in autofocus mode your camera needs to focus on something in order to shoot. There is a setting to override requiring focus but it’s easier to put your camera in manual. Putting your camera in manual focus allows you to take a picture no matter what the focus is, blurry or razor sharp. The reason I wanted to achieve an out of focus image was because of the effect it creates. The effect that results from images being out of focused is often referred to as “bokeh.” Most of the time bokeh is used to create separation in a picture between the subject and background. The intensity of the bokeh usually increases as your aperture gets larger. This technique is used a lot in portraits such as head shots. In my picture instead of focusing on one subject and blurring out everything else, I blurred out the entire image. I wanted to use the blurriness to create a sense of disorientation from looking at the picture. I also wanted to use the blurry lights to create the composition of my image in the form of leading lines. All of the lights are pinched inward to pull your focus onto the blurred out taxi. The leading line composition was meant to represent the usual progression of a saturday night, increased blurring over time and ending in a taxi.
As you can see by applying some of the lessons that I’ve learned, I was able to create the image that I wanted. Of course some chance was involved this week, but the lesson to take away is that once you start to build your photography toolbox it’s important you know what concept to take out or apply to achieve the image you’re going for. Your creativity will always be limited to the speed that you’re able to think of your feet and apply your knowledge.
Picture info: ISO 3200, 35mm, f/1.8, 1/200sec, -1 Exposure step
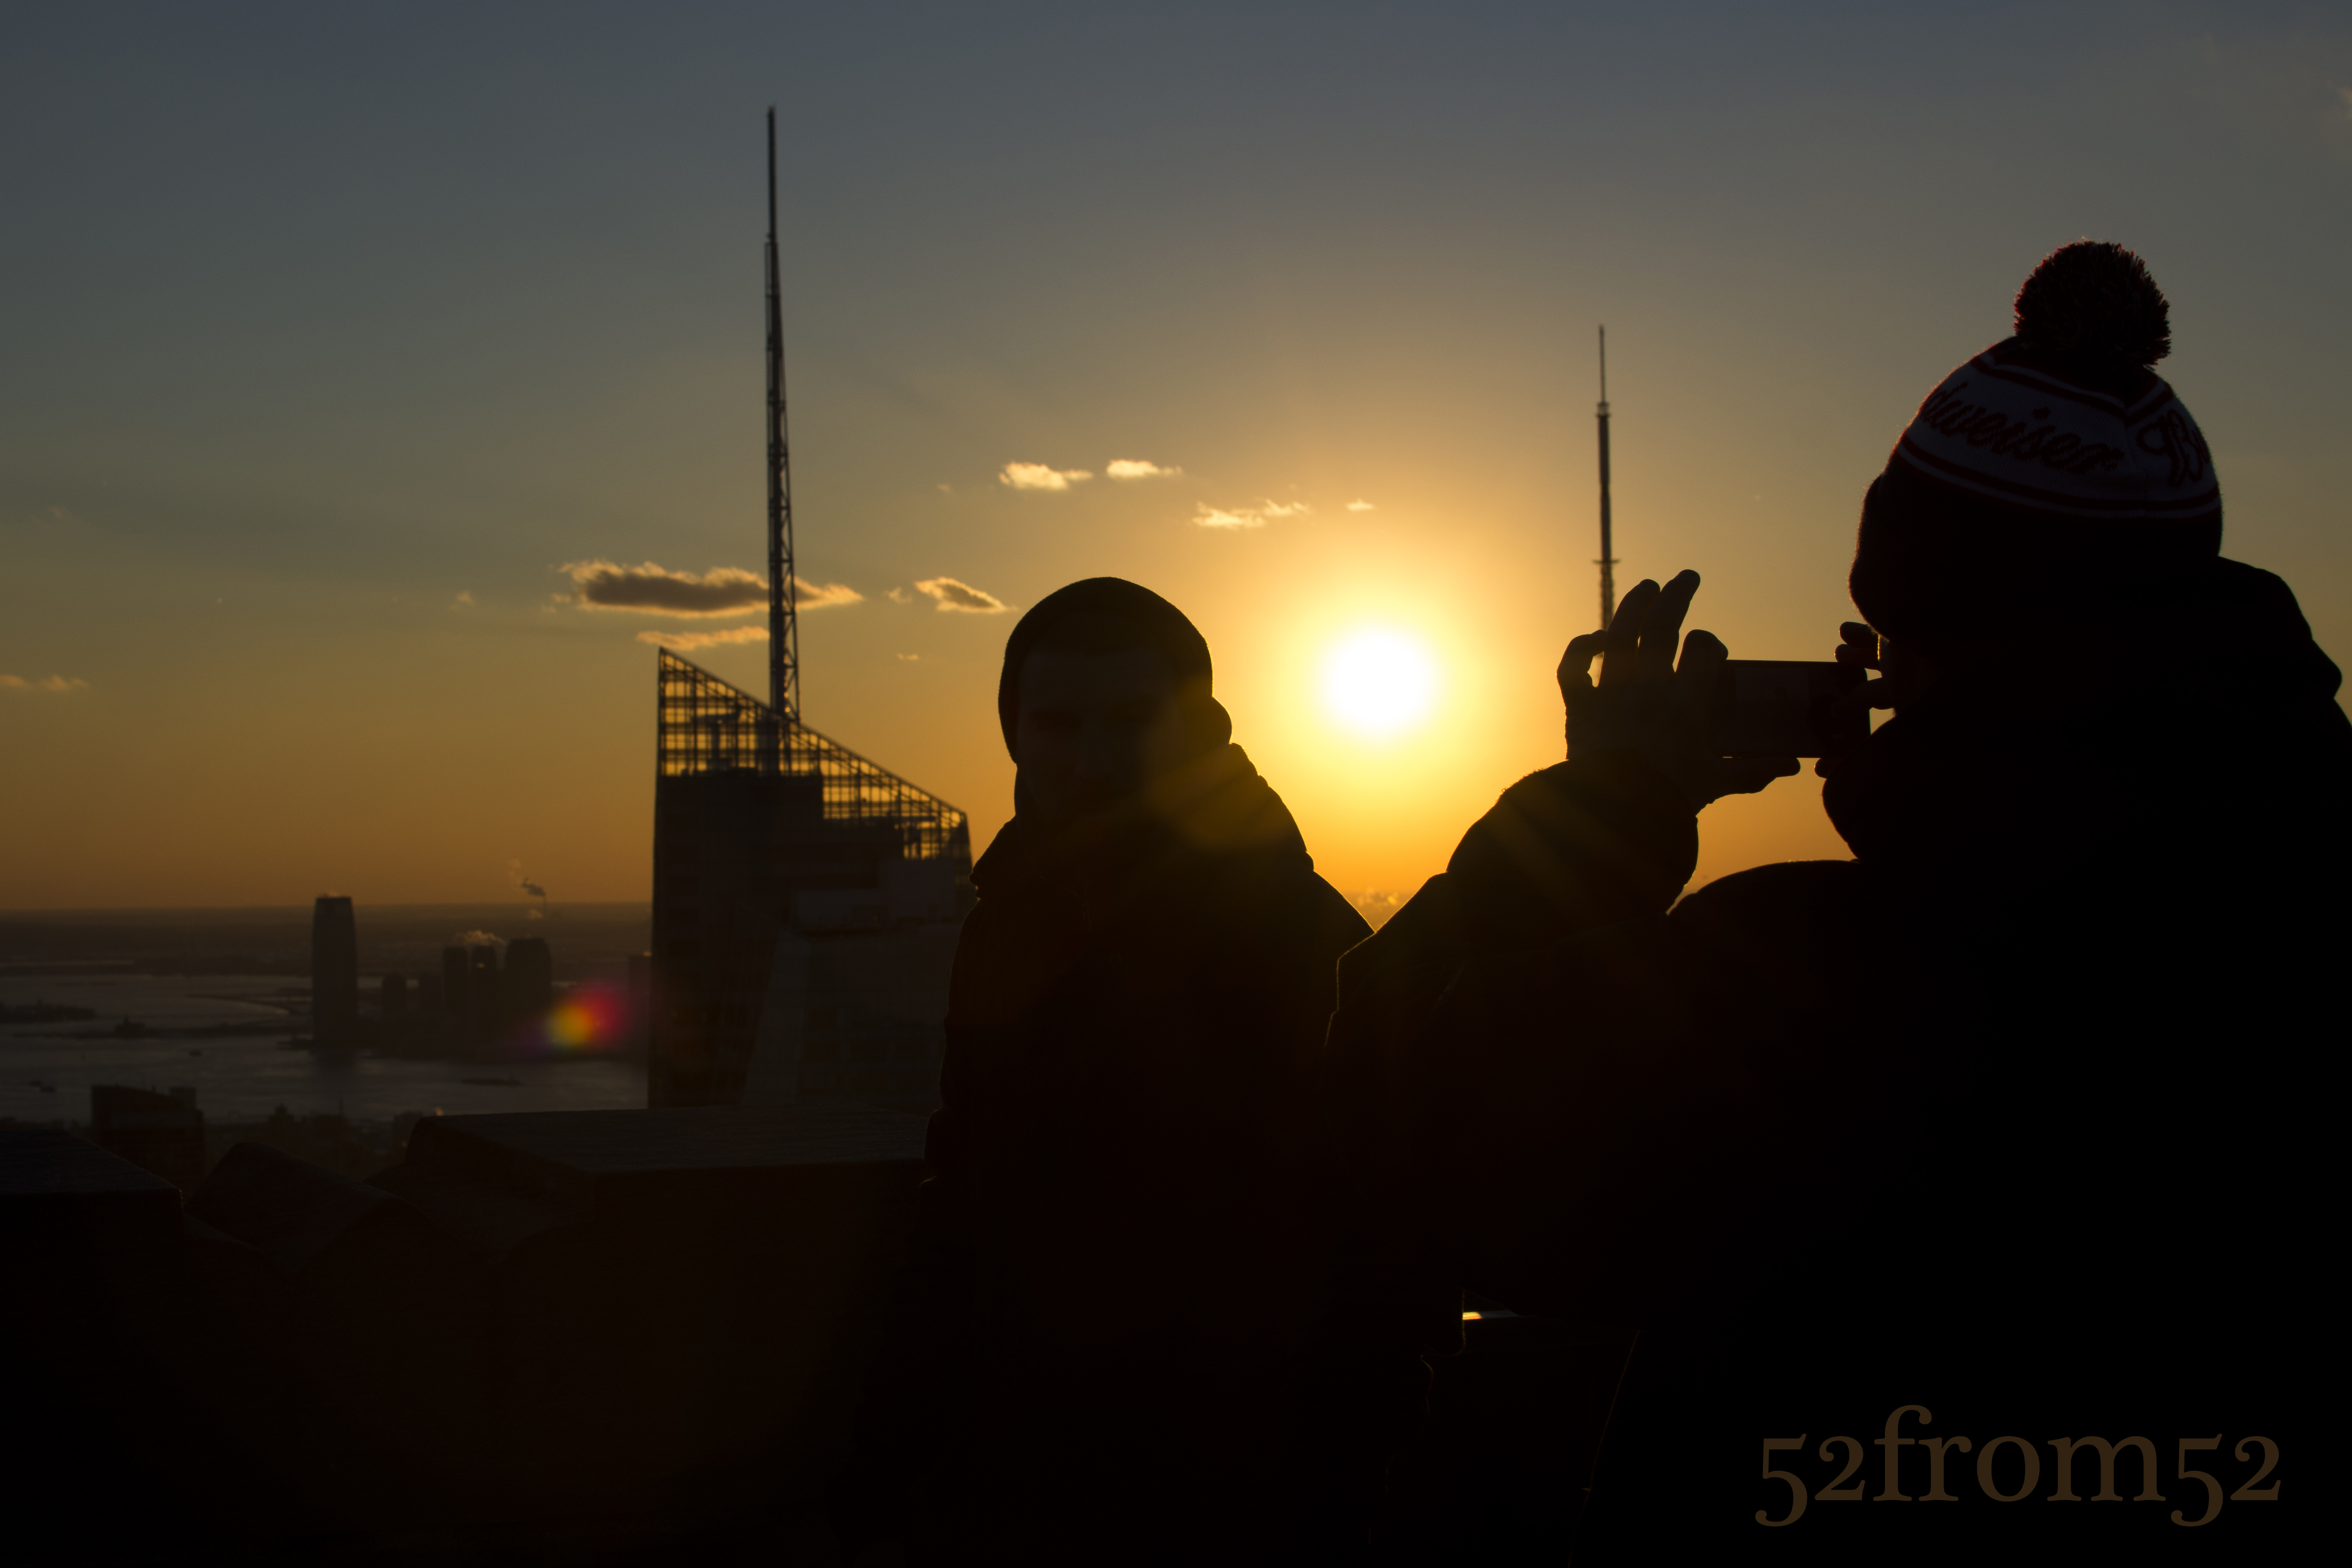
Week 19 (12/9/2013 – 12/15/2013): Top of the Rock Observation Deck
Picture taken on 12/12/2013 at 5:15 PM
Picture description:
This week I finally got the chance to make a return visit to Top of the Rock. My first visit was six months ago and was only two weeks after I purchased my Nikon. Since my last visit I’ve often looked back at the pictures I took and thought about the many things that I could have done better. I’ve learned many lessons over the past six months, in part because of this blog but also because I’ve immersed myself in photography. Articles, YouTube tutorials and experimenting with different techniques have been my main sources for learning. One other source of learning that might surprise you is instagram. I often flip through different hashtags looking for ideas of what to shoot or to see how people photograph certain subjects or places. Instagram has photographers of every level ranging from the professional to amateur, and or dare I say serial selfie taker. Before and after my trip I looked through the hashtag #topoftherock to see the kind of pictures people took during their visit. Besides the selfies and couple pictures I noticed that nearly all of the pictures looked identical with the exception of changes to the sky or filter the person used on the picture. After seeing how people have been over-sharing the same picture I knew that I had to find some way to differentiate mine from the rest.
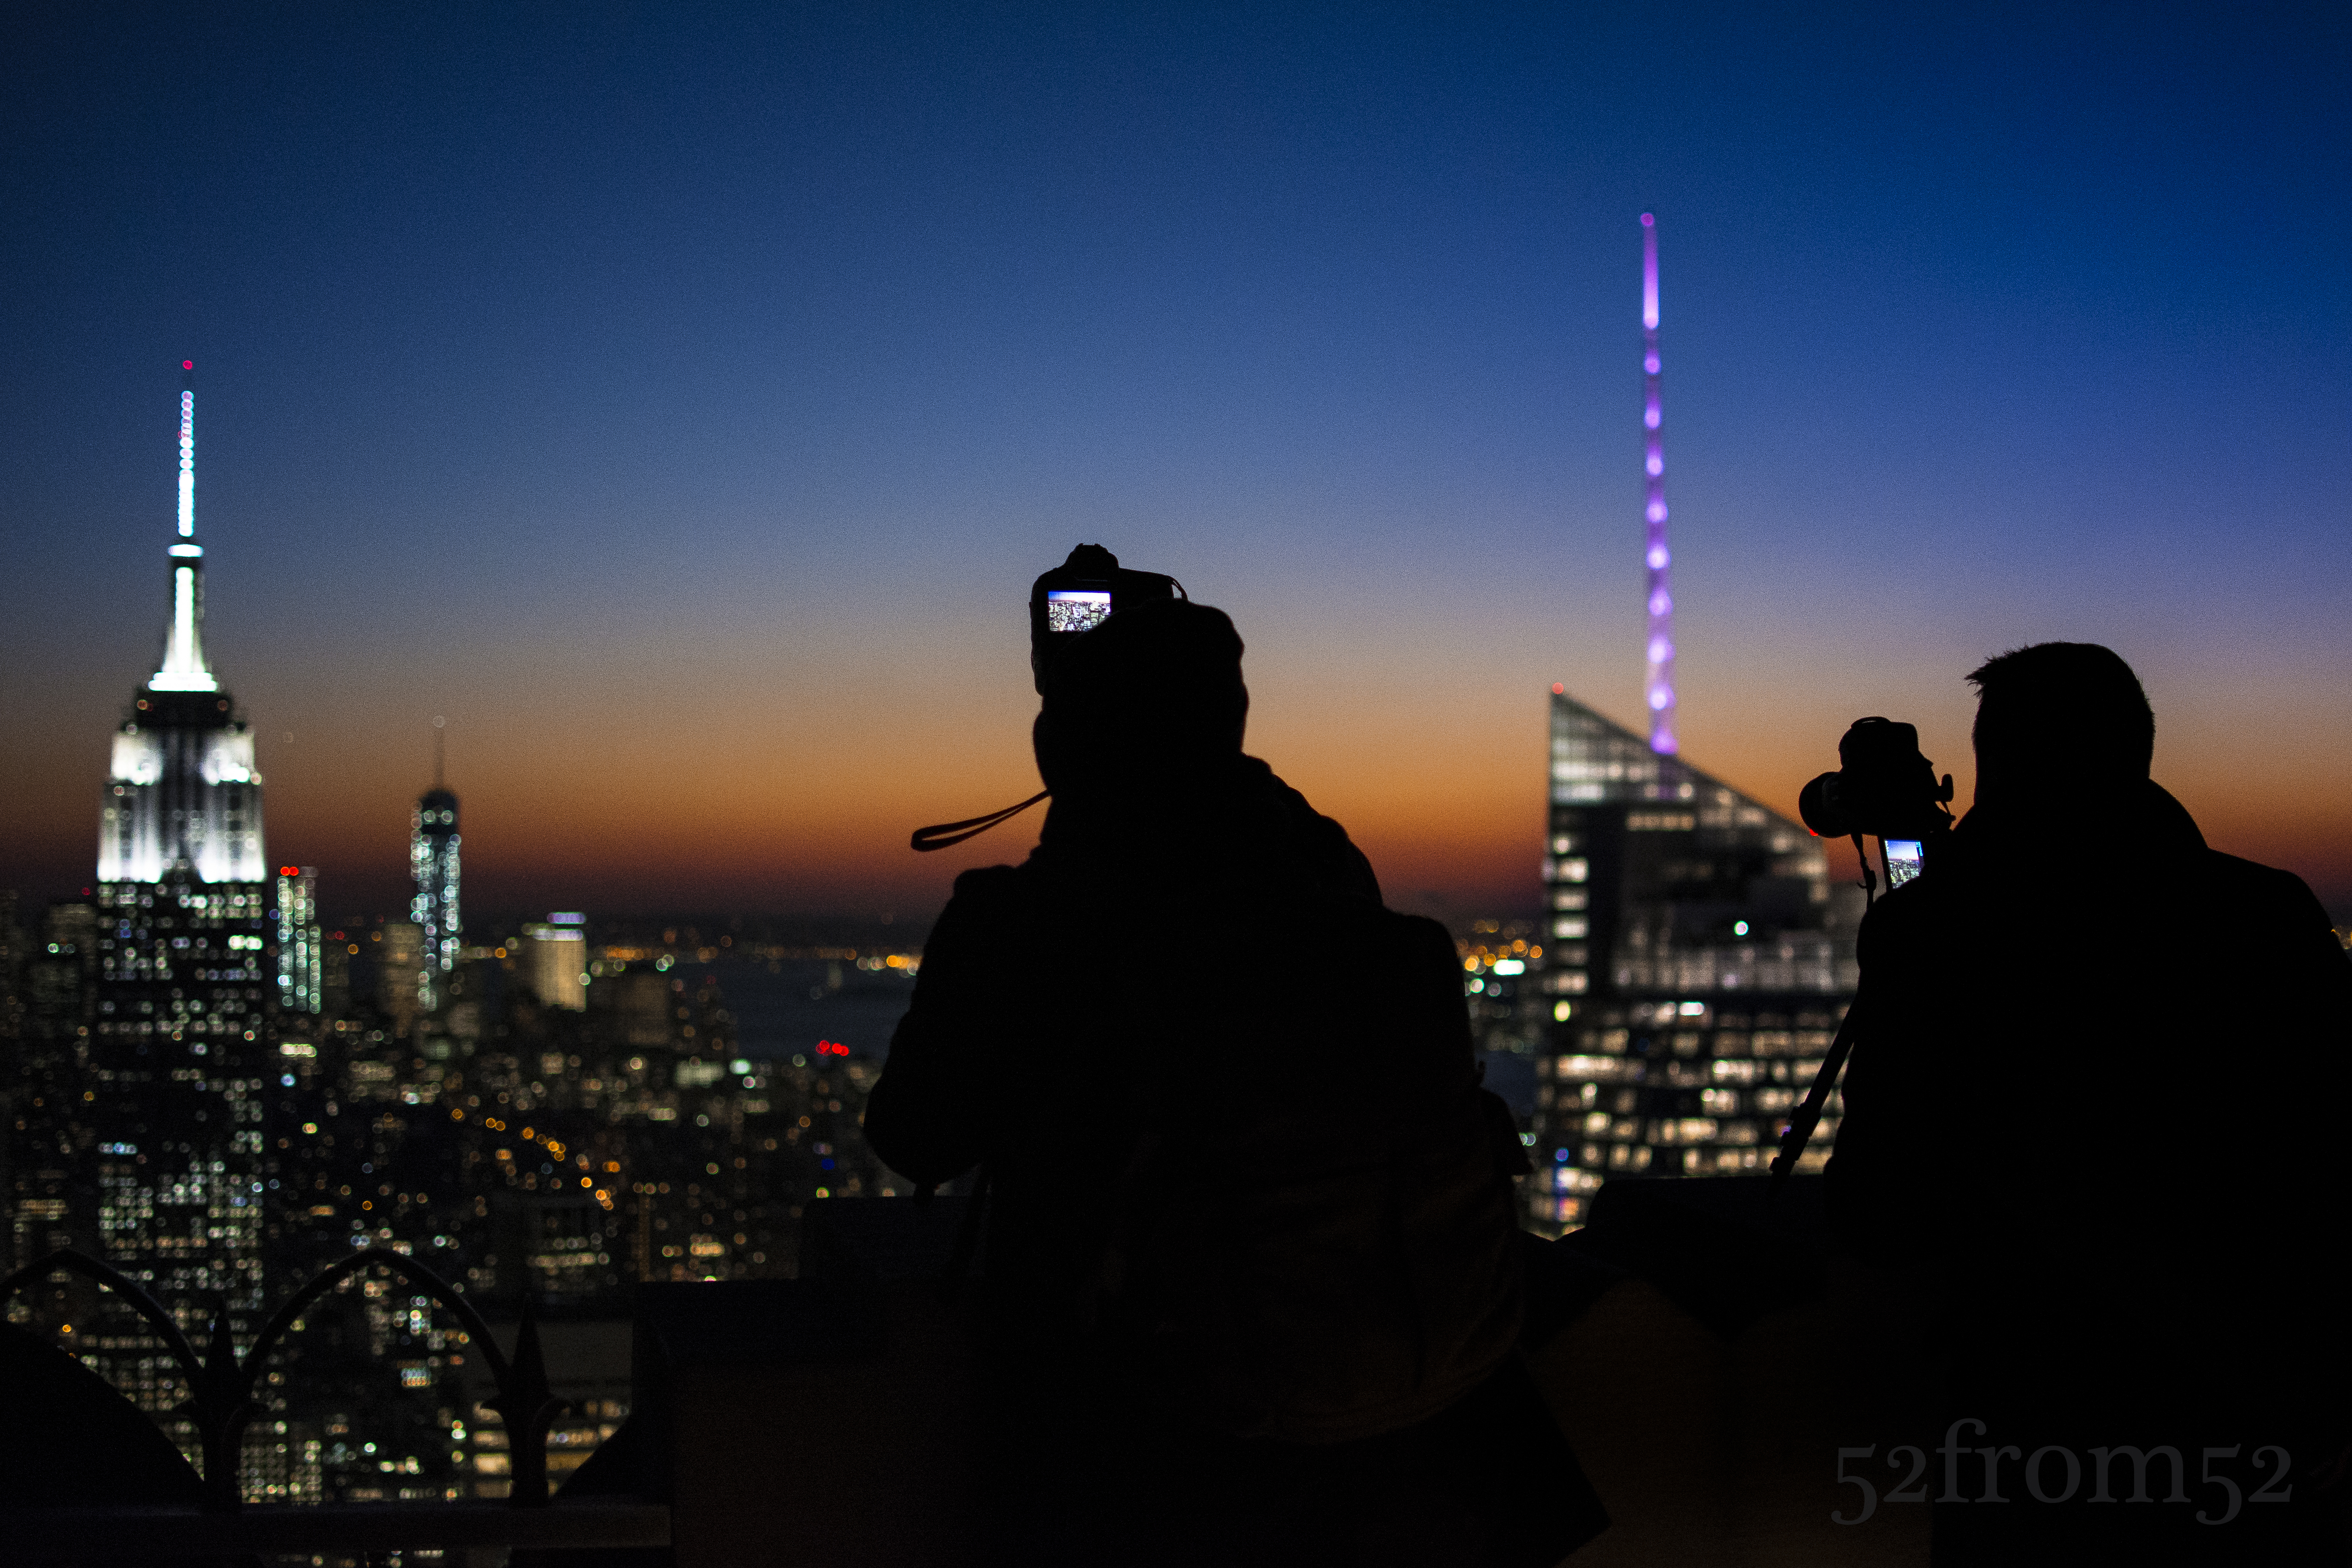
During my visit even though my goal was to take an original picture, I couldn’t help myself from taking the classic Top of the Rock picture. I found myself taking the same kind of picture over and over again partially to make sure I got a good one, but also because in person it’s just that hypnotizing of a view. After about an hour of scanning the horizon for a unique view I came to the conclusion that from my vantage point there really was none. It didn’t matter where I aligned the buildings, I had already seen that picture, or one very similar, shared countless times. At that moment I decided to take a step back from my coveted position to see what new perspectives I could find. Within a matter of seconds I was rewarded for my decision. After stepping back I saw that all the people taking pictures were casting silhouettes in front of the very same view I was just photographing. I spent the next couple of minutes wading in and out of the crowd to try and get the a picture that met my satisfaction. Eventually the 20 degree weather got the best of me and I decided to call it a night. On my way home while thinking about my night, I realized the valuable lesson that I just learned. It’s very easy to get drawn into taking the obvious picture. The only way my photography is going to continue to improve or “move forward” is if I regularly remind myself to take a “step back” and find a new perspective on what’s right in front of me.
Photography Concepts:
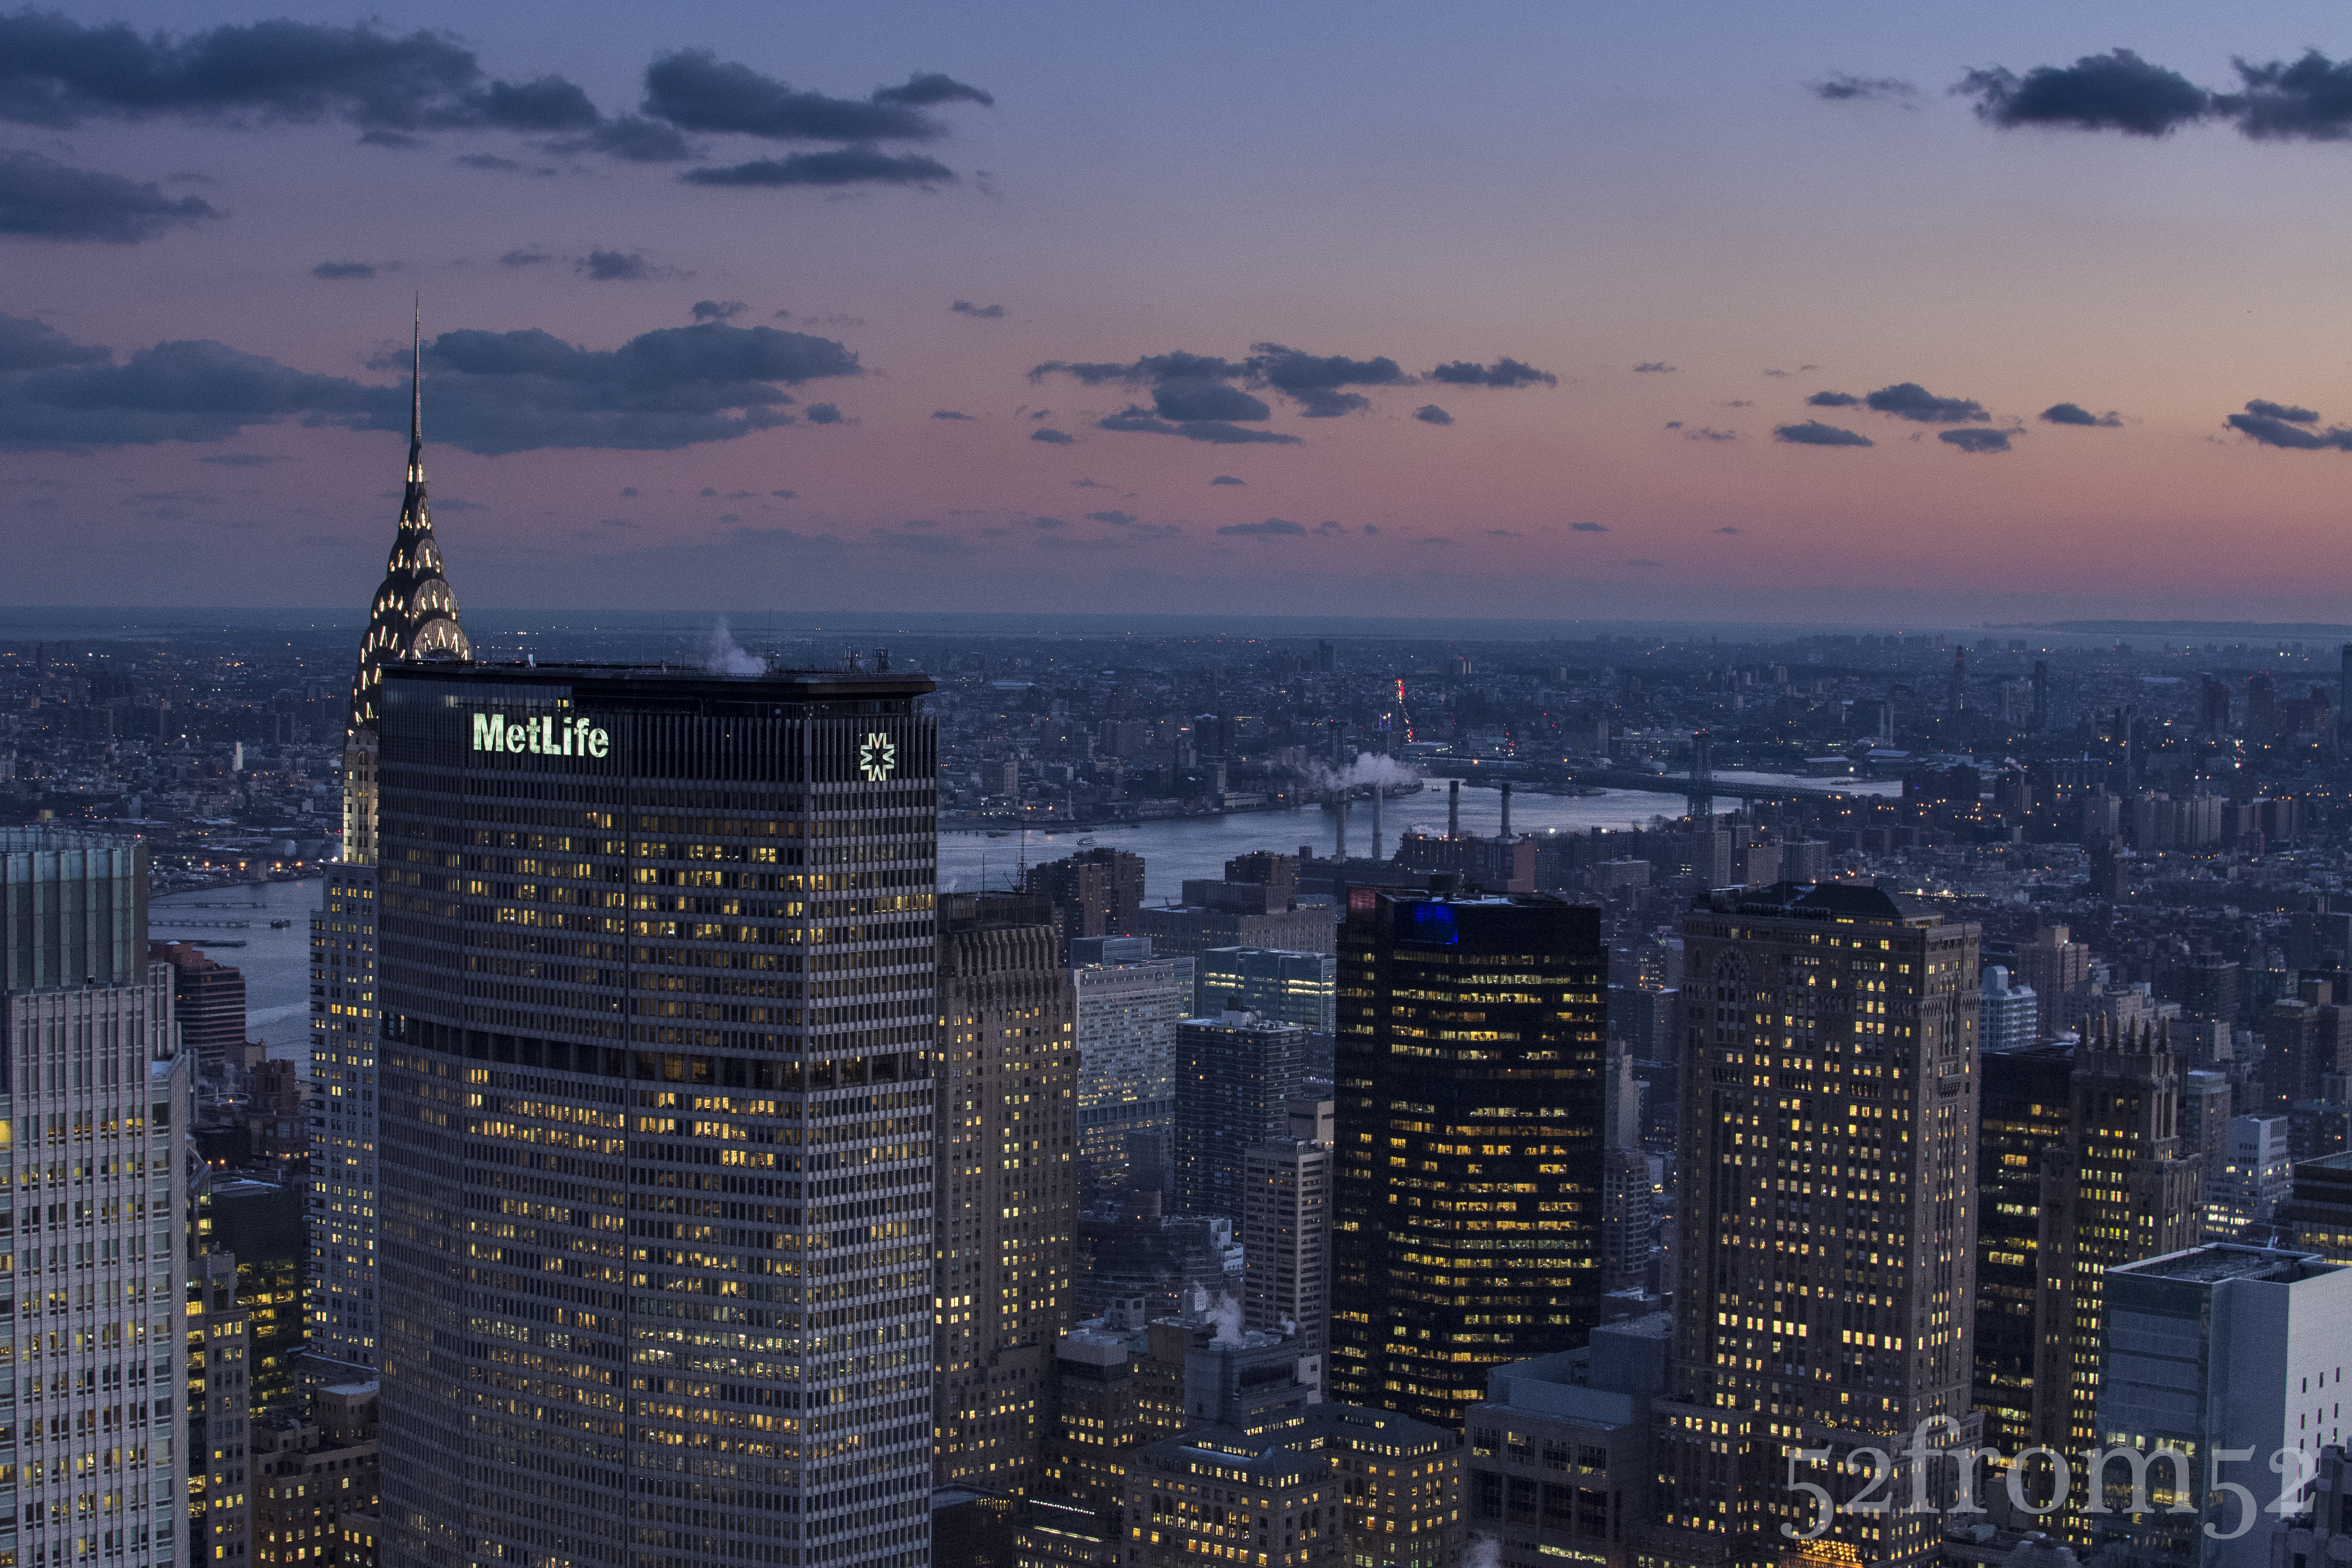
Although I used the previous section to talk about avoiding the obvious shot, it doesn’t mean the classic Top of the Rock pictures aren’t good ones. For the purpose of this blog I wanted to challenge myself to get something unique but it leaves the question, how do you take a good picture at Top of the Rock? As I mentioned earlier I often look back at the pictures I took during my first visit and dwell on what I could have done better. Let me share with you some of the lessons I learned between my two visits in terms of taking pictures at Top of the Rock.
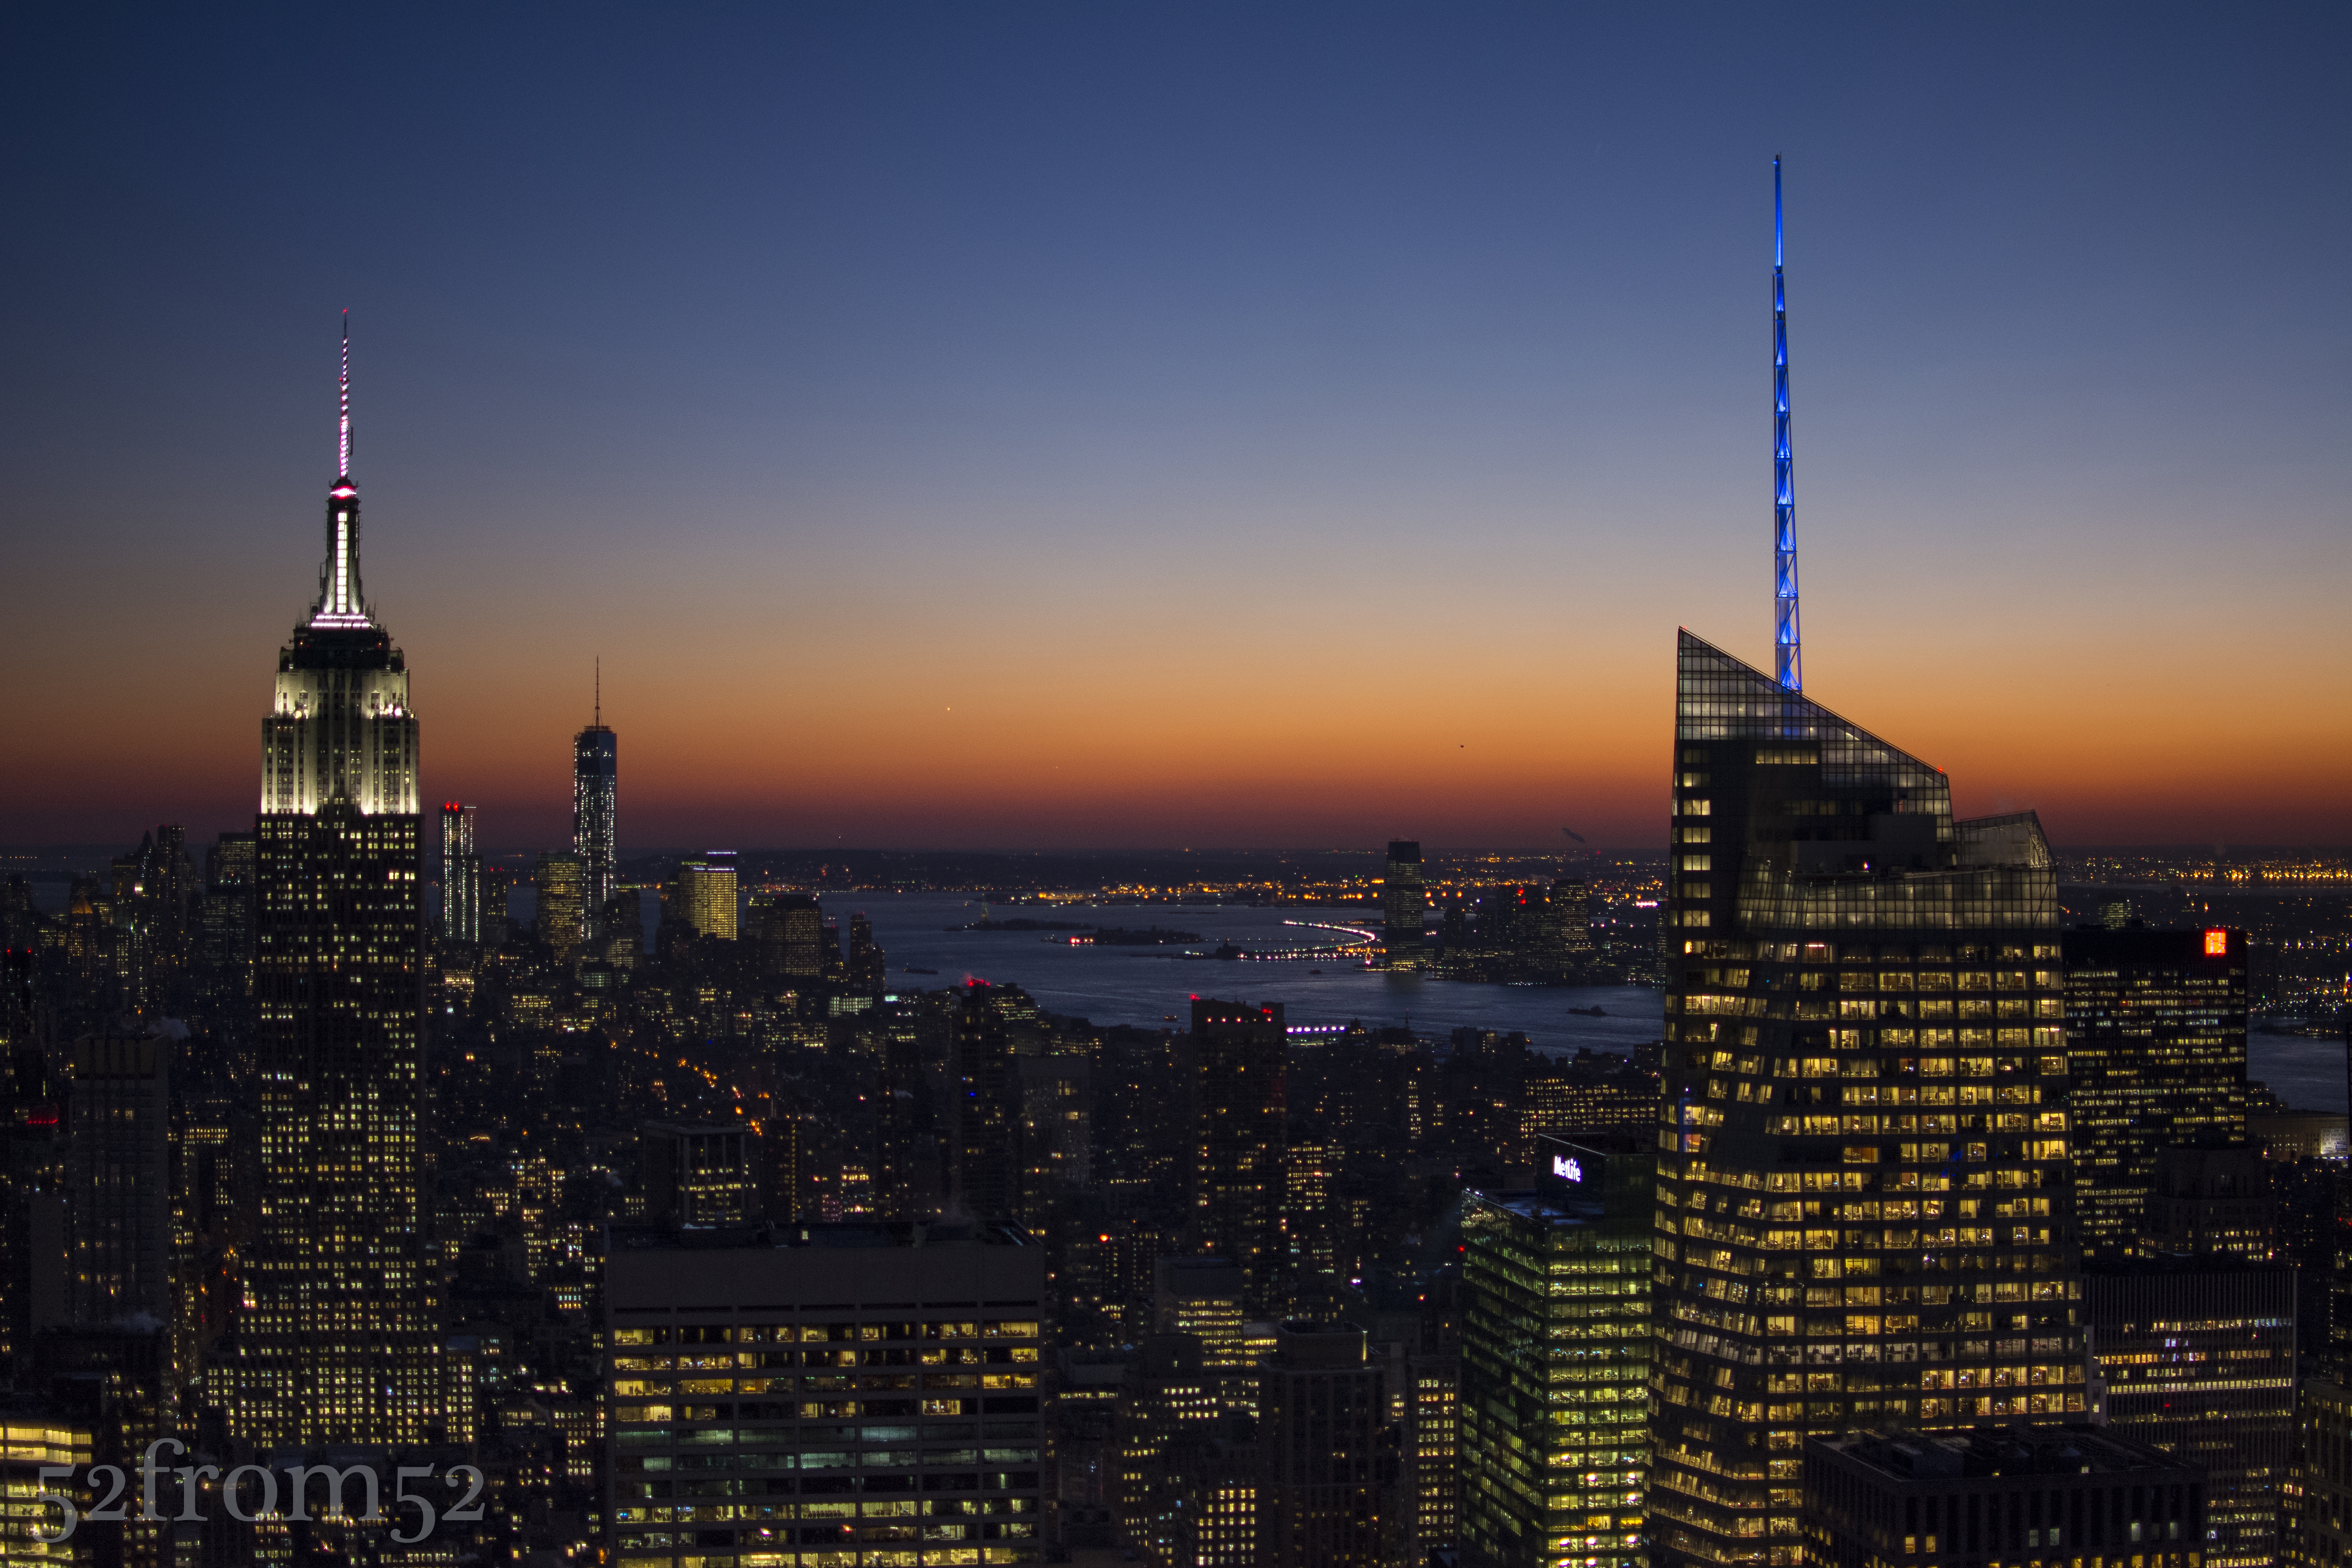
Example of the classic Top of the Rock Pic
The first thing you have to ask yourself is what kind of picture are you looking to take? Do you want take pictures of only the buildings or are you planning on featuring yourself or friends in the picture with the buildings in the background? Knowing your subject is important to so you can determine the time you’re going to go and where you should set up shop once you’re there. Let’s start with talking about taking pictures of people. If you’re taking pictures that will feature yourself or your friends the location is less critical but the time that you arrive is important. In this case you’ll want to go about an hour before sunset this way you have time to take nice pictures in softer light and without flash. In my opinion flash is the worst when taking pictures at Top of the Rock. Unless you’re an absolute pro and know how to compensate correctly flash tends to wash out the city backdrop, which is one of the main reasons you’re at Top of the Rock right? In order to feature the cityscape behind you, don’t use flash, especially if you’re taking pictures on the 68-69th floor behind the glass. Once you find a nice location play around, take pictures of you subjects looking out towards the buildings or doing some forced perspectives (google it). If you want to get more original, take pictures of your subjects from a distance. Perhaps have your subject stand looking out towards the city and snap your picture focusing on them through the busy crowd? As was the theme of this blog, once you take a step back you’ll be surprised what new perspectives you’ll see.
Example of a unique Top of the Rock Picture
What about the settings to use or not use when taking pictures of people, other than flash? One option is to use the smallest aperture your camera will allow which will give you nice background blur and permit you to use a low ISO. The negatives of this is the exposure of your cityscape background might be overexposed. The solution, shoot your picture in such a way that you’ll be able to only edit the background later to correct the overexposure (don’t forget to shoot in RAW to enable this). Option two in terms of aperture would be to use a small aperture which if you took my advice and came close to sunset, is going to force you to use a high ISO. The negatives, you’ll have a grainer photo but the positive is you will have a more detailed cityscape background. If you’re only looking to share this picture on something like instagram a high ISO image is fine. Even with the wide aperture you still might have an issue with overexposure for the background so compose your picture accordingly. The last setting I mention is try to use a focal length of 50mm+, I won’t go into detail about why but if you want to know why check out the video below from one of my favorite YouTube sources.
Now let me talk about what to do if you’re looking to take pictures of the buildings. First, I recommend going to the 70th floor and trying to lock down a position in the center area where you don’t have the bottom floors jutting into your picture. Getting this prime location is even more important if you’re using a wide angle lens. Just like shooting people, I think the best time to take pictures of buildings is right before and during sunset but you can go any time especially if there are nice mid-day clouds. For now I’ll talk about what to do at sunset. Going at sunset or at night really forces your hand in terms of camera settings. Unlike taking pictures of people, when you use a small aperture there aren’t many positives. Your plane of focus is going to be narrow even with the buildings being far away. What’s going to happen is one building might appear in perfect focus while the others are a little blurry. You can still take a good picture using small apertures but if your goal is to get a crisp image that you can blow up on perhaps a canvas, I don’t recommend using small apertures. What are your options then? Option one, you can boost your ISO but this is going to still leave you with the problem of not having a crisp image for enlarging later. Option two, bring a tripod and shoot with a small aperture and slow shutter speed. This seems simple right? Well tripods are not allowed at Top of the Rock but there are ways around this rule. As you can see in this week’s featured picture people bring tripods. The key is to bring one small enough to fit in your bag, and one that has a small leg spread so it can sit on top of the cement pillars. This is also why getting a good location is critical, there are a limited number of cement pillars and or locations that can facilitate the use of a tripod. I’m not going to go into the all settings specific to tripods because if it’s pretty simple, small aperture, low ISO, slow shutter. Two things I will recommend though is use the multiple focus point setting which will grab more buildings in focus, and underexpose your image. One thing not to do, which believe it or not I saw someone do, don’t use flash while you’re shooting buildings on a tripod. Maybe I’m missing something and if I am please comment and correct me, but I don’t see any positive in using flash on a tripod when you’re not taking pictures of motion or people.
ISO 2500, 35mm, f/7.1, 1/40 sec, no tripod
These are some of the lessons/tips I’ve learned from my two trips to Top of the Rock. I still haven’t gotten what I would consider a great classic Top of the Rock picture, but that’s mainly because I haven’t brought a tripod or wide angle lens. I think I’ll take at least one more trip in a few months and try my hand using more than just my 35mm lens and perhaps a tripod. Until then I hope the lessons I’ve learned and shared so far help you shoot some great pictures at Top of the Rock, have fun and remember take a step back!
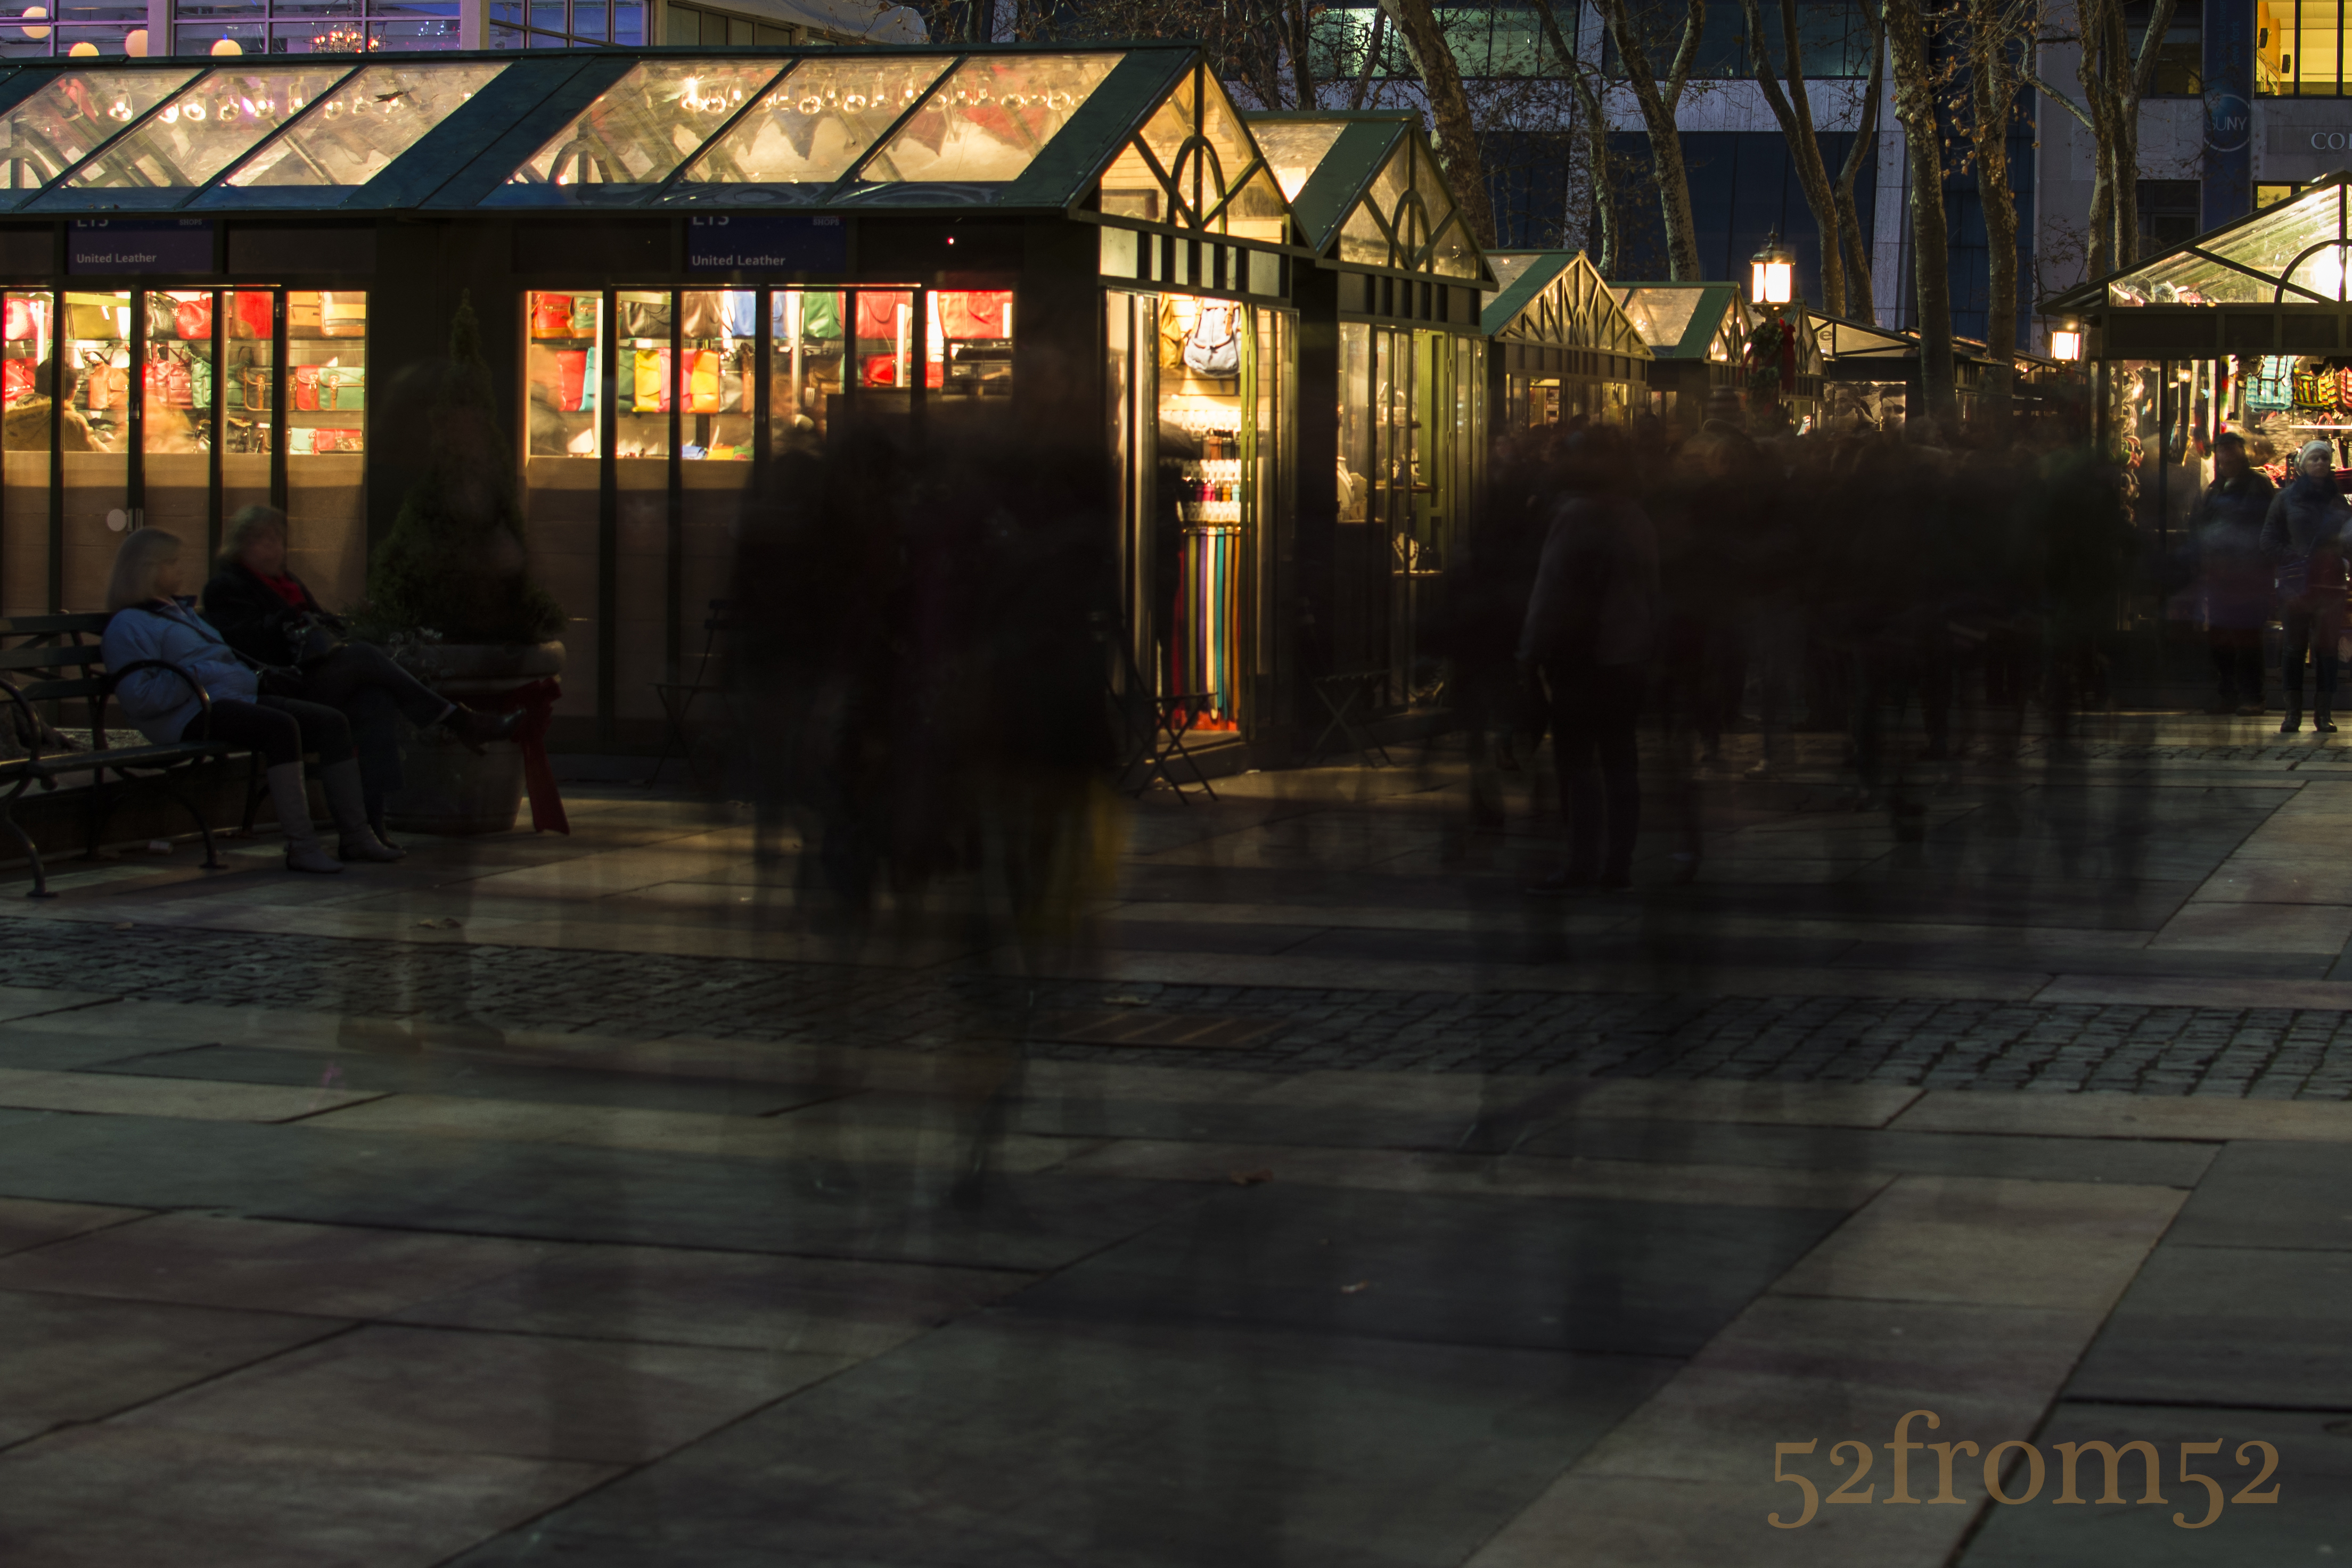
Week 18 (12/2/2013 – 12/8/2013): Bryant Park, New York City
Picture taken on 12/7/2013 at 4:46 PM
Picture description:
It’s hard to top New York City during the Holiday season. Everywhere you turn there are festive window displays, giant Christmas trees and glowing lights filling the night sky. If you’ve been reading my blog from the beginning you might remember my week 2 post, “A Day of Reflection” where I visited Bryant Park. As I said in week 2, Bryant Park is one of my favorite locations in New York City. One of the best things about Bryant Park is how it transforms throughout the year with each season. During the winter months the center grass area turns into an ice skating rink with a beautiful panoramic view of midtown New York. Surrounding the rink is a network of stores in in the form of tiny huts. As you can imagine this winter wonderland attracts visitors from all over. In case you didn’t guess by now Bryant Park is obviously where I got this week’s photo, but before I talk about my time in the park let me tell you how I ended up there.
In the beginning of the week I wasn’t sure what to photograph so I threw out a status on Facebook to get some ideas. One of the suggestions I got was to capture the “hustle and bustle” of holiday shoppers, thanks Laura! After getting this suggestion Bryant Park and its “Winter Village” instantly came to mind. Since I pass the park during my commute to work I stopped in on the way home to scout for a good picture. After briefly walking around I found what I thought would be a great angle for a long exposure. The picture I had in mind would feature the Christmas tree centered between the store huts and shoppers in the foreground. The reason I had a long exposure in mind was so I could get all of the shoppers in the foreground to blur as they moved around. With my picture planned there were only two more questions I needed answered, could I use a tripod in the park, and could I fit everything in the frame of my 35mm lens? I got one of my questions answered the next day after emailing the company that manages Bryant Park. The tripod was permitted; I just couldn’t use it on the ice, too bad right? The last question wouldn’t be answered until I got on location with my camera.
This brings me to the day of the picture. Let me give you some advice, if you’re ever in New York City during December; don’t walk up 42nd street unless you want the full tourist experience. I usually avoid 42nd street but for some reason I decided to take it after getting out of port authority, bad move! I literally felt like I was an extra in the Walking Dead. The streets were so packed that you couldn’t move any faster than at a zombie pace. I fought through the crowd thinking it’s okay I’ll have space once I get to the park, wrong. When I finally got to the park I was greeted with an even larger crowd than was on 42nd street. I knew this might be a problem for my picture but I remained optimistic until I got to my spot. Once I fought my way to my planned location it was time to answer my last question, will everything fit in frame…and the answer was no. As you can imagine this was very disappointing, but I couldn’t give up so I starting thinking how I could still get this picture but from another angle? I started walking around, and then while I was standing in front of the tree it hit me. Just like in my last visit to Bryant Park, why not use a reflection to capture my subject? Look closely at the Christmas ball and you’ll see the reverse angle of my original picture. Now it’s your turn, try to capture a creative reflection shot! When you do use the hashtag #52from52_wk18 and post it on Instagram.
Photography Concepts:
There wasn’t really anything tricky about capturing this picture from a photography technique standpoint. This week’s picture was made mostly via creativity which is less of a concept and more of an attribute that each individual photographer possesses. This is why I threw out the challenge for people to take their own reflection shots, I’d like to see them and see how your creativity is displayed. All that being said even though this week’s picture wasn’t too technical I can still briefly talk about the picture I was originally going to take and some of the lessons I learned.
Original Picture Idea
Above is picture from the position I originally planned to take a this week’s photograph from. As you can see it took a portrait composition to capture the tree and the crowd in one frame. I could have taken two pictures and stitched them together via photoshop (definitely a future blog subject) but I didn’t know if that would work well with a long exposure. I also could have tried to get my long exposure from this portrait composition but I wasn’t happy with the way the stores were getting cut off. There was also one more issue with my long exposure idea that I didn’t learn until after the fact. Dealing with a crowd of this density doesn’t really provide the look I was going for when using a long exposure. Of the pictures I did take via long exposure, I learned that at 30 seconds the crowd disappeared and just blotched out the area they were standing in. Even when I took shorter exposures (4-10 seconds) the crowd’s density still didn’t allow you to clearly see these were people I was photographing. Below is an example of a 5 second exposure . This concept of using long exposures to capture the movement of people is something I’m going to experiment with more in the future so stay tuned.
Picture info: ISO 100, 35mm, f/9, 30sec, 0.6 neutral density filter, -2 exposure stops
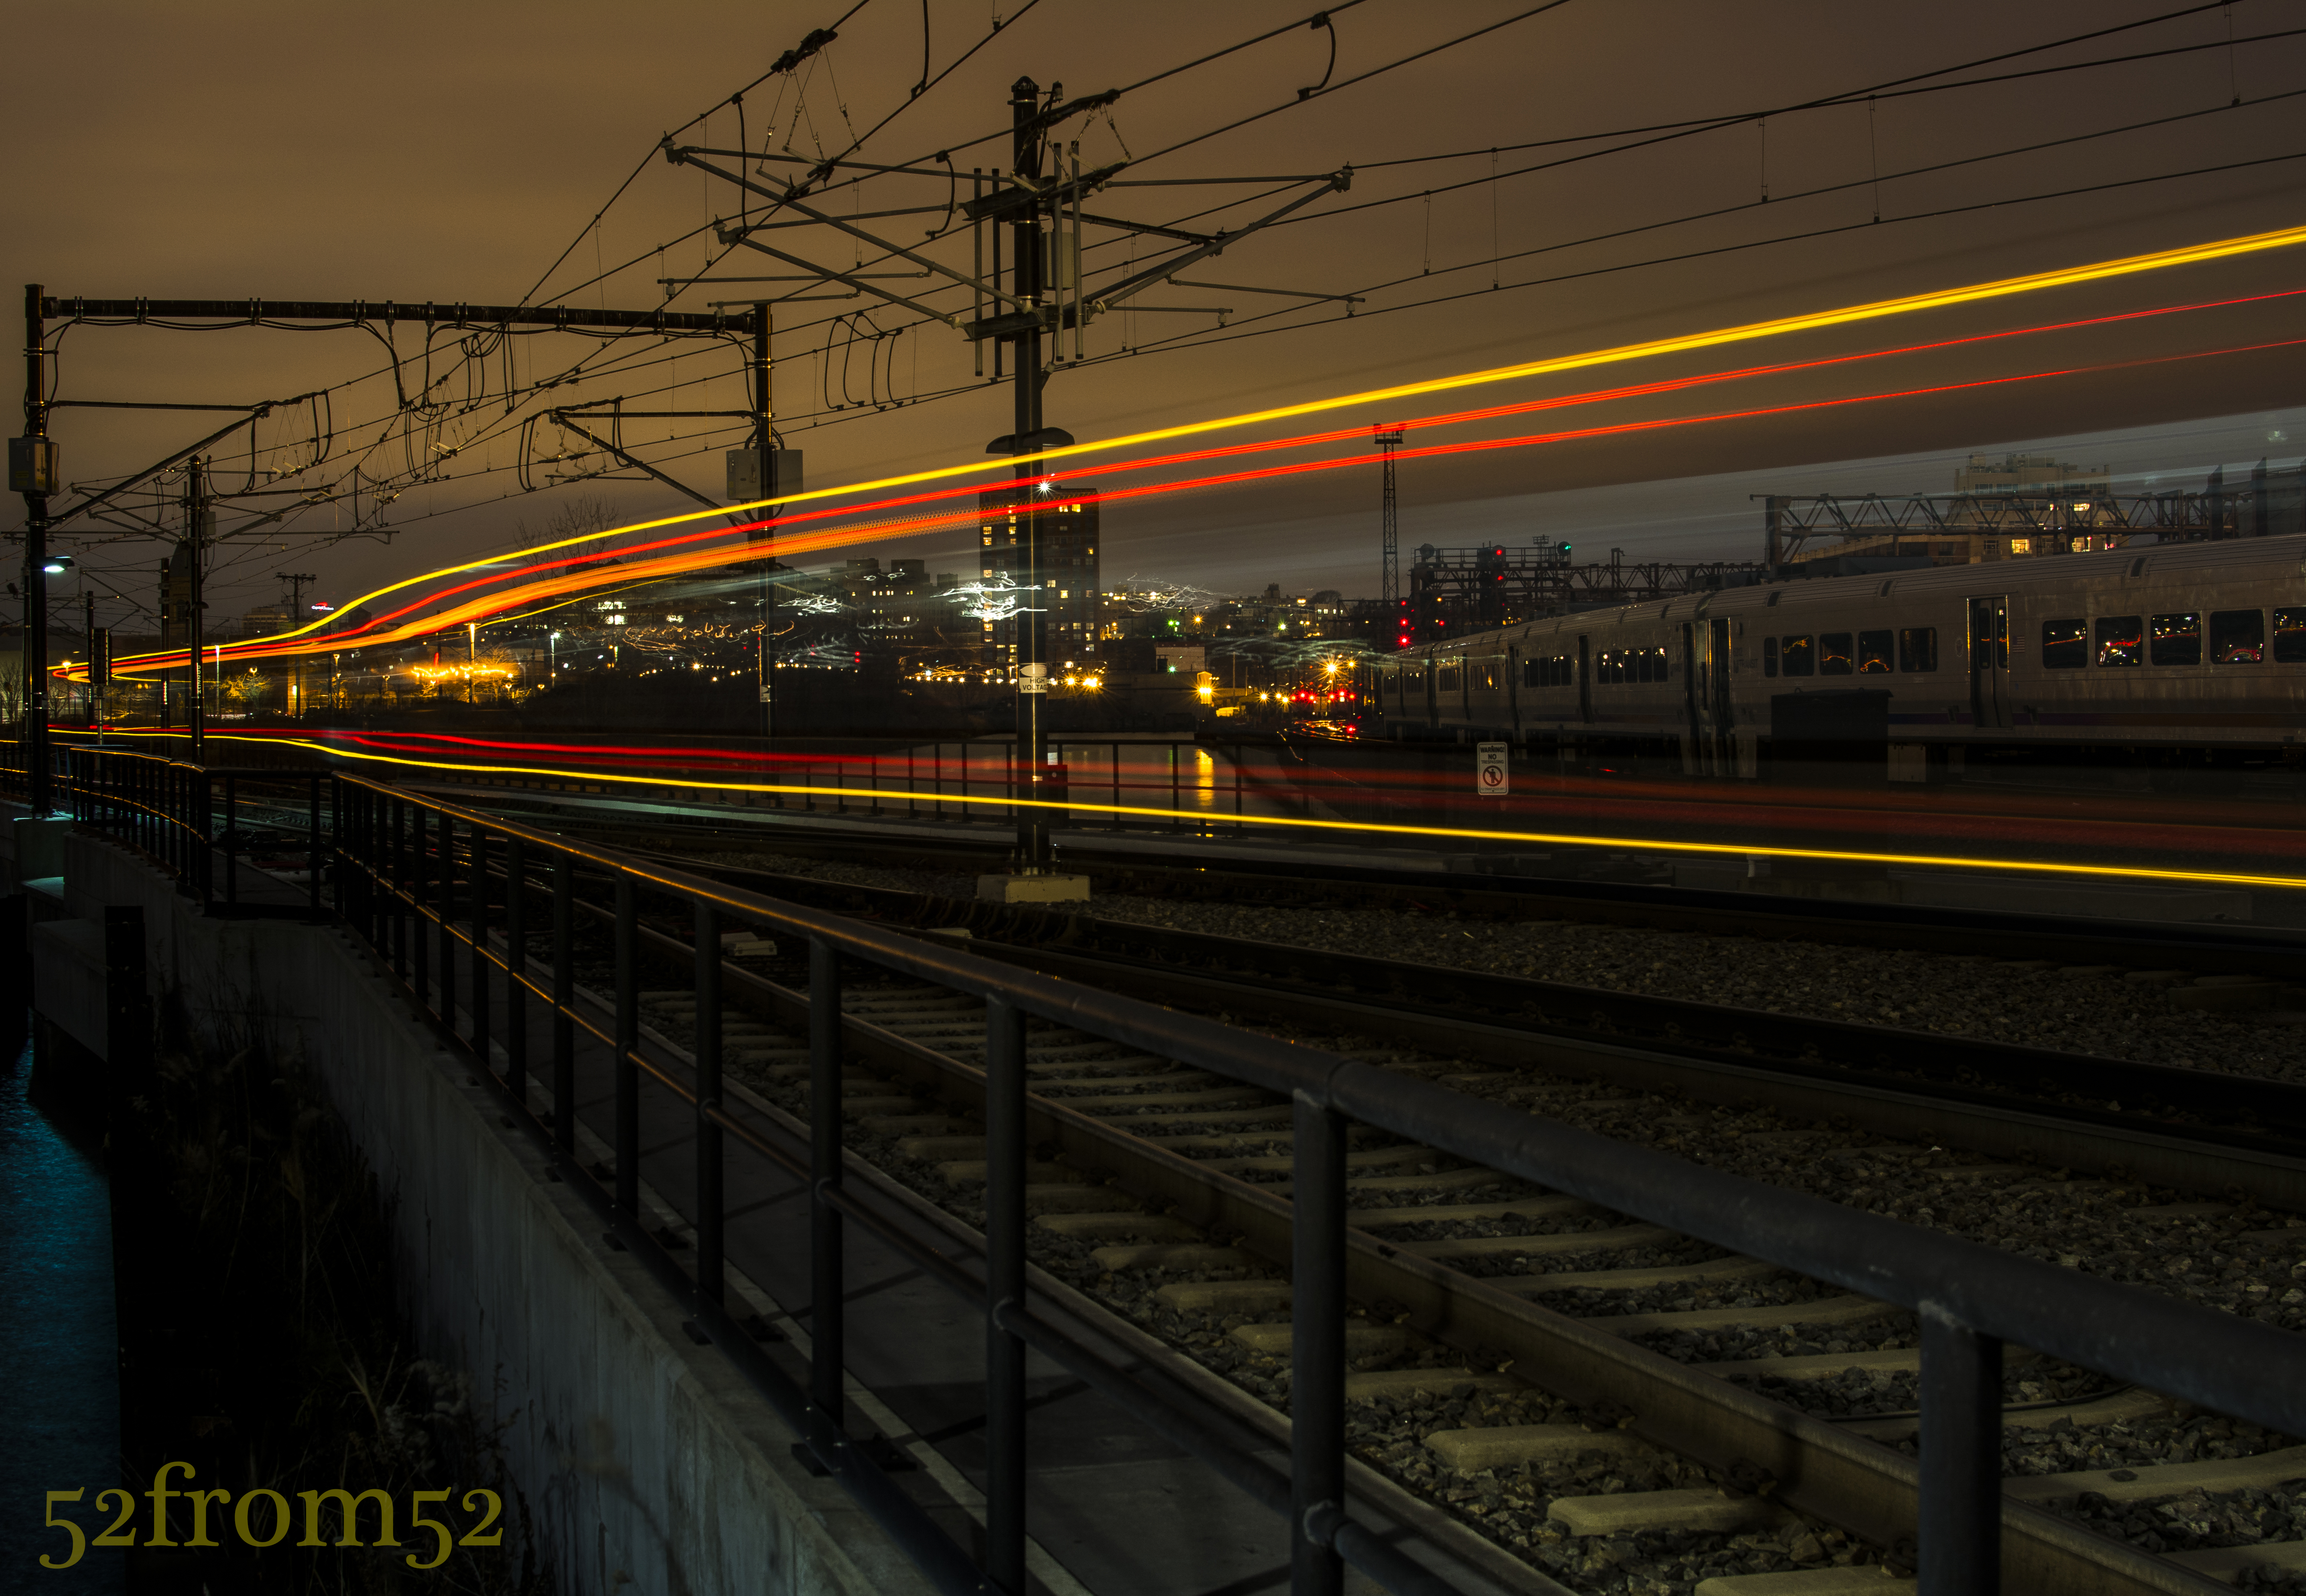
Week 17 (11/25/2013 – 12/1/2013): Hoboken Light Rail Station
Picture taken on 11/30/2013 at 5:12 PM
Picture description:
Opportunities come and go, and sometimes you only have one shot to take advantage of them. That was absolutely the case for my week 17 picture. This week I picked up some neutral density filters (I’ll explain what these are in the concepts section) which I wanted to experiment with. Coming into the week my goal was to venture into the city to get some kind of street shot/long exposure. When it came time to go out and shoot on Saturday I was a bit demotivated due to two things. First it was really cold outside, and the second reason was because of the conflicting online posts about wether or not it’s okay to use a tripod in New York City. Since I wasn’t in the mood to argue my way out of a ticket I decided to play it safe and set out for an area in Hoboken that I have been meaning to photograph for a while.
The location I chose for this week’s shoot was a walkway between the Hoboken train station and Newport, Jersey City. I’ve seen some really nice pictures on Flickr that were taken from this seemingly hidden location. Many of the pictures featured old dock posts of a broken down pier with either the Jersey City or New York city skylines in the background. With a couple clear pictures in mind I set up my tripod and started taking some long exposures.
After spending about 2 hours taking long exposures and chasing lots of seagulls I decided to call it a night. As I started to pack up my gear I spotted a potential picture which would feature the light-rail train as it left the station. I figured why not give it a shot? I quickly set up my tripod on the edge of the tracks in preparation for the next train. The trains were coming about every 30 minutes, so unless I wanted to wait out in the cold for the next one, I’d have only one shot at capturing a good picture. From the distance I heard the bell sound announcing the train’s pending departure, I quickly clicked my camera’s shutter release, sat back and watched as the light-rail moved in and out of the frame. After what seemed like an eternity, but really was only 30 seconds, my camera finished taking the picture and I eagerly awaited seeing what it captured. Once the preview came up on the screen I immediately knew this was the picture I had to feature in this week’s post.
Photography concepts:
This is the second “long exposure” post that I’ve done, the first being my week 6 picture “Night Light.” Since week 6 I’ve learned some new tricks for taking and editing long exposure pictures. As I am becoming better from past lessons, I’m able to add more moving parts and that’s what spurred on this week’s experiment with neutral density filters.
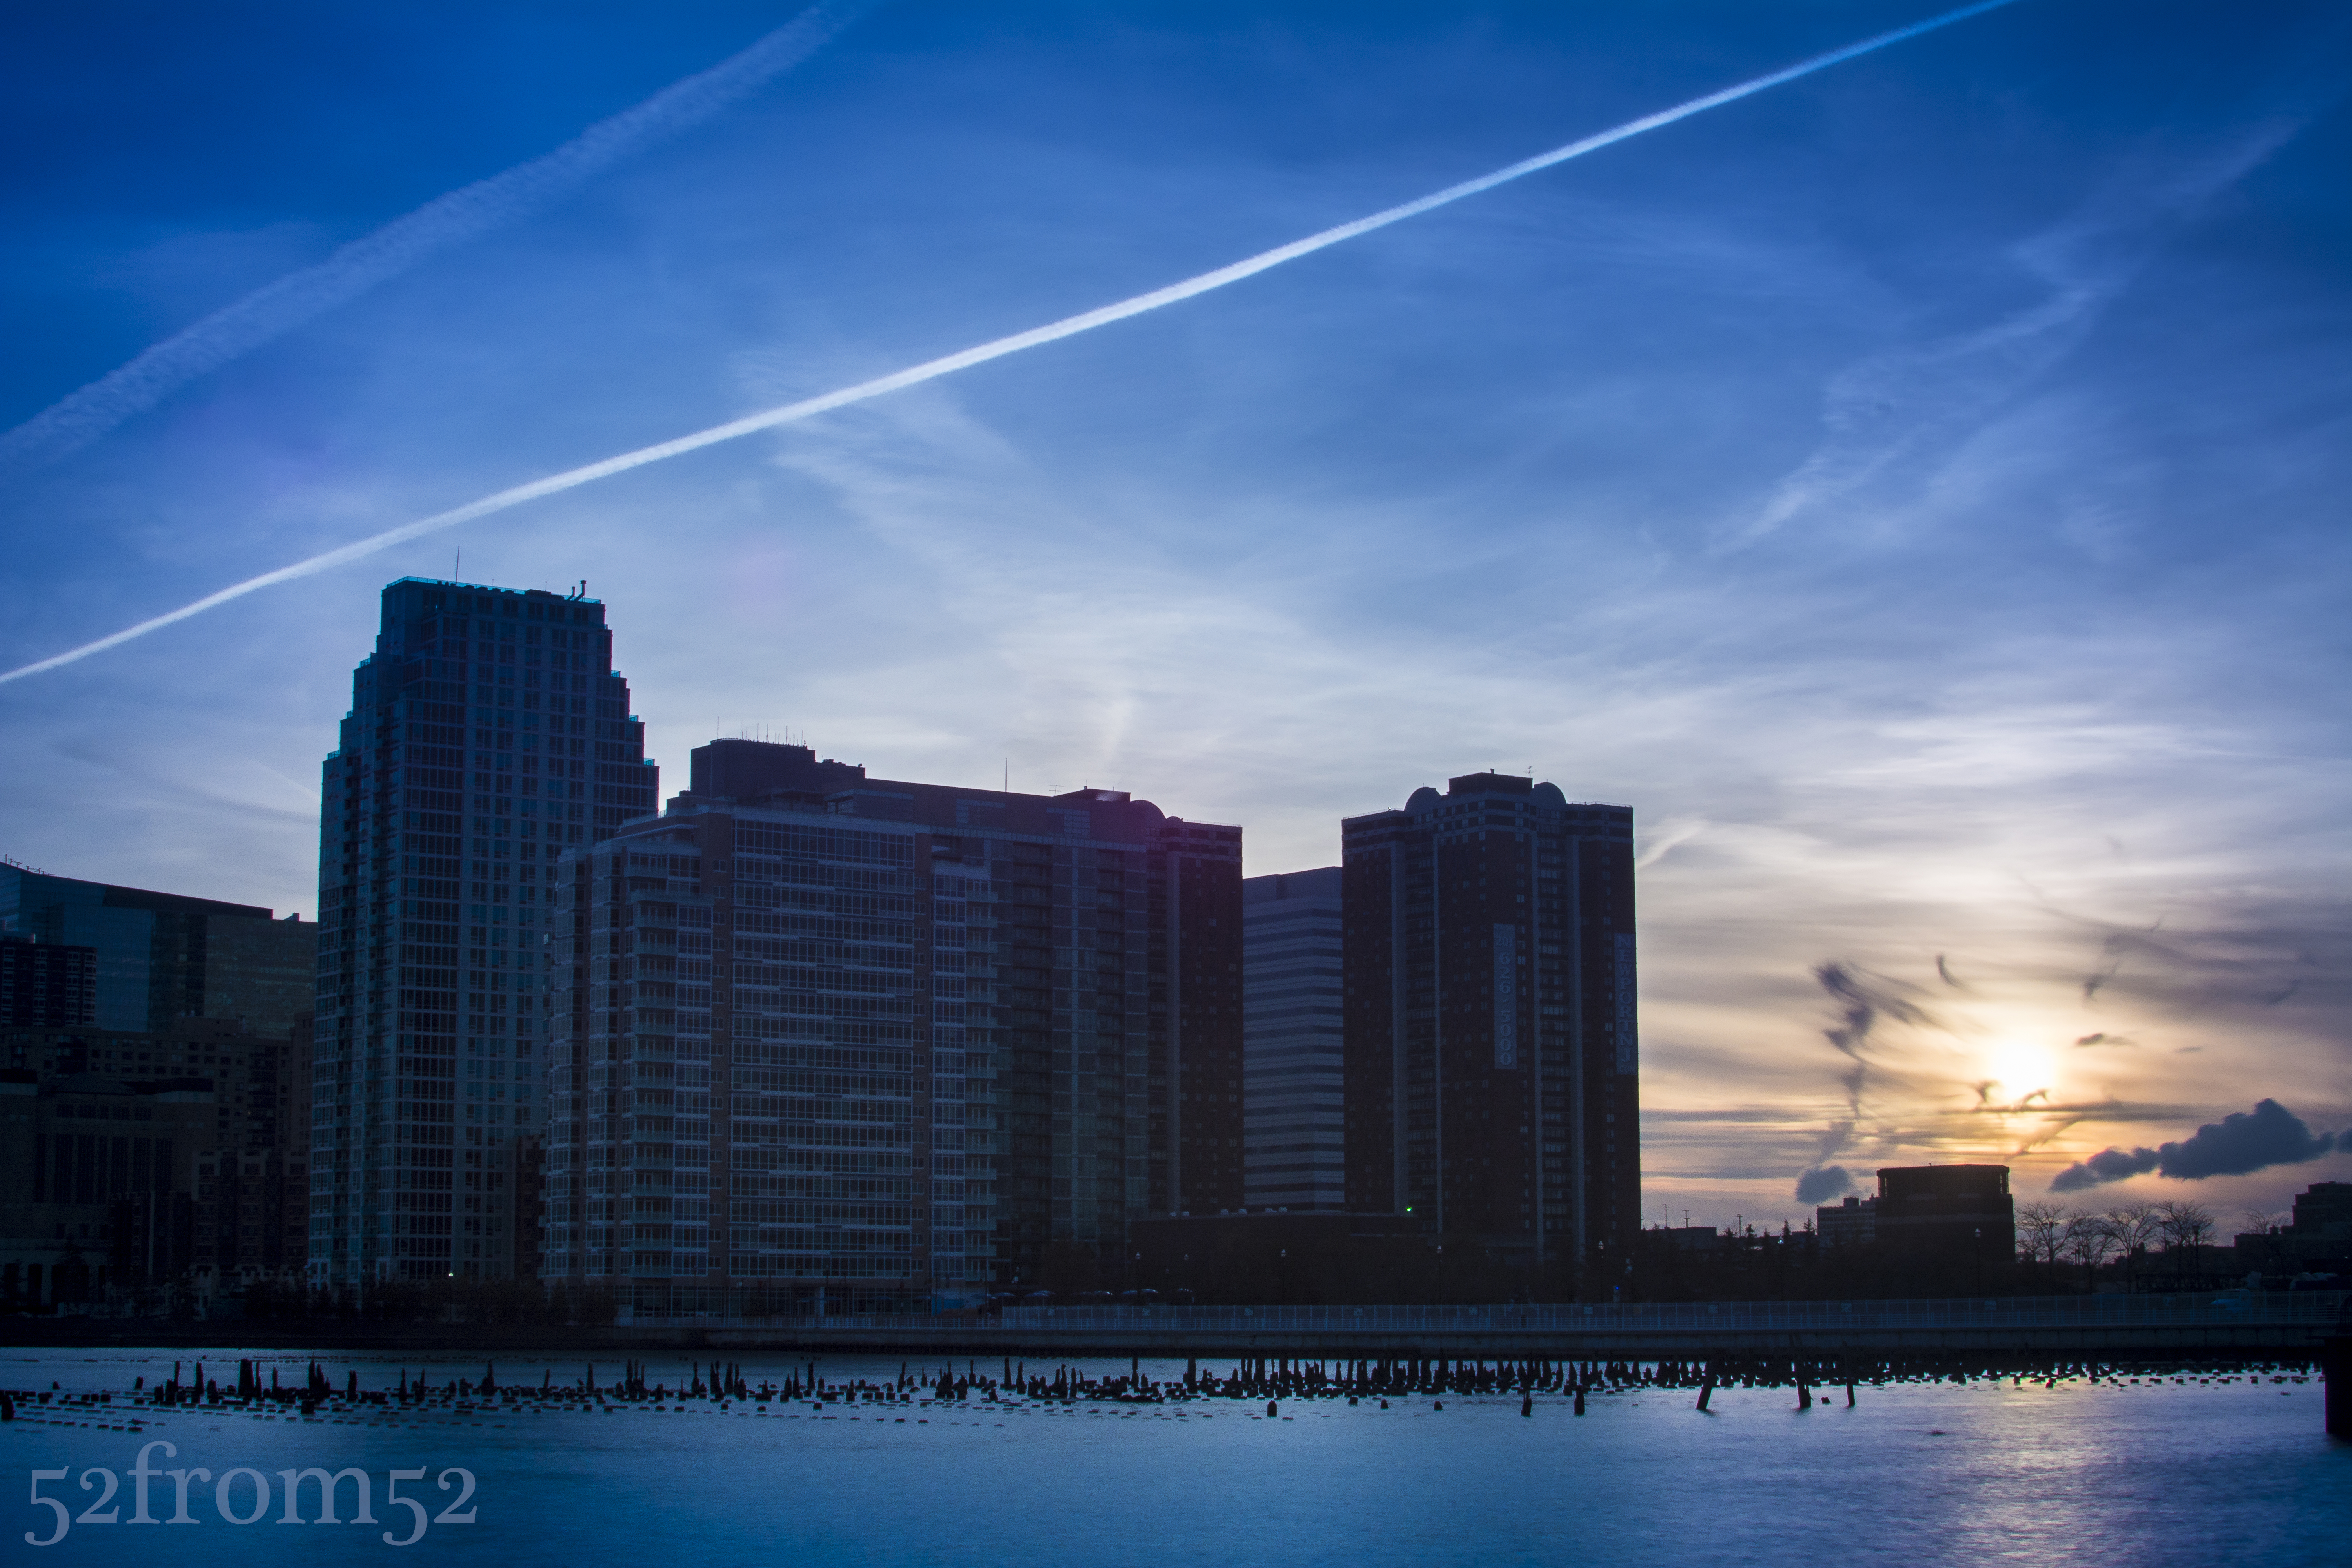
Neutral density filters, commonly called ND filters are pieces of glass that come in many shapes and sizes but ultimately block light from hitting your camera’s sensor. As I mentioned in this weeks description, my goal for the week was to get a long exposure but you don’t need an ND filter to do this. Although ND filter’s are not required for all long exposures, they are if you want to take a long exposure during the day or anytime there are bright light sources. With the use of ND filters you’re able to use settings that would usually not be feasible in certain conditions or due to other selected camera settings such as wide apertures. Usually when you use slow shutter speeds (20-30 second) you have to shrink your aperture to f/13-f/20 to limit the amount of light. f/13 isn’t bad but once you start approaching f/20 pictures lose their crispness, this is where the ND filters come in handy. Take the below picture for example. The sun was setting behind the buildings and flooding my camera’s sensor with light. Given the amount of light, and having already maxed out at the smallest aperture my lens can shoot with (f/20), I would usually only be able to use a fast shutter. With the use of the ND filters I was able to shoot with a 4 second shutter speed. For the below picture I used a combination of ND filters which totaled out at a 2.7 density rating, which is equivalent to -9 exposure stops.
Now you’re probably asking why would you want to do a long exposure for a picture such as this, and what are the effects? One reason/effect is the smooth and very reflective water. Notice how the water has begun to almost look like ice in the above picture. The smoothing effect is even more prevalent in the below picture where I used a 30 second exposure and a 0.6 ND filter.
All this being said, how did the ND filter help me with this week’s picture? In order for me to capture the train’s full movement from right to left I needed to use a 30 second shutter speed. As mentioned in previous blogs, night pictures look better when under exposed but even with dropping the exposure down 2 stops I still wasn’t able to hit the 30 second shutter speed mark. Add in the fact that once the train passed by my camera’s sensor was going to get a burst of light it was very important to somehow compensate. I didn’t want to shoot with too small of an aperture so here is where the ND filter came in. I used a 0.6 ND filter which is equivalent to -2 exposure stops, this allowed me to maintain a good night exposure, use an aperture of f/9 and hit my 30 second shutter speed. The result of the 30 second exposure was the very vivid light trail that’s featured in this week’s picture. This was my first time experimenting with the ND filters so expect some more pictures and feedback in some coming blogs. For more info on ND filters check out the below link.
Week 6 (9/8/2013 – 9/14/2013): Shipyard Marina, Hoboken NJ
Picture Taken on 9/9/2013 9:11PM
Picture Description
Going into this week my goal was to create a multiple exposure photograph or light trail night picture. As a possible secondary option I bookmarked the possibility of photographing the freedom tower. On Monday night I went out around 6ish to mess around with my new Nikon ML-L3 remote. I was aiming for either a double/triple exposure of the Hoboken ferry or some kind of sunset shot. After messing around for about an hour I went back to my apartment to eat some dinner, review my pictures, and wait until the sun was totally down so I could try for a night picture. Unfortunately after reviewing the pictures on my computer none of them worked out as I planned so I was going to have to go back out for the night shot.
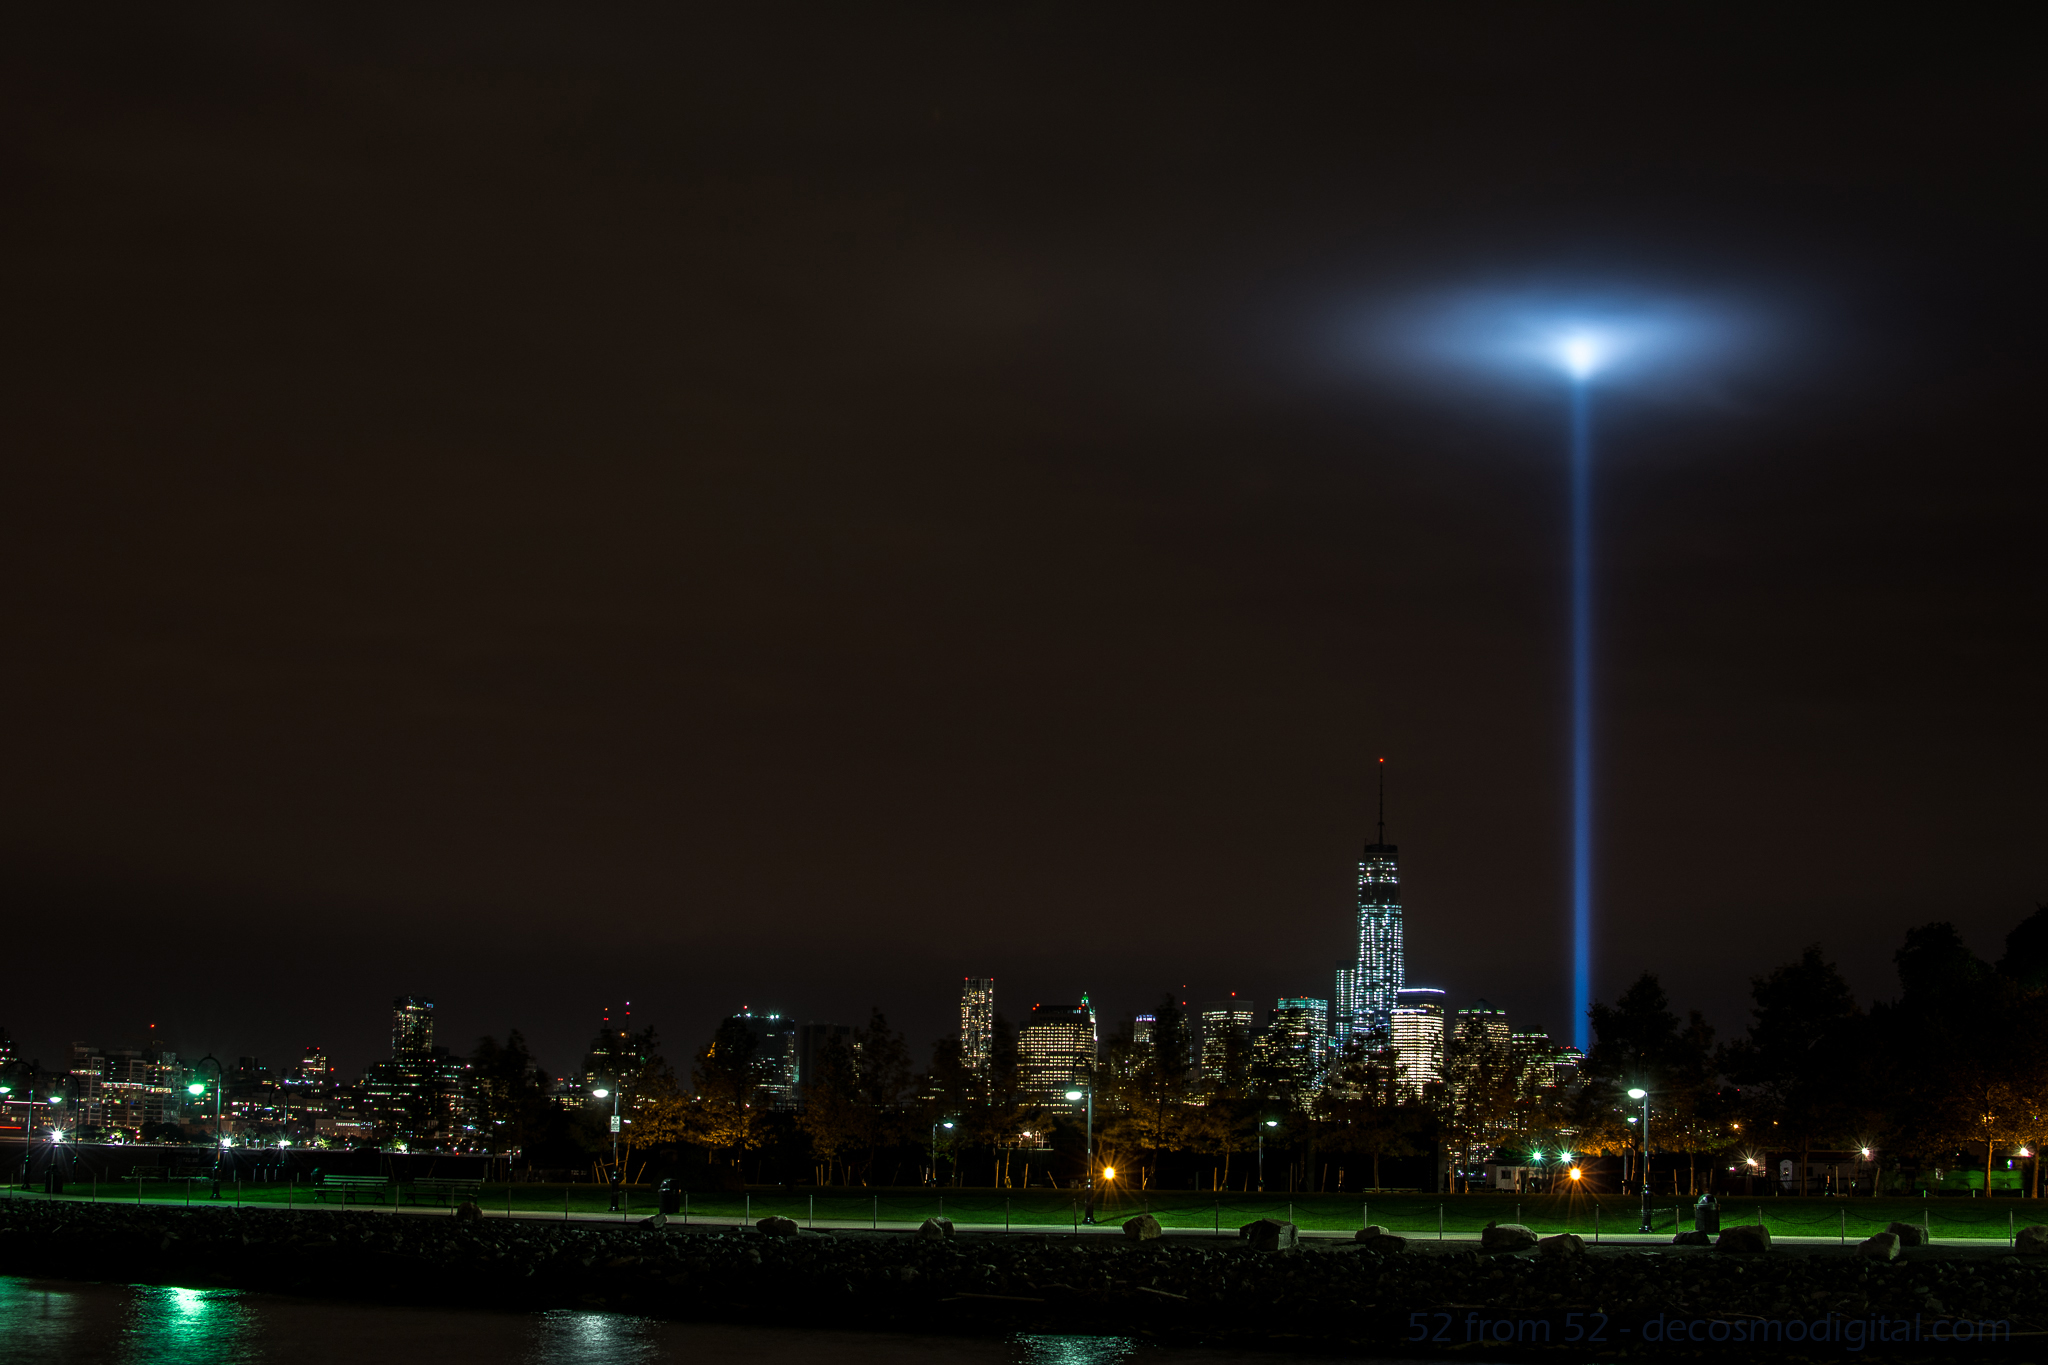
After dinner as I stepped outside of my apartment my eyes were instantly drawn to the distant southeastern skyline. What I was looking at was simply amazing, the 9/11 memorial lights were getting trapped in some low thick clouds and forming this surreal spherical glow. All of my other night picture plans went out the window at that point, I had to take a picture of this unique occurrence.
After taking the picture I thought it was good (not great) but didn’t want to use it as my picture for this week. As I do with most unused pictures I posted it up on Facebook to share with my friends. To my surprise this picture got more activity than any other one I’ve posted. Coming up with a picture to top this one, at least this week would have been hard so in the end I decided to use this picture.
Photography Concepts
To get this picture I had to apply many of the tricks I’ve learned over the past couple of months. In some of my previous long exposure pictures I noticed a slight camera shake. To prevent getting shaky images I’ve moved towards using either a 2 second delayed shutter release or in this case a remote. Next I regularly use a UV filter on all my camera lens to prevent any wear and tear. Over time I noticed that at night using a filter increases the amount of light distortion and bleed, so prior to this picture I removed the UV filter. The last two keys to this photo, which I’ll talk about in a little more detail, are the exposure settings I used and editing in Lightroom.
The exposure I used was -2 (stops) which for anyone that doesn’t know, it’s an underexposure. The reason I underexposed was because after taking other nighttime city shot I’ve noticed that with so many lights from all the buildings my pictures tend to get overexposed. There are lots of negatives with overexposing, in terms of my city pictures the most noticeable is the change in the sky color. After messing around with different exposures I’ve settled on -2 for my go to exposure setting.
Now it’s hard to describe all the different tweaking I did in Lightroom but one of the main fixes was the white balance setting. I forgot my white balance cards when I went out to shoot this picture so I had to do it after the fact. I also made some moderate adjustments to the Highlights, shadows, whites, blacks and clarity to get the picture to look like what I saw in person. If you want to learn about Lightroom I highly recommend going on youtube and watching some tutorial videos. There is so much information out there to support learning photography (and most other hobbies) it’s just about finding it.
Before and After Editing in Lightroom
Since I originally did not want to use this picture let me quickly explain why and what I could have done better. For starters if I remembered my white balance cards I would not of had to do so much editing in Lightroom. I rather get a good picture in camera rather than edit it especially for this photoblog. I also wasn’t happy about my composition, the green in the picture is really nice but I was made I cut off some of the left side of the peninsula that is shipyard park. I wish that I would have stepped back another 30-50 ft to get more into the picture. Last I wish I found something interesting to put into the foreground of the picture, it just makes for a more interesting picture.