Rethink

Picture info: ISO 3200, 36mm, f/2.8, 1/60 Sec

Picture info: ISO 3200, 36mm, f/2.8, 1/60 Sec

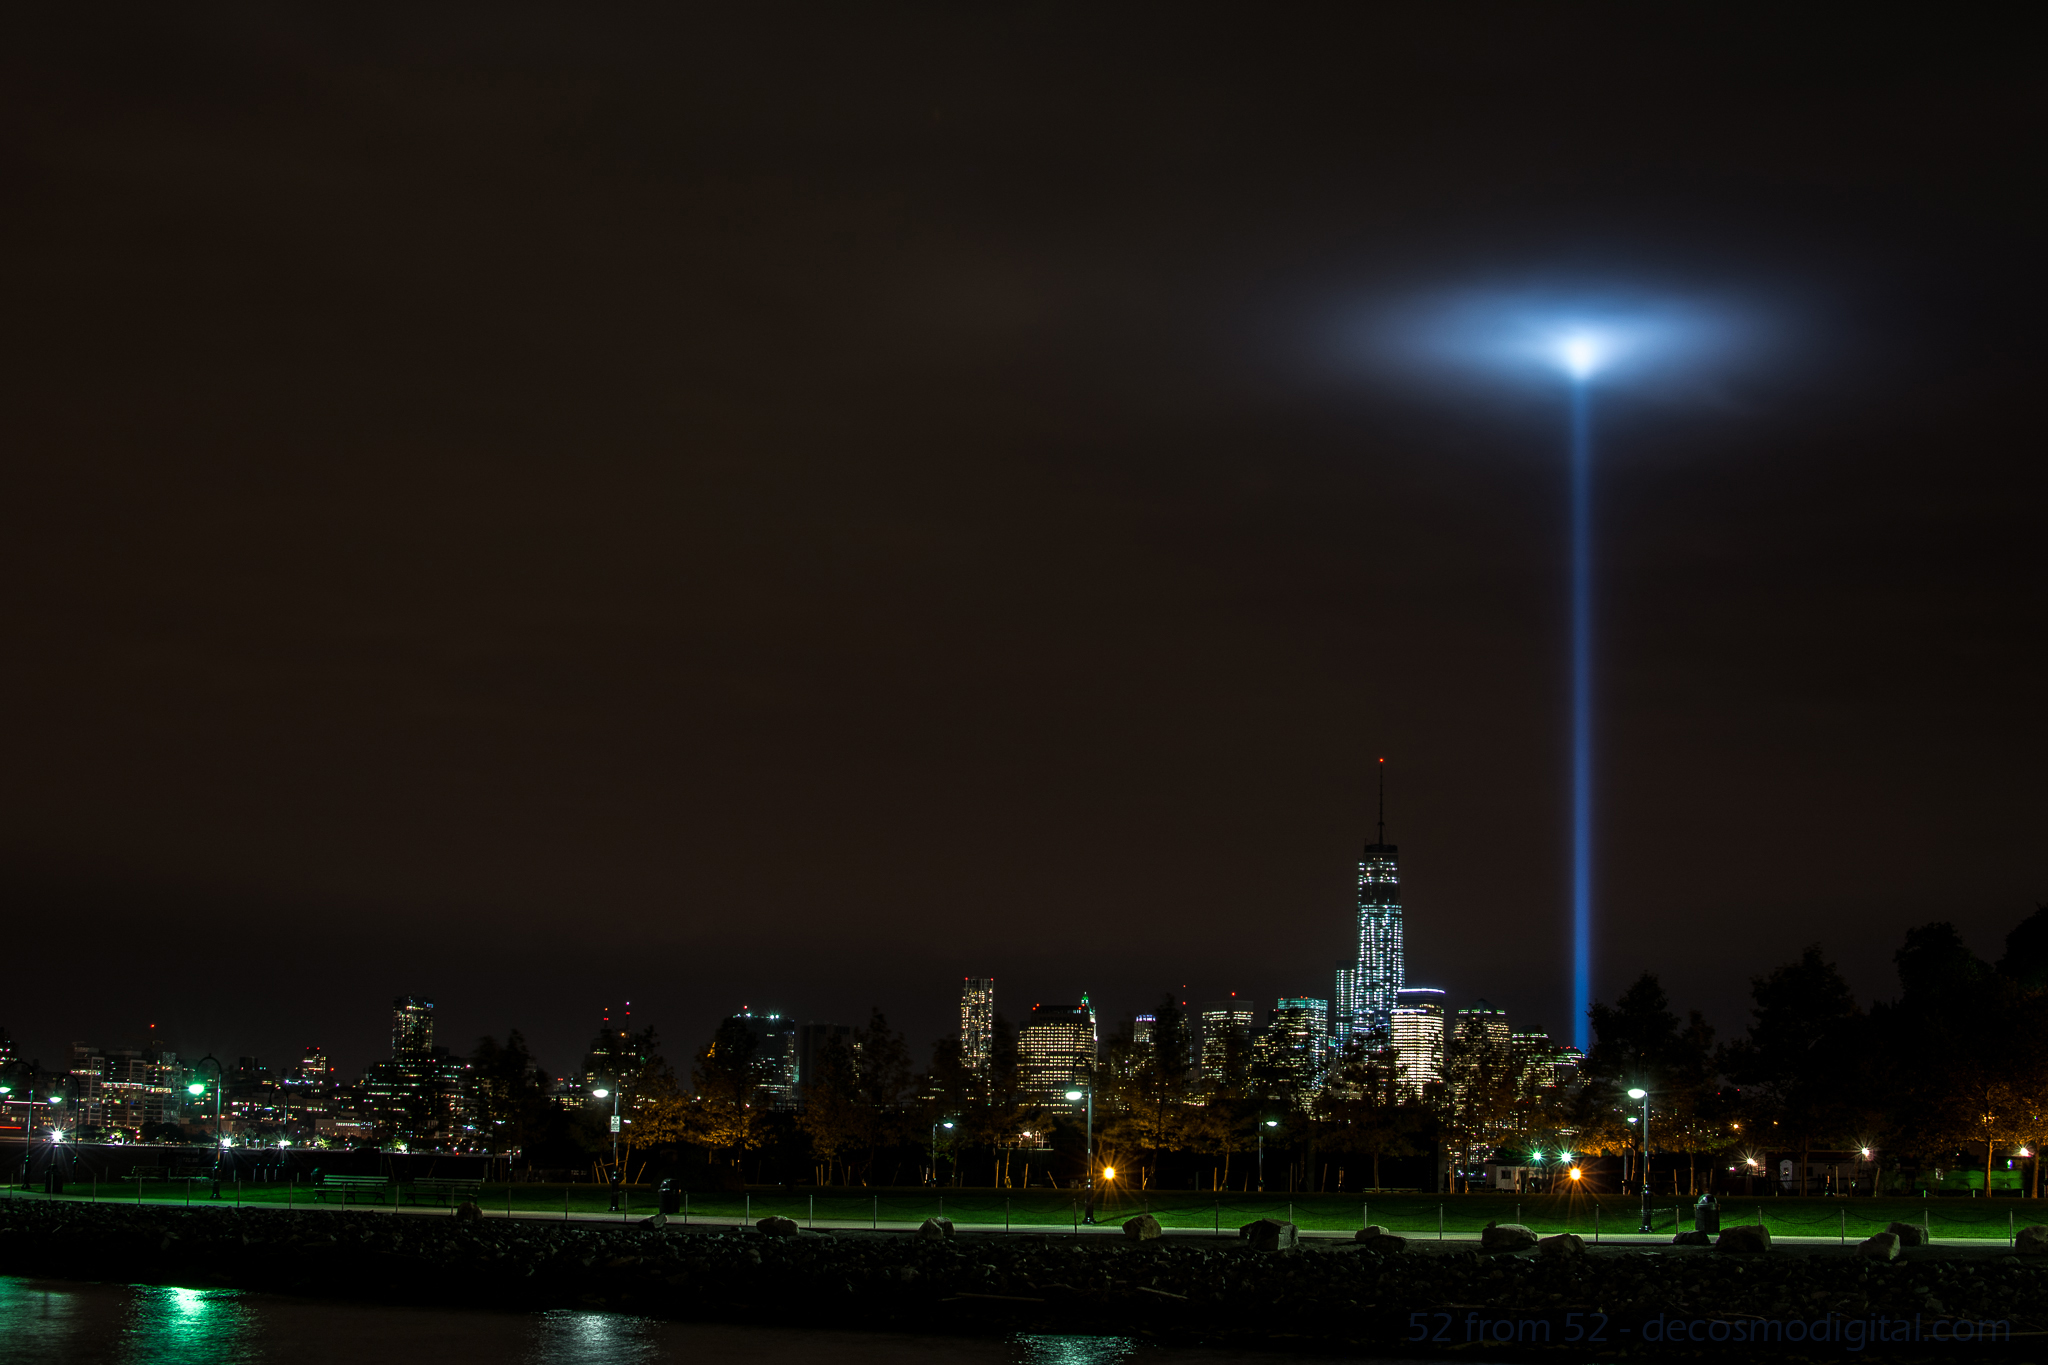
Week 46 (6/16/2014 -6/22/2014): Pier C, Hoboken NJ

Picture taken on 6/16/2014 at 9:05 PM

Photograph description:

If you took a step back and evaluated your life, what would you see?  One thing that I often notice about myself is that I have a tendency to fall into a routine.  I’ll make a decision that sets a precedent, then intentionally, or sometimes unintentionally, follow that precedent.  Routines can be good, but sometimes falling into a routine can limit the experiences or results that you get out of life.

Over the past few weeks as I’ve identified some of my different routines, I’ve intentionally set out to shake things up.  For example, every morning I pick up a hot coffee on my way to work.  To mix things up I started drinking iced coffee in the morning instead of my usual grande dark roast.  Another example, usually I go running in the evening, instead I’ve switched things up and have been going in the early AM.  These are just a few small examples which might seem trivial, but when you start to add up all the small changes, they make a big difference.  As with the saying “change begets change,” so the more routines that I’ve changed, the more I’ve rethought other aspects of my daily routine. As you’ve probably guessed, eventually this change made it’s way into my photography.

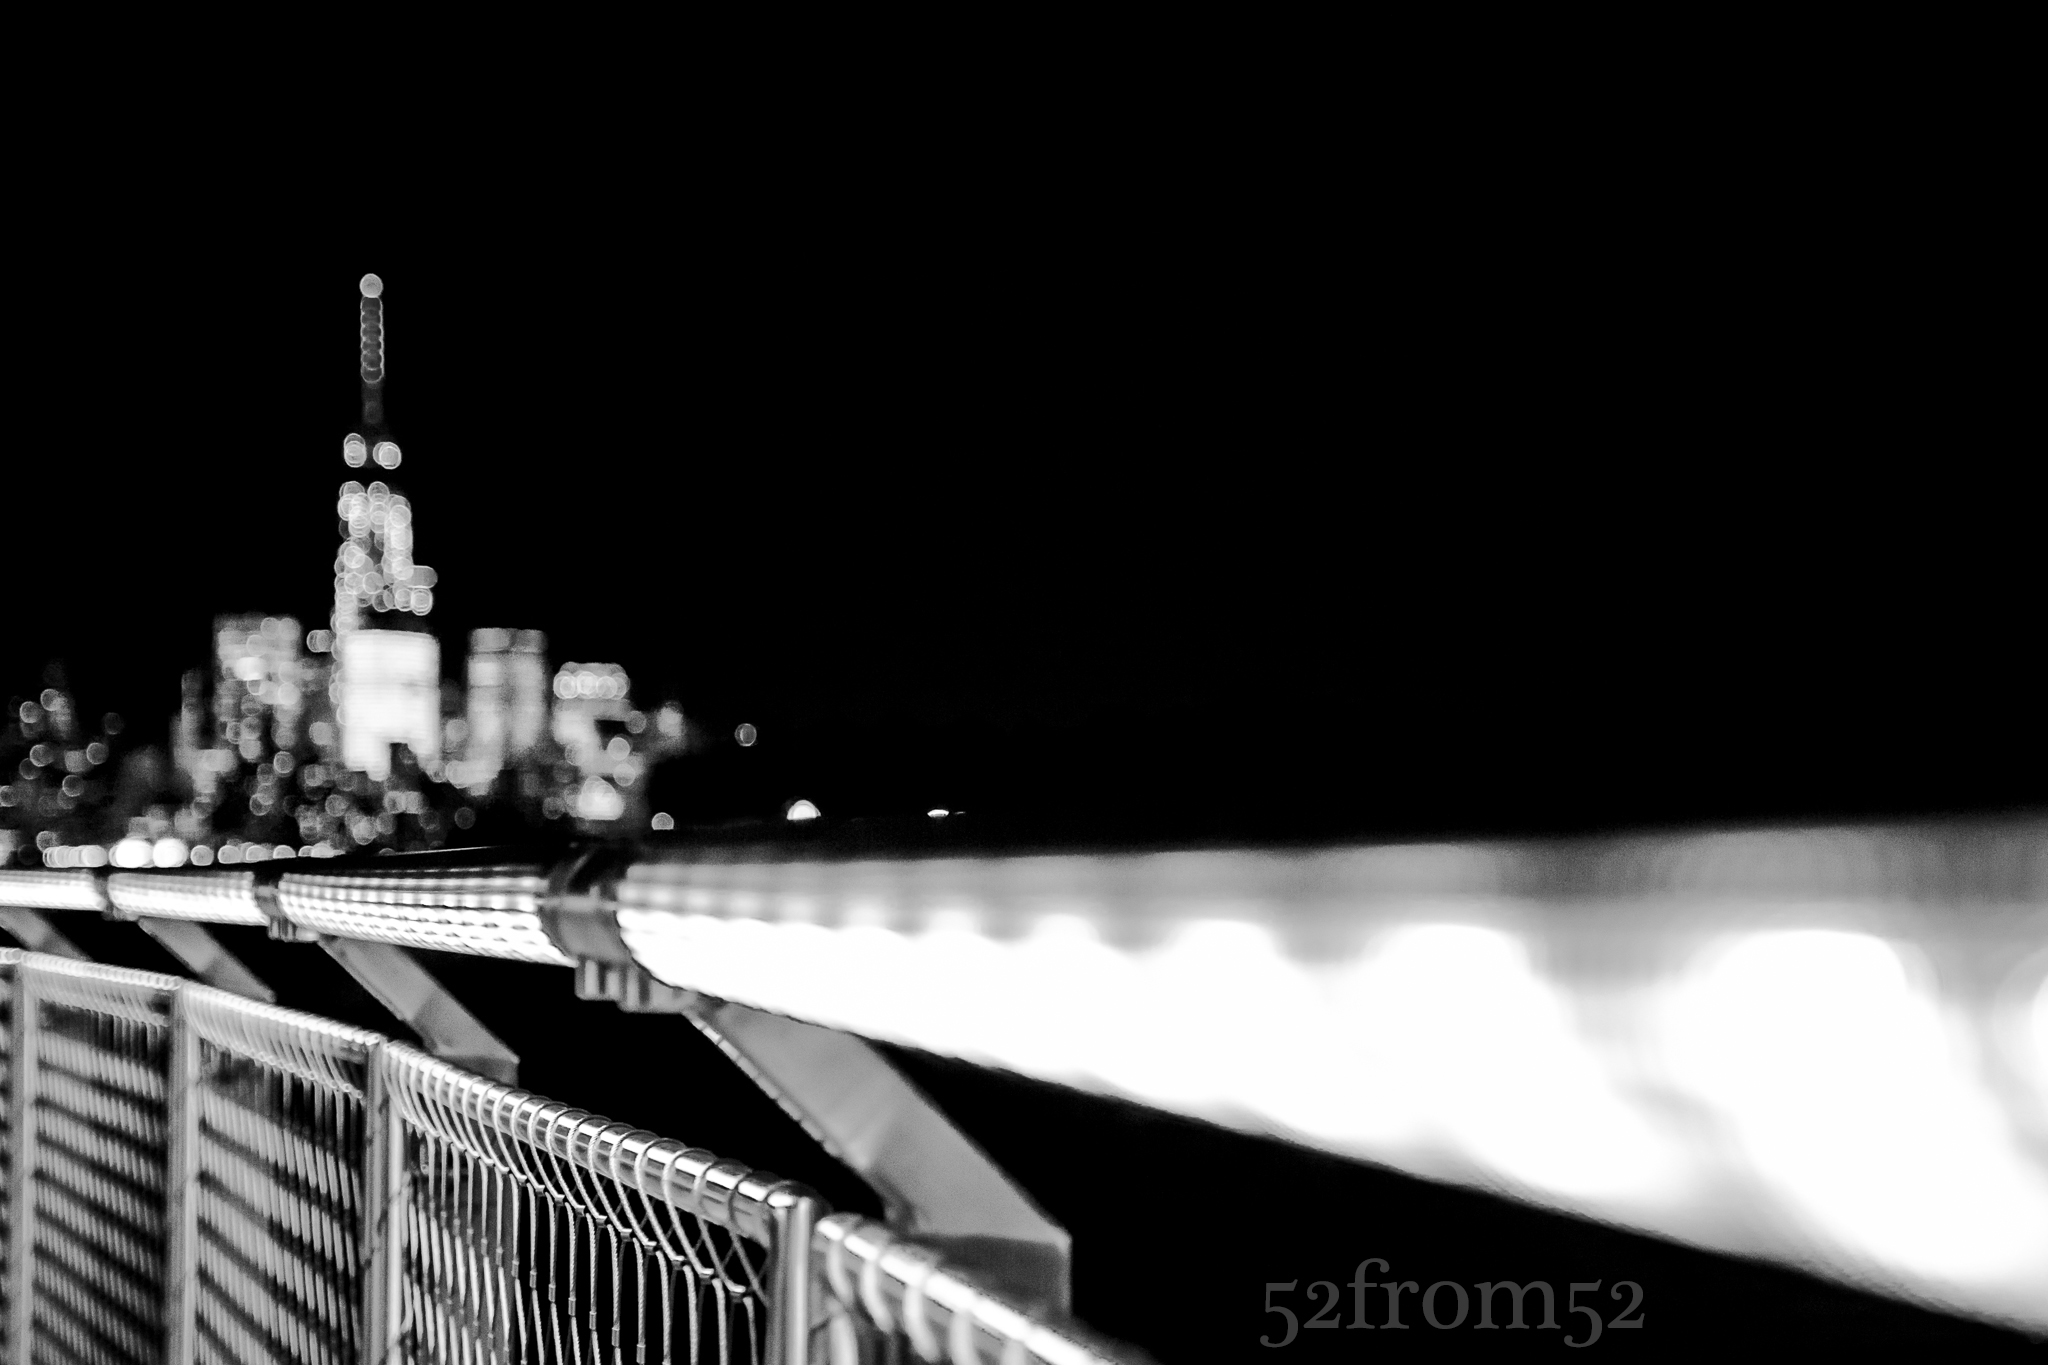
After analyzing my photography I noticed my tendency or “routine” was to shoot symmetrical photographs.  If my photograph had lines, they typically were level on a x/y axis.  The composition of my images was good, but as a whole my photographs were lacking some diversity.  The conclusion, rethink my usual composition style by, flipping, tilting, blurring and or anything that would bring a new composition look to my photographs.  The result, this week’s picture.

Photography concepts:

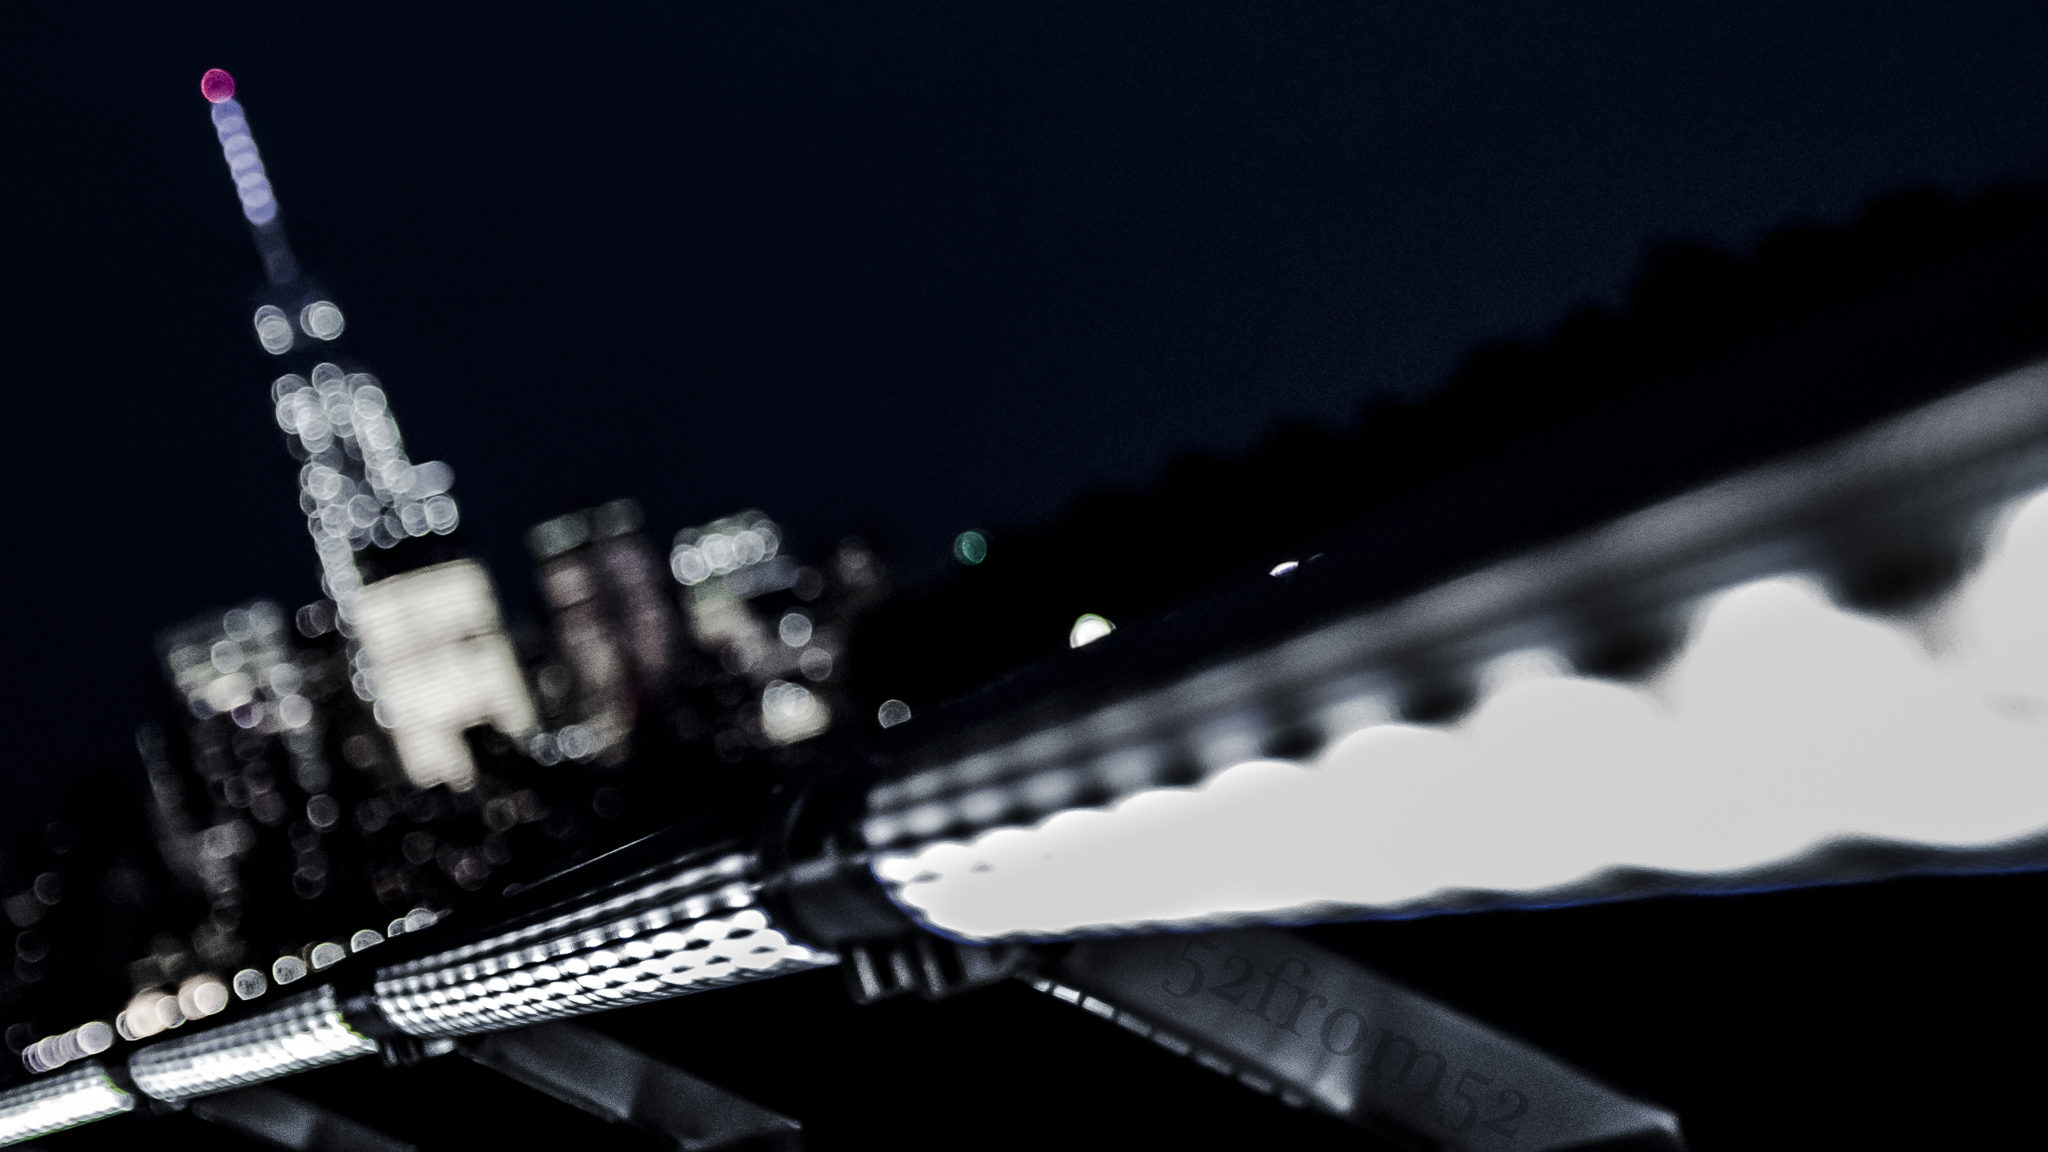
This week marked the first time I opened myself up for some image critiquing prior to posting.  Usually I commit to my image and don’t budge after selecting and editing my photograph.  As I said earlier, I’ve been mixing things up so after showing my brother-in-law (also Anthony) this week’s picture I reworked my photograph based on his critique.  After showing Anthony this week’s original image he pointed out how the railing was distracting and sort of made your eye stop look in confusion rather than continue down the path towards the blurry one world trade.  With Anthony’s comments in mind, I re-edited my photograph cutting some of the blurry railing out, while also darkening the rest so it was less distracting.  The next twist, literally, was I rotated the axis of my whole image so I no longer had a level shot.  The last major re-edit was to bring some subtle color back the image, this also helped the railing distraction by reducing the contrast of white on pure black.

Original Edit

Original Edit

After reworking my photograph I again sent it to Anthony for some critiquing.  He was in agreement that my re-edits were a good improvement to the image.  Anthony’s only remaining criticism was that the “in focus” portion of my image was a small portion of the railing, which was on the lower part of the image and not really featured in the image.  Although I saw the flaw that Anthony pointed out, the location of my focus was a necessary tradeoff to get the image I wanted.  While shooting this week’s photo my intention was to blur out the World Trade building enough so it had nice bokeh, but was still recognizable.  In order to get the bokeh I wanted, I needed to shoot with a wide aperture (my lenses widest f/2.8), which left me with a small plane of focus.  After selecting the appropriate aperture, I flipped my lens to manual focus and slowly twisted the focus ring until I got the right amount of bokeh.  Had I shot with a smaller aperture I would have gotten more of the railing in focus, but it would have been harder to get the same amount of bokeh.  As I hinted about earlier in the week, this week’s picture was all about the bokeh!

White Site

Picture Info: ISO 100, 35mm, f/2.2, 1/5 sec, -.6 ND filter

Picture Info: ISO 100, 35mm, f/2.2, 1/5 sec, -.6 ND filter

Week 32 (3/10/2014 -3/16/2014): World Trade Center PATH station

Picture taken on 3/13/2014 at 12:33 PM

Picture Description:

Architecture has been an interest of mine for almost as far back as I can remember.  As a kid I dreamt of becoming an architect, but life had other plans.  Why and how I didn’t fulfill my childhood dream is a story for another time.  I don’t regret not becoming an architect, I’m very happy with where I’m at professionally, but there are days I find myself daydreaming about a good blueprint or 3D model.  Since I don’t practice architecture professionally I can only seek out nice locations to appreciate the work of others.

This past Thursday was one of those days where I decided to set out to see some local modern architecture.  My destination was the new World Trade Center (WTC) PATH station. I’ve been admiring the WTC PATH station via online posts (mainly instagram) for a while, so it was nice to finally see it in person.  Of course beyond just admiring the architecture, I wanted to photograph the location.  As I said, I’ve seen lots of posts online of the station and sadly all of them seemed almost identical.  Prior to arriving I planned out some shots in my head that might provide a more unique view.

Usual eye level shot (taken at 18mm)

Usual eye level shot (taken at 18mm)

As the train pulled into the station I was nearly blinded by all the bright white marble that made up the platform.  Getting off the train felt like walking into a dream or train station from the future.  I spent the next 20-30 minutes touring the area and eventually met up with my younger brother.  After linking up, my brother and I went to the main hallway that everyone has been photographing.  Most of the pictures that I’ve seen were taken at eye level, so naturally one way to get a more unique view was to shoot from low to the ground.  My plan was to set my camera up few inches off the ground using my mini tripod.  One advantage about using my mini tripod in a public location is most people don’t realize I’m taking a picture.  From a distance it could almost look like I’m tying my shoe.  While at WTC this ‘stealthy’ feature proved to be a big advantage because once one of the staff members realized I wasn’t playing with my shoe strings he told me “no tripods are allowed.”  The staff member then said my alternative was to put my camera on the ground.  This really made no sense considering shooting with my camera on the ground or with the little tripod takes up the same amount of space.  Although I didn’t agree with the rule, I had already gotten my shot so I saw no reason in arguing and took that as my cue to leave.

Photography Concepts:

There were two main lessons that I took away from shooting this week’s picture.  The first lesson was that with so much white my camera tried to underexpose the image.  In order to get the image the way I wanted, I had to override my camera’s judgement and overexpose the image via exposure compensation.  I could have shot in manual which would have given me more control over exposure, but I was trying to shoot quick before I got told to move (which did eventually happen).  Lately I’ve been finding that I am hardly ever using the even exposure my camera calculates.  Thus far I’ve mainly used exposure compensation (+/- 3 stops) to adjust my image, but I think it’s time for me to just start shooting in manual.  It’s a big step shooting all manual but when it comes to shooting an image such as this week’s, it’s the better way to go.

The second lesson learned was the ideal shutter speed to shoot to give a slight blur to people walking.  My original idea was to shoot with a long shutter (10+ seconds) to get ghost like blurs of people walking.  Unfortunately since there weren’t many people in the hall, when I shot a 15 second exposure there was hardly a hint of people, except one guy that was standing still.  From that point I began winding my camera’s dial to increase my shutter speed, eventually settling at 1/5 of a second.  I didn’t know at the time, but I had luckily stumbled upon the ideal shutter speed for blurring people walking.  Below is a link to a guide I found after Thursday which provides the ideal shutter speeds for capturing certain effects.  

15 second exposure

15 second exposure

The last thing I want to mention is something I learned from watching Lightroom Tutorial video.  There is a feature in lightroom that allows you to correct perspective.  Let me tell you, this is absolutely awesome.  For me it’s always difficult to get my camera’s lens oriented correctly to capture perfectly straight vertical or horizontal lines.  Lightroom’s perspective correction is something I always knew I needed but never knew existed.  Watch the video (link below) and you will understand the features capabilities better.

In the coming weeks when I’m not forced to shoot under a time restraint I’m going to try to shoot in manual mode.  My guess is this will open a whole new world of opportunities and image quality for me.  Only time will tell…

Links:

Shutter Speed Cheat Sheet

http://www.digitalcameraworld.com/2012/06/26/best-shutter-speeds-for-every-situation/

Lightroom Perspective Correction:

https://www.youtube.com/watch?v=bU_r5hS4fpE&list=PLmXfFxjdp3CH8D2p_Rm5RKtOUmGGzpnFj

Night Light

ISO 100, 35mm, f/8.0, 4 sec

ISO 100, 35mm, f/8.0, 4 sec

Week 6 (9/8/2013 – 9/14/2013): Shipyard Marina, Hoboken NJ
Picture Taken on 9/9/2013 9:11PM

Picture Description

Going into this week my goal was to create a multiple exposure photograph or light trail night picture.  As a possible secondary option I bookmarked the possibility of photographing the freedom tower.  On Monday night I went out around 6ish to mess around with my new Nikon ML-L3 remote.  I was aiming for either a double/triple exposure of the Hoboken ferry or some kind of sunset shot.   After messing around for about an hour I went back to my apartment to eat some dinner, review my pictures, and wait until the sun was totally down so I could try for a night picture.  Unfortunately after reviewing the pictures on my computer none of them worked out as I planned so I was going to have to go back out for the night shot.

After dinner as I stepped outside of my apartment my eyes were instantly drawn to the distant southeastern skyline.   What I was looking at was simply amazing, the 9/11 memorial lights were getting trapped in some low thick clouds and forming this surreal spherical glow.  All of my other night picture plans went out the window at that point, I had to take a picture of this unique occurrence.

After taking the picture I thought it was good (not great) but didn’t want to use it as my picture for this week.  As I do with most unused pictures I posted it up on Facebook to share with my friends.  To my surprise this picture got more activity than any other one I’ve posted.  Coming up with a picture to top this one, at least this week would have been hard so in the end I decided to use this picture.

 Photography Concepts 

To get this picture I had to apply many of the tricks I’ve learned over the past couple of months. In some of my previous long exposure pictures I noticed a slight camera shake.  To prevent getting shaky images I’ve moved towards using either a 2 second delayed shutter release or in this case a remote.  Next I regularly use a UV filter on all my camera lens to prevent any wear and tear.  Over time I noticed that at night using a filter increases the amount of light distortion and bleed, so prior to this picture I removed the UV filter.  The last two keys to this photo, which I’ll talk about in a little more detail, are the exposure settings I used and editing in Lightroom.

The exposure I used was -2 (stops) which for anyone that doesn’t know, it’s an underexposure.  The reason I underexposed was because after taking other nighttime city shot I’ve noticed that with so many lights from all the buildings my pictures tend to get overexposed.  There are lots of negatives with overexposing, in terms of my city pictures the most noticeable is the change in the sky color.  After messing around with different exposures I’ve settled on -2 for my go to exposure setting.

Now it’s hard to describe all the different tweaking I did in Lightroom but one of the main fixes was the white balance setting.  I forgot my white balance cards when I went out to shoot this picture so I had to do it after the fact.  I also made some moderate adjustments to the Highlights, shadows, whites, blacks and clarity to get the picture to look like what I saw in person.  If you want to learn about Lightroom I highly recommend going on youtube and watching some tutorial videos.  There is so much information out there to support learning photography (and most other hobbies) it’s just about finding it.

Before and After Editing in Lightroom

Before and After Editing in Lightroom

Since I originally did not want to use this picture let me quickly explain why and what I could have done better.  For starters if I remembered my white balance cards I would not of had to do so much editing in Lightroom.  I rather get a good picture in camera rather than edit it especially for this photoblog. I also wasn’t happy about my composition, the green in the picture is really nice but I was made I cut off some of the left side of the peninsula that is shipyard park.  I wish that I would have stepped back another 30-50 ft to get more into the picture.  Last I wish I found something interesting to put into the foreground of the picture, it just makes for a more interesting picture.

Article about Exposure
http://bit.ly/1eOEzt8

Lightroom Video’s
http://bit.ly/140WqbT
http://bit.ly/1ddxPTS

Never Forget

ISO 160, 35mm, f/ 2.5, 1/500 sec

ISO 160, 35mm, f/ 2.5, 1/500 sec

Week 5 (9/1/2013 – 9/7/2013): 9/11 Memorial, New York City, NY
Picture taken on 9/5/2013 at 5:44 PM

Picture Description

In a less than a week 12 years will have passed since September 11th, 2001 and prior to this week I never visited the hallowed ground that was the location of the World Trade Center towers.  I have wanted to pay my respects by visiting the grounds for some time now and this week I finally made the time to visit the 9/11 memorial.

As expected prior to entering the memorial you’re paraded through an array of security screenings and lots of twisting alley ways.  When you finally get into the memorial area it’s a surreal feeling especially when you think about the significance of the ground you’re now standing on.  So much that has happened over the past 10+ years has been a result of what happened there on that fateful day.  The events of 9/11 will forever remain in the forefront of my mind.  As with most Americans, especially those that live in the New York area, I can vividly replay much of the day in my mind as if it was only yesterday.  I was fortunate to not lose any loved ones through the tragic events and it’s hard for me to even fathom what those that did had to go through, and still do.  As I walked around I tried to do so respectfully since I’m sure among the crowd there were at least a few visitors that had lost someone.   The reflecting pools are both architecturally beautiful and symbolically somber.  The pools each take up about an acre of space and the perimeter of each pool is lined with the names of those that lost their lives.  The relationship you can draw between the magnitude of the pools and encircling list of names is powerful and very sobering.   While walking around you randomly come upon names with flowers, flags and other items placed or wedged into the cracks of letters.   I don’t know how often flowers and such are removed but my guess is that the presence of one means someone placed it there that day or very recently.  During my walk around the North pool I noticed that someone had placed a flower on a loved one’s name just below the World Trade Center heading.  I thought the flower with the reflection pool backdrop would make for a meaningful picture.

blog_5-final(2)

I hope after reading this you too go visit the memorial to pay your respects and experience this all for yourself.  I’d also like to say if anyone is reading this and lost a loved one, you have my deepest condolences.

Photography Concepts 

This picture was very straight forward, unlike last week nothing was moving so I just line everything up and fired away.  As I take more and more pictures I’m beginning to learn what the ideal settings are for specific ‘looks’.  This picture for example, I wanted to emphasize the flower, names and obviously “World Trade Center.”  If you read my first blog you might be able to guess one of the settings I used to get the blurred background.  If you said wide aperture, you were correct!  I used an aperture of f/2.2 to blur out the reflecting pool.  The second and main part in capturing this picture was utilizing my camera’s focus points.  I used a single point auto-focus to mainly to make sure “World Trade Center” was properly focused but oddly enough there is more effected with using focus points than just ‘focus’ so that’s what I’m going to talk about.

Nikon D5200 Focus Points - Taken from below Nikon Website

Nikon D5200 Focus Points – Taken from below Nikon Website

When it comes to “auto-focus” my Nikon D5200 has 4 different focusing modes but for now I’ll just talk about the one I used. I used single point auto-focusing for this picture which is what I use for most of my pictures. For anyone that doesn’t have a DSLR you might be unfamiliar with the term focus points.  They’re exactly what you’d think they are, selectable focus areas I see when looking through the lens.  Similar to what you see on standard camera’s or camera phones, however on my camera they’re not totally free moving.  For example, on most camera phones you pretty much touch anywhere on the screen and it uses that as the main focus point.  On a camera such as mine I’m limited to 39 focus points.  The really high end DSLR cameras (e.g. Nikon D4 – 51 focus points, Canon EOS 5D Mark III – 61 focus points) have more but I’m yet to run into any issues using 39.  Beyond focusing, by manually selecting the exact focus point I’m able to have more control over my camera’s exposure. One scenario where how the camera sets exposure comes into play is when you’re dealing with multiple light sources such as natural/unnatural light in one photo.  I’ve noticed that finding the best medium exposure matters most when you’re trying to incorporate the sky into a photo.  A lot of times if you set your exposure off an object the sky gets over exposed meanwhile if you set it off the sky your object (subject) gets under exposed.  Finding the middle ground in terms of exposure can be hard and is somewhat fixable after the fact but pictures come out way better if you do the right exposure in camera.  What I usually do is try to set my focus point somewhere close to both my subject and the sky to obtain the best exposure.  The problem with not selecting your actual subject is you have to use a smaller aperture to make sure more of the image (such as your subject) is in focus and not blurred out.  Since I wanted a blurred background in my photo I had to go with the wider aperture so when I put my focus point on the World Trade Center it ended up over exposing the background a little.  Nothing I wasn’t able to fix in LightRoom but it’s something you have to keep in mind.  If you over expose too much the detail of a picture isn’t always recoverable.  To have more flexibility lately I’ve been shooting in RAW form or in Nikon terms .NEF files.  Based on everything I’ve watched/read shooting in RAW verses JPEG retains more of the pictures editable attributes.  No matter what camera you have, one with RAW mode, 1 or 51 Focus points, when used correctly focus points can greatly help set the right exposure for you picture.

Nikon D5200 Single Focus Point - Taken from below Nikon Website

Nikon D5200 Single Focus Point – Taken from below Nikon Website

Nikon D5200 Article source for two pictures:
http://imaging.nikon.com/lineup/dslr/d5200/features02.htm