Candid

Picture Info: ISO 100, 35mm, f/2.8, 1/125sec

Picture Info: ISO 100, 35mm, f/2.8, 1/125sec

Week 50 (7/14/2014 -7/20/2014): Parent’s Kitchen

Picture taken on 7/19/2014 6:01PM

Photography description:

This past week my brother Ryan asked me to take a headshot for his school ID.   Headshot photography isn’t my forte, mainly because of limited experience, but for family and friends I’ll always happily make an attempt.

Going into the mini shoot, using a picture of my brother for this week’s picture was never my intention.  In fact this week’s picture was more of a test shot taken while Ryan was fixing his shirt.  After I loaded everything into Lightroom for editing this picture just jumped out at me.  The texture of Ryan’s hair and shirt, along with the contrast between his white shirt and dark hair is what caught my eye.  After getting Ryan’s approval I decided this would be the perfect feature for this week’s picture.

Photography Concepts:

The natural texture and contrast of the original picture was what caught my eye, but focused editing to enhance the two attributes is what brought both to the reality of my imagination.

Original vs Edit

Original vs Edit

The first step was to add to the naturally toned contrast in the picture by changing the background from blue to grey.  In Lightroom uniformed color changes are a breeze, you simply select the color and change the hue or saturation level.  The only limiting factor is the colors you can shift to.  For example, the original blue background could have only been changed to something close to the blue spectrum (e.g. shades of blue or purple), or grey.  Luckily grey was the color I wanted, and grey was within the range I could shift to.  I turned the background grey by dropping both the blue and aqua colors saturation and luminance to zero, as seen below.

Color Edit

Color Edit

The second round of editing focused on the texture of my picture.  My brother’s hair had a lot of natural texture, but increasing the clarity and contrast brought it out even more.  Next I enhanced his shirt’s texture by dropping the highlights and white tones to reveal all of the wrinkles.  I did both of these focused edits at the full picture level (seen below) and at a more focused level using circular radial gradual filters on his head and shirt.

Lightroom edit settings

Lightroom edit settings


Afternoon Shading


Picture info: ISO 100, 36mm, f/13, 1/60 sec

Picture info: ISO 100, 36mm, f/13, 1/60 sec

Week 45 (6/92014 -6/15/2014): My Apartment

Picture taken on 6/15/2014 at 6:05 PM

Photograph description

A recent YouTube video gave me the idea about trying to photograph things in my everyday life.  The challenge with photographing everyday life is finding ways to creatively photograph your surroundings.  This past sunday, as I laid on my couch post Father’s day brunch thinking about what I could photograph, I realized my subject was literally right in front of me.  Right next to the couch in my room is a 6 foot high inset window that captures the most amazing afternoon light.  The time and angle of which the sun hits my window varies throughout the year, but during the summer it’s light starts around 5PM and lasts until about 630PM.  As the sun moves left to right across the sky it’s light bleeds through the cracks of room’s blinds creating different shades of light minute to minute.  Adding to the shading complexity is a tree that sits in my backyard.  Depending on the day’s wind, the tree’s leaves are typically swaying creating a constantly shifting wave of shaded patterns.  This daily afternoon dance of shade and light has captured my attention countless times and is ultimately why I chose to feature it as this week’s picture.

Photography concepts

Manual, manual, manual, that is how I was able to shoot this week’s image.  Shooting in manual over the past few months has unlocked a whole new world when it comes to photographing light.  It took a few times of shooting then adjusting to find the exposure that I thought best captured the moment.  The tricky part was not moving away from an aperture that captured the sun’s light appropriately.  In week’s past I’ve often spoken about what apertures are best for making the sun look a certain way.  This week I didn’t wanted the sun to softly peak form the blinds so kept my aperture in the range of f/11-f/15.  I’ve found that those apertures produce nice soft sun beams.  Anything larger (f/1.8-f/10) starts to make the sun look like one giant blob of light, and anything smaller (f/16+) make the sun’s beam have a sharpness to them.  I’ve taken a picture of the sun peaking through my blinds at f/22 and it didn’t create an image that’s true to the way I see it.

Old picture using f/22

Old picture using f/22

The second half of creating this week’s image was done in lightroom.  Raising the Highlights, Contrast, Whites, and Clarity while lowering Shadows, and Blacks is how I achieved this week’s image.  The more you play with these settings the better you will become with knowing what to raise or lower to achieve your look.  It can be intimidating the first time you use Lightroom when you see all of the adjustments at your fingertips, but trust me before you know it you’ll be flying through them and wish you had more ways to tweak your image.  Lightroom has become my greatest tool for fine tuning an image to be exactly what I want.  The only way you’ll learn is through practice, I’ve edited 1000’s of images since starting this blog and I’m still learning new tricks.  If you haven’t already I highly recommend purchasing lightroom and trying it out today!


Coffee

Picture info: ISO 6400, 35mm, f/1.8, 1/800 sec

Picture info: ISO 6400, 35mm, f/1.8, 1/800 sec

Week 44 (6/2/2014 -6/8/2014): Parent’s Kitchen

Picture taken on 6/8/2014 at 3:42 PM

Photograph description:

As a child I never knew why people drank coffee, as an adult I don’t know how I would get along without it.  Oddly enough I can remember the exact day that I made the transition to a coffee drinker.  My first cup of coffee was drank more out of a sense of duty than desire but the addiction took all the same.

It all started on a cold foggy spring morning in April of 2009.  I was at West Point Military Academy to compete in a paintball event.  On the first morning of my stay I was awoken by the sound of a bugle horn, followed by machine gun fire (blanks).  Although the startling sounds woke me up, they did not warm me up so I set out into the fog, cold and half asleep, for the mess hall to find some hot chocolate.  Once I arrived at the mess hall found a soldier standing by a hot water dispenser.  I kindly asked, “excuse me sir, do you have hot chocolate?”  The soldier sternly replied, “No, we have Coffee” while handing me a cup of hot coffee.  As the soldier handed me the cup I noticed he was a reasonably high ranking NCO.  Feeling embarrassed to turn down the cup of coffee from such a seasoned soldier I accepted the cup and drank it black.  Not only did that cup of coffee warm me up, it also gave me such a jolt of energy that I was hooked from that day forward.

These days my coffees aren’t shared with soldiers but instead typically with friends and family.  This past weekend while home visiting my family I grabbed a cup with my brother as we caught up.  After our coffee run we came back to my parent’s kitchen and brewed some coffee not for the purposes of drinking, but for the purposes of shooting coffee photographs.  It was a successful experiment and resulted in me finally checking “coffee picture” off my photography bucket list.

52from52-wk44(2)

Photography concepts:

This week’s picture was difficult to pull off, mainly because it required two things, a fast shutter and focus speed.  The first hurdle to overcome was how to get a fast enough shutter speed in a low natural light setting.  Even with a wide open aperture of f/1.8, my shutter was still too slow to when using a normal ISO setting.  I was left with no choice but to use an extremely high ISO setting of 6400.  Lucky I was able to clean up the “noise” created from the high ISO in lightroom by using noise reduction.  The trade off for using noise reduction is decreased detail and what ends up looking like a very smooth image.  In the case of this picture I actually liked the look that the noise reduction created so it all worked out.

My low light problem was solved with just a few clicks of a button, with my camera doing most of the work.  When it came to focus speed it was all on me to make the adjustment.  Since I was using a wide open aperture it was very important that I had control of where my focus point hit.  Small apertures result in small focus planes, meaning if my focus point hit the wrong spot my whole image would appear out of focus.  It’s easy to work around a small focus plane if you’re shooting something still, but I had to fire off pictures quick to catch milk’s mixing action.  The solution I came up with was to place my camera on a mini tripod and put my camera into manual focus.  The advantage of manual focus is the camera’s focus engine doesn’t think, it will keep firing instantly.  They key to using manual focus, at least in this situation, was to calibrate my focus via autofocus, then put my camera into manual focus mode so it wouldn’t change again when I clicked the shutter button.  The reason I had to use the tripod was so my camera didn’t move at all and lose my precise focus point.  This manual focus strategy worked well and is definitely something I’ll keep in my back pocket for pictures that require quick focus.

Dealing with lines

Picture Info: ISO 1600, 36mm, f/11, 1/30 sec

Picture Info: ISO 1600, 36mm, f/11, 1/30 sec

Week 36 (4/7/2014 -4/13/2014): Tampa International Airport, Terminal A

Picture taken on 4/8/2014 at 6:37 PM

Photograph description:

While traveling it’s nearly impossible to avoid standing in lines.  Typically a trip starts with the traffic you always seem to hit on your way to the airport.  Once you arrive at the airport, there is bag check, security and finally the line for boarding.  In addition to the standard lines you might also stand in line for a snack, the bathroom or perhaps to gain access to the highly sought after charging station.  For so many lines, there is an equal amount of solutions that people come up with for dealing with them.  Some people bring a travel buddy, some depend on an unhealthy amount of electronics (my father), while others simply pop a pill and fall into a manufactured state of calm.  No matter how you slice it, everyone has to deal with lines.

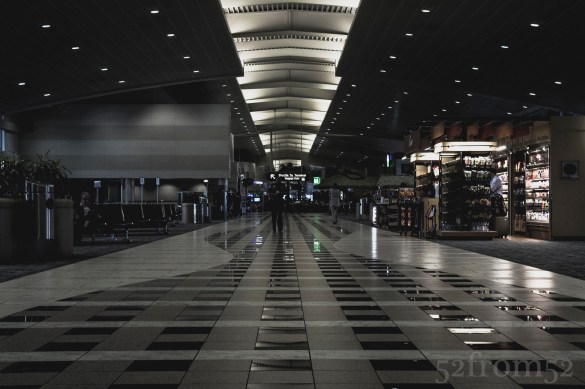
Just like in traveling, in photography we all have to find a way to deal with lines.  I was reminded of this topic while killing time in the airport waiting on my delayed flight. As you likely guessed my entertainment of choice while waiting was taking pictures.  From a visual standpoint Tampa is one of the more interesting airports that I’ve flow into.  Terminal A, my usual turnstop, is a long continuous room split by the Green Iguana bar.  When you stand on either of the extreme ends of the terminal you’re provided a nice visual.  There are many “Leading Line” types of visuals.  Looking down you’re taken through the terminal via winding tiles, while looking up will provide you with a super straight light formation.  All of these lines have always made it an interesting challenge to try and get everything lined up.  This time around I decided to make good use of my delay time and try my best to properly line up the shot.  Let me just say this week’s photo was the result of more than a few attempts.

Photography concepts:

As mentioned in this weeks description section, this week was all about dealing with lines.  When you’re dealing with lines and multiple points of symmetry things tend to get complicated.  There are a couple adjustments that all need to be balanced properly.  First you need to center your picture, which if you’re observant doesn’t look like I did.   Although the light was centered I was a few inches off with my physical alignment with the center tile.  I wanted to use my mistake to illustrate the difficulty of dealing with so much symmetry.  Through mistakes such as this, I’ve found what I believe to be the main adjustments to focus on while lining up a shot.

First, as I said center your image to the best of your ability, and more importantly make sure your camera’s lens is in the right position (where I failed). You don’t have to be perfect because once you start making other adjustments you’re going to lose the perfect center.  The important thing it to take note of whatever you central reference points are (top and bottom). Second adjust your left to right tilt which is done by pushing either side of the camera more forward.  While doing this try to recenter your image again using two center reference points.   The third and last adjustment is your camera’s up/down tilt.  Tilting your camera pointing up will forced 90 degree horizontal lines (such as buildings) to lean back, while tilting down will lean things forward.  Completing all of these adjustments is a juggling act and may take a couple times of cycling through your steps doing minor tweaks.  If you have a tripod, I highly recommend using one for these precise shots.  Take your time and get the shot right.  That was my issue, I couldn’t take my time.  I rushed my shot a little because of the fact that I was in an airport.  Sometimes people get odd when you’re using a DSLR in certain places such as airports or train stations.  In fact, the person walking towards me in this week’s shot was a security guard.  Luckily he wasn’t coming to yell at me.

Right after taking the picture I saw that it wasn’t perfectly lined up but I figured that was the best I’d get, and thought I could fix it via lightroom’s perspective editing.  After importing my image into lightroom I realized that even though the perspective editor is good, you can’t fix everything.  Because I positioned myself wrong there wasn’t much I could do.  Based on this realization I’d say although you need to focus on all three adjustments (center, left/right tilt, down/up tilt) the most important is center setting that central pivot point (the line between your two center points).  The down/up and right/left tilt perspective are easier to fix after the fact.  This just goes to show you, you’re always better off getting it right “in camera.”


White Site

Picture Info: ISO 100, 35mm, f/2.2, 1/5 sec, -.6 ND filter

Picture Info: ISO 100, 35mm, f/2.2, 1/5 sec, -.6 ND filter

Week 32 (3/10/2014 -3/16/2014): World Trade Center PATH station

Picture taken on 3/13/2014 at 12:33 PM

Picture Description:

Architecture has been an interest of mine for almost as far back as I can remember.  As a kid I dreamt of becoming an architect, but life had other plans.  Why and how I didn’t fulfill my childhood dream is a story for another time.  I don’t regret not becoming an architect, I’m very happy with where I’m at professionally, but there are days I find myself daydreaming about a good blueprint or 3D model.  Since I don’t practice architecture professionally I can only seek out nice locations to appreciate the work of others.

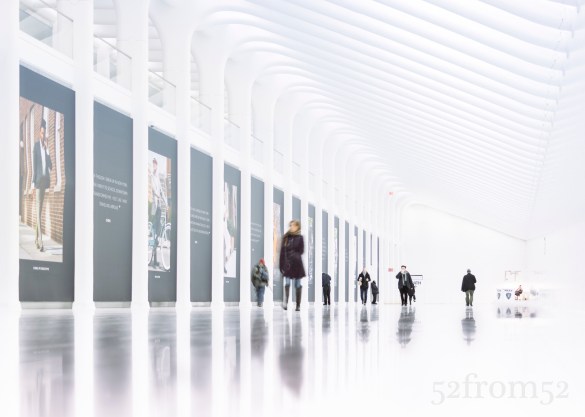
This past Thursday was one of those days where I decided to set out to see some local modern architecture.  My destination was the new World Trade Center (WTC) PATH station. I’ve been admiring the WTC PATH station via online posts (mainly instagram) for a while, so it was nice to finally see it in person.  Of course beyond just admiring the architecture, I wanted to photograph the location.  As I said, I’ve seen lots of posts online of the station and sadly all of them seemed almost identical.  Prior to arriving I planned out some shots in my head that might provide a more unique view.
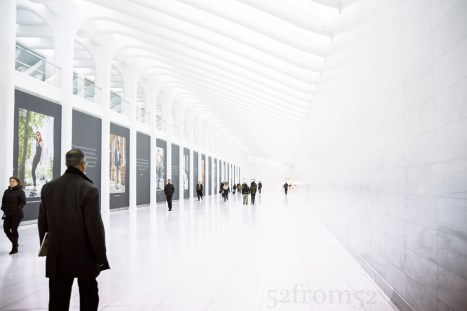
Usual eye level shot (taken at 18mm)

Usual eye level shot (taken at 18mm)

As the train pulled into the station I was nearly blinded by all the bright white marble that made up the platform.  Getting off the train felt like walking into a dream or train station from the future.  I spent the next 20-30 minutes touring the area and eventually met up with my younger brother.  After linking up, my brother and I went to the main hallway that everyone has been photographing.  Most of the pictures that I’ve seen were taken at eye level, so naturally one way to get a more unique view was to shoot from low to the ground.  My plan was to set my camera up few inches off the ground using my mini tripod.  One advantage about using my mini tripod in a public location is most people don’t realize I’m taking a picture.  From a distance it could almost look like I’m tying my shoe.  While at WTC this ‘stealthy’ feature proved to be a big advantage because once one of the staff members realized I wasn’t playing with my shoe strings he told me “no tripods are allowed.”  The staff member then said my alternative was to put my camera on the ground.  This really made no sense considering shooting with my camera on the ground or with the little tripod takes up the same amount of space.  Although I didn’t agree with the rule, I had already gotten my shot so I saw no reason in arguing and took that as my cue to leave.

Photography Concepts:

There were two main lessons that I took away from shooting this week’s picture.  The first lesson was that with so much white my camera tried to underexpose the image.  In order to get the image the way I wanted, I had to override my camera’s judgement and overexpose the image via exposure compensation.  I could have shot in manual which would have given me more control over exposure, but I was trying to shoot quick before I got told to move (which did eventually happen).  Lately I’ve been finding that I am hardly ever using the even exposure my camera calculates.  Thus far I’ve mainly used exposure compensation (+/- 3 stops) to adjust my image, but I think it’s time for me to just start shooting in manual.  It’s a big step shooting all manual but when it comes to shooting an image such as this week’s, it’s the better way to go.

The second lesson learned was the ideal shutter speed to shoot to give a slight blur to people walking.  My original idea was to shoot with a long shutter (10+ seconds) to get ghost like blurs of people walking.  Unfortunately since there weren’t many people in the hall, when I shot a 15 second exposure there was hardly a hint of people, except one guy that was standing still.  From that point I began winding my camera’s dial to increase my shutter speed, eventually settling at 1/5 of a second.  I didn’t know at the time, but I had luckily stumbled upon the ideal shutter speed for blurring people walking.  Below is a link to a guide I found after Thursday which provides the ideal shutter speeds for capturing certain effects.  
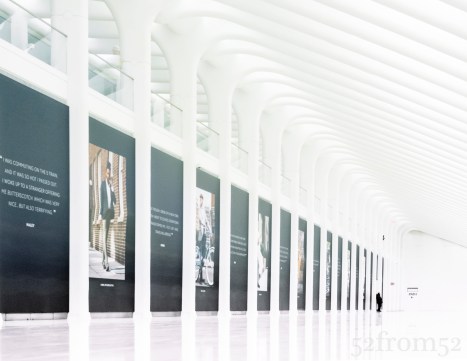
15 second exposure

15 second exposure

The last thing I want to mention is something I learned from watching Lightroom Tutorial video.  There is a feature in lightroom that allows you to correct perspective.  Let me tell you, this is absolutely awesome.  For me it’s always difficult to get my camera’s lens oriented correctly to capture perfectly straight vertical or horizontal lines.  Lightroom’s perspective correction is something I always knew I needed but never knew existed.  Watch the video (link below) and you will understand the features capabilities better.

In the coming weeks when I’m not forced to shoot under a time restraint I’m going to try to shoot in manual mode.  My guess is this will open a whole new world of opportunities and image quality for me.  Only time will tell…

Links:

Shutter Speed Cheat Sheet

http://www.digitalcameraworld.com/2012/06/26/best-shutter-speeds-for-every-situation/

Lightroom Perspective Correction:

https://www.youtube.com/watch?v=bU_r5hS4fpE&list=PLmXfFxjdp3CH8D2p_Rm5RKtOUmGGzpnFj