Lost Ball

Picture info: ISO 100, 35mm, f/22, 1/2 sec

Picture info: ISO 100, 35mm, f/22, 1/2 sec

Week 47 (6/23/2014 -6/29/2014): Apple Mountain Golf Course

Picture taken on 6/29/2014 at 8:12AM

Photograph description:

If you’ve ever played golf chances are you’ve lose a ball at some point.  No matter the level of play, mini golf, pitch and putt or a regular 18 hole, everyone has a story about losing their ball.  For me, this past week’s “lost ball” happened long after I left the golf course and for me that’s a first.  If you haven’t already guessed or sat puzzled as to why my picture has “This file could not be found” across the top, this past week’s picture was lost forever.  In my haste to import my pictures after my round of golf, I overlooked the fact that my Lightroom defaulted to some bad import settings.  Unfortunately it wasn’t until days after formatting my SD card that I realized the pictures had been lost.  Luckily Lightroom keeps previews of your imported images regardless of having files to support the image.  A quick screen shot later and I was at least able to keep my weekly steak alive and show a blurry representation of this week’s picture.  Lesson learned, double check your images are imported correctly before formatting your memory cards.

Instameet

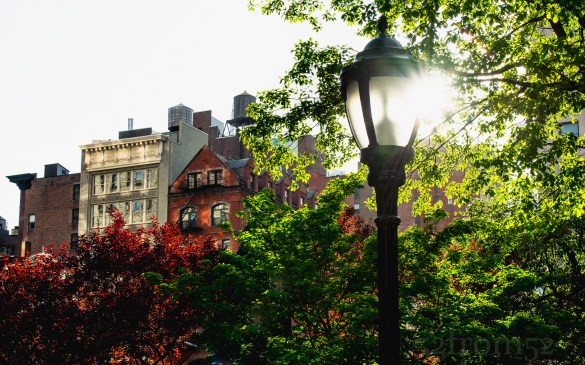
Picture Info: ISO 100, 36mm, f/9.0, 1/80sec

Picture Info: ISO 100, 36mm, f/9.0, 1/80sec

Week 41 (5/12/2014 -5/18/2014): Madison Square Park, NYC

Picture taken on 5/18/2014 at 5:30PM

Photograph description:

Anyone that knows me would probably tell you that I’m an Instagram addict.  I share a picture typically 1-2 times a day, and I’m constantly in pursuit of my next post.  The reason I enjoy Instagram is mainly because it’s very simple, take a picture, share a picture, like a picture, and yet there is a depth to it.  If something is going on in the world, chances are you can find basically a live feed to it on Instagram.  Think of Instagram as your square portal to everything and anything happening around the world.  You’re never more than a hashtag search away from getting a glimpse into anything from having tea in London, to a wild safari ride in Africa.  The possibilities of what you can find are endless.

This past weekend Instagram tapped into the power of hashtags by using them to unify coordinated events around the world.  The overall event was officially referred to as “WorldWide Instameet 9” and had the official hashtag of #WWIM9.  The concept was simple, each city or region had an organizer that picked a time and location to meet.  After meeting up everyone did exactly what brought them together, take and share pictures via Instagram.  Each local “instameet” had their own hashtag in addition to the official worldwide one.  This concept enabled people to search pictures at the worldwide level, or by the specific location.

A few days before WWIM9 a post about it popped in my Instagram feed.  One of the more popular New York City instagrammers posted up the event details and pointed everyone in the direction of the organizers feed.  Of course after stumbling upon this, it immediately peaked my interest.  I’ve been meaning to check out one of these “instameets” but always seem to be busy on the day it’s held.  Luckily, this time around I was finally free to participate.

I could probably write a 10 page post detailing the entire event, but where is the fun in that?  Don’t just read about my instameet, go to one yourself!  I promise you won’t be disappointed, unless your camera dies.  My friend Becky may have put it best, there is so much creative energy flying around it’s hard not to get inspired.

Photography concepts:

This week I’m going to change it up.  Instead of breaking down my picture I’m going to talk about some of the new photography concepts I was introduced to this past weekend. There was far more than just DSLR’s being used amongst the many participants.  There were three different styles/equipment that really caught my attention.  First, and probably the most captivating was how one instagrammer (@huper_X) used a drone/gopro combo to capture amazing aerial footage.  I didn’t get a chance to talk to the photographer, so I’m not sure about the exact drone he used, but below is link to something that looked identical to his drone.  Bottom line, this drone captured footage that looked like it came from a helicopter.  It was truly amazing to witness this thing on display.

The second new style/equipment of photography that I was introduced to was a 360 camera called the “Theta” by Ricoh.  This compact device was used by @tsaebadliw (Will) to capture one of my favorite pictures from the day (below).  Will set up the camera, then had everyone gather around to capture an amazing 360 degree view of the group.  Usually, a 360 camera is used in real estate for virtual tours, but as Will and the “Theta’s” creators display on their site, it’s great for getting creative as well.
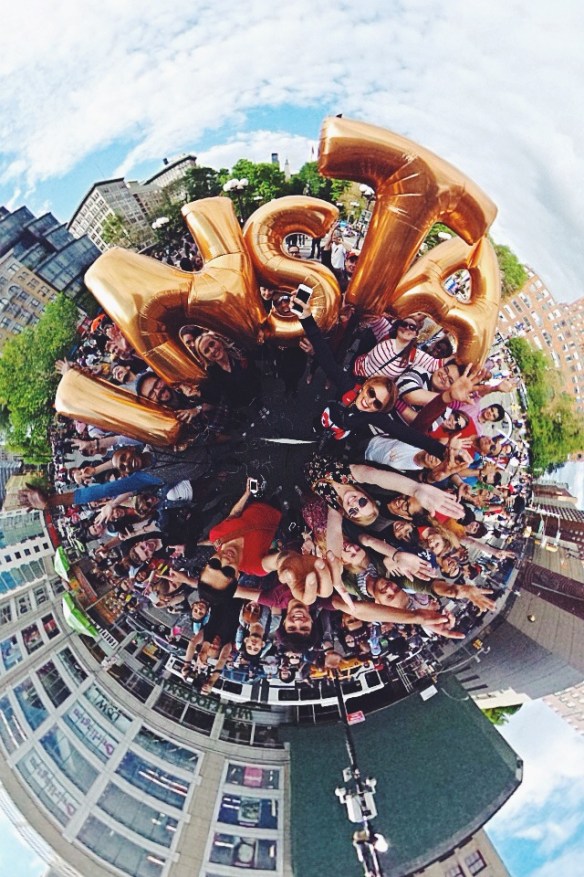
360 PhotoSphere by: @tsaebadliw (instagram) _wildabeast1 (twitter)

360 PhotoSphere by: @tsaebadliw (instagram) _wildabeast1 (twitter)

The third and most relevant piece of equipment to my style of photography that I learned about was Olloclips.  Olloclips are lenses for your iPhone/iPad that mimic the capabilities of a DSLR.  Olloclips has telephoto, macro, and wide angle lenses. The idea of enhancing my iPhone’s picture capabilities was very appealing since it’s impossible to carry my DSLR everywhere.  Taking great pictures with your phone doesn’t require an Olloclip, but it would certainly help.

Check out below for links to all of the new toys I learned about, along with some links to the instagram blog for the WWIM9 event.  I’ll get back to breaking down my pictures next week, enjoy your memorial day weekend!


Links:

Phantom 2 Vision Drone:

http://www.dji.com/

“Theta” 360 Camera by Ricoh

https://theta360.com/en/

OlloClip:

http://www.olloclip.com/

Instagram’s blog post on WWIM9

http://blog.instagram.com/post/82909503229/wwim9-announcement

Video shot by @huper_X at Madison Square park via an aerial drone.


Getting a-head

Picture Specs: ISO 200, 35mm, f/5, 1/30 sec

Picture Specs: ISO 200, 35mm, f/5, 1/30 sec

Week 10 (10/6/2013 – 10/12/2013): My Apartment, Hoboken NJ
Picture taken on 10/10/2013 at 4:53 PM

Picture description:

In life it’s always better to get ahead.  Getting ahead was the catalyst for this week’s picture/concept.   As I’m gaining more experience and exposure in the photography world, more opportunities are presenting themselves.  One upcoming project is going to require me to take a lot of indoor pictures and possibly product/macro types of shots.  In an effort to prepare (get ahead) for this future project, and to explore more areas of photography I decided to experiment with “studio” photography.  Now I don’t have a studio or access to one so the best I could do is purchase an at home alternative to allow me to take some small scale pictures.  Luckily one of the best companies to buy photography gear from has a storefront in New York City and not too far from my office.  I’m of course talking about B & H.  After doing some research online about what I should get I took a trip to B & H to check everything out in person.  I spoke to one of the employees who recommended a duel light set up which would have been both bulky and expensive.   I decided his suggestion wasn’t the route I wanted to take and ended up settling on the “MyStudio” portable photo studio with built in lighting.  It came at a reasonable price and it seemed to be the perfect size to be functional in my apartment.

Setting up “MyStudio” was pretty quick and easy.  Of course it helps that I’m a handy man (not by trade) but I feel like most people would be able to put everything together in under 10-15 minutes.  Once everything was set up it was time for the fun to begin.  Per my brother “anything is cool if you’re a good photographer”  at least in terms of macro photography so I took that as a challenge.  I began going through my room and photographing almost anything that would fit in “MyStudio.”  Although my brother was right, not everything that I took a picture of could easily tie into a post.  I decided to find something a little more relevant.  My “getting ahead” philosophy (along with Halloween being around the corner) is what drew me to skulls (heads) that are featured in this week’s picture.

Photography concepts:

One big difference between this picture and those of past week’s was I needed a decent amount of equipment to make this happen.   For starters I needed the “MyStudio” which I would recommend to anyone looking for a small at home studio option (link/picture below).  Next I needed a tripod since with macro/studio photography sometimes you have to take longer exposures to capture more light and you really need to line everything up with precision.  I probably could have gotten away with not using a tripod but I already had a good one so there was no reason to not.  Another key tool you need while doing studio photography and any other indoor shots are white balance cards.  I’ve mentioned white balancing before but this week it was really key.  When you’re using a white balance card you usually take a reference shot and either tune your camera into that setting or use the reference shot as a guide for setting all your white balance in editing.  This week I decided to leave my white balance cards in the picture so you could get an idea about how I used them.   The last and most obvious (other than my camera) thing that I needed was a subject.  In the past I found real life subjects to photography, while this week I had to find and place my subject.  Having the freedom to get creative was nice but also very challenging.

MyStudio; Taken from BH's site (link to product below)

MyStudio; Taken from BH’s site (link to product below)

The main challenge about having “creative freedom” was positioning my subjects and relationally lining up my camera.  When you’re working on such a small scale the slightest adjustments to your camera’s angle or the location of your subject changes the entire dynamic of the picture.  Using this week’s picture as an example.  You’ll notice that the single skull and the bag of skulls are a little offset with the single skull being further up in the picture.  I positioned the single skull forward so it was larger in the picture but I had to push the bag back to get it in the full frame.  Once I put the two subjects on different planes, in relation to my camera’s lens, it forced me to use a smaller aperture.  If I had shot this picture with a f/1.8 instead of f/5 the single skull would have been in focus and the bag blurry.  Even with f/5 you can already start to see some of the blur in the back portion of the bag.  Based on what I’ve read, along with my own experience with wider apertures (smaller f numbers) the plane of focus becomes very thin.  What this means  is only the things that are on the same plane as your subject will be in focus.  The smaller the aperture the deeper the in focus plane gets.  I haven’t done enough reading to explain the mathematics behind this focal plane concept but I feel like this picture was an easy way to demonstrate the concept and it’s challenges.

There is still a lot more to learn about indoor shooting so this topic might get featured again in the coming weeks. Let’s just say for now this is to be continued…

BH Link for “MyStudio”

http://www.bhphotovideo.com/c/product/727653-REG/MyStudio_PS5_PS5_PortaStudio_Portable_Photo.html

Never Forget

ISO 160, 35mm, f/ 2.5, 1/500 sec

ISO 160, 35mm, f/ 2.5, 1/500 sec

Week 5 (9/1/2013 – 9/7/2013): 9/11 Memorial, New York City, NY
Picture taken on 9/5/2013 at 5:44 PM

Picture Description

In a less than a week 12 years will have passed since September 11th, 2001 and prior to this week I never visited the hallowed ground that was the location of the World Trade Center towers.  I have wanted to pay my respects by visiting the grounds for some time now and this week I finally made the time to visit the 9/11 memorial.

As expected prior to entering the memorial you’re paraded through an array of security screenings and lots of twisting alley ways.  When you finally get into the memorial area it’s a surreal feeling especially when you think about the significance of the ground you’re now standing on.  So much that has happened over the past 10+ years has been a result of what happened there on that fateful day.  The events of 9/11 will forever remain in the forefront of my mind.  As with most Americans, especially those that live in the New York area, I can vividly replay much of the day in my mind as if it was only yesterday.  I was fortunate to not lose any loved ones through the tragic events and it’s hard for me to even fathom what those that did had to go through, and still do.  As I walked around I tried to do so respectfully since I’m sure among the crowd there were at least a few visitors that had lost someone.   The reflecting pools are both architecturally beautiful and symbolically somber.  The pools each take up about an acre of space and the perimeter of each pool is lined with the names of those that lost their lives.  The relationship you can draw between the magnitude of the pools and encircling list of names is powerful and very sobering.   While walking around you randomly come upon names with flowers, flags and other items placed or wedged into the cracks of letters.   I don’t know how often flowers and such are removed but my guess is that the presence of one means someone placed it there that day or very recently.  During my walk around the North pool I noticed that someone had placed a flower on a loved one’s name just below the World Trade Center heading.  I thought the flower with the reflection pool backdrop would make for a meaningful picture.

blog_5-final(2)

I hope after reading this you too go visit the memorial to pay your respects and experience this all for yourself.  I’d also like to say if anyone is reading this and lost a loved one, you have my deepest condolences.

Photography Concepts 

This picture was very straight forward, unlike last week nothing was moving so I just line everything up and fired away.  As I take more and more pictures I’m beginning to learn what the ideal settings are for specific ‘looks’.  This picture for example, I wanted to emphasize the flower, names and obviously “World Trade Center.”  If you read my first blog you might be able to guess one of the settings I used to get the blurred background.  If you said wide aperture, you were correct!  I used an aperture of f/2.2 to blur out the reflecting pool.  The second and main part in capturing this picture was utilizing my camera’s focus points.  I used a single point auto-focus to mainly to make sure “World Trade Center” was properly focused but oddly enough there is more effected with using focus points than just ‘focus’ so that’s what I’m going to talk about.

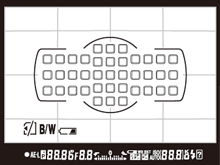
Nikon D5200 Focus Points - Taken from below Nikon Website

Nikon D5200 Focus Points – Taken from below Nikon Website

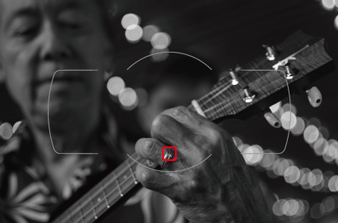
When it comes to “auto-focus” my Nikon D5200 has 4 different focusing modes but for now I’ll just talk about the one I used. I used single point auto-focusing for this picture which is what I use for most of my pictures. For anyone that doesn’t have a DSLR you might be unfamiliar with the term focus points.  They’re exactly what you’d think they are, selectable focus areas I see when looking through the lens.  Similar to what you see on standard camera’s or camera phones, however on my camera they’re not totally free moving.  For example, on most camera phones you pretty much touch anywhere on the screen and it uses that as the main focus point.  On a camera such as mine I’m limited to 39 focus points.  The really high end DSLR cameras (e.g. Nikon D4 – 51 focus points, Canon EOS 5D Mark III – 61 focus points) have more but I’m yet to run into any issues using 39.  Beyond focusing, by manually selecting the exact focus point I’m able to have more control over my camera’s exposure. One scenario where how the camera sets exposure comes into play is when you’re dealing with multiple light sources such as natural/unnatural light in one photo.  I’ve noticed that finding the best medium exposure matters most when you’re trying to incorporate the sky into a photo.  A lot of times if you set your exposure off an object the sky gets over exposed meanwhile if you set it off the sky your object (subject) gets under exposed.  Finding the middle ground in terms of exposure can be hard and is somewhat fixable after the fact but pictures come out way better if you do the right exposure in camera.  What I usually do is try to set my focus point somewhere close to both my subject and the sky to obtain the best exposure.  The problem with not selecting your actual subject is you have to use a smaller aperture to make sure more of the image (such as your subject) is in focus and not blurred out.  Since I wanted a blurred background in my photo I had to go with the wider aperture so when I put my focus point on the World Trade Center it ended up over exposing the background a little.  Nothing I wasn’t able to fix in LightRoom but it’s something you have to keep in mind.  If you over expose too much the detail of a picture isn’t always recoverable.  To have more flexibility lately I’ve been shooting in RAW form or in Nikon terms .NEF files.  Based on everything I’ve watched/read shooting in RAW verses JPEG retains more of the pictures editable attributes.  No matter what camera you have, one with RAW mode, 1 or 51 Focus points, when used correctly focus points can greatly help set the right exposure for you picture.

Nikon D5200 Single Focus Point - Taken from below Nikon Website

Nikon D5200 Single Focus Point – Taken from below Nikon Website

Nikon D5200 Article source for two pictures:
http://imaging.nikon.com/lineup/dslr/d5200/features02.htm