Never Forget

ISO 160, 35mm, f/ 2.5, 1/500 sec

ISO 160, 35mm, f/ 2.5, 1/500 sec

Week 5 (9/1/2013 – 9/7/2013): 9/11 Memorial, New York City, NY
Picture taken on 9/5/2013 at 5:44 PM

Picture Description

In a less than a week 12 years will have passed since September 11th, 2001 and prior to this week I never visited the hallowed ground that was the location of the World Trade Center towers.  I have wanted to pay my respects by visiting the grounds for some time now and this week I finally made the time to visit the 9/11 memorial.

As expected prior to entering the memorial you’re paraded through an array of security screenings and lots of twisting alley ways.  When you finally get into the memorial area it’s a surreal feeling especially when you think about the significance of the ground you’re now standing on.  So much that has happened over the past 10+ years has been a result of what happened there on that fateful day.  The events of 9/11 will forever remain in the forefront of my mind.  As with most Americans, especially those that live in the New York area, I can vividly replay much of the day in my mind as if it was only yesterday.  I was fortunate to not lose any loved ones through the tragic events and it’s hard for me to even fathom what those that did had to go through, and still do.  As I walked around I tried to do so respectfully since I’m sure among the crowd there were at least a few visitors that had lost someone.   The reflecting pools are both architecturally beautiful and symbolically somber.  The pools each take up about an acre of space and the perimeter of each pool is lined with the names of those that lost their lives.  The relationship you can draw between the magnitude of the pools and encircling list of names is powerful and very sobering.   While walking around you randomly come upon names with flowers, flags and other items placed or wedged into the cracks of letters.   I don’t know how often flowers and such are removed but my guess is that the presence of one means someone placed it there that day or very recently.  During my walk around the North pool I noticed that someone had placed a flower on a loved one’s name just below the World Trade Center heading.  I thought the flower with the reflection pool backdrop would make for a meaningful picture.

blog_5-final(2)

I hope after reading this you too go visit the memorial to pay your respects and experience this all for yourself.  I’d also like to say if anyone is reading this and lost a loved one, you have my deepest condolences.

Photography Concepts 

This picture was very straight forward, unlike last week nothing was moving so I just line everything up and fired away.  As I take more and more pictures I’m beginning to learn what the ideal settings are for specific ‘looks’.  This picture for example, I wanted to emphasize the flower, names and obviously “World Trade Center.”  If you read my first blog you might be able to guess one of the settings I used to get the blurred background.  If you said wide aperture, you were correct!  I used an aperture of f/2.2 to blur out the reflecting pool.  The second and main part in capturing this picture was utilizing my camera’s focus points.  I used a single point auto-focus to mainly to make sure “World Trade Center” was properly focused but oddly enough there is more effected with using focus points than just ‘focus’ so that’s what I’m going to talk about.

Nikon D5200 Focus Points - Taken from below Nikon Website

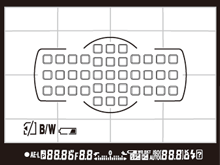
Nikon D5200 Focus Points – Taken from below Nikon Website

When it comes to “auto-focus” my Nikon D5200 has 4 different focusing modes but for now I’ll just talk about the one I used. I used single point auto-focusing for this picture which is what I use for most of my pictures. For anyone that doesn’t have a DSLR you might be unfamiliar with the term focus points.  They’re exactly what you’d think they are, selectable focus areas I see when looking through the lens.  Similar to what you see on standard camera’s or camera phones, however on my camera they’re not totally free moving.  For example, on most camera phones you pretty much touch anywhere on the screen and it uses that as the main focus point.  On a camera such as mine I’m limited to 39 focus points.  The really high end DSLR cameras (e.g. Nikon D4 – 51 focus points, Canon EOS 5D Mark III – 61 focus points) have more but I’m yet to run into any issues using 39.  Beyond focusing, by manually selecting the exact focus point I’m able to have more control over my camera’s exposure. One scenario where how the camera sets exposure comes into play is when you’re dealing with multiple light sources such as natural/unnatural light in one photo.  I’ve noticed that finding the best medium exposure matters most when you’re trying to incorporate the sky into a photo.  A lot of times if you set your exposure off an object the sky gets over exposed meanwhile if you set it off the sky your object (subject) gets under exposed.  Finding the middle ground in terms of exposure can be hard and is somewhat fixable after the fact but pictures come out way better if you do the right exposure in camera.  What I usually do is try to set my focus point somewhere close to both my subject and the sky to obtain the best exposure.  The problem with not selecting your actual subject is you have to use a smaller aperture to make sure more of the image (such as your subject) is in focus and not blurred out.  Since I wanted a blurred background in my photo I had to go with the wider aperture so when I put my focus point on the World Trade Center it ended up over exposing the background a little.  Nothing I wasn’t able to fix in LightRoom but it’s something you have to keep in mind.  If you over expose too much the detail of a picture isn’t always recoverable.  To have more flexibility lately I’ve been shooting in RAW form or in Nikon terms .NEF files.  Based on everything I’ve watched/read shooting in RAW verses JPEG retains more of the pictures editable attributes.  No matter what camera you have, one with RAW mode, 1 or 51 Focus points, when used correctly focus points can greatly help set the right exposure for you picture.

Nikon D5200 Single Focus Point - Taken from below Nikon Website

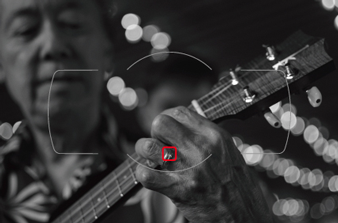
Nikon D5200 Single Focus Point – Taken from below Nikon Website

Nikon D5200 Article source for two pictures:
http://imaging.nikon.com/lineup/dslr/d5200/features02.htm

A Shot in the Dark

Picture Specs: ISO 4000, 35mm, f/2.8, 1/13sec

Picture Specs: ISO 4000, 35mm, f/2.8, 1/13sec

Week 4 (8/25/2013 – 8/31/2013): East River, New York, NY
Picture taken on 8/28/2013 at 8:10 PM

Picture Description:

I’m on a Boat!!! Well…I was on Wednesday and that’s where I got the picture for this week’s post.  Hopefully you get the reference and if you don’t shame on you, go watch some SNL highlights.  Unlike the members of “The Lonely Island” I was not on a boat to shoot a music video with T-pain (damn), I was celebrating my parent’s 30th wedding anniversary.  We spent the evening on the Duchess which is part of World Yacht’s fleet of party boats.  Our cruise left from pier 81 at around 7PM and provided us with beautiful views the entire night!  I highly recommend booking a trip on World Yacht if you’re looking for a unique way to celebrate an occasion or trying to plan a memorable night out in the city.

View from the top deck of "Duchess" - World Yacht

View from the top deck of “Duchess” – World Yacht

Going into the evening I knew I’d have plenty of scenic picture opportunities but since I was there for my parents the time I could devote to getting a picture was limited.  Luckily I ended up sitting right next to a window which opened and allowed me to lean out and get this week’s picture.  The Brooklyn bridge is one of the most iconic New York City landmarks so when it appeared on the horizon I immediately put my steak knife down and grabbed my Nikon.  The shot I got is of the “BMW” bridges or Brooklyn, Manhattan, and Williamsburg bridges as we traveled North on the East river.

Photography Concepts:

If there was one overall lesson I learned this week, it’s that taking pictures on a boat and at night is VERY difficult.  First, the lighting is inconsistent  (low, high, indoor, outdoor)  which makes it difficult to tune in your exposure.  Second, surprise the boat is moving good luck focusing! Third, if you’re taking pictures of subjects off the boat you have to act fast because you have a very small window to get the shot you just saw.  As a result of hitting moving targets your composition is constantly changing.  Normally when you frame up a picture you’re standing still so you can get a couple pictures, not on a boat, snap fast and often!  In my opinion the combination of moving targets and low light was definitely the hardest aspect of this week.

This picture was tricky and I definitely wish I had a couple more shots at it.  Just like last week I had to use a high ISO but this time it was almost double (4000) which starts to show the negative attributes of a high ISO.  My picture (pre-edit) was a little grainy which is what happens when you use a high ISO.  I won’t try to explain why graininess (aka noise) happens but there are plenty of places to read about it online (one linked below).  While editing my picture in Lightroom I did my best to lessen the graininess by using some noise reduction corrections, which made for a softer (less sharp) image.  This is the first time I’ve mentioned Lightroom but let me tell you, it’s awesome!  I’ll talk more about it another time but I highly recommend it for editing/organizing all your pictures.

Other than a high ISO to make up for the limited amount of light I also had to use a wide aperture (f/2.8) and slow shutter speed (1/13 of a second!).  Now remember slower shutter speeds blurs motion so using one on a moving boat is risky.  I think this picture came in focus enough but if I was on land it would have been a lot sharper and I probably would have used a tripod.  I could have opened my aperture more (max f/1.8) to enable a faster shutter, but the wider the aperture the shallower the depth of field which isn’t ideal for a landscape picture.  As I mentioned earlier the window (especially when shooting through a literal window!) of opportunity for a picture is limited so I didn’t have enough time to work my way up the aperture scale (large to small).  Even if I had more time though a shutter of 1/13 is already too slow so I couldn’t drop that any further which I’d have to do if I shrunk my aperture.   As I said, this was a tricky picture.

One more big lesson that I learned this week (which isn’t really demonstrated in this picture) was the importance of white balancing.  While taking picture inside the boat everything seemed yellowy due to the indoor lighting.  Once the light stabilized inside I took a couple pictures of my white balance cards in the different parts of the boat so I could adjust everything in Lightroom later.  Let me tell you WOW what a difference!! I’ll try to get a picture in the coming weeks to demonstrate the usage of white balancing.  If you’re a beginner like me you’re going to be surprised by the results.

Links:

World Yacht Site: http://bit.ly/14KB8zR

ISO/Noise Article: http://bit.ly/18qN5bB

A Day of Reflection

Picture Specs: ISO 500, 35mm, f/9.0, 1/200 sec

Picture Specs: ISO 500, 35mm, f/9.0, 1/200 sec

Week 2 (8/11/2013 – 8/17/2013): Corner of 6th/42nd Bryant Park, New York City
Picture taken: 8/14/2013 at 5:50PM

Picture Description:

If you were to ask me what are my favorite locations in New York City, Bryant Park would absolutely be in my top five.  Although I pass the park almost every day (during my commute to work) I don’t always have the time to stop and enjoy everything it has to offer.  If you’ve spent any amount of time in the park you know it’s a very busy place filled with a diverse group of people.  It’s safe to say there is an activity for almost anyone, year round. One part of the park that I never explored was the New York Public Library.  Yes, for those of you that know me I went into the library, voluntarily!  No I did not borrow any books BUT I did have fun checking out the amazing architecture throughout the building.  At the start of my visit, my plan was to get a picture of the “Rose Main Reading Room” however that didn’t come out as I hoped.  A picture with the 35mm didn’t do the room justice (trust me, Google it) you really need a wide-angle lens, so I decided not to use that picture for this post.

Taken via NYPL’s Photobooth

After exploring the library, I took my adventure outside.  In the heart of the park there were hundreds of people out enjoying the beautiful 70 degree sunny weather.  Both of the park’s restaurants were buzzing and the lawn was littered with people hanging out next to the towering movie screen sitting on the west side of the lawn.  In case you don’t know, HBO has a film festival that runs every Monday during the summer.  The festival makes for a great dinner and a movie idea, but those kind of tips would need a whole other blog so I’ll leave it at that.

After doing a quick walk-through of the park one thing that immediately caught my eye was how most of the buildings surrounding the park were picking up great reflections of one another.  A reflection shot usually makes for an interesting and unique photo so I decided this would be the perfect idea for this weeks post.

Photography Concepts:

There weren’t a lot of technical intricacies to this week’s photo other than timing.  Prior to going to Bryant Park I knew when the sun would be at the right angle (no pun intended) for some nice shots and maybe even a good reflection picture.  I use an APP on my iPhone called “The Photographer’s Ephemeris” which tells me the angle of the sun based on time/day.  If you’re looking to use the sun as a part of your picture or get a reflection shot I highly recommend using this application when planning your shot.

One composition concept that I attempted to use at least subtly is “leading lines”.  When you look at the picture the lines sort of lead you to the corner of the building where you notice you’re not looking at a blurry picture, you’re actually looking at a reflection.  At least that’s the way I saw it.

Last, when shooting during the day even though there is plenty of natural light, at some points I had to slow down my shutter speed or boost my ISO.  I’ll talk about this more when I take a night picture but take note that for a picture like this when you want everything in focus you need to use a smaller aperture.  I used f/9 which is (based on everything I read) a good aperture for landscapes.  Since a smaller aperture means less light, you have to compensate with a higher ISO or slower shutter speed.

Challenges:

I’m only in week two and I can already see how challenging the 52 from 52 concept is going to be.  Luckily I like a challenge, anything worthwhile takes time and effort.  I put a decent amount of thought into what I wanted to photograph this week.  I naturally have lots of ideas but some of them are about timing (weather, time of day, ect.) while others are location based and require traveling.  With a busy schedule, one of my biggest difficulties will be setting aside the time to go out and take pictures each week…but that’s the purpose of this, to force me to get out there and learn!

First Post!

Picture Specs: ISO 100, 35mm, f/1.8, 1/100 sec

Picture Specs: ISO 100, 35mm, f/1.8, 1/100 sec

Week 1 (8/4/2013 – 8/10/2013): Hoboken uptown Pier
Picture taken on 8/6/2013 at 5:45AM

Picture description:

For those of you that follow my instagram or are friends with me on facebook you’ve probably noticed I like to take pictures of the New York City skyline, particularly from the Hoboken piers.  Initially I told myself I wasn’t going to start with a skyline shot but in the end it made the most sense for at least one BIG reason.  Taking skyline pictures is pretty much what got me into photography in the first place. The more skyline pictures I took the more I realized how much I enjoyed taking pictures and that I really needed a better camera.  The second reason this picture is significant is because it’s by far my favorite spot in Hoboken.  I’ve dubbed this “my bench” and usually spend at least one morning/evening a week sitting here soaking in the view.  Whether I’m drinking my morning coffee or taking a breather after a run on the pier, I often find myself back at this bench.  My favorite time to sit here is the early morning for a couple reasons; there are a lot less people walking around, you hear tons of birds chirping and waves crashing during high tide, and you obviously get a great view of the sunrise.  It’s very tranquil and a great way to start out your day.  Trying to capture the feeling of sitting in this bench is why I decided to start out with this picture.

Photography concepts:

First I shot this picture at f/1.8 which is the widest aperture (opening of the lens) and shallowest depth of field I can take.  It might seem odd but the smaller the ‘f’ number the larger the opening of the lens is.  While the larger the ‘f’ number the smaller the opening is and the more things are in focus.  I took this picture with a small ‘f’ (fstop/aperture) of 1.8 initially to put the bench in focus and blur out the skyline but after trying one in reverse with my focus point on the buildings, I liked this one better.  Shallow depth of fields give that blur effect and are hard if not impossible to pull off with a camera phone since you can’t control your camera’s lens opening like with a DSLR.  For my fellow instagramers, the blur feature on instagram is meant to mimic depth of field shots but it’s limited to the circle or straight area.  I felt like by using the shallow DOF in this picture it makes it easier to imagine yourself sitting on the bench.

The second concept in play is the rule of thirds.  In this picture the bench is in the far left/bottom third of the picture with the rest of the scene in the middle/right thirds.  For anyone that doesn’t know about the rule of thirds, it’s just breaking the picture into thirds vertically and horizontally (seen below).  This results in 9 boxes with 4 intersection points.  It’s said that by putting subjects or things such as eyes on these lines makes for more dramatic pictures.  In my picture the bench  is on one of the intersection points and clouds are on two.  Using the rule of thirds in this way helps you focus on the sky and give you the feeling of looking out from the bench from left to right.

DSC_0023-ruleofthirds

The last sort of “concept” that I want to point out is the timing of the shot.  When shooting sunrises or sunsets it’s said that the best light is +/- 30 minutes of the actual sunrise or sunset time.  On the morning of this picture the sunrise was at 5:58 AM.  I got to my spot a little later than I had hoped (hit the snooze a couple times) but I still managed to get the light I was looking for.  Once it got close to and then past the actual sunrise time the colors seemed more washed out.  Overall I’ve learned that my favorite time to take pictures of the sunrise is before the time and for sunsets is after.