One shot

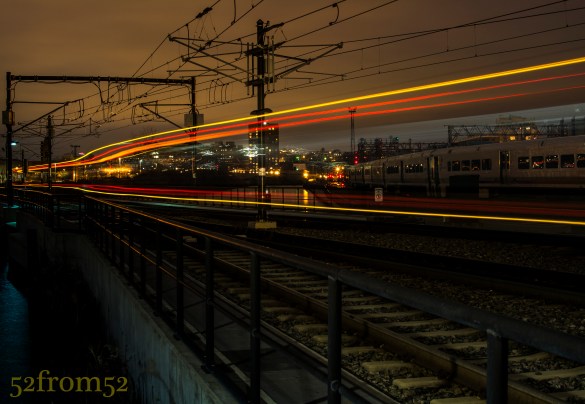
Picture info: ISO 100, 35mm, f/9, 30seconds, 0.6 neutral density filter, -2 exposure stops

Picture info: ISO 100, 35mm, f/9, 30sec, 0.6 neutral density filter, -2 exposure stops

Week 17 (11/25/2013 – 12/1/2013): Hoboken Light Rail Station
Picture taken on 11/30/2013 at 5:12 PM

Picture description:

Opportunities come and go, and sometimes you only have one shot to take advantage of them.  That was absolutely the case for my week 17 picture.   This week I picked up some neutral density filters (I’ll explain what these are in the concepts section) which I wanted to experiment with.  Coming into the week my goal was to venture into the city to get some kind of street shot/long exposure.   When it came time to go out and shoot on Saturday I was a bit demotivated due to two things. First it was really cold outside, and the second reason was because of the conflicting online posts about wether or not it’s okay to use a tripod in New York City. Since I wasn’t in the mood to argue my way out of a ticket I decided to play it safe and set out for an area in Hoboken that I have been meaning to photograph for a while.

The location I chose for this week’s shoot was a walkway between the Hoboken train station and Newport, Jersey City.  I’ve seen some really nice pictures on Flickr that were taken from this seemingly hidden location.  Many of the pictures featured old dock posts of a broken down pier with either the Jersey City or New York city skylines in the background.  With a couple clear pictures in mind I set up my tripod and started taking some long exposures.

After spending about 2 hours taking long exposures and chasing lots of seagulls I decided to call it a night.  As I started to pack up my gear I spotted a potential picture which would feature the light-rail train as it left the station.  I figured why not give it a shot?  I quickly set up my tripod on the edge of the tracks in preparation for the next train.  The trains were coming about every 30 minutes, so unless I wanted to wait out in the cold for the next one, I’d have only one shot at capturing a good picture.  From the distance I heard the bell sound announcing the train’s pending departure, I quickly clicked my camera’s shutter release, sat back and watched as the light-rail moved in and out of the frame.   After what seemed like an eternity, but really was only 30 seconds, my camera finished taking the picture and I eagerly awaited seeing what it captured.  Once the preview came up on the screen I immediately knew this was the picture I had to feature in this week’s post.

Photography concepts:

This is the second “long exposure” post that I’ve done, the first being my week 6 picture “Night Light.”  Since week 6 I’ve learned some new tricks for taking and editing long exposure pictures.  As I am becoming better from past lessons, I’m able to add more moving parts and that’s what spurred on this week’s experiment with neutral density filters.

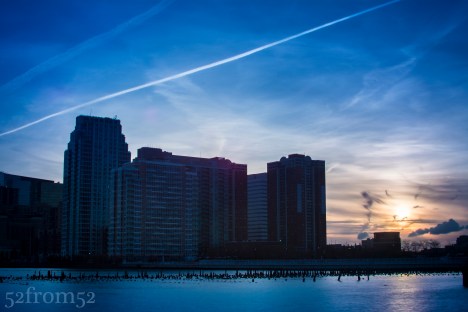
Neutral density filters, commonly called ND filters are pieces of glass that come in many shapes and sizes but ultimately block light from hitting your camera’s sensor.  As I mentioned in this weeks description, my goal for the week was to get a long exposure but you don’t need an ND filter to do this.  Although ND filter’s are not required for all long exposures, they are if you want to take a long exposure during the day or anytime there are bright light sources.  With the use of ND filters you’re able to use settings that would usually not be feasible in certain conditions or due to other selected camera settings such as wide apertures. Usually when you use slow shutter speeds (20-30 second) you have to shrink your aperture to f/13-f/20 to limit the amount of light.  f/13 isn’t bad but once you start approaching f/20 pictures lose their crispness, this is where the ND filters come in handy.  Take the below picture for example.  The sun was setting behind the buildings and flooding my camera’s sensor with light.  Given the amount of light, and having already maxed out at the smallest aperture my lens can shoot with (f/20), I would usually only be able to use a fast shutter.  With the use of the ND filters I was able to shoot with a 4 second shutter speed.  For the below picture I used a combination of ND filters which totaled out at a 2.7  density rating,  which is equivalent to -9 exposure stops.

Picture info: ISO 100, 35mm, f/20, 4 seconds, 2.7 ND filter, -2 exposure stops

Picture info: ISO 100, 35mm, f/20, 4 sec, 2.7 ND filter, -2 exposure stops

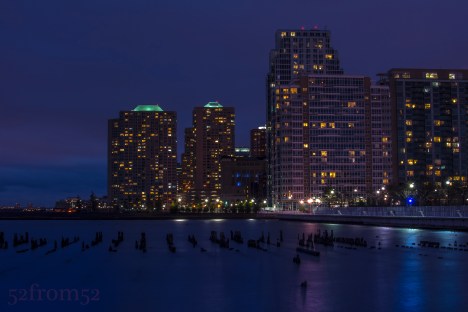
Now you’re probably asking why would you want to do a long exposure for a picture such as this, and what are the effects? One reason/effect is the smooth and very reflective water.  Notice how the water has begun to almost look like ice in the above picture.  The smoothing effect is even more prevalent in the below picture where I used a 30 second exposure and a 0.6 ND filter.

picture info: ISO 100, 35mm, f/14, 30 seconds, 0.6 ND filter, -2 exposure stops

Picture info: ISO 100, 35mm, f/14, 30 sec, 0.6 ND filter, -2 exposure stops

All this being said, how did the ND filter help me with this week’s picture? In order for me to capture the train’s full movement from right to left I needed to use a 30 second shutter speed.  As mentioned in previous blogs, night pictures look better when under exposed but even with dropping the exposure down 2 stops I still wasn’t able to hit the 30 second shutter speed mark.  Add in the fact that once the train passed by my camera’s sensor was going to get a burst of light it was very important to somehow compensate.  I didn’t want to shoot with too small of an aperture so here is where the ND filter came in.  I used a 0.6 ND filter which is equivalent to -2 exposure stops, this allowed me to maintain a good night exposure, use an aperture of f/9 and hit my 30 second shutter speed.  The result of the 30 second exposure was the very vivid light trail that’s featured in this week’s picture.  This was my first time experimenting with the ND filters so expect some more pictures and feedback in some coming blogs.  For more info on ND filters check out the below link.
http://www.digitalcameraworld.com/2012/07/05/how-and-when-to-use-nd-filters-and-what-the-numbers-mean/

Getting a-head

Picture Specs: ISO 200, 35mm, f/5, 1/30 sec

Picture Specs: ISO 200, 35mm, f/5, 1/30 sec

Week 10 (10/6/2013 – 10/12/2013): My Apartment, Hoboken NJ
Picture taken on 10/10/2013 at 4:53 PM

Picture description:

In life it’s always better to get ahead.  Getting ahead was the catalyst for this week’s picture/concept.   As I’m gaining more experience and exposure in the photography world, more opportunities are presenting themselves.  One upcoming project is going to require me to take a lot of indoor pictures and possibly product/macro types of shots.  In an effort to prepare (get ahead) for this future project, and to explore more areas of photography I decided to experiment with “studio” photography.  Now I don’t have a studio or access to one so the best I could do is purchase an at home alternative to allow me to take some small scale pictures.  Luckily one of the best companies to buy photography gear from has a storefront in New York City and not too far from my office.  I’m of course talking about B & H.  After doing some research online about what I should get I took a trip to B & H to check everything out in person.  I spoke to one of the employees who recommended a duel light set up which would have been both bulky and expensive.   I decided his suggestion wasn’t the route I wanted to take and ended up settling on the “MyStudio” portable photo studio with built in lighting.  It came at a reasonable price and it seemed to be the perfect size to be functional in my apartment.

Setting up “MyStudio” was pretty quick and easy.  Of course it helps that I’m a handy man (not by trade) but I feel like most people would be able to put everything together in under 10-15 minutes.  Once everything was set up it was time for the fun to begin.  Per my brother “anything is cool if you’re a good photographer”  at least in terms of macro photography so I took that as a challenge.  I began going through my room and photographing almost anything that would fit in “MyStudio.”  Although my brother was right, not everything that I took a picture of could easily tie into a post.  I decided to find something a little more relevant.  My “getting ahead” philosophy (along with Halloween being around the corner) is what drew me to skulls (heads) that are featured in this week’s picture.

Photography concepts:

One big difference between this picture and those of past week’s was I needed a decent amount of equipment to make this happen.   For starters I needed the “MyStudio” which I would recommend to anyone looking for a small at home studio option (link/picture below).  Next I needed a tripod since with macro/studio photography sometimes you have to take longer exposures to capture more light and you really need to line everything up with precision.  I probably could have gotten away with not using a tripod but I already had a good one so there was no reason to not.  Another key tool you need while doing studio photography and any other indoor shots are white balance cards.  I’ve mentioned white balancing before but this week it was really key.  When you’re using a white balance card you usually take a reference shot and either tune your camera into that setting or use the reference shot as a guide for setting all your white balance in editing.  This week I decided to leave my white balance cards in the picture so you could get an idea about how I used them.   The last and most obvious (other than my camera) thing that I needed was a subject.  In the past I found real life subjects to photography, while this week I had to find and place my subject.  Having the freedom to get creative was nice but also very challenging.

MyStudio; Taken from BH's site (link to product below)

MyStudio; Taken from BH’s site (link to product below)

The main challenge about having “creative freedom” was positioning my subjects and relationally lining up my camera.  When you’re working on such a small scale the slightest adjustments to your camera’s angle or the location of your subject changes the entire dynamic of the picture.  Using this week’s picture as an example.  You’ll notice that the single skull and the bag of skulls are a little offset with the single skull being further up in the picture.  I positioned the single skull forward so it was larger in the picture but I had to push the bag back to get it in the full frame.  Once I put the two subjects on different planes, in relation to my camera’s lens, it forced me to use a smaller aperture.  If I had shot this picture with a f/1.8 instead of f/5 the single skull would have been in focus and the bag blurry.  Even with f/5 you can already start to see some of the blur in the back portion of the bag.  Based on what I’ve read, along with my own experience with wider apertures (smaller f numbers) the plane of focus becomes very thin.  What this means  is only the things that are on the same plane as your subject will be in focus.  The smaller the aperture the deeper the in focus plane gets.  I haven’t done enough reading to explain the mathematics behind this focal plane concept but I feel like this picture was an easy way to demonstrate the concept and it’s challenges.

There is still a lot more to learn about indoor shooting so this topic might get featured again in the coming weeks. Let’s just say for now this is to be continued…

BH Link for “MyStudio”

http://www.bhphotovideo.com/c/product/727653-REG/MyStudio_PS5_PS5_PortaStudio_Portable_Photo.html