Center of Attention

Picture Info: ISO 200, 35mm, f/8, 1/320sec

Picture Info: ISO 200, 35mm, f/8, 1/320sec

Week 16 (11/18/2013 – 11/24/2013): Wagner Park, New York City
Picture taken on 11/23/2013 at 5:04 PM

Picture description:

Back in September I discovered the beautiful location that is Wagner Park.  After getting the picture for my week 5 post, Never Forget, at the Freedom Tower, I had dinner with my wonderful mother for her birthday at a place that had long been on my “To Try” Yelp list.  The restaurant I’m talking about is Gigino at Wagner Park and let me tell you put it on your to do list.   Gigino has outdoor seating (weather permitting) which provided us with one of the best sunsets I’ve ever seen while we ate a delicious dinner.  After dinner I knew that I’d have to make a return trip in the near future, if not for a date, I’d absolutely have to take my camera to capture the scenic views at Wagner Park.

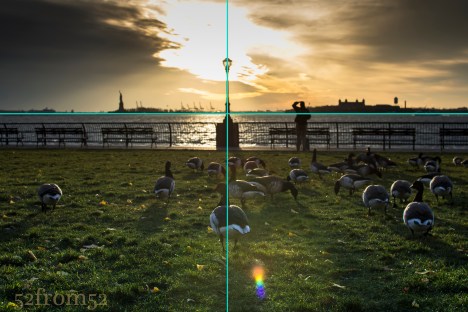
Since September I haven’t made it back to Gigino, mainly because it’s gotten far too cold to take anyone on a date there.  That being said I can handle the cold on my own so this past Saturday I decided to take a trip to Wagner Park around sunset to see what kind of pictures I could get.  Luckily as it turned out I chose a great night that provided a really interesting and vivid sunset.  Out of all the sunset pictures there was one picture that really caught my attention during editing.  It’s pretty obvious which picture I’m talking about, look up, but let me give you the quick story behind it.

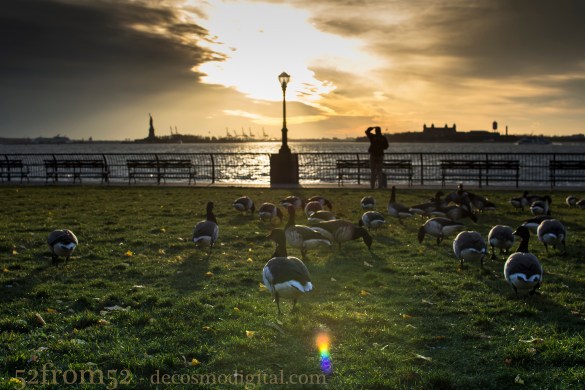
After arriving at Wagner Park I noticed that I wasn’t the only one that decided today was a good day to hang out in the park.  No I’m not talking about a person, although they were there too, I’m talking about a brace of ducks.  Yes, a group of ducks is called a “brace” look it up, I did.  As I walked around the park trying to figure out where would be the best place to get my sunset shot I kept glancing over to the ducks.  Eventually I decided why not see if I can creep up on the group and snap a birds eye view?  Since the sun was so strongly beaming down from the horizon I couldn’t use the viewfinder (I’ll explain this more later) I blindly lined up my shot and fired away.  With each picture I adjusted my shot based off the last picture’s preview.  After a couple shots I finally “walked in” my picture’s composition to something that I liked, and here you have it.

Photography concepts:

As I mentioned in the description section this picture was shot basically blind and through a series of picture to picture adjustments.  The reason I did this is first because I could not use the viewfinder.  It might seem obvious but when you’re taking a picture directly into the sun you can’t look through the viewfinder.  Why? Well the sun is dangerous enough to look at with the naked eye, forget about through essentially a magnifying glass.  Since I value my eyesight I won’t even risk getting flashed with the sun’s blinding light.   For shot’s into the sun this leaves the live-view option which is the back screen.  Although I could have used the live-view I don’t like how it focuses, it’s not fast enough for moving objects.  With the ducks moving around I wanted to be able to fire quick shots and thus did not use the live view.

A concept I tend to mention in almost every post is the rule of thirds.  This time though I want to highlight how I didn’t exactly follow the rules.  In this picture I had three things that I considered the focus of my shot, or my main subjects.  One was the sun, two was the light post and the third the ducks, more specifically the one duck that was closest to me in the foreground.  When it came time to align my shot rather than put the sun on one of the left or right third lines like I usually do I centered it.  I also centered the main duck and the light poll, which only further highlighted the sun.  Aligning the sun with the light post gave off the effect that the light post is the reason the sky is so illuminated.    The reason I said I did’t exactly follow the rule was because I did follow it for some other parts of the picture.  For example, I did not put the horizon in the absolute center of my picture.  I gave more weight to the ducks/grass rather than the sky to further emphasize them in the picture. Another way I loosely followed the rule of thirds was putting some of my  secondary subjects close to the cross points of the upper thirds line on the left and right.  I’m talking about the Statue of Liberty and Ellis Island.  Although this falls under the rule, it was more of an accident but I’m glad everything lined up with such great symmetry.

Center Vs. Rule of Thirds

Center Vs. Rule of Thirds

The last thing I want to mention real quick is how I edited the sky.  In the unedited photo the sky was really blown out from the sun.  As I’ve mentioned before since I shoot in a RAW format I’m able to recover some of the detail even when images get over or under exposed.  Below is a comparison of how the image originally looked and how it did after I dropped the exposure for just the sky by about 2 steps.  One way I might have been able to avoid doing this is shooting in HDR mode or creating one via bracketing and photo merging.  I haven’t talked a lot (if at all) about HDR but it’s something I plan to in some future posts.  Right now I’m still in the experimental stages with my Nikon as far as HDR but it’s one of my favorite effects with my iPhone 5s.  More to come on this subject soon!
Edited (via Lightroom) vs Unedited

Edited (via Lightroom) vs Unedited

Need for Speed

Picture Specs: ISO 200, 35mm, f/1.8, 1/4000sec

Picture Specs: ISO 200, 35mm, f/1.8, 1/4000sec

Week 15 (11/11/2013 – 11/17/2013): Palisades interstate park
Picture taken on 11/16/2013 at 5:20 PM

Picture description:

This week’s photo was captured at the Palisades Interstate Park, a place that I haven’t been to since I was a kid.  If you’ve never gone I highly recommend spending the day exploring all that the park has to offer.  The park is nestled on the palisades cliffs which are both beautiful and dangerous so mind the paths.  Jutting out from the cliffs is none other than the iconic George Washington Bridge which is always a sight for sore eyes, granted you’re not stuck in traffic on it.  To add to the parks beauty when you’re north of the bridge you have a sprawling view of the Manhattan island coastline aka New York City.

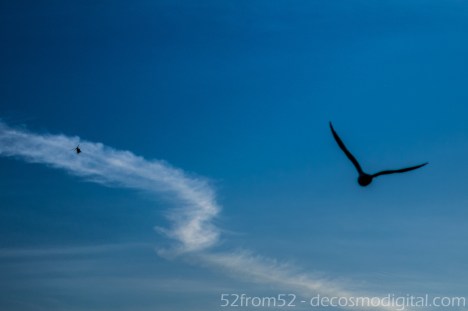
Helicopter Vs Seagull Joust

Helicopter Vs Seagull Joust

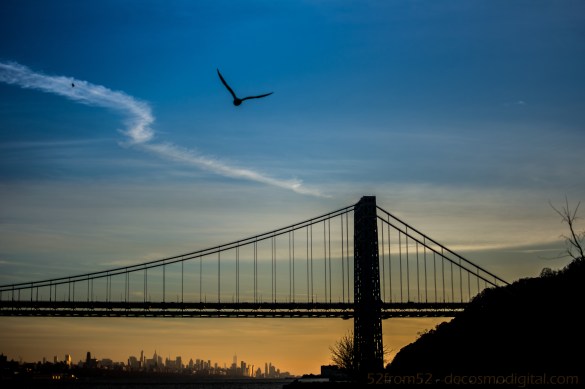
While walking around the park there were two things buzzing around the sky that kept grabbing my attention.  One was a pair of helicopters which were doing fly bys of the bridge, my guess is they were filming for either a TV show or movie.  The second airborne thing that I couldn’t help but notice was all of the seagulls flying around.  At one point I was able to creep up within inches of one seagull that seemed to like the lime light of my camera.  Unfortunately my Dr. Doolittle moment was spoiled when a couple of rude people crashed my photoshoot, naturally scaring away the Zoolander of seagulls.  Luckily this forced me to move locations which is where I stumbled upon a big flock of birds that kept doing take off runs towards the bridge.  While one bird launch from the cliffs he seemingly locked into an aerial joust with one of the helicopters.  It might be a little hard to see at your first glance but if you look at this week’s picture close enough you’ll see the helicopter’s silhouette in the top left.  At the time of the picture I wasn’t sure if I actually caught this freeze frame but I was pleasantly surprised when I found it during editing.  Capturing this moment was a good cap off to an amazing day!

Zoolander the Seagull

Zoolander the Seagull

Photography concepts:

If I had to sum up the key element to this week’s photo in one word it would be speed!  As you can imagine when trying to capture not just one but two moving targets you have to shoot fast.  There were two setting which enabled me to get this picture, a quick shutter and autofocus.  I shot this picture at the fastest my camera can take a picture which is 1/4000 of a second.  As I’ve mentioned in previous posts my Nikon has 39 auto-focus points which was great for getting the bird, bridge and helicopter all at once.  I got a little lucky at the time of this picture though because I kept switching between auto-focus and selective focusing but was thankfully on auto-focus when the “jousting” moment occurred.

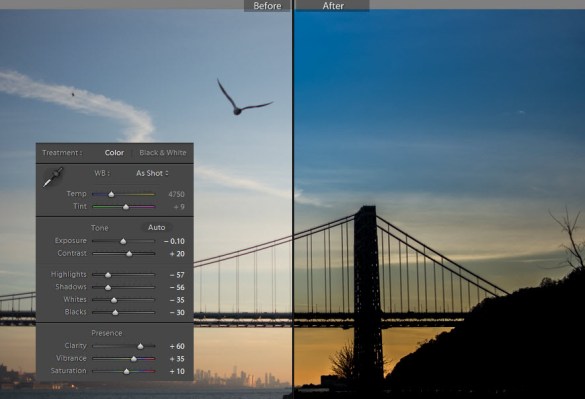
When it came to editing this picture I thought that turning my subjects (Bird, Helicopter, Bridge) into silhouettes would give an interesting affect. Lightroom really is an amazing tool and is what gave me the freedom to easily transform this picture.  As a result of dropping the exposure and other settings such as highlights, shadows, whites, blacks (which I needed to do to get silhouettes) lots of the detail that was in the clouds were revealed.  The last step was to adjust my vibrance and I was left with a picture that looks like it was painted to perfection.

Lightroom editing

Lightroom editing

Out of time

Picture Specs: ISO 400, 35mm, f/1.8, 1/800sec

Picture Specs: ISO 400, 35mm, f/1.8, 1/800sec

Week 14 (11/3/2013 – 11/9/2013): Hoboken Terminal
Picture taken on 11/9/2013 at 4:31 PM

Picture description:

As the days continue to grow shorter and colder it’s becoming harder to find time during the week to snap a picture.  Once winter hits I get the feeling that I’ll be taking more nighttime shots since the sun goes down so early.  Option two would be to take pictures on Saturday and cut it close to the self imposed weekly deadline I adhere to.  Having completed over one quarter of my 52 week blog I’ve come to notice when I’m taking most of my pictures and for that reason I’m going to adjust my weekly window.  Usually I run my week Sunday-Saturday which means I have a weekend day on either side of the week to get a picture.  What I’ve noticed is due to my schedule I hardly every (as in never) take pictures on Sunday but it would be the prime day to write a blog if I take a picture on Saturday. For that reason I’m going to change it up and move my weekly window to Monday-Sunday.  I guess it’s my own daylight savings adjustment.

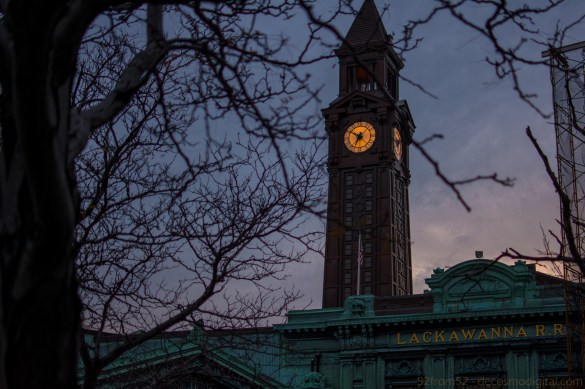
Now that I’ve worked out my time issue let me talk about this week’s picture and how it had a role in my recent decision.  Going into this week my plan was to revisit Top of the Rock (went in June) after work to get a picture looking downtown at sunset.  Unfortunately due to my busy schedule and daylight savings moving sunset times to around 4:30/4:45 this was an impossible goal to accomplish.  This made me realize that if I wanted to continue to take advantage of shooting during the “golden hour” I’ll have to do more of my picture taking on the weekends.  Taking a picture and writing a blog all in one day, especially on Saturday, a day/night I usually go out, can prove difficult.  This is the exact scenario that transpired this week.  My window of opportunity to get the picture I wanted fell to Saturday and in the end I didn’t have the time to make it to Top of the Rock.  Thankfully getting an interesting picture in Hoboken is as easy as taking an afternoon stroll, no planning required.  After setting out to get my picture I began to work my way down the Hoboken waterfront.  As I got closer to downtown  my eye’s were drawn to the train station’s clock tower. With the idea of running out of time in the forefront of my mind a clock picture seemed fitting, all that was left was finding the right angle.

*Never noticed before taking this week’s picture, this clock is not set to the correct time. 

Photography concepts:

As I mentioned in this week’s description section I try to take most of my pictures during what’s referred to as the “golden hour” or “magic hour.”  It’s said that during the “golden hour” you have the best/softest light for taking more dramatic pictures.  Although it’s called the “golden hour” it’s really closer to four total hours a day, one before and one after the sunrise and sunset times.  At these times the sun is at a prime angles for soft light which is roughly 10 to -10 degrees in relation to the horizon.  Having softer light provides lots of advantages for getting a nicely exposed and vivid picture.  Below are two links to some articles which go into more detail about the “golden hour” in case you want to read more.  Back to this week’s picture, I set out to get my picture at the start of the “golden hour” which for Saturday was around 3:45.  I ended up getting my picture just before sunset (4:45) which was good because any later and I might have needed a tripod or  to boost my ISO.

If you’ve been reading my blog or if you’re familiar with photography you might be able to guess how I was able blur out most of the tree and focus on the clock/train station.  In case this is your first time reading this effect is done through the use of a wide aperture, this week’s was f/1.8.  I’ve talked about aperture and it’s affects on an image in many of previous blogs so if you’d like to learn more circle back and read some of my older posts.  The last concept I used which is one I’ve also already talked about during my week 5 post “never forget” is selective focus points.  Just to quickly rehash, on most nice cameras and absolutely every DSLR’s you can manually select one point to base your camera’s focus.  This is different from auto-focus points in that those will often pick up whatever is closest or largest.  I use selective focus points very frequently when shooting with both my DSLR and even my iPhone 5s.  Why leave things to chance, it’s always better to control your focus so this is a tool I highly recommend any photographer uses.

http://www.photographymad.com/pages/view/the-golden-hour-in-photography

How To Make Your Photos Magical

On the run

Picture specs: ISO 640, 35mm, f/8, 1/15 sec

Picture specs: ISO 640, 35mm, f/8, 1/15 sec

Week 13 (10/27/2013 – 11/2/2013): Maxwell Place Park, Hoboken NJ
Picture taken on 11/1/2013 at 5:59 PM

Picture description:

One of the many benefits of living in Hoboken is having easy access to its waterfront parks and paths.  The waterfront provides a place to relax, socialize and or exercise in the midst of some beautiful views.  If I had to point out one negative aspect about exercising on the waterfront, it would be that while running you regularly have to fight the urge to stop and take pictures.  If you follow my Instagram you’ll probably notice most times this is a losing battle for me.  This week I decided to take my Nikon out during the time I usually run to see if I could capture something that depicts my daily struggle.

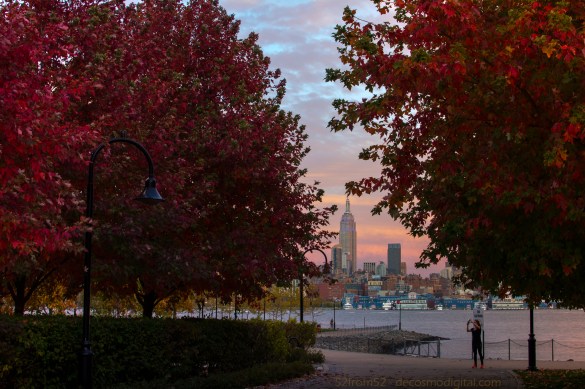
While moseying around Maxwell Park I noticed that many of the trees that were green just last week were now turning all different kinds of amazing colors.  There were two trees that really stood out to me so I began trying to find a good angle to photograph them.  As I shuffled around the trees I noticed that I wasn’t the only one that was giving them focused attention.  Runner after runner stopped to fire off a picture “on the run” then carried on their way.  Initially having runners photobomb my picture was very frustrating until it hit me, this is exactly what I do, so why not try to capture the moment?

Photography concepts:

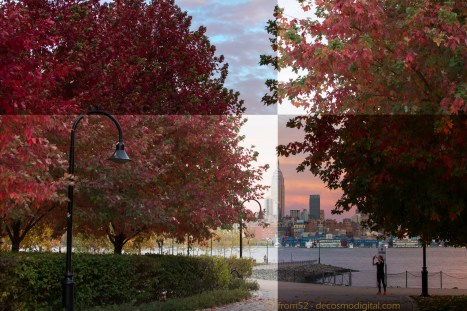
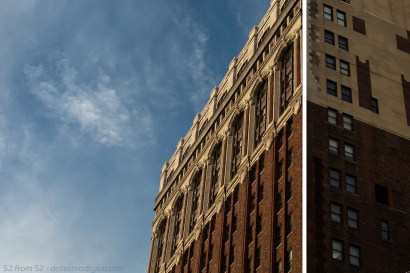
This week’s photo included a wide range of colors most of which required different exposure settings to reveal their vividness.  The best tactic that I’ve found for recovering color when you can’t choose one exposure is via select post-production exposure adjustments.  Although it’s possible to recover many colors after the fact you still have to select an in camera exposure which isn’t going to make that impossible.  What I’ve found through experience and also read is that going with an underexposed picture allows for more recovery capabilities.  Despite my own observation regarding underexposing, this week I rolled the dice and didn’t drop the exposure of my picture.  To demonstrate what I’m talking about regarding exposure recovery I sliced up before and after sections of my picture to highlight the comparison.  The most noticeable area that benefited from the exposure adjustment was the sky and empire state building.  Without making the adjustments illustrated below the tree’s would have still had nice color but the entire sky would have been very washed out.

Half edited

Edited vs. Unedited example

In addition to having the right in camera exposure settings the other key setting which permits recovery capabilities is shooting in your camera’s RAW mode.  For Nikon the raw mode is NEF format and it retains 12-14 bit data versus in JPEG where it retains only 8 bits.  To read more about Nikon’s RAW format see the article linked below.  Although each camera brand has it’s own RAW mode it’s fair to say that each would follow similar attributes and recovery capabilities.  When I first started taking picture with my 5200 I went with just JPEG then after learning the value of RAW I did JPEG + RAW.  Now to save space I only shoot in RAW format which still takes up a lot of space.  So far the space limitation is one of the only negative that I’ve run into in regards to shooting in RAW mode.  My 32GB card can hold about 875 NAF images while I can shoot 2000+ JPEG (fine) images.  The other negative aspect of shooting in RAW is that there are some limitations on what you can use the edit the image.  I recently found out that you can edit RAW images via Google+ and Snapseed which is really great for on the go editing.  If you want to learn more about Google+ editing watch the below YouTube video from one of my favorite online photography resources “Camera Rec Toby”.  If you have time I highly recommend clicking through Toby’s YouTube page, he is very informative.

NIkon NEF Article

Getting Negative

Picture specs: ISO 500, 35mm, f/4.0, 1/4000 second

Picture specs: ISO 500, 35mm, f/4.0, 1/4000 second

Week 8 (9/22/2013 – 9/28/2013): Flatiron building, corner of  23rd/5th NYC
Picture Taken on 9/25/2013 at 4:58 PM

Picture Description:

No, don’t worry I’m not going on any kind of negative rant in this week’s post.  If you want to understand the “negative” reference in the title you’ll have to read the photography concepts!  Enough on that, time for the story behind the picture.

I was reminded about a very valuable lesson this week, that lesson being that you really can’t force things.  As usual I had a plan for this week but by Tuesday I realized my plan was pretty much a wash.  The plan was to get a picture of or around the United Nations building.  The reason I chose this week was because it’s the annual United Nations General Assembly.  Most people have no idea about when the General Assembly happens let alone the chaos that happens in the area surrounding the UN.  I work not too far from the UN so each year I get a front row seat to the insanity.  SWAT cars, Secret Service, hundreds of NYPD officers, and countless diplomats converge on my little east side nook.  What I wanted to do was get a picture that in some way captured the madness.  On Monday I scouted the surrounding area to see if there were any good pictures that caught my eye.  Due to all the added security I couldn’t get close to the UN building so I knew I’d have to get some kind of distant shot.  The only idea I could think of was a sunrise picture since the UN is right on the water.  Sunset shot easy right, yes…on any other week!

It wasn’t until Tuesday morning when I brought my camera into work with me that I realized the flaw in my plan.  With so many cops and security personnel around the second I took my camera out all eyes focused on me.  Why is he photographing the UN?  Why is he wearing a black coat?  Why is he walking down that street?  Why is he looking around in such an odd way?  These are all of the questions I could almost hear getting asked as I felt the burning stares.  After a few short minutes I decided to move locations to the waterfront on the East river, bad idea. Once I got to the waterfront I saw police boats circling which seemed to immediately fixate on me.  As one large boat headed in my direction, I quickly threw my camera into my bag and slowly walked away.  In my head I had this sudden fear that some kind of unmarked car was going to zoom up, grab me, and take me away for hours of questioning.  At this point I said you know what I really don’t want to get arrested this week, I’m going to get a bagel and call it a morning.

That afternoon as I thought about what unfolded in the morning I realized even though I really wanted the UN picture this week, now isn’t the best time, there is always next week.  Giving up on something like this is difficult for me.  Once I see something I want I go for it but as I said  earlier, this week I was reminded sometimes you can’t force things you just have to be patient and wait for the right time.

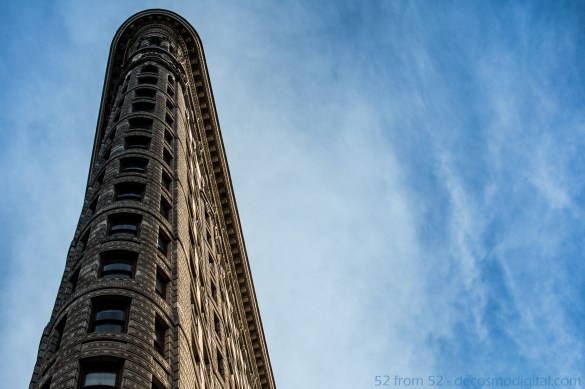
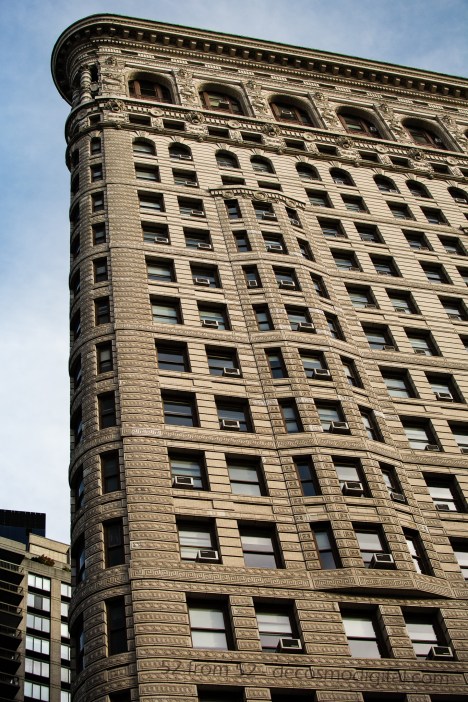
Once I came to terms with holding off on the UN idea I decided that I would take a trip to the flatiron building to see if I had better luck without all the piercing police eyes.  Prior to this week I had only seen the flatiron building from a distance or very briefly up-close while driving by.  The building is quite the scene in person and can make you a little dizzy when you’re standing right next to it looking straight up.  Luckily I was able to conquer the dizziness and get this week’s shot, hopefully you like it!

Photography Concepts:

Photography wise what I learned this week is “getting negative” isn’t a bad idea, let me explain.  As I continue to read about the concepts of photography one term that’s come up a lot when referencing a pictures composition is “negative space.”  Based on everything I’ve read negative space is the area surrounding your subject (which is positive space).  It seems logical enough right?  I’ve seen that in some photos people literally fill the negative space with well nothing.  What this does it it really emphasizes the subject.  In my case my subject was the flatiron building and my negative space was filled with the nice blue sky.  When I first started taking pictures if I took a picture where half of it was empty I’d probably think about cropping it down to eliminate that space.  What I’ve now learned is if used correctly the empty “negative” space is a nice tool to put in your composition toolbox.

An example of a picture where there is no negative space.

An example of a picture where the subject takes up most of the frame

One trick I learned this week while getting myself dizzy from looking up for too long was how to line up my pictures better.  In a lot of the pictures I’ve previously taken of buildings while looking straight up I noticed that the picture always seems tilted.  The way I lined the picture up or saw it in real life didn’t translate well to the composition of the photo once I reviewed it at home.  While I was shooting this week I tried to choose a line or lines in the building that would level things out when I looked at the picture later on.  It felt odd while I was taking the picture but my results were a lot better. For example in the below picture I chose the corner line between the two sides of the building to line up my shot.  It’s hard to give some kind of formula for choosing the right line, but it’s something I’m going to try and pay closer attention to in the future.

Blog_8(final)3

Night Light

ISO 100, 35mm, f/8.0, 4 sec

ISO 100, 35mm, f/8.0, 4 sec

Week 6 (9/8/2013 – 9/14/2013): Shipyard Marina, Hoboken NJ
Picture Taken on 9/9/2013 9:11PM

Picture Description

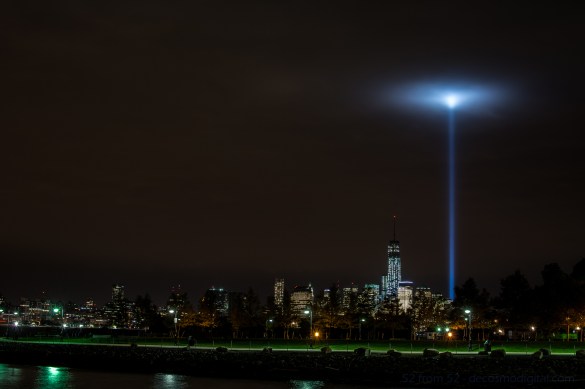
Going into this week my goal was to create a multiple exposure photograph or light trail night picture.  As a possible secondary option I bookmarked the possibility of photographing the freedom tower.  On Monday night I went out around 6ish to mess around with my new Nikon ML-L3 remote.  I was aiming for either a double/triple exposure of the Hoboken ferry or some kind of sunset shot.   After messing around for about an hour I went back to my apartment to eat some dinner, review my pictures, and wait until the sun was totally down so I could try for a night picture.  Unfortunately after reviewing the pictures on my computer none of them worked out as I planned so I was going to have to go back out for the night shot.

After dinner as I stepped outside of my apartment my eyes were instantly drawn to the distant southeastern skyline.   What I was looking at was simply amazing, the 9/11 memorial lights were getting trapped in some low thick clouds and forming this surreal spherical glow.  All of my other night picture plans went out the window at that point, I had to take a picture of this unique occurrence.

After taking the picture I thought it was good (not great) but didn’t want to use it as my picture for this week.  As I do with most unused pictures I posted it up on Facebook to share with my friends.  To my surprise this picture got more activity than any other one I’ve posted.  Coming up with a picture to top this one, at least this week would have been hard so in the end I decided to use this picture.

 Photography Concepts 

To get this picture I had to apply many of the tricks I’ve learned over the past couple of months. In some of my previous long exposure pictures I noticed a slight camera shake.  To prevent getting shaky images I’ve moved towards using either a 2 second delayed shutter release or in this case a remote.  Next I regularly use a UV filter on all my camera lens to prevent any wear and tear.  Over time I noticed that at night using a filter increases the amount of light distortion and bleed, so prior to this picture I removed the UV filter.  The last two keys to this photo, which I’ll talk about in a little more detail, are the exposure settings I used and editing in Lightroom.

The exposure I used was -2 (stops) which for anyone that doesn’t know, it’s an underexposure.  The reason I underexposed was because after taking other nighttime city shot I’ve noticed that with so many lights from all the buildings my pictures tend to get overexposed.  There are lots of negatives with overexposing, in terms of my city pictures the most noticeable is the change in the sky color.  After messing around with different exposures I’ve settled on -2 for my go to exposure setting.

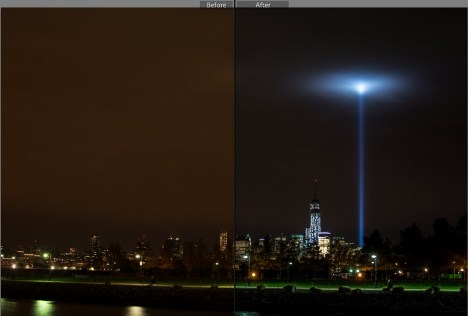
Now it’s hard to describe all the different tweaking I did in Lightroom but one of the main fixes was the white balance setting.  I forgot my white balance cards when I went out to shoot this picture so I had to do it after the fact.  I also made some moderate adjustments to the Highlights, shadows, whites, blacks and clarity to get the picture to look like what I saw in person.  If you want to learn about Lightroom I highly recommend going on youtube and watching some tutorial videos.  There is so much information out there to support learning photography (and most other hobbies) it’s just about finding it.

Before and After Editing in Lightroom

Before and After Editing in Lightroom

Since I originally did not want to use this picture let me quickly explain why and what I could have done better.  For starters if I remembered my white balance cards I would not of had to do so much editing in Lightroom.  I rather get a good picture in camera rather than edit it especially for this photoblog. I also wasn’t happy about my composition, the green in the picture is really nice but I was made I cut off some of the left side of the peninsula that is shipyard park.  I wish that I would have stepped back another 30-50 ft to get more into the picture.  Last I wish I found something interesting to put into the foreground of the picture, it just makes for a more interesting picture.

Article about Exposure
http://bit.ly/1eOEzt8

Lightroom Video’s
http://bit.ly/140WqbT
http://bit.ly/1ddxPTS

First Post!

Picture Specs: ISO 100, 35mm, f/1.8, 1/100 sec

Picture Specs: ISO 100, 35mm, f/1.8, 1/100 sec

Week 1 (8/4/2013 – 8/10/2013): Hoboken uptown Pier
Picture taken on 8/6/2013 at 5:45AM

Picture description:

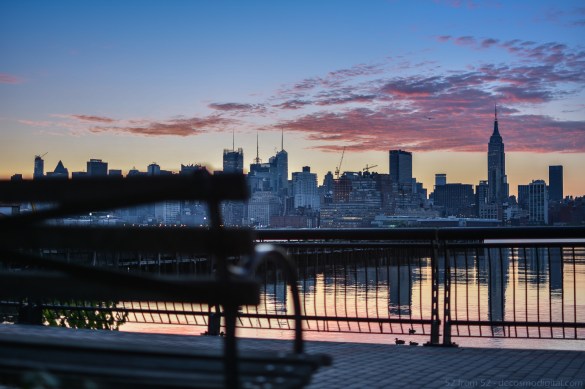
For those of you that follow my instagram or are friends with me on facebook you’ve probably noticed I like to take pictures of the New York City skyline, particularly from the Hoboken piers.  Initially I told myself I wasn’t going to start with a skyline shot but in the end it made the most sense for at least one BIG reason.  Taking skyline pictures is pretty much what got me into photography in the first place. The more skyline pictures I took the more I realized how much I enjoyed taking pictures and that I really needed a better camera.  The second reason this picture is significant is because it’s by far my favorite spot in Hoboken.  I’ve dubbed this “my bench” and usually spend at least one morning/evening a week sitting here soaking in the view.  Whether I’m drinking my morning coffee or taking a breather after a run on the pier, I often find myself back at this bench.  My favorite time to sit here is the early morning for a couple reasons; there are a lot less people walking around, you hear tons of birds chirping and waves crashing during high tide, and you obviously get a great view of the sunrise.  It’s very tranquil and a great way to start out your day.  Trying to capture the feeling of sitting in this bench is why I decided to start out with this picture.

Photography concepts:

First I shot this picture at f/1.8 which is the widest aperture (opening of the lens) and shallowest depth of field I can take.  It might seem odd but the smaller the ‘f’ number the larger the opening of the lens is.  While the larger the ‘f’ number the smaller the opening is and the more things are in focus.  I took this picture with a small ‘f’ (fstop/aperture) of 1.8 initially to put the bench in focus and blur out the skyline but after trying one in reverse with my focus point on the buildings, I liked this one better.  Shallow depth of fields give that blur effect and are hard if not impossible to pull off with a camera phone since you can’t control your camera’s lens opening like with a DSLR.  For my fellow instagramers, the blur feature on instagram is meant to mimic depth of field shots but it’s limited to the circle or straight area.  I felt like by using the shallow DOF in this picture it makes it easier to imagine yourself sitting on the bench.

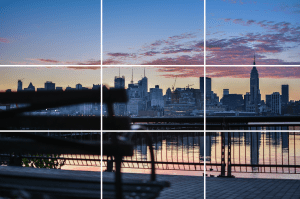
The second concept in play is the rule of thirds.  In this picture the bench is in the far left/bottom third of the picture with the rest of the scene in the middle/right thirds.  For anyone that doesn’t know about the rule of thirds, it’s just breaking the picture into thirds vertically and horizontally (seen below).  This results in 9 boxes with 4 intersection points.  It’s said that by putting subjects or things such as eyes on these lines makes for more dramatic pictures.  In my picture the bench  is on one of the intersection points and clouds are on two.  Using the rule of thirds in this way helps you focus on the sky and give you the feeling of looking out from the bench from left to right.

DSC_0023-ruleofthirds

The last sort of “concept” that I want to point out is the timing of the shot.  When shooting sunrises or sunsets it’s said that the best light is +/- 30 minutes of the actual sunrise or sunset time.  On the morning of this picture the sunrise was at 5:58 AM.  I got to my spot a little later than I had hoped (hit the snooze a couple times) but I still managed to get the light I was looking for.  Once it got close to and then past the actual sunrise time the colors seemed more washed out.  Overall I’ve learned that my favorite time to take pictures of the sunrise is before the time and for sunsets is after.