Step forward by stepping back

52from52 - Week 19

Picture info: ISO 3200, 35mm, f/1.8, 1/200sec, -1 Exposure step

Week 19 (12/9/2013 – 12/15/2013): Top of the Rock Observation Deck

Picture taken on 12/12/2013 at 5:15 PM

Picture description:

This week I finally got the chance to make a return visit to Top of the Rock.  My first visit was six months ago and was only two weeks after I purchased my Nikon.  Since my last visit I’ve often looked back at the pictures I took and thought about the many things that I could have done better.  I’ve learned many lessons over the past six months, in part because of this blog but also because I’ve immersed myself in photography.  Articles, YouTube tutorials and experimenting with different  techniques have been my main sources for learning.  One other source of learning that might surprise you is instagram.  I often flip through different hashtags looking for ideas of what to shoot or to see how people photograph certain subjects or places.  Instagram has photographers of every level ranging from the professional to amateur, and or dare I say serial selfie taker.  Before and after my trip I looked through the hashtag #topoftherock to see the kind of pictures people took during their visit.  Besides the selfies and couple pictures I noticed that nearly all of the pictures looked identical with the exception of changes to the sky or filter the person used on the picture.  After seeing how people have been over-sharing the same picture I knew that I had to find some way to differentiate mine from the rest.

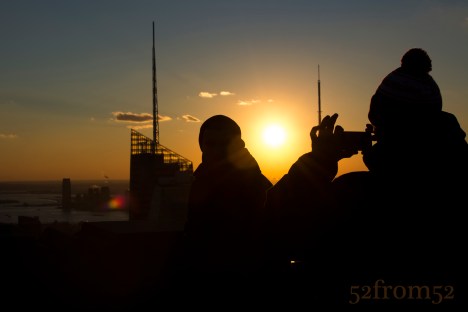
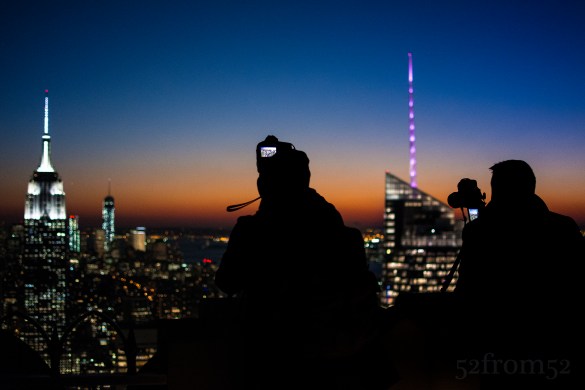
During my visit even though my goal was to take an original picture, I couldn’t help myself from taking the classic Top of the Rock picture.  I found myself taking the same kind of picture over and over again partially to make sure I got a good one, but also because in person it’s just that hypnotizing of a view.  After about an hour of scanning the horizon for a unique view I came to the conclusion that from my vantage point there really was none.  It didn’t matter where I aligned the buildings, I had already seen that picture, or one very similar, shared countless times.  At that moment I decided to take a step back from my coveted position to see what new perspectives I could find.  Within a matter of seconds I was rewarded for my decision.  After stepping back I saw that all the people taking pictures were casting silhouettes in front of the very same view I was just photographing.  I spent the next couple of minutes wading in and out of the crowd to try and get the a picture that met my satisfaction.  Eventually the 20 degree weather got the best of me and I decided to call it a night.  On my way home while thinking about my night, I realized the valuable lesson that I just learned.  It’s very easy to get drawn into taking the obvious picture. The only way my photography is going to continue to improve or “move forward” is if I regularly remind myself to take a “step back” and find a new perspective on what’s right in front of me.

Photography Concepts:

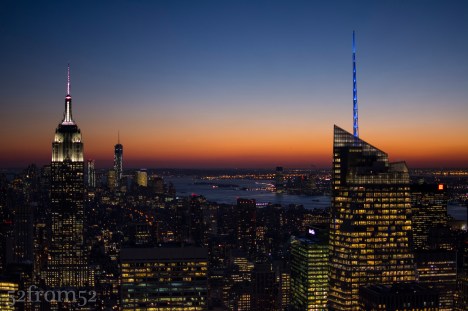
Although I used the previous section to talk about avoiding the obvious shot, it doesn’t mean the classic Top of the Rock pictures aren’t good ones.  For the purpose of this blog I wanted to challenge myself to get something unique but it leaves the question, how do you take a good picture at Top of the Rock?  As I mentioned earlier I often look back at the pictures I took during my first visit and dwell on what I could have done better.  Let me share with you some of the lessons I learned between my two visits in terms of taking pictures at Top of the Rock.

Example of the classic Top of the Rock Pic

Example of the classic Top of the Rock Pic

The first thing you have to ask yourself is what kind of picture are you looking to take?  Do you want take pictures of only the buildings or are you planning on featuring yourself or friends in the picture with the buildings in the background?  Knowing your subject is important to so you can determine the time you’re going to go and where you should set up shop once you’re there. Let’s start with talking about taking pictures of people.  If you’re taking pictures that will feature yourself or your friends the location is less critical but the time that you arrive is important.  In this case you’ll want to go about an hour before sunset this way you have time to take nice pictures in softer light and without flash.  In my opinion flash is the worst when taking pictures at Top of the Rock.  Unless you’re an absolute pro and know how to compensate correctly flash tends to wash out the city backdrop, which is one of the main reasons you’re at Top of the Rock right?  In order to feature the cityscape behind you, don’t use flash, especially if you’re taking pictures on the 68-69th floor behind the glass.  Once you find a nice location play around, take pictures of you subjects looking out towards the buildings or doing some forced perspectives (google it).  If you want to get more original, take pictures of your subjects from a distance.  Perhaps have your subject stand looking out towards the city and snap your picture focusing on them through the busy crowd? As was the theme of this blog, once you take a step back you’ll be surprised what new perspectives you’ll see.

Example of a unique Top of the Rock Picture

Example of a unique Top of the Rock Picture

What about the settings to use or not use when taking pictures of people, other than flash?  One option is to use the smallest aperture your camera will allow which will give you nice background blur and permit you to use a low ISO.  The negatives of this is the exposure of your cityscape background might be overexposed.  The solution, shoot your picture in such a way that you’ll be able to only edit the background later to correct the overexposure (don’t forget to shoot in RAW to enable this).  Option two in terms of aperture would be to use a small aperture which if you took my advice and came close to sunset, is going to force you to use a high ISO.  The negatives, you’ll have a grainer photo but the positive is you will have a more detailed cityscape background.  If you’re only looking to share this picture on something like instagram a high ISO image is fine.  Even with the wide aperture you still might have an issue with overexposure for the background so compose your picture accordingly.  The last setting I mention is try to use a focal length of 50mm+, I won’t go into detail about why but if you want to know why check out the video below from one of my favorite YouTube sources.

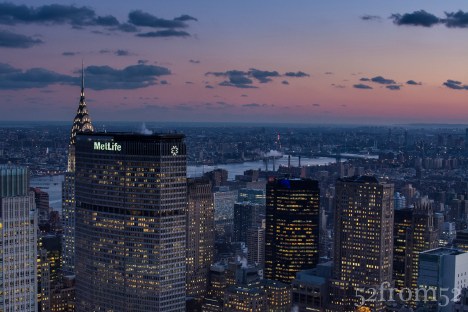
Now let me talk about what to do if you’re looking to take pictures of the buildings.  First, I recommend going to the 70th floor and trying to lock down a position in the center area where you don’t have the bottom floors jutting into your picture.  Getting this prime location is even more important if you’re using a wide angle lens.  Just like shooting people, I think the best time to take pictures of buildings is right before and during sunset but you can go any time especially if there are nice mid-day clouds.  For now I’ll talk about what to do at sunset.  Going at sunset or at night really forces your hand in terms of camera settings.  Unlike taking pictures of people, when you use a small aperture there aren’t many positives.  Your plane of focus is going to be narrow even with the buildings being far away.  What’s going to happen is one building might appear in perfect focus while the others are a little blurry.  You can still take a good picture using small apertures but if your goal is to get a crisp image that you can blow up on perhaps a canvas,  I don’t recommend using small apertures.  What are your options then?  Option one, you can boost your ISO but this is going to still leave you with the problem of not having a crisp image for enlarging later.  Option two, bring a tripod and shoot with a small aperture and slow shutter speed.  This seems simple right? Well tripods are not allowed at Top of the Rock but there are ways around this rule.  As you can see in this week’s featured picture people bring tripods.  The key is to bring one small enough to fit in your bag, and one that has a small leg spread so it can sit on top of the cement pillars.  This is also why getting a good location is critical, there are a limited number of cement pillars and or locations that can facilitate the use of a tripod.  I’m not going to go into the all settings specific to tripods because if it’s pretty simple, small aperture, low ISO, slow shutter.  Two things I will recommend though  is use the multiple focus point setting which will grab more buildings in focus, and underexpose your image.  One thing not to do, which believe it or not I saw someone do, don’t use flash while you’re shooting buildings on a tripod.  Maybe I’m missing something and if I am please comment and correct me, but I don’t see any positive in using flash on a tripod when you’re not taking pictures of motion or people.

ISO 2500, 35mm, f/7.1, 1/40 sec, no tripod

ISO 2500, 35mm, f/7.1, 1/40 sec, no tripod

These are some of the lessons/tips I’ve learned from my two trips to Top of the Rock.  I still haven’t gotten what I would consider a great classic Top of the Rock picture, but that’s mainly because I haven’t brought a tripod or wide angle lens.  I think I’ll take at least one more trip in a few months and try my hand using more than just my 35mm lens and perhaps a tripod.  Until then I hope the lessons I’ve learned and shared so far help you shoot some great pictures at Top of the Rock, have fun and remember take a step back!

Big Head Focal Length by CameraRecToby:
One shot

Picture info: ISO 100, 35mm, f/9, 30seconds, 0.6 neutral density filter, -2 exposure stops

Picture info: ISO 100, 35mm, f/9, 30sec, 0.6 neutral density filter, -2 exposure stops

Week 17 (11/25/2013 – 12/1/2013): Hoboken Light Rail Station
Picture taken on 11/30/2013 at 5:12 PM

Picture description:

Opportunities come and go, and sometimes you only have one shot to take advantage of them.  That was absolutely the case for my week 17 picture.   This week I picked up some neutral density filters (I’ll explain what these are in the concepts section) which I wanted to experiment with.  Coming into the week my goal was to venture into the city to get some kind of street shot/long exposure.   When it came time to go out and shoot on Saturday I was a bit demotivated due to two things. First it was really cold outside, and the second reason was because of the conflicting online posts about wether or not it’s okay to use a tripod in New York City. Since I wasn’t in the mood to argue my way out of a ticket I decided to play it safe and set out for an area in Hoboken that I have been meaning to photograph for a while.

The location I chose for this week’s shoot was a walkway between the Hoboken train station and Newport, Jersey City.  I’ve seen some really nice pictures on Flickr that were taken from this seemingly hidden location.  Many of the pictures featured old dock posts of a broken down pier with either the Jersey City or New York city skylines in the background.  With a couple clear pictures in mind I set up my tripod and started taking some long exposures.

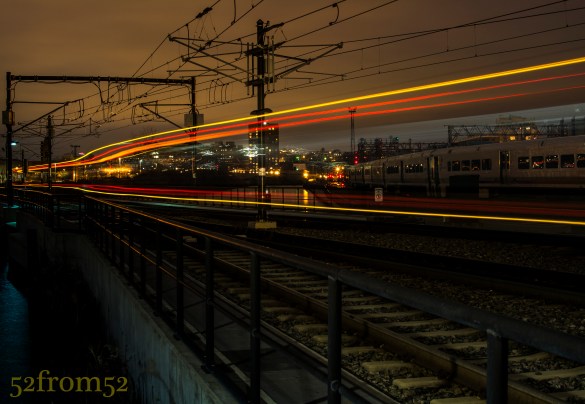
After spending about 2 hours taking long exposures and chasing lots of seagulls I decided to call it a night.  As I started to pack up my gear I spotted a potential picture which would feature the light-rail train as it left the station.  I figured why not give it a shot?  I quickly set up my tripod on the edge of the tracks in preparation for the next train.  The trains were coming about every 30 minutes, so unless I wanted to wait out in the cold for the next one, I’d have only one shot at capturing a good picture.  From the distance I heard the bell sound announcing the train’s pending departure, I quickly clicked my camera’s shutter release, sat back and watched as the light-rail moved in and out of the frame.   After what seemed like an eternity, but really was only 30 seconds, my camera finished taking the picture and I eagerly awaited seeing what it captured.  Once the preview came up on the screen I immediately knew this was the picture I had to feature in this week’s post.

Photography concepts:

This is the second “long exposure” post that I’ve done, the first being my week 6 picture “Night Light.”  Since week 6 I’ve learned some new tricks for taking and editing long exposure pictures.  As I am becoming better from past lessons, I’m able to add more moving parts and that’s what spurred on this week’s experiment with neutral density filters.

Neutral density filters, commonly called ND filters are pieces of glass that come in many shapes and sizes but ultimately block light from hitting your camera’s sensor.  As I mentioned in this weeks description, my goal for the week was to get a long exposure but you don’t need an ND filter to do this.  Although ND filter’s are not required for all long exposures, they are if you want to take a long exposure during the day or anytime there are bright light sources.  With the use of ND filters you’re able to use settings that would usually not be feasible in certain conditions or due to other selected camera settings such as wide apertures. Usually when you use slow shutter speeds (20-30 second) you have to shrink your aperture to f/13-f/20 to limit the amount of light.  f/13 isn’t bad but once you start approaching f/20 pictures lose their crispness, this is where the ND filters come in handy.  Take the below picture for example.  The sun was setting behind the buildings and flooding my camera’s sensor with light.  Given the amount of light, and having already maxed out at the smallest aperture my lens can shoot with (f/20), I would usually only be able to use a fast shutter.  With the use of the ND filters I was able to shoot with a 4 second shutter speed.  For the below picture I used a combination of ND filters which totaled out at a 2.7  density rating,  which is equivalent to -9 exposure stops.

Picture info: ISO 100, 35mm, f/20, 4 seconds, 2.7 ND filter, -2 exposure stops

Picture info: ISO 100, 35mm, f/20, 4 sec, 2.7 ND filter, -2 exposure stops

Now you’re probably asking why would you want to do a long exposure for a picture such as this, and what are the effects? One reason/effect is the smooth and very reflective water.  Notice how the water has begun to almost look like ice in the above picture.  The smoothing effect is even more prevalent in the below picture where I used a 30 second exposure and a 0.6 ND filter.

picture info: ISO 100, 35mm, f/14, 30 seconds, 0.6 ND filter, -2 exposure stops

Picture info: ISO 100, 35mm, f/14, 30 sec, 0.6 ND filter, -2 exposure stops

All this being said, how did the ND filter help me with this week’s picture? In order for me to capture the train’s full movement from right to left I needed to use a 30 second shutter speed.  As mentioned in previous blogs, night pictures look better when under exposed but even with dropping the exposure down 2 stops I still wasn’t able to hit the 30 second shutter speed mark.  Add in the fact that once the train passed by my camera’s sensor was going to get a burst of light it was very important to somehow compensate.  I didn’t want to shoot with too small of an aperture so here is where the ND filter came in.  I used a 0.6 ND filter which is equivalent to -2 exposure stops, this allowed me to maintain a good night exposure, use an aperture of f/9 and hit my 30 second shutter speed.  The result of the 30 second exposure was the very vivid light trail that’s featured in this week’s picture.  This was my first time experimenting with the ND filters so expect some more pictures and feedback in some coming blogs.  For more info on ND filters check out the below link.

http://www.digitalcameraworld.com/2012/07/05/how-and-when-to-use-nd-filters-and-what-the-numbers-mean/

Center of Attention

Picture Info: ISO 200, 35mm, f/8, 1/320sec

Picture Info: ISO 200, 35mm, f/8, 1/320sec

Week 16 (11/18/2013 – 11/24/2013): Wagner Park, New York City
Picture taken on 11/23/2013 at 5:04 PM

Picture description:

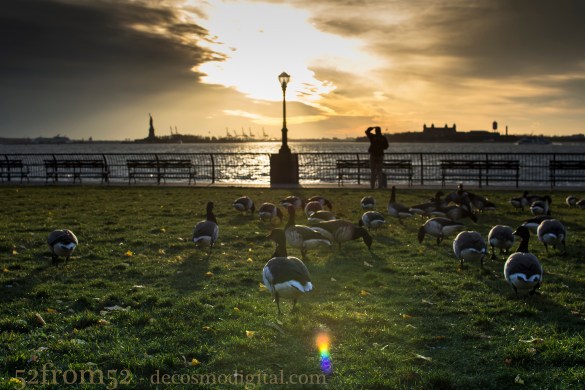
Back in September I discovered the beautiful location that is Wagner Park.  After getting the picture for my week 5 post, Never Forget, at the Freedom Tower, I had dinner with my wonderful mother for her birthday at a place that had long been on my “To Try” Yelp list.  The restaurant I’m talking about is Gigino at Wagner Park and let me tell you put it on your to do list.   Gigino has outdoor seating (weather permitting) which provided us with one of the best sunsets I’ve ever seen while we ate a delicious dinner.  After dinner I knew that I’d have to make a return trip in the near future, if not for a date, I’d absolutely have to take my camera to capture the scenic views at Wagner Park.

Since September I haven’t made it back to Gigino, mainly because it’s gotten far too cold to take anyone on a date there.  That being said I can handle the cold on my own so this past Saturday I decided to take a trip to Wagner Park around sunset to see what kind of pictures I could get.  Luckily as it turned out I chose a great night that provided a really interesting and vivid sunset.  Out of all the sunset pictures there was one picture that really caught my attention during editing.  It’s pretty obvious which picture I’m talking about, look up, but let me give you the quick story behind it.

After arriving at Wagner Park I noticed that I wasn’t the only one that decided today was a good day to hang out in the park.  No I’m not talking about a person, although they were there too, I’m talking about a brace of ducks.  Yes, a group of ducks is called a “brace” look it up, I did.  As I walked around the park trying to figure out where would be the best place to get my sunset shot I kept glancing over to the ducks.  Eventually I decided why not see if I can creep up on the group and snap a birds eye view?  Since the sun was so strongly beaming down from the horizon I couldn’t use the viewfinder (I’ll explain this more later) I blindly lined up my shot and fired away.  With each picture I adjusted my shot based off the last picture’s preview.  After a couple shots I finally “walked in” my picture’s composition to something that I liked, and here you have it.

Photography concepts:

As I mentioned in the description section this picture was shot basically blind and through a series of picture to picture adjustments.  The reason I did this is first because I could not use the viewfinder.  It might seem obvious but when you’re taking a picture directly into the sun you can’t look through the viewfinder.  Why? Well the sun is dangerous enough to look at with the naked eye, forget about through essentially a magnifying glass.  Since I value my eyesight I won’t even risk getting flashed with the sun’s blinding light.   For shot’s into the sun this leaves the live-view option which is the back screen.  Although I could have used the live-view I don’t like how it focuses, it’s not fast enough for moving objects.  With the ducks moving around I wanted to be able to fire quick shots and thus did not use the live view.

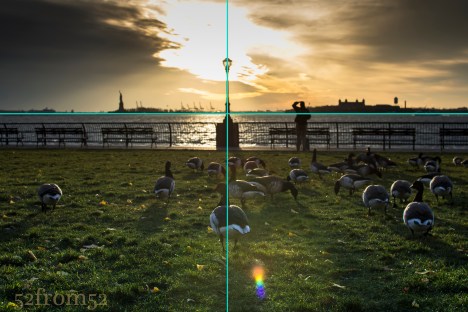
A concept I tend to mention in almost every post is the rule of thirds.  This time though I want to highlight how I didn’t exactly follow the rules.  In this picture I had three things that I considered the focus of my shot, or my main subjects.  One was the sun, two was the light post and the third the ducks, more specifically the one duck that was closest to me in the foreground.  When it came time to align my shot rather than put the sun on one of the left or right third lines like I usually do I centered it.  I also centered the main duck and the light poll, which only further highlighted the sun.  Aligning the sun with the light post gave off the effect that the light post is the reason the sky is so illuminated.    The reason I said I did’t exactly follow the rule was because I did follow it for some other parts of the picture.  For example, I did not put the horizon in the absolute center of my picture.  I gave more weight to the ducks/grass rather than the sky to further emphasize them in the picture. Another way I loosely followed the rule of thirds was putting some of my  secondary subjects close to the cross points of the upper thirds line on the left and right.  I’m talking about the Statue of Liberty and Ellis Island.  Although this falls under the rule, it was more of an accident but I’m glad everything lined up with such great symmetry.

Center Vs. Rule of Thirds

Center Vs. Rule of Thirds

The last thing I want to mention real quick is how I edited the sky.  In the unedited photo the sky was really blown out from the sun.  As I’ve mentioned before since I shoot in a RAW format I’m able to recover some of the detail even when images get over or under exposed.  Below is a comparison of how the image originally looked and how it did after I dropped the exposure for just the sky by about 2 steps.  One way I might have been able to avoid doing this is shooting in HDR mode or creating one via bracketing and photo merging.  I haven’t talked a lot (if at all) about HDR but it’s something I plan to in some future posts.  Right now I’m still in the experimental stages with my Nikon as far as HDR but it’s one of my favorite effects with my iPhone 5s.  More to come on this subject soon!

Edited (via Lightroom) vs Unedited

Edited (via Lightroom) vs Unedited

Need for Speed

Picture Specs: ISO 200, 35mm, f/1.8, 1/4000sec

Picture Specs: ISO 200, 35mm, f/1.8, 1/4000sec

Week 15 (11/11/2013 – 11/17/2013): Palisades interstate park
Picture taken on 11/16/2013 at 5:20 PM

Picture description:

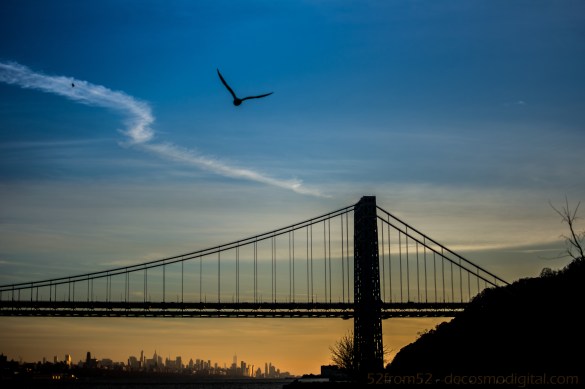
This week’s photo was captured at the Palisades Interstate Park, a place that I haven’t been to since I was a kid.  If you’ve never gone I highly recommend spending the day exploring all that the park has to offer.  The park is nestled on the palisades cliffs which are both beautiful and dangerous so mind the paths.  Jutting out from the cliffs is none other than the iconic George Washington Bridge which is always a sight for sore eyes, granted you’re not stuck in traffic on it.  To add to the parks beauty when you’re north of the bridge you have a sprawling view of the Manhattan island coastline aka New York City.

Helicopter Vs Seagull Joust

Helicopter Vs Seagull Joust

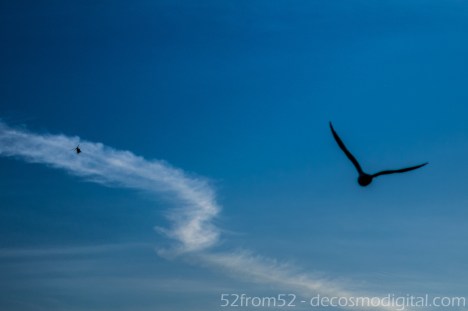
While walking around the park there were two things buzzing around the sky that kept grabbing my attention.  One was a pair of helicopters which were doing fly bys of the bridge, my guess is they were filming for either a TV show or movie.  The second airborne thing that I couldn’t help but notice was all of the seagulls flying around.  At one point I was able to creep up within inches of one seagull that seemed to like the lime light of my camera.  Unfortunately my Dr. Doolittle moment was spoiled when a couple of rude people crashed my photoshoot, naturally scaring away the Zoolander of seagulls.  Luckily this forced me to move locations which is where I stumbled upon a big flock of birds that kept doing take off runs towards the bridge.  While one bird launch from the cliffs he seemingly locked into an aerial joust with one of the helicopters.  It might be a little hard to see at your first glance but if you look at this week’s picture close enough you’ll see the helicopter’s silhouette in the top left.  At the time of the picture I wasn’t sure if I actually caught this freeze frame but I was pleasantly surprised when I found it during editing.  Capturing this moment was a good cap off to an amazing day!

Zoolander the Seagull

Zoolander the Seagull

Photography concepts:

If I had to sum up the key element to this week’s photo in one word it would be speed!  As you can imagine when trying to capture not just one but two moving targets you have to shoot fast.  There were two setting which enabled me to get this picture, a quick shutter and autofocus.  I shot this picture at the fastest my camera can take a picture which is 1/4000 of a second.  As I’ve mentioned in previous posts my Nikon has 39 auto-focus points which was great for getting the bird, bridge and helicopter all at once.  I got a little lucky at the time of this picture though because I kept switching between auto-focus and selective focusing but was thankfully on auto-focus when the “jousting” moment occurred.

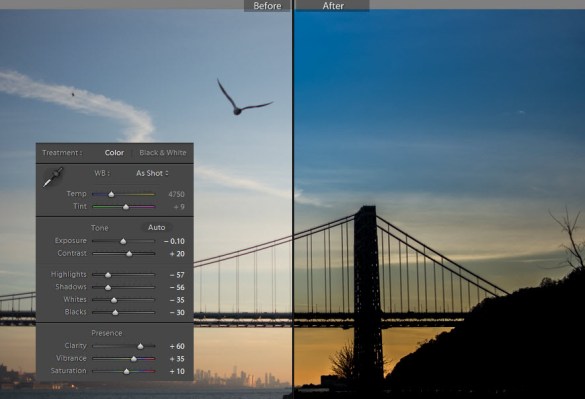
When it came to editing this picture I thought that turning my subjects (Bird, Helicopter, Bridge) into silhouettes would give an interesting affect. Lightroom really is an amazing tool and is what gave me the freedom to easily transform this picture.  As a result of dropping the exposure and other settings such as highlights, shadows, whites, blacks (which I needed to do to get silhouettes) lots of the detail that was in the clouds were revealed.  The last step was to adjust my vibrance and I was left with a picture that looks like it was painted to perfection.

Lightroom editing

Lightroom editing

Rushing to/Rushing from…

ISO 400, 35 mm, f/3.2, 1/80 second

ISO 400, 35 mm, f/3.2, 1/80 second, -2 stop exposure

Week 7 (9/15/2013 – 9/21/2013): Hoboken Terminal, Hoboken NJ
Picture Taken on 9/17/2013 at 6:55 PM

Picture Description:

Have you ever noticed that almost everyone at train stations are in a rush? I have to admit in most cases I’m one of those people. Think back to your last time at a train station, chances are you were either rushing to or from your destination and paid little attention to your surroundings. In the rare instance (or maybe not so rare depending on how punctual you are) that you miss your train the thought of waiting for the next one can almost seem like a prison sentence. I’m no stranger to mass transit, I’ve been taking it for years and I’ve become all too familiar with the scenarios I just described. I have often wondered about all the little things I’ve missed over the years while rushing around or overlooked while being frustrated by some unplanned circumstance such as missing a train. Maybe I missed out on an interesting conversation with a passing stranger? I might have trampled right over a rare coin laying abandoned on the ground or perhaps walked past a person that needed my help with something as simple as directions. You would be surprised what you notice when you actually take the time to pause, think and observe. This concept of how people rush through train stations and life in general is what gave me the idea for this week’s post.

This week I decided to try and observe things, people and places I regularly might overlook. I’ve been riding the bus with my headphones out, phone in my pocket and head up. I made it a point to sit outside for lunch rather than eat at my desk on the computer. Besides the little day to day changes I also decided to take a trip to the train station, not to catch a train but give a photographic demonstration of what you/we often miss out on. My plan was to get to the Hoboken train station just before sunset because I knew the station was aligned East to West so there would be a good sunset down the tracks.

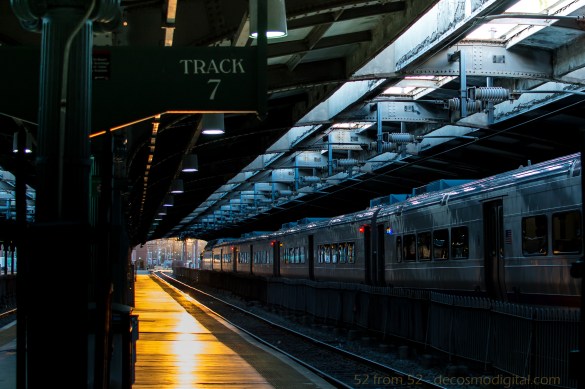
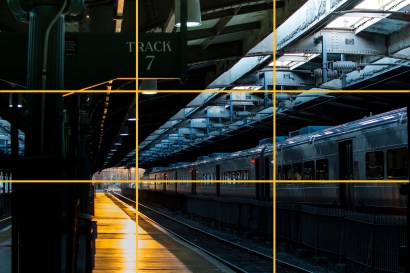
Upon arriving at the station it was exactly how I imagined it. I got to the station around 6:45 which is the tail end of rush hour but the station was still very busy. Crowds of people were weaving in and out of one another, some on their phones while others just with this blank look on their face. As I tried to shuffle between the waves of people to line up my shot I got tapped on the shoulder, “Can I help you?” I heard. My unusual behavior caught the eye of a police officer, apparently being the only person not rushing looked a little suspicious . I politely replied no (didn’t want to get arrested) and said I was just trying to get a sunset photograph while offering to show my pictures as proof. The police officer looked dumbfounded but said okay and walked away. I spent a couple more minutes fighting the crowd trying to get the best shot the whole time noticing that literally no one was seeing this awesome view. One person stopped and I thought they were checking it out, but it turned out they were just looking for a train time. By the end of my little endeavor I felt validated about my rushing theory and accomplished that I was able to get the the exact picture I had in mind. One oddly coincidental aspect of this photo, this is my seventh blog and somehow I ended up getting a photo of track 7. This wasn’t planned but sometimes the best things aren’t…

Photography Concepts:

I applied a couple of the basic composition techniques I’ve talked about in my previous posts to deliver what I felt to be an interesting picture. The rule of thirds and leading lines are the two most main composition concepts at work in this photo. Instead of going for a symmetrical picture and having the track split my picture down the middle I went with having it take you right to left and right out of the station, or is it leading in? I felt like this picture can give the feeling that you could be waiting to leave, or you just said good-bye to someone leaving you with nothing but an empty track. Basically when someone looked at the photo I was hoping they would almost ask the question, am I coming or going, am I rushing to or rushing from?

Ruleofthirds2

The rule of thirds gave less of a message and was more of the framework for lining everything up. I put the train right on the bottom third intersection line and did my best to have the exit for the station at the intersection point of the bottom and left thirds lines. The last two main pieces of the picture were the track sign and the empty platform, I lined both of those up along the left thirds lines. You might be saying to yourself wow you gave lining up a lot of thought. Surprisingly I really didn’t think too much while framing everything. Over the past couple of weeks as I have taken more and more pictures along these guidelines I’ve started to do it automatically. I’ve noticed a big difference in the pictures I’ve been taking, and judging by peoples comments they have too. Don’t take my word for it, pay more attention to lining up your pictures and see what you think or better yet what other people think.

Night Light

ISO 100, 35mm, f/8.0, 4 sec

ISO 100, 35mm, f/8.0, 4 sec

Week 6 (9/8/2013 – 9/14/2013): Shipyard Marina, Hoboken NJ
Picture Taken on 9/9/2013 9:11PM

Picture Description

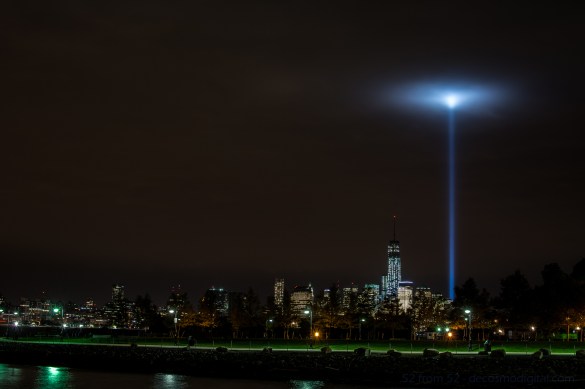
Going into this week my goal was to create a multiple exposure photograph or light trail night picture.  As a possible secondary option I bookmarked the possibility of photographing the freedom tower.  On Monday night I went out around 6ish to mess around with my new Nikon ML-L3 remote.  I was aiming for either a double/triple exposure of the Hoboken ferry or some kind of sunset shot.   After messing around for about an hour I went back to my apartment to eat some dinner, review my pictures, and wait until the sun was totally down so I could try for a night picture.  Unfortunately after reviewing the pictures on my computer none of them worked out as I planned so I was going to have to go back out for the night shot.

After dinner as I stepped outside of my apartment my eyes were instantly drawn to the distant southeastern skyline.   What I was looking at was simply amazing, the 9/11 memorial lights were getting trapped in some low thick clouds and forming this surreal spherical glow.  All of my other night picture plans went out the window at that point, I had to take a picture of this unique occurrence.

After taking the picture I thought it was good (not great) but didn’t want to use it as my picture for this week.  As I do with most unused pictures I posted it up on Facebook to share with my friends.  To my surprise this picture got more activity than any other one I’ve posted.  Coming up with a picture to top this one, at least this week would have been hard so in the end I decided to use this picture.

 Photography Concepts 

To get this picture I had to apply many of the tricks I’ve learned over the past couple of months. In some of my previous long exposure pictures I noticed a slight camera shake.  To prevent getting shaky images I’ve moved towards using either a 2 second delayed shutter release or in this case a remote.  Next I regularly use a UV filter on all my camera lens to prevent any wear and tear.  Over time I noticed that at night using a filter increases the amount of light distortion and bleed, so prior to this picture I removed the UV filter.  The last two keys to this photo, which I’ll talk about in a little more detail, are the exposure settings I used and editing in Lightroom.

The exposure I used was -2 (stops) which for anyone that doesn’t know, it’s an underexposure.  The reason I underexposed was because after taking other nighttime city shot I’ve noticed that with so many lights from all the buildings my pictures tend to get overexposed.  There are lots of negatives with overexposing, in terms of my city pictures the most noticeable is the change in the sky color.  After messing around with different exposures I’ve settled on -2 for my go to exposure setting.

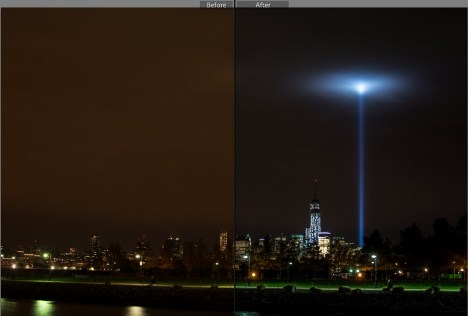
Now it’s hard to describe all the different tweaking I did in Lightroom but one of the main fixes was the white balance setting.  I forgot my white balance cards when I went out to shoot this picture so I had to do it after the fact.  I also made some moderate adjustments to the Highlights, shadows, whites, blacks and clarity to get the picture to look like what I saw in person.  If you want to learn about Lightroom I highly recommend going on youtube and watching some tutorial videos.  There is so much information out there to support learning photography (and most other hobbies) it’s just about finding it.

Before and After Editing in Lightroom

Before and After Editing in Lightroom

Since I originally did not want to use this picture let me quickly explain why and what I could have done better.  For starters if I remembered my white balance cards I would not of had to do so much editing in Lightroom.  I rather get a good picture in camera rather than edit it especially for this photoblog. I also wasn’t happy about my composition, the green in the picture is really nice but I was made I cut off some of the left side of the peninsula that is shipyard park.  I wish that I would have stepped back another 30-50 ft to get more into the picture.  Last I wish I found something interesting to put into the foreground of the picture, it just makes for a more interesting picture.

Article about Exposure
http://bit.ly/1eOEzt8

Lightroom Video’s
http://bit.ly/140WqbT
http://bit.ly/1ddxPTS

A Shot in the Dark

Picture Specs: ISO 4000, 35mm, f/2.8, 1/13sec

Picture Specs: ISO 4000, 35mm, f/2.8, 1/13sec

Week 4 (8/25/2013 – 8/31/2013): East River, New York, NY
Picture taken on 8/28/2013 at 8:10 PM

Picture Description:

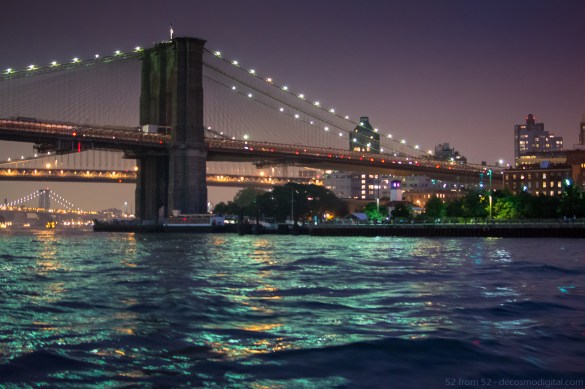
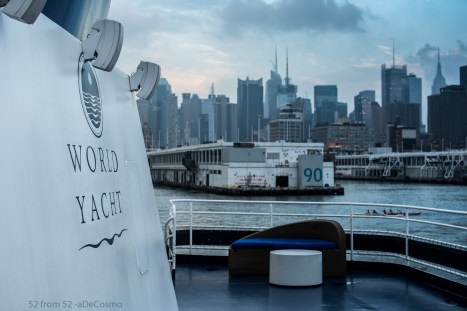
I’m on a Boat!!! Well…I was on Wednesday and that’s where I got the picture for this week’s post.  Hopefully you get the reference and if you don’t shame on you, go watch some SNL highlights.  Unlike the members of “The Lonely Island” I was not on a boat to shoot a music video with T-pain (damn), I was celebrating my parent’s 30th wedding anniversary.  We spent the evening on the Duchess which is part of World Yacht’s fleet of party boats.  Our cruise left from pier 81 at around 7PM and provided us with beautiful views the entire night!  I highly recommend booking a trip on World Yacht if you’re looking for a unique way to celebrate an occasion or trying to plan a memorable night out in the city.

View from the top deck of "Duchess" - World Yacht

View from the top deck of “Duchess” – World Yacht

Going into the evening I knew I’d have plenty of scenic picture opportunities but since I was there for my parents the time I could devote to getting a picture was limited.  Luckily I ended up sitting right next to a window which opened and allowed me to lean out and get this week’s picture.  The Brooklyn bridge is one of the most iconic New York City landmarks so when it appeared on the horizon I immediately put my steak knife down and grabbed my Nikon.  The shot I got is of the “BMW” bridges or Brooklyn, Manhattan, and Williamsburg bridges as we traveled North on the East river.

Photography Concepts:

If there was one overall lesson I learned this week, it’s that taking pictures on a boat and at night is VERY difficult.  First, the lighting is inconsistent  (low, high, indoor, outdoor)  which makes it difficult to tune in your exposure.  Second, surprise the boat is moving good luck focusing! Third, if you’re taking pictures of subjects off the boat you have to act fast because you have a very small window to get the shot you just saw.  As a result of hitting moving targets your composition is constantly changing.  Normally when you frame up a picture you’re standing still so you can get a couple pictures, not on a boat, snap fast and often!  In my opinion the combination of moving targets and low light was definitely the hardest aspect of this week.

This picture was tricky and I definitely wish I had a couple more shots at it.  Just like last week I had to use a high ISO but this time it was almost double (4000) which starts to show the negative attributes of a high ISO.  My picture (pre-edit) was a little grainy which is what happens when you use a high ISO.  I won’t try to explain why graininess (aka noise) happens but there are plenty of places to read about it online (one linked below).  While editing my picture in Lightroom I did my best to lessen the graininess by using some noise reduction corrections, which made for a softer (less sharp) image.  This is the first time I’ve mentioned Lightroom but let me tell you, it’s awesome!  I’ll talk more about it another time but I highly recommend it for editing/organizing all your pictures.

Other than a high ISO to make up for the limited amount of light I also had to use a wide aperture (f/2.8) and slow shutter speed (1/13 of a second!).  Now remember slower shutter speeds blurs motion so using one on a moving boat is risky.  I think this picture came in focus enough but if I was on land it would have been a lot sharper and I probably would have used a tripod.  I could have opened my aperture more (max f/1.8) to enable a faster shutter, but the wider the aperture the shallower the depth of field which isn’t ideal for a landscape picture.  As I mentioned earlier the window (especially when shooting through a literal window!) of opportunity for a picture is limited so I didn’t have enough time to work my way up the aperture scale (large to small).  Even if I had more time though a shutter of 1/13 is already too slow so I couldn’t drop that any further which I’d have to do if I shrunk my aperture.   As I said, this was a tricky picture.

One more big lesson that I learned this week (which isn’t really demonstrated in this picture) was the importance of white balancing.  While taking picture inside the boat everything seemed yellowy due to the indoor lighting.  Once the light stabilized inside I took a couple pictures of my white balance cards in the different parts of the boat so I could adjust everything in Lightroom later.  Let me tell you WOW what a difference!! I’ll try to get a picture in the coming weeks to demonstrate the usage of white balancing.  If you’re a beginner like me you’re going to be surprised by the results.

Links:

World Yacht Site: http://bit.ly/14KB8zR

ISO/Noise Article: http://bit.ly/18qN5bB