Getting a-head

Picture Specs: ISO 200, 35mm, f/5, 1/30 sec

Picture Specs: ISO 200, 35mm, f/5, 1/30 sec

Week 10 (10/6/2013 – 10/12/2013): My Apartment, Hoboken NJ
Picture taken on 10/10/2013 at 4:53 PM

Picture description:

In life it’s always better to get ahead.  Getting ahead was the catalyst for this week’s picture/concept.   As I’m gaining more experience and exposure in the photography world, more opportunities are presenting themselves.  One upcoming project is going to require me to take a lot of indoor pictures and possibly product/macro types of shots.  In an effort to prepare (get ahead) for this future project, and to explore more areas of photography I decided to experiment with “studio” photography.  Now I don’t have a studio or access to one so the best I could do is purchase an at home alternative to allow me to take some small scale pictures.  Luckily one of the best companies to buy photography gear from has a storefront in New York City and not too far from my office.  I’m of course talking about B & H.  After doing some research online about what I should get I took a trip to B & H to check everything out in person.  I spoke to one of the employees who recommended a duel light set up which would have been both bulky and expensive.   I decided his suggestion wasn’t the route I wanted to take and ended up settling on the “MyStudio” portable photo studio with built in lighting.  It came at a reasonable price and it seemed to be the perfect size to be functional in my apartment.

Setting up “MyStudio” was pretty quick and easy.  Of course it helps that I’m a handy man (not by trade) but I feel like most people would be able to put everything together in under 10-15 minutes.  Once everything was set up it was time for the fun to begin.  Per my brother “anything is cool if you’re a good photographer”  at least in terms of macro photography so I took that as a challenge.  I began going through my room and photographing almost anything that would fit in “MyStudio.”  Although my brother was right, not everything that I took a picture of could easily tie into a post.  I decided to find something a little more relevant.  My “getting ahead” philosophy (along with Halloween being around the corner) is what drew me to skulls (heads) that are featured in this week’s picture.

Photography concepts:

One big difference between this picture and those of past week’s was I needed a decent amount of equipment to make this happen.   For starters I needed the “MyStudio” which I would recommend to anyone looking for a small at home studio option (link/picture below).  Next I needed a tripod since with macro/studio photography sometimes you have to take longer exposures to capture more light and you really need to line everything up with precision.  I probably could have gotten away with not using a tripod but I already had a good one so there was no reason to not.  Another key tool you need while doing studio photography and any other indoor shots are white balance cards.  I’ve mentioned white balancing before but this week it was really key.  When you’re using a white balance card you usually take a reference shot and either tune your camera into that setting or use the reference shot as a guide for setting all your white balance in editing.  This week I decided to leave my white balance cards in the picture so you could get an idea about how I used them.   The last and most obvious (other than my camera) thing that I needed was a subject.  In the past I found real life subjects to photography, while this week I had to find and place my subject.  Having the freedom to get creative was nice but also very challenging.

MyStudio; Taken from BH's site (link to product below)

MyStudio; Taken from BH’s site (link to product below)

The main challenge about having “creative freedom” was positioning my subjects and relationally lining up my camera.  When you’re working on such a small scale the slightest adjustments to your camera’s angle or the location of your subject changes the entire dynamic of the picture.  Using this week’s picture as an example.  You’ll notice that the single skull and the bag of skulls are a little offset with the single skull being further up in the picture.  I positioned the single skull forward so it was larger in the picture but I had to push the bag back to get it in the full frame.  Once I put the two subjects on different planes, in relation to my camera’s lens, it forced me to use a smaller aperture.  If I had shot this picture with a f/1.8 instead of f/5 the single skull would have been in focus and the bag blurry.  Even with f/5 you can already start to see some of the blur in the back portion of the bag.  Based on what I’ve read, along with my own experience with wider apertures (smaller f numbers) the plane of focus becomes very thin.  What this means  is only the things that are on the same plane as your subject will be in focus.  The smaller the aperture the deeper the in focus plane gets.  I haven’t done enough reading to explain the mathematics behind this focal plane concept but I feel like this picture was an easy way to demonstrate the concept and it’s challenges.

There is still a lot more to learn about indoor shooting so this topic might get featured again in the coming weeks. Let’s just say for now this is to be continued…

BH Link for “MyStudio”

http://www.bhphotovideo.com/c/product/727653-REG/MyStudio_PS5_PS5_PortaStudio_Portable_Photo.html

Searching for…

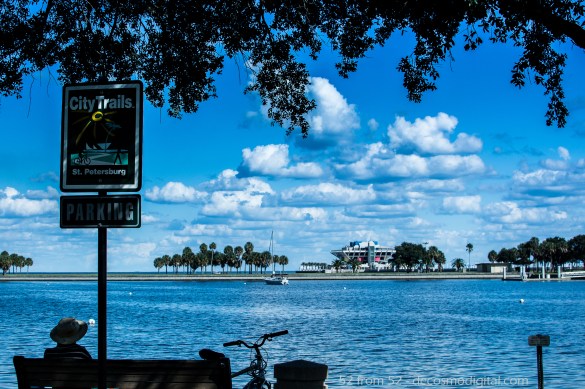
Picture Specs: ISO 320, 35mm, f/7.1, 1/500 sec

Picture Specs: ISO 320, 35mm, f/7.1, 1/500 sec

Week 9 (9/29/2013 – 10/5/2013): St. Petersburg Pier, FL
Picture taken on 10/1/2013 at 4:04 PM

Picture description:

Everyone is searching for something. Like most weeks one of the things I was searching for was an interesting picture to write about. In past weeks I had a set plan or some general idea about what I wanted to shoot, but my only plan for this week was to leave it open ended. The beginning part of my week was spent down in Florida visiting my insanely awesome family. My hope was that while in Florida something interesting would present itself and that my Nikon would be close or in hand to capture the moment. As one day rolled into another my camera stayed on the bench while most of my time was spent running around with my cousins doing what we do, “You don’t even know!” By the last day while my cousin Courtney and I were killing time before my flight we decided to grab a bite and hit the St. Petersburg Pier or as they call it “the pier” to see about getting a picture.

Once we got to the pier one picture instantly jumped out at me. With the thought of how everyone is “searching for” something in the back of my mind, the picture that caught my attention was this man sitting on a bench peering out at the pier as it jutted out into the deep blue bay. To me it looked like he was simply enjoying the beautiful view but also deep in thought, perhaps searching for an answer to something?

Another reason why this picture caught my eye was because this man’s spot reminded me of my own back up North. If you recall my post from week one I featured my favorite bench with a view. Chances are if Florida was my home this or one similar to this would be “my bench.” I’ve found that setting aside time to be alone in your thoughts is mentally one of the healthiest habits to have. Things move fast, as do people so if you don’t carve out some time to slow things down for a little you’re going to burn yourself out, at least that’s my philosophy. Not everyone has a bench, but I encourage you to find your equivalent. This nameless man and I have found our bench, the only remaining question is will we find everything else we’re searching for?

Photography concepts:

With 9 weeks in the books more of my focus is shifting towards the composition of my picture rather than the technical aspects such as exposure. Setting the right exposure is by choosing the correct settings is still key but it’s becoming more second nature for me. Using this week as an example, once I picked my spot there were two apertures I wanted to try for this picture. One was f/4 since this seems to be the “sweet spot” for my lens, and the other was something around f/7-8 to get most of the picture in a crisp focus. In the end f/7.1 looked the best since it kept everything in a nice focus, with the priority going to the sign in the foreground. In past weeks more of my time might have been spent finding the right exposure but thankfully this week I found it quickly and could put more thought into the elements of my composition.

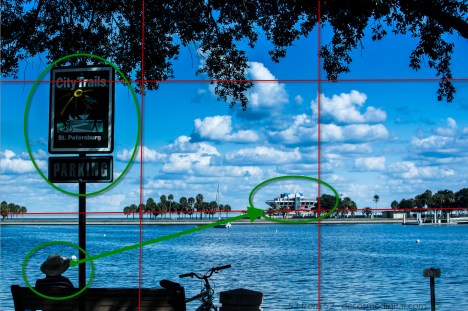
Other than the beautiful clouds and water there were three things that I wanted to emphasis in this picture. My main subject was the pier with my secondary subject the man on the bench. Luckily these two subjects complimented one another in that the man is looking out towards the pier. This leads the viewer towards following the man’s gaze out into the water towards the pier. My third subject was the sign which had the main purpose of highlighting the location of my picture, St. Petersburg.

Framing the shot

Once my subjects were chosen it was all about lining them up, which of course brings back the concept of the rule of thirds. You’ll notice that two of my subjects are in the left thirds of the picture with my third and main subject (the pier) at the lower intersection point of the right two thirds. Putting the pier in its own two thirds was so my main subject had the prime location in the photo and so the viewer could see the area surrounding it. The last framing element I went for was breaking up the picture top to bottom by putting the water in the lower 1/3, the sky in the middle 1/3 and the tree branches in the top 1/3. This naturally framed my main subject (the pier) in-between the branches and the water. My feeling was that framing the picture like this gave it a tighter feel rather than a wide open feeling one would have felt if the sky took up 2/3+ of the picture. My goal was that the combination of all the framing elements would make the viewer feel like they were looking through the same natural window as the man on the bench. I hope it worked!

Getting Negative

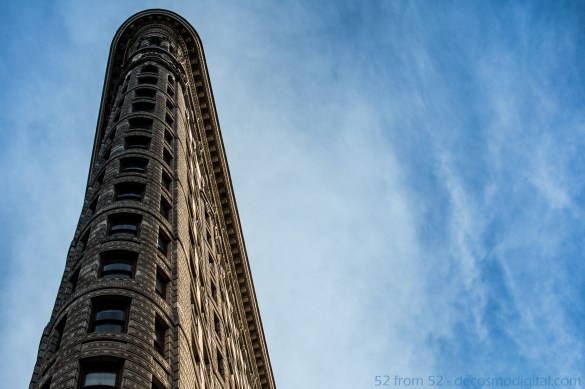
Picture specs: ISO 500, 35mm, f/4.0, 1/4000 second

Picture specs: ISO 500, 35mm, f/4.0, 1/4000 second

Week 8 (9/22/2013 – 9/28/2013): Flatiron building, corner of  23rd/5th NYC
Picture Taken on 9/25/2013 at 4:58 PM

Picture Description:

No, don’t worry I’m not going on any kind of negative rant in this week’s post.  If you want to understand the “negative” reference in the title you’ll have to read the photography concepts!  Enough on that, time for the story behind the picture.

I was reminded about a very valuable lesson this week, that lesson being that you really can’t force things.  As usual I had a plan for this week but by Tuesday I realized my plan was pretty much a wash.  The plan was to get a picture of or around the United Nations building.  The reason I chose this week was because it’s the annual United Nations General Assembly.  Most people have no idea about when the General Assembly happens let alone the chaos that happens in the area surrounding the UN.  I work not too far from the UN so each year I get a front row seat to the insanity.  SWAT cars, Secret Service, hundreds of NYPD officers, and countless diplomats converge on my little east side nook.  What I wanted to do was get a picture that in some way captured the madness.  On Monday I scouted the surrounding area to see if there were any good pictures that caught my eye.  Due to all the added security I couldn’t get close to the UN building so I knew I’d have to get some kind of distant shot.  The only idea I could think of was a sunrise picture since the UN is right on the water.  Sunset shot easy right, yes…on any other week!

It wasn’t until Tuesday morning when I brought my camera into work with me that I realized the flaw in my plan.  With so many cops and security personnel around the second I took my camera out all eyes focused on me.  Why is he photographing the UN?  Why is he wearing a black coat?  Why is he walking down that street?  Why is he looking around in such an odd way?  These are all of the questions I could almost hear getting asked as I felt the burning stares.  After a few short minutes I decided to move locations to the waterfront on the East river, bad idea. Once I got to the waterfront I saw police boats circling which seemed to immediately fixate on me.  As one large boat headed in my direction, I quickly threw my camera into my bag and slowly walked away.  In my head I had this sudden fear that some kind of unmarked car was going to zoom up, grab me, and take me away for hours of questioning.  At this point I said you know what I really don’t want to get arrested this week, I’m going to get a bagel and call it a morning.

That afternoon as I thought about what unfolded in the morning I realized even though I really wanted the UN picture this week, now isn’t the best time, there is always next week.  Giving up on something like this is difficult for me.  Once I see something I want I go for it but as I said  earlier, this week I was reminded sometimes you can’t force things you just have to be patient and wait for the right time.

Once I came to terms with holding off on the UN idea I decided that I would take a trip to the flatiron building to see if I had better luck without all the piercing police eyes.  Prior to this week I had only seen the flatiron building from a distance or very briefly up-close while driving by.  The building is quite the scene in person and can make you a little dizzy when you’re standing right next to it looking straight up.  Luckily I was able to conquer the dizziness and get this week’s shot, hopefully you like it!

Photography Concepts:

Photography wise what I learned this week is “getting negative” isn’t a bad idea, let me explain.  As I continue to read about the concepts of photography one term that’s come up a lot when referencing a pictures composition is “negative space.”  Based on everything I’ve read negative space is the area surrounding your subject (which is positive space).  It seems logical enough right?  I’ve seen that in some photos people literally fill the negative space with well nothing.  What this does it it really emphasizes the subject.  In my case my subject was the flatiron building and my negative space was filled with the nice blue sky.  When I first started taking pictures if I took a picture where half of it was empty I’d probably think about cropping it down to eliminate that space.  What I’ve now learned is if used correctly the empty “negative” space is a nice tool to put in your composition toolbox.

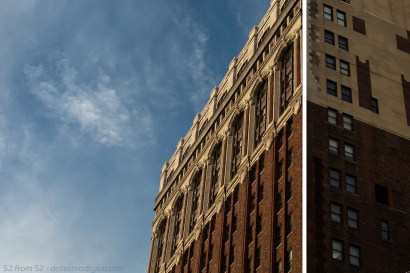
An example of a picture where there is no negative space.

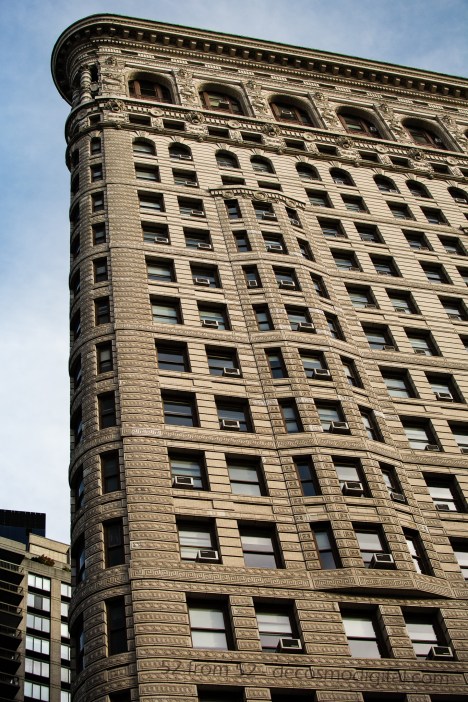
An example of a picture where the subject takes up most of the frame

One trick I learned this week while getting myself dizzy from looking up for too long was how to line up my pictures better.  In a lot of the pictures I’ve previously taken of buildings while looking straight up I noticed that the picture always seems tilted.  The way I lined the picture up or saw it in real life didn’t translate well to the composition of the photo once I reviewed it at home.  While I was shooting this week I tried to choose a line or lines in the building that would level things out when I looked at the picture later on.  It felt odd while I was taking the picture but my results were a lot better. For example in the below picture I chose the corner line between the two sides of the building to line up my shot.  It’s hard to give some kind of formula for choosing the right line, but it’s something I’m going to try and pay closer attention to in the future.

Blog_8(final)3

Night Light

ISO 100, 35mm, f/8.0, 4 sec

ISO 100, 35mm, f/8.0, 4 sec

Week 6 (9/8/2013 – 9/14/2013): Shipyard Marina, Hoboken NJ
Picture Taken on 9/9/2013 9:11PM

Picture Description

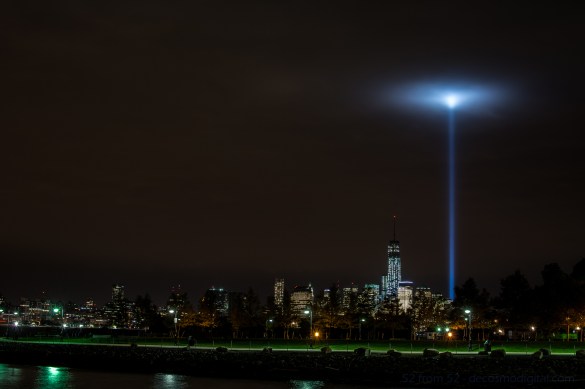
Going into this week my goal was to create a multiple exposure photograph or light trail night picture.  As a possible secondary option I bookmarked the possibility of photographing the freedom tower.  On Monday night I went out around 6ish to mess around with my new Nikon ML-L3 remote.  I was aiming for either a double/triple exposure of the Hoboken ferry or some kind of sunset shot.   After messing around for about an hour I went back to my apartment to eat some dinner, review my pictures, and wait until the sun was totally down so I could try for a night picture.  Unfortunately after reviewing the pictures on my computer none of them worked out as I planned so I was going to have to go back out for the night shot.

After dinner as I stepped outside of my apartment my eyes were instantly drawn to the distant southeastern skyline.   What I was looking at was simply amazing, the 9/11 memorial lights were getting trapped in some low thick clouds and forming this surreal spherical glow.  All of my other night picture plans went out the window at that point, I had to take a picture of this unique occurrence.

After taking the picture I thought it was good (not great) but didn’t want to use it as my picture for this week.  As I do with most unused pictures I posted it up on Facebook to share with my friends.  To my surprise this picture got more activity than any other one I’ve posted.  Coming up with a picture to top this one, at least this week would have been hard so in the end I decided to use this picture.

 Photography Concepts 

To get this picture I had to apply many of the tricks I’ve learned over the past couple of months. In some of my previous long exposure pictures I noticed a slight camera shake.  To prevent getting shaky images I’ve moved towards using either a 2 second delayed shutter release or in this case a remote.  Next I regularly use a UV filter on all my camera lens to prevent any wear and tear.  Over time I noticed that at night using a filter increases the amount of light distortion and bleed, so prior to this picture I removed the UV filter.  The last two keys to this photo, which I’ll talk about in a little more detail, are the exposure settings I used and editing in Lightroom.

The exposure I used was -2 (stops) which for anyone that doesn’t know, it’s an underexposure.  The reason I underexposed was because after taking other nighttime city shot I’ve noticed that with so many lights from all the buildings my pictures tend to get overexposed.  There are lots of negatives with overexposing, in terms of my city pictures the most noticeable is the change in the sky color.  After messing around with different exposures I’ve settled on -2 for my go to exposure setting.

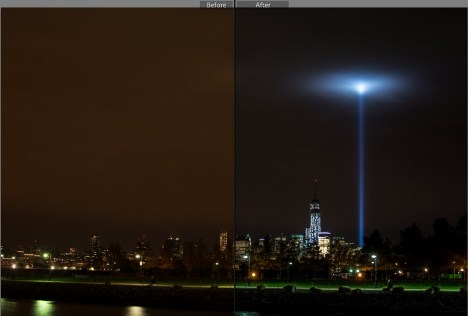
Now it’s hard to describe all the different tweaking I did in Lightroom but one of the main fixes was the white balance setting.  I forgot my white balance cards when I went out to shoot this picture so I had to do it after the fact.  I also made some moderate adjustments to the Highlights, shadows, whites, blacks and clarity to get the picture to look like what I saw in person.  If you want to learn about Lightroom I highly recommend going on youtube and watching some tutorial videos.  There is so much information out there to support learning photography (and most other hobbies) it’s just about finding it.

Before and After Editing in Lightroom

Before and After Editing in Lightroom

Since I originally did not want to use this picture let me quickly explain why and what I could have done better.  For starters if I remembered my white balance cards I would not of had to do so much editing in Lightroom.  I rather get a good picture in camera rather than edit it especially for this photoblog. I also wasn’t happy about my composition, the green in the picture is really nice but I was made I cut off some of the left side of the peninsula that is shipyard park.  I wish that I would have stepped back another 30-50 ft to get more into the picture.  Last I wish I found something interesting to put into the foreground of the picture, it just makes for a more interesting picture.

Article about Exposure
http://bit.ly/1eOEzt8

Lightroom Video’s
http://bit.ly/140WqbT
http://bit.ly/1ddxPTS

Never Forget

ISO 160, 35mm, f/ 2.5, 1/500 sec

ISO 160, 35mm, f/ 2.5, 1/500 sec

Week 5 (9/1/2013 – 9/7/2013): 9/11 Memorial, New York City, NY
Picture taken on 9/5/2013 at 5:44 PM

Picture Description

In a less than a week 12 years will have passed since September 11th, 2001 and prior to this week I never visited the hallowed ground that was the location of the World Trade Center towers.  I have wanted to pay my respects by visiting the grounds for some time now and this week I finally made the time to visit the 9/11 memorial.

As expected prior to entering the memorial you’re paraded through an array of security screenings and lots of twisting alley ways.  When you finally get into the memorial area it’s a surreal feeling especially when you think about the significance of the ground you’re now standing on.  So much that has happened over the past 10+ years has been a result of what happened there on that fateful day.  The events of 9/11 will forever remain in the forefront of my mind.  As with most Americans, especially those that live in the New York area, I can vividly replay much of the day in my mind as if it was only yesterday.  I was fortunate to not lose any loved ones through the tragic events and it’s hard for me to even fathom what those that did had to go through, and still do.  As I walked around I tried to do so respectfully since I’m sure among the crowd there were at least a few visitors that had lost someone.   The reflecting pools are both architecturally beautiful and symbolically somber.  The pools each take up about an acre of space and the perimeter of each pool is lined with the names of those that lost their lives.  The relationship you can draw between the magnitude of the pools and encircling list of names is powerful and very sobering.   While walking around you randomly come upon names with flowers, flags and other items placed or wedged into the cracks of letters.   I don’t know how often flowers and such are removed but my guess is that the presence of one means someone placed it there that day or very recently.  During my walk around the North pool I noticed that someone had placed a flower on a loved one’s name just below the World Trade Center heading.  I thought the flower with the reflection pool backdrop would make for a meaningful picture.

blog_5-final(2)

I hope after reading this you too go visit the memorial to pay your respects and experience this all for yourself.  I’d also like to say if anyone is reading this and lost a loved one, you have my deepest condolences.

Photography Concepts 

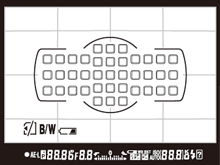
This picture was very straight forward, unlike last week nothing was moving so I just line everything up and fired away.  As I take more and more pictures I’m beginning to learn what the ideal settings are for specific ‘looks’.  This picture for example, I wanted to emphasize the flower, names and obviously “World Trade Center.”  If you read my first blog you might be able to guess one of the settings I used to get the blurred background.  If you said wide aperture, you were correct!  I used an aperture of f/2.2 to blur out the reflecting pool.  The second and main part in capturing this picture was utilizing my camera’s focus points.  I used a single point auto-focus to mainly to make sure “World Trade Center” was properly focused but oddly enough there is more effected with using focus points than just ‘focus’ so that’s what I’m going to talk about.

Nikon D5200 Focus Points - Taken from below Nikon Website

Nikon D5200 Focus Points – Taken from below Nikon Website

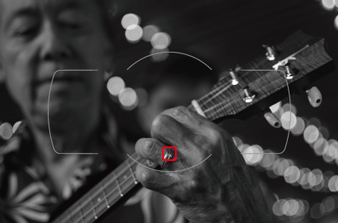
When it comes to “auto-focus” my Nikon D5200 has 4 different focusing modes but for now I’ll just talk about the one I used. I used single point auto-focusing for this picture which is what I use for most of my pictures. For anyone that doesn’t have a DSLR you might be unfamiliar with the term focus points.  They’re exactly what you’d think they are, selectable focus areas I see when looking through the lens.  Similar to what you see on standard camera’s or camera phones, however on my camera they’re not totally free moving.  For example, on most camera phones you pretty much touch anywhere on the screen and it uses that as the main focus point.  On a camera such as mine I’m limited to 39 focus points.  The really high end DSLR cameras (e.g. Nikon D4 – 51 focus points, Canon EOS 5D Mark III – 61 focus points) have more but I’m yet to run into any issues using 39.  Beyond focusing, by manually selecting the exact focus point I’m able to have more control over my camera’s exposure. One scenario where how the camera sets exposure comes into play is when you’re dealing with multiple light sources such as natural/unnatural light in one photo.  I’ve noticed that finding the best medium exposure matters most when you’re trying to incorporate the sky into a photo.  A lot of times if you set your exposure off an object the sky gets over exposed meanwhile if you set it off the sky your object (subject) gets under exposed.  Finding the middle ground in terms of exposure can be hard and is somewhat fixable after the fact but pictures come out way better if you do the right exposure in camera.  What I usually do is try to set my focus point somewhere close to both my subject and the sky to obtain the best exposure.  The problem with not selecting your actual subject is you have to use a smaller aperture to make sure more of the image (such as your subject) is in focus and not blurred out.  Since I wanted a blurred background in my photo I had to go with the wider aperture so when I put my focus point on the World Trade Center it ended up over exposing the background a little.  Nothing I wasn’t able to fix in LightRoom but it’s something you have to keep in mind.  If you over expose too much the detail of a picture isn’t always recoverable.  To have more flexibility lately I’ve been shooting in RAW form or in Nikon terms .NEF files.  Based on everything I’ve watched/read shooting in RAW verses JPEG retains more of the pictures editable attributes.  No matter what camera you have, one with RAW mode, 1 or 51 Focus points, when used correctly focus points can greatly help set the right exposure for you picture.

Nikon D5200 Single Focus Point - Taken from below Nikon Website

Nikon D5200 Single Focus Point – Taken from below Nikon Website

Nikon D5200 Article source for two pictures:
http://imaging.nikon.com/lineup/dslr/d5200/features02.htm

Unplanned “Destiny”

Picture Specs: ISO 2500, 35mm, f/2.2, 1/4000sec

Picture Specs: ISO 2500, 35mm, f/2.2, 1/4000sec

Week 3 (8/18/2013 – 8/24/2013): Shipyard Park, Hoboken NJ
Picture taken on 8/22/2013 at 6:25PM

Picture Description:

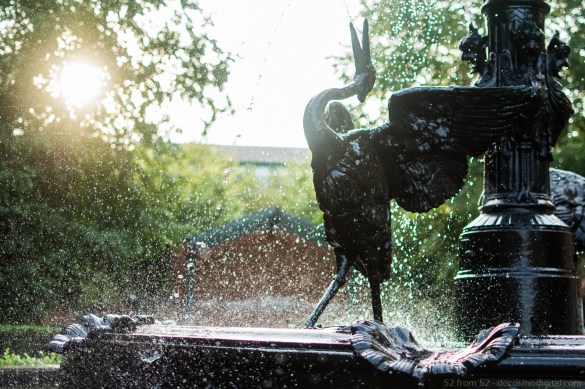
This week’s picture is a perfect example of how sometimes the best things aren’t planned. Opportunities present themselves when you least expect them, don’t get tunnel vision, especially in photography.

All week I planned on getting one of two shots, either a night scene in New York City or a sunset shot in Hoboken at Pier 14. I had a clear picture in mind for both ideas and scouted out locations where I could execute my idea. I was busy in the beginning of the week so I was aiming to take my picture on Thursday.

When I rolled out of bed Thursday morning still recovering from the night before (awesome night! Boozing for charity/Benjamin’s Steakhouse…Google it), I said to myself there is no way I’m going to have the energy to cruise the city streets late at night for the picture I had in mind. Luckily I had a plan B, Pier 14. After work during my run I did a quick drive by of pier 14 to make sure everything was good for later. Upon getting to my spot I noticed that this massive boat called “destiny” (ironic I know) was parked right in the way of what would be my view of the sunset. In addition to the giant boat there were a bunch of workers welding in the area that would be in the background of my shot. I thought to myself “ah maybe it will make for a better picture”….it didn’t.

When I returned about an hour later the picture was nothing like I had planned no matter what angle I shot it from. At this point it would have been too much of a hassle to bolt into the city for my original plan so I decided to start walking around. While wandering around I remembered seeing a fountain in Shipyard Park which could make for a good picture. When I got to the fountain I realized that thanks to “destiny” I stumbled upon the perfect shot!  The sun was at the perfect angle and I had the park all to myself.

Photography Concepts:

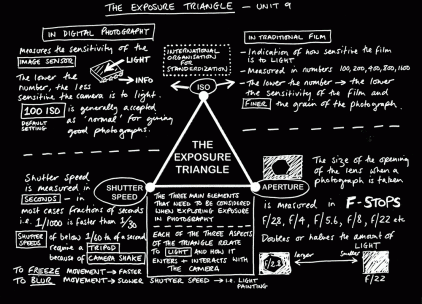
The most important part of this picture was capturing it with the fastest shutter speed possible. The quickest my camera can take a picture is in 1/4000 of a second, which compared to your average camera or iPhone is noticeably faster. The high speed shutter is what gave me the ability to freeze the water droplets and splashing. In order for me to use a super fast shutter I had to compensate with a very high ISO of 2500 and almost wide open aperture of f/2.2. Now although I mentioned “boosting” ISO in my previous post I didn’t explain it’s relationship to making your picture brighter. To put it plainly ISO is your camera’s sensitivity to light, lower number = less sensitive which means your sensor needs more light from either a slower shutter speed or wider aperture. The higher the ISO the less light you need from your shutter or aperture. These three aspects of a camera’s settings (ISO/Aperture/Shutter) are commonly referred to as the “Triangle of Photography”. I’ll try to explain this more in another post, but for now if you want to read more about ISO below is a really good article from NIKON. This article also explains the negative aspect of ISO which I’m yet to talk about.

See below for image source

See below for image source

When it came to framing the picture I followed the rule of thirds to position the key elements (bird, sun, water droplets). The bird is just about on the intersection point of the center/right thirds leaving the remaining two thirds of the horizontal space to be filled with splashing. As for the lighting angle back-lit vs front-lit, I took the picture both ways and found that the back-lit (sun/light source behind subject) looked way better because all the light shined through the water droplets. With the sun in the rear, the droplets captured the light and made for a cool almost glowing effect.

The one thing I should have tried but totally forgot was to take a couple pictures with flash. Although it might have lit up the bird too much, based on everything I’ve read flash freezes motion and in this case might have made the water droplets more prominent. On the bright side (pun intended) it’s something to walk away with, I’ll have to mess around with flash for a future post.

Nikon Article: http://bit.ly/1dAdide
Image source – Via Google search http://bit.ly/14pBJ9X

A Day of Reflection

Picture Specs: ISO 500, 35mm, f/9.0, 1/200 sec

Picture Specs: ISO 500, 35mm, f/9.0, 1/200 sec

Week 2 (8/11/2013 – 8/17/2013): Corner of 6th/42nd Bryant Park, New York City
Picture taken: 8/14/2013 at 5:50PM

Picture Description:

If you were to ask me what are my favorite locations in New York City, Bryant Park would absolutely be in my top five.  Although I pass the park almost every day (during my commute to work) I don’t always have the time to stop and enjoy everything it has to offer.  If you’ve spent any amount of time in the park you know it’s a very busy place filled with a diverse group of people.  It’s safe to say there is an activity for almost anyone, year round. One part of the park that I never explored was the New York Public Library.  Yes, for those of you that know me I went into the library, voluntarily!  No I did not borrow any books BUT I did have fun checking out the amazing architecture throughout the building.  At the start of my visit, my plan was to get a picture of the “Rose Main Reading Room” however that didn’t come out as I hoped.  A picture with the 35mm didn’t do the room justice (trust me, Google it) you really need a wide-angle lens, so I decided not to use that picture for this post.

Taken via NYPL’s Photobooth

After exploring the library, I took my adventure outside.  In the heart of the park there were hundreds of people out enjoying the beautiful 70 degree sunny weather.  Both of the park’s restaurants were buzzing and the lawn was littered with people hanging out next to the towering movie screen sitting on the west side of the lawn.  In case you don’t know, HBO has a film festival that runs every Monday during the summer.  The festival makes for a great dinner and a movie idea, but those kind of tips would need a whole other blog so I’ll leave it at that.

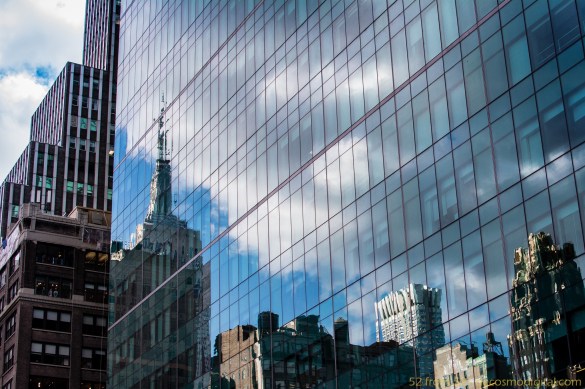
After doing a quick walk-through of the park one thing that immediately caught my eye was how most of the buildings surrounding the park were picking up great reflections of one another.  A reflection shot usually makes for an interesting and unique photo so I decided this would be the perfect idea for this weeks post.

Photography Concepts:

There weren’t a lot of technical intricacies to this week’s photo other than timing.  Prior to going to Bryant Park I knew when the sun would be at the right angle (no pun intended) for some nice shots and maybe even a good reflection picture.  I use an APP on my iPhone called “The Photographer’s Ephemeris” which tells me the angle of the sun based on time/day.  If you’re looking to use the sun as a part of your picture or get a reflection shot I highly recommend using this application when planning your shot.

One composition concept that I attempted to use at least subtly is “leading lines”.  When you look at the picture the lines sort of lead you to the corner of the building where you notice you’re not looking at a blurry picture, you’re actually looking at a reflection.  At least that’s the way I saw it.

Last, when shooting during the day even though there is plenty of natural light, at some points I had to slow down my shutter speed or boost my ISO.  I’ll talk about this more when I take a night picture but take note that for a picture like this when you want everything in focus you need to use a smaller aperture.  I used f/9 which is (based on everything I read) a good aperture for landscapes.  Since a smaller aperture means less light, you have to compensate with a higher ISO or slower shutter speed.

Challenges:

I’m only in week two and I can already see how challenging the 52 from 52 concept is going to be.  Luckily I like a challenge, anything worthwhile takes time and effort.  I put a decent amount of thought into what I wanted to photograph this week.  I naturally have lots of ideas but some of them are about timing (weather, time of day, ect.) while others are location based and require traveling.  With a busy schedule, one of my biggest difficulties will be setting aside the time to go out and take pictures each week…but that’s the purpose of this, to force me to get out there and learn!