Wow week 30 and I can’t believe how fast time has flown since I started this project. Doing this photoblog is one of the best decisions I’ve ever made. I have learned so much, made some new friends and have become even more hooked on photography. That being said, I’m excited to see what the next 22 weeks will bring!
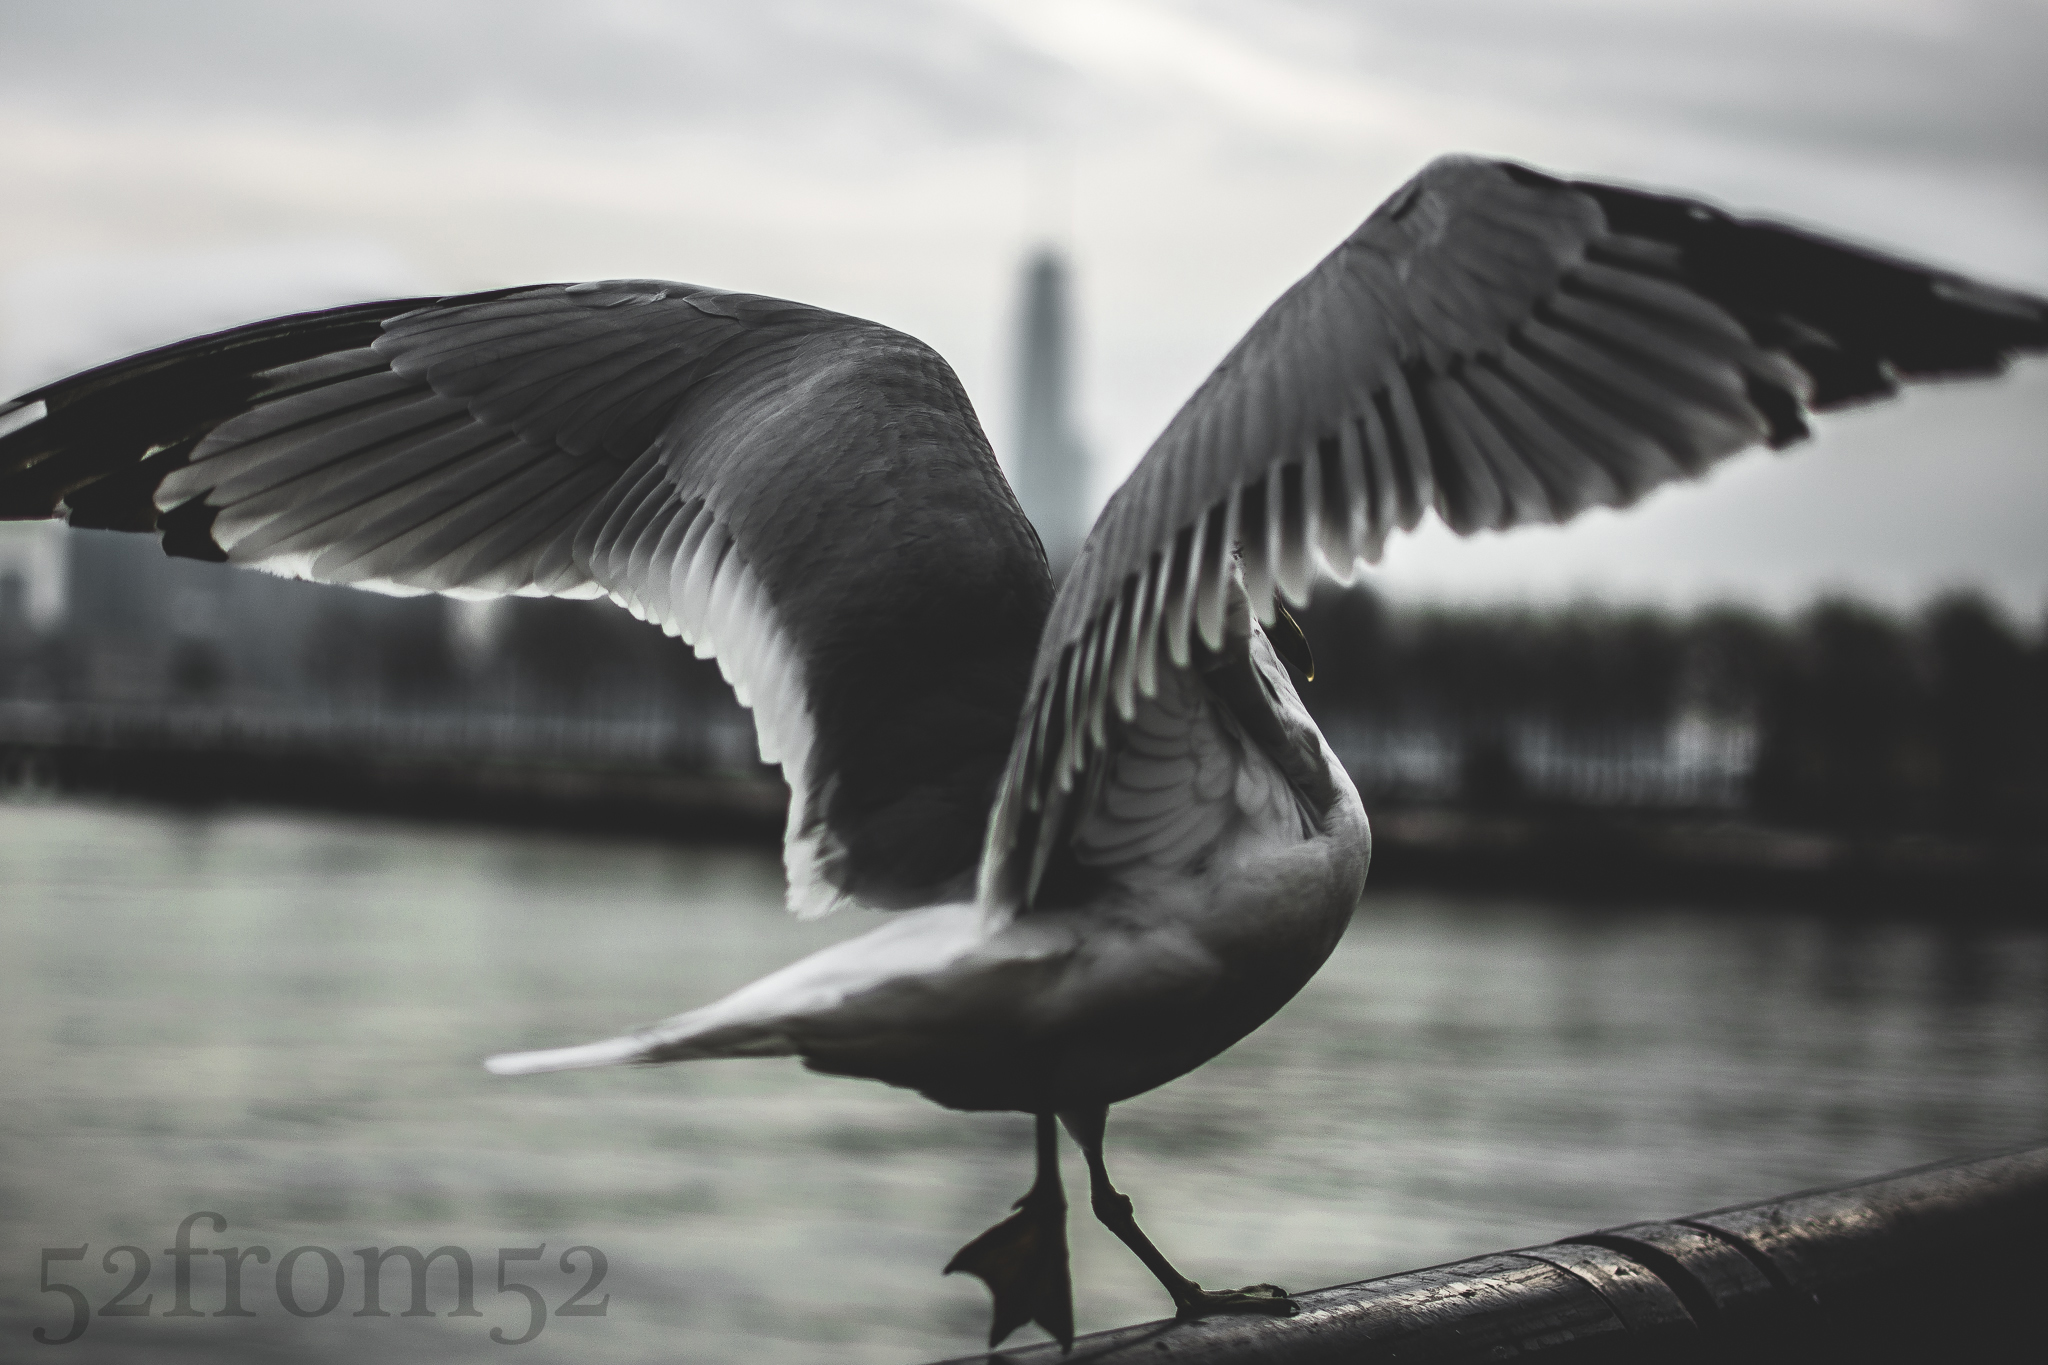
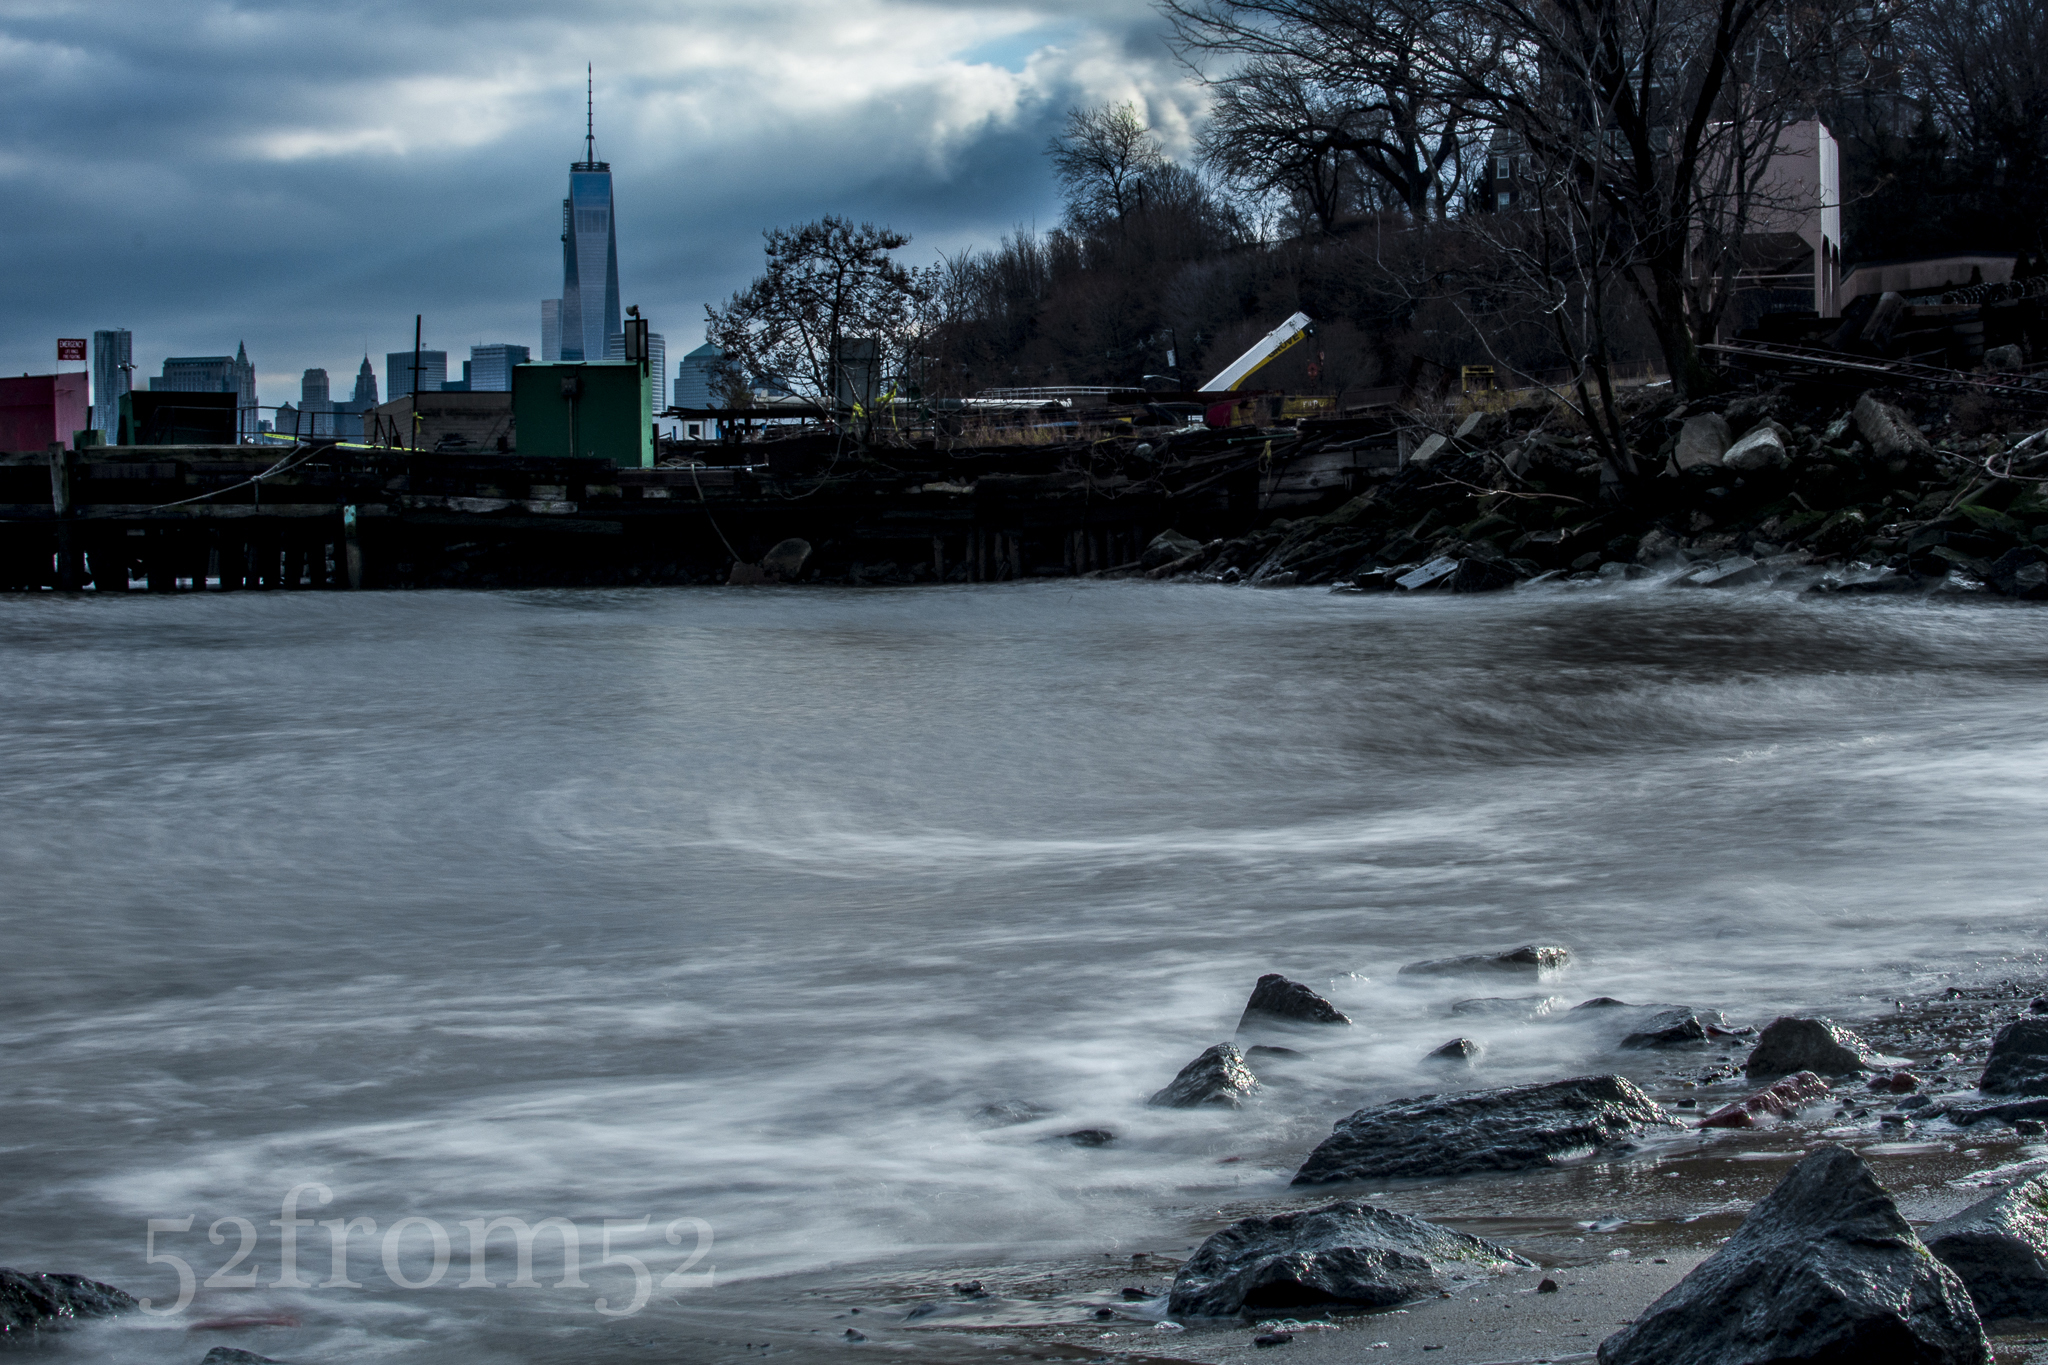
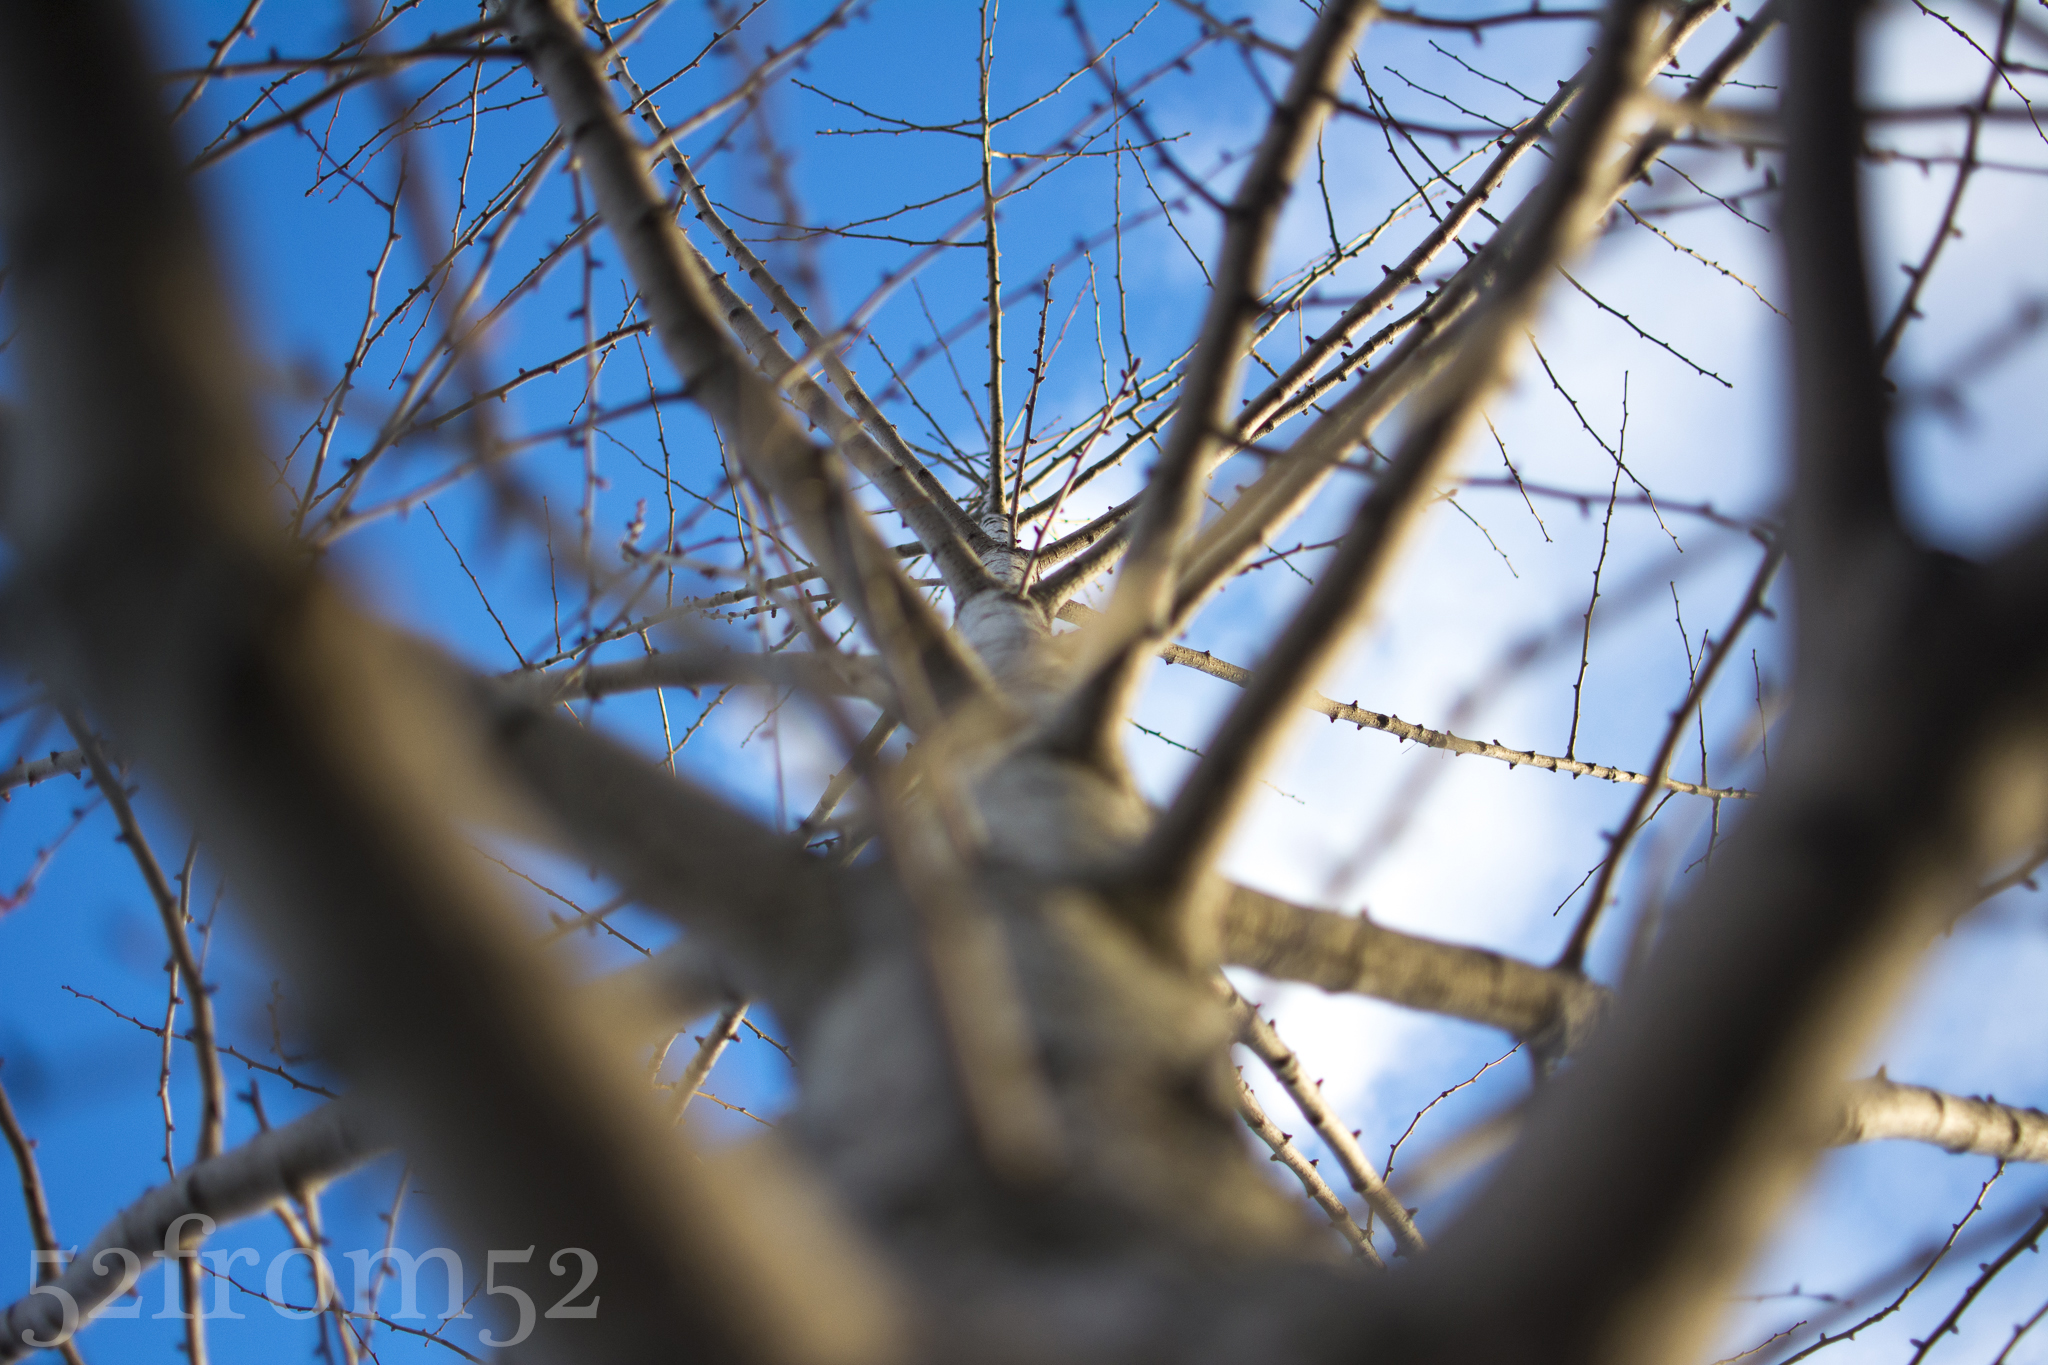
I was a little off my game this week when it came to taking pictures. Usually I get out about 1-2 times per week, this way once Sunday hits I have some options for my post. I’d like to say my lack of photo time was because it was hard to find time, but it was mainly hard to find the motivation to get out and fight the cold. Waking up Sunday I felt the pressure to find a good picture to feature and lucky for me it wasn’t too cold. As I have so often this winter, I went out along the Hoboken waterfront to see what I could find.
To get in the mood I threw on some headphones and lost myself in the hypnotic beats of Armin Vann Burren on SiriusXM’s electronic area. Oddly enough electronic music has the ability to both get me amped and sooth me, sometimes simultaneously. This time around Armin’s mix had more of a relaxing effect as I strolled around in the cloudy day. After looping around the newly opened walkway that encircles the 4th street field, I came upon a surprisingly brave seagull. No matter how quickly I moved towards him the seagull would only fly out a few feet then perch right back on the railing. This seagull’s challenging attitude provided me with a unique opportunity to adjust my camera settings to find the ideal exposure and composition.
Photography concepts:
Shooting fast, shooting often and anticipating movement are the keys to photographing birds and most animals. Shooting fast and often seems pretty obvious but the trick is knowing how to set up your camera to do so. Ideally you want to use your camera’s fastest shutter speed. The easiest way to get a fast shutter speed is to shoot with a large aperture. The aperture will vary based on available light, but in most cases your safest bet is to shoot wide open at your lenses largest aperture. My lenses widest aperture is f/1.8. Shooting at my lenses maximum aperture allowed me to achieve a super fast shutter of 1/4000 of a second. You may have noticed that even with shooting as fast as I did, the seagulls wings are still a just a little blurry. It’s possible the blur is due to a little lag in focus but I’m pretty happy with my camera’s ability to focus quickly so it’s more likely due to a small plane of focus.
Now how to shoot often? My camera and most other DSLR’s have different shooting modes which allow for faster frames per second. The fastest my camera will shoot is 5 frames per second. This allowed me to hold down my shutter release button and let my camera fire off lots of consecutive bursts to capture all the action.
Now even with a fast shutter and my camera firing off almost continuous bursts, all would have been lost had I not positioned myself correctly. Birds and other animals usually give away their next move by the way they orient their body or with their body language. In the case of this seagull when he was about to fly he usually dipped his head and obviously started ruffling his wings. I took his flight cues and body orientation as my cue for where to lead my camera and when to start shooting.
One last point worth noting, although I shot at f/1.8 I could have shot with a smaller aperture by increasing my ISO. The reason that I shot at f/1.8 was to get the background totally blurred. If you don’t want the background blurred raise your ISO and shoot with a smaller aperture. Shooting with a smaller aperture will also give you a bigger margin of error in terms your plane of focus. Don’t take my word for it, play around with your settings to find the look that you like. Just remember you might only get one shot at the picture so practice and know what your settings are before you approach your subject.
Week 29 (2/17/2014 -2/23/2014): Wagner Park, New York, NY
Picture taken on 2/23/2014 at 5:13 PM
Photograph description:
There is a first for everything, and this week was a feast of firsts. For starters, this week was the first time that I didn’t post within my weekly deadline. After a busy weekend when it came time to write my post on Sunday night, I couldn’t resist collapsing face down on my plush tempurpedic. Other than my latent post, this week also marked the first time that my post’s picture was shot with something other than my Nikon 35mm f/1.8 lens. I still shot my picture at ~35mm but this time it was with a new Sigma 17-50mm f/2.8. I had been tussling with whether or not to buy a new lens for a couple of weeks. Last week I was finally able to validate purchasing a new lens. One of my stocks recently started to take a hit so I decided to cut bait and divert those funds to the investment of a new lens. Hopefully the lens will pay better dividends.
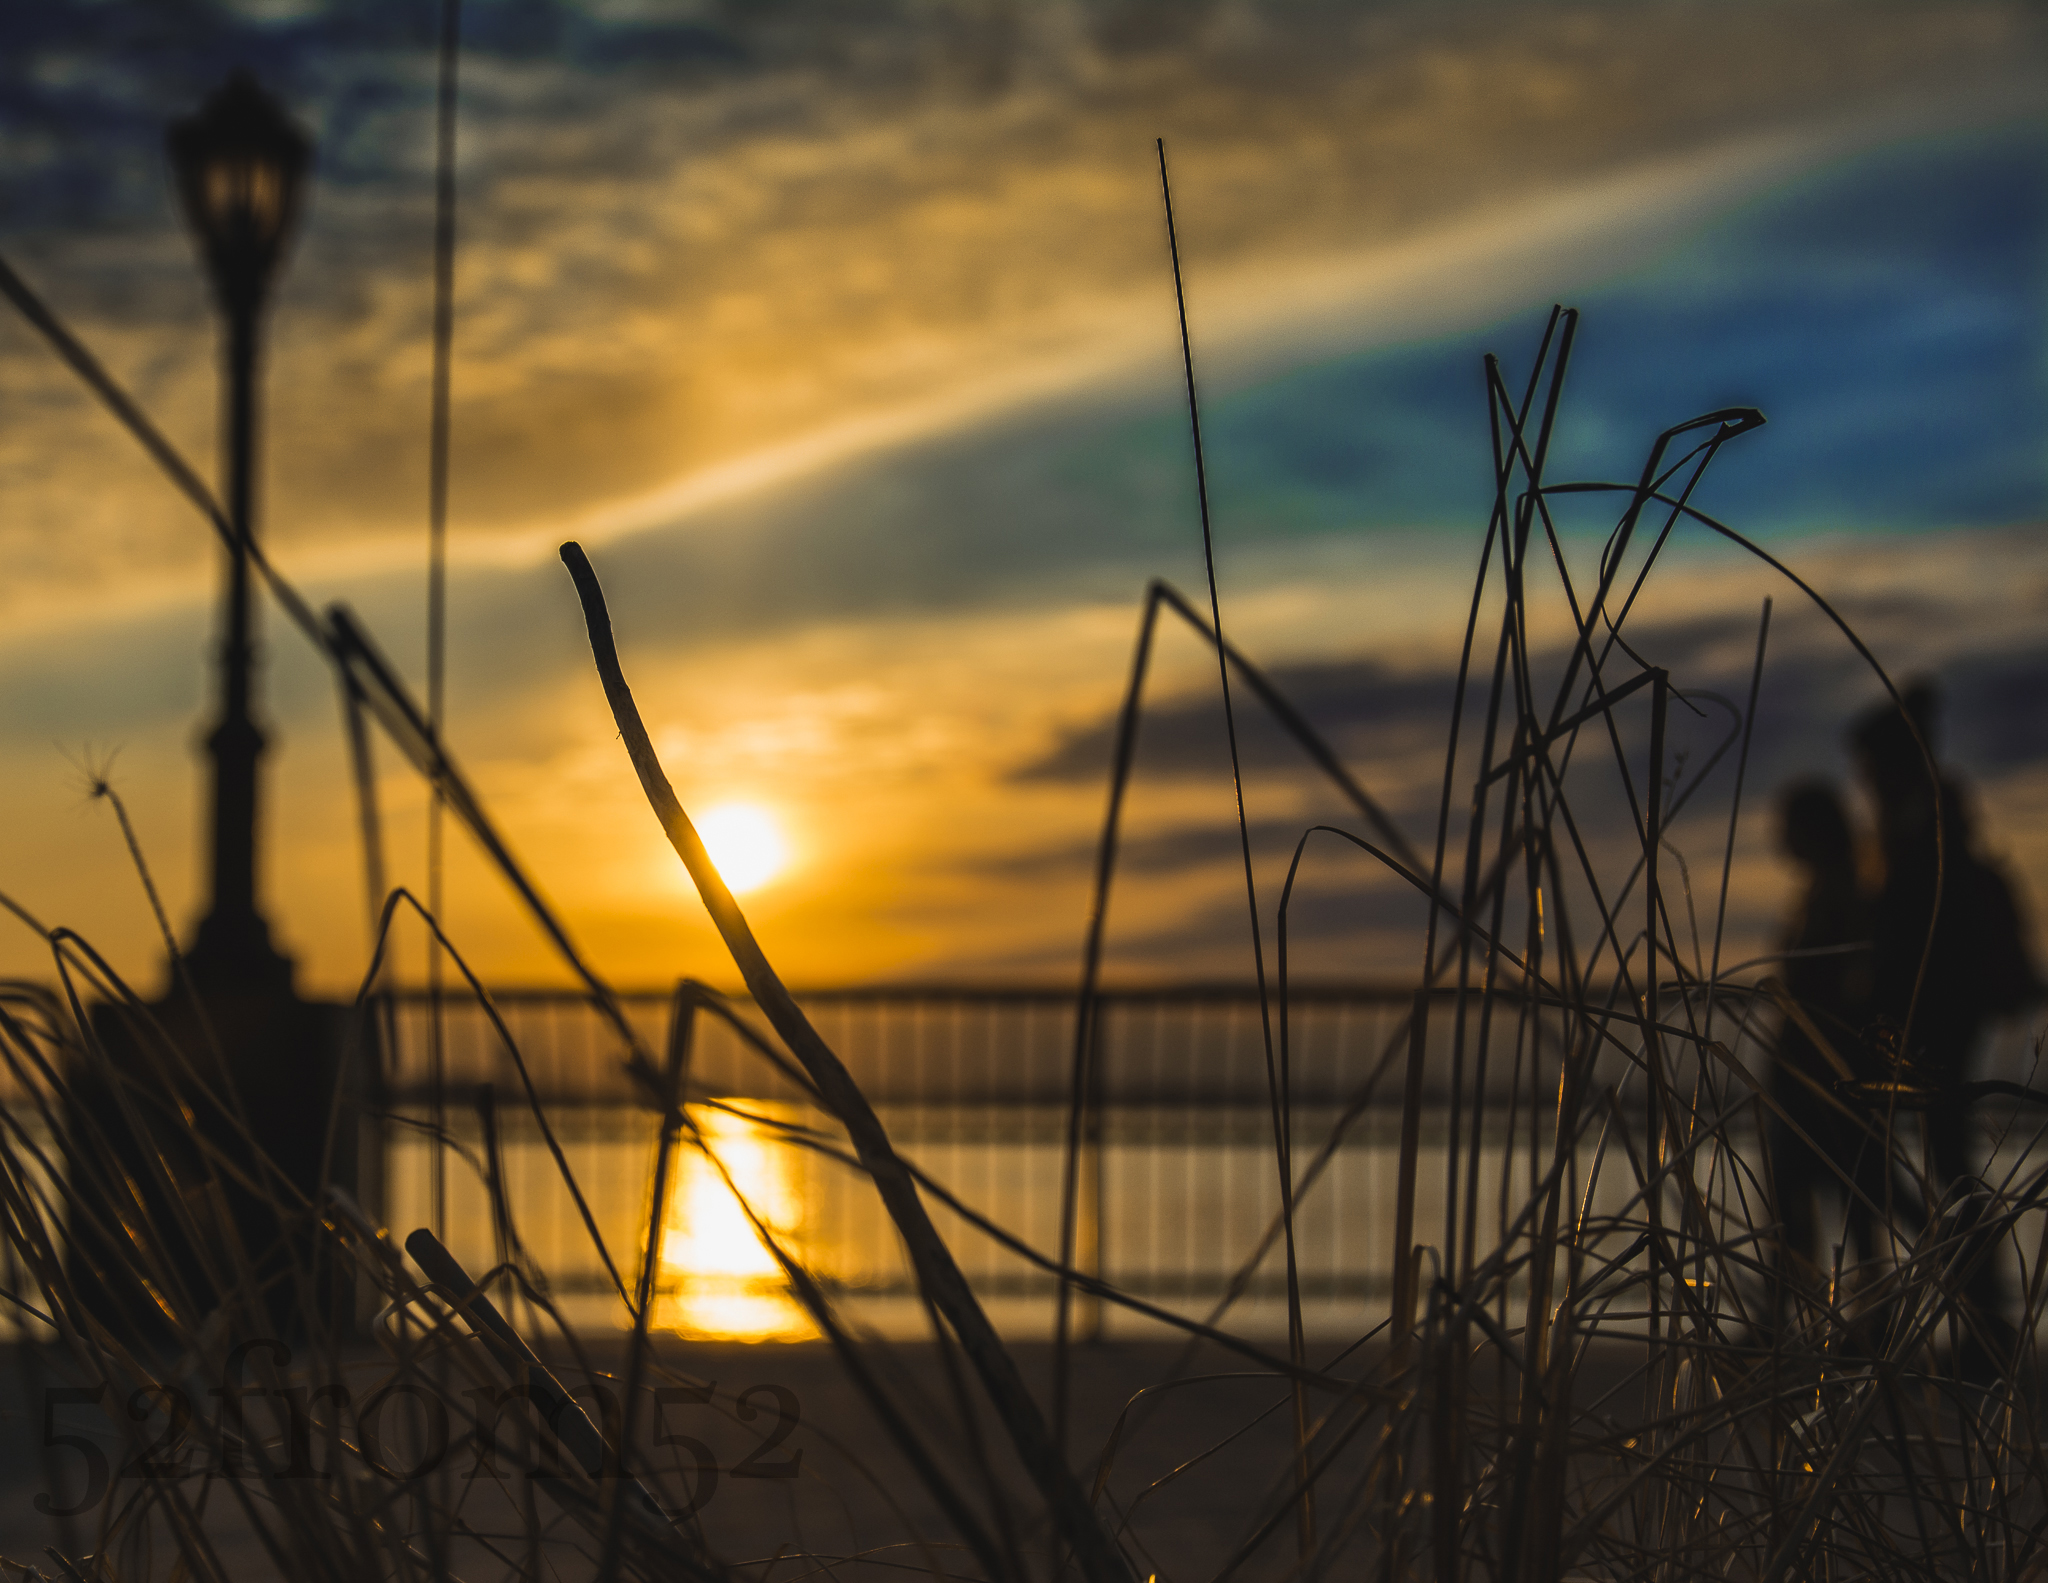
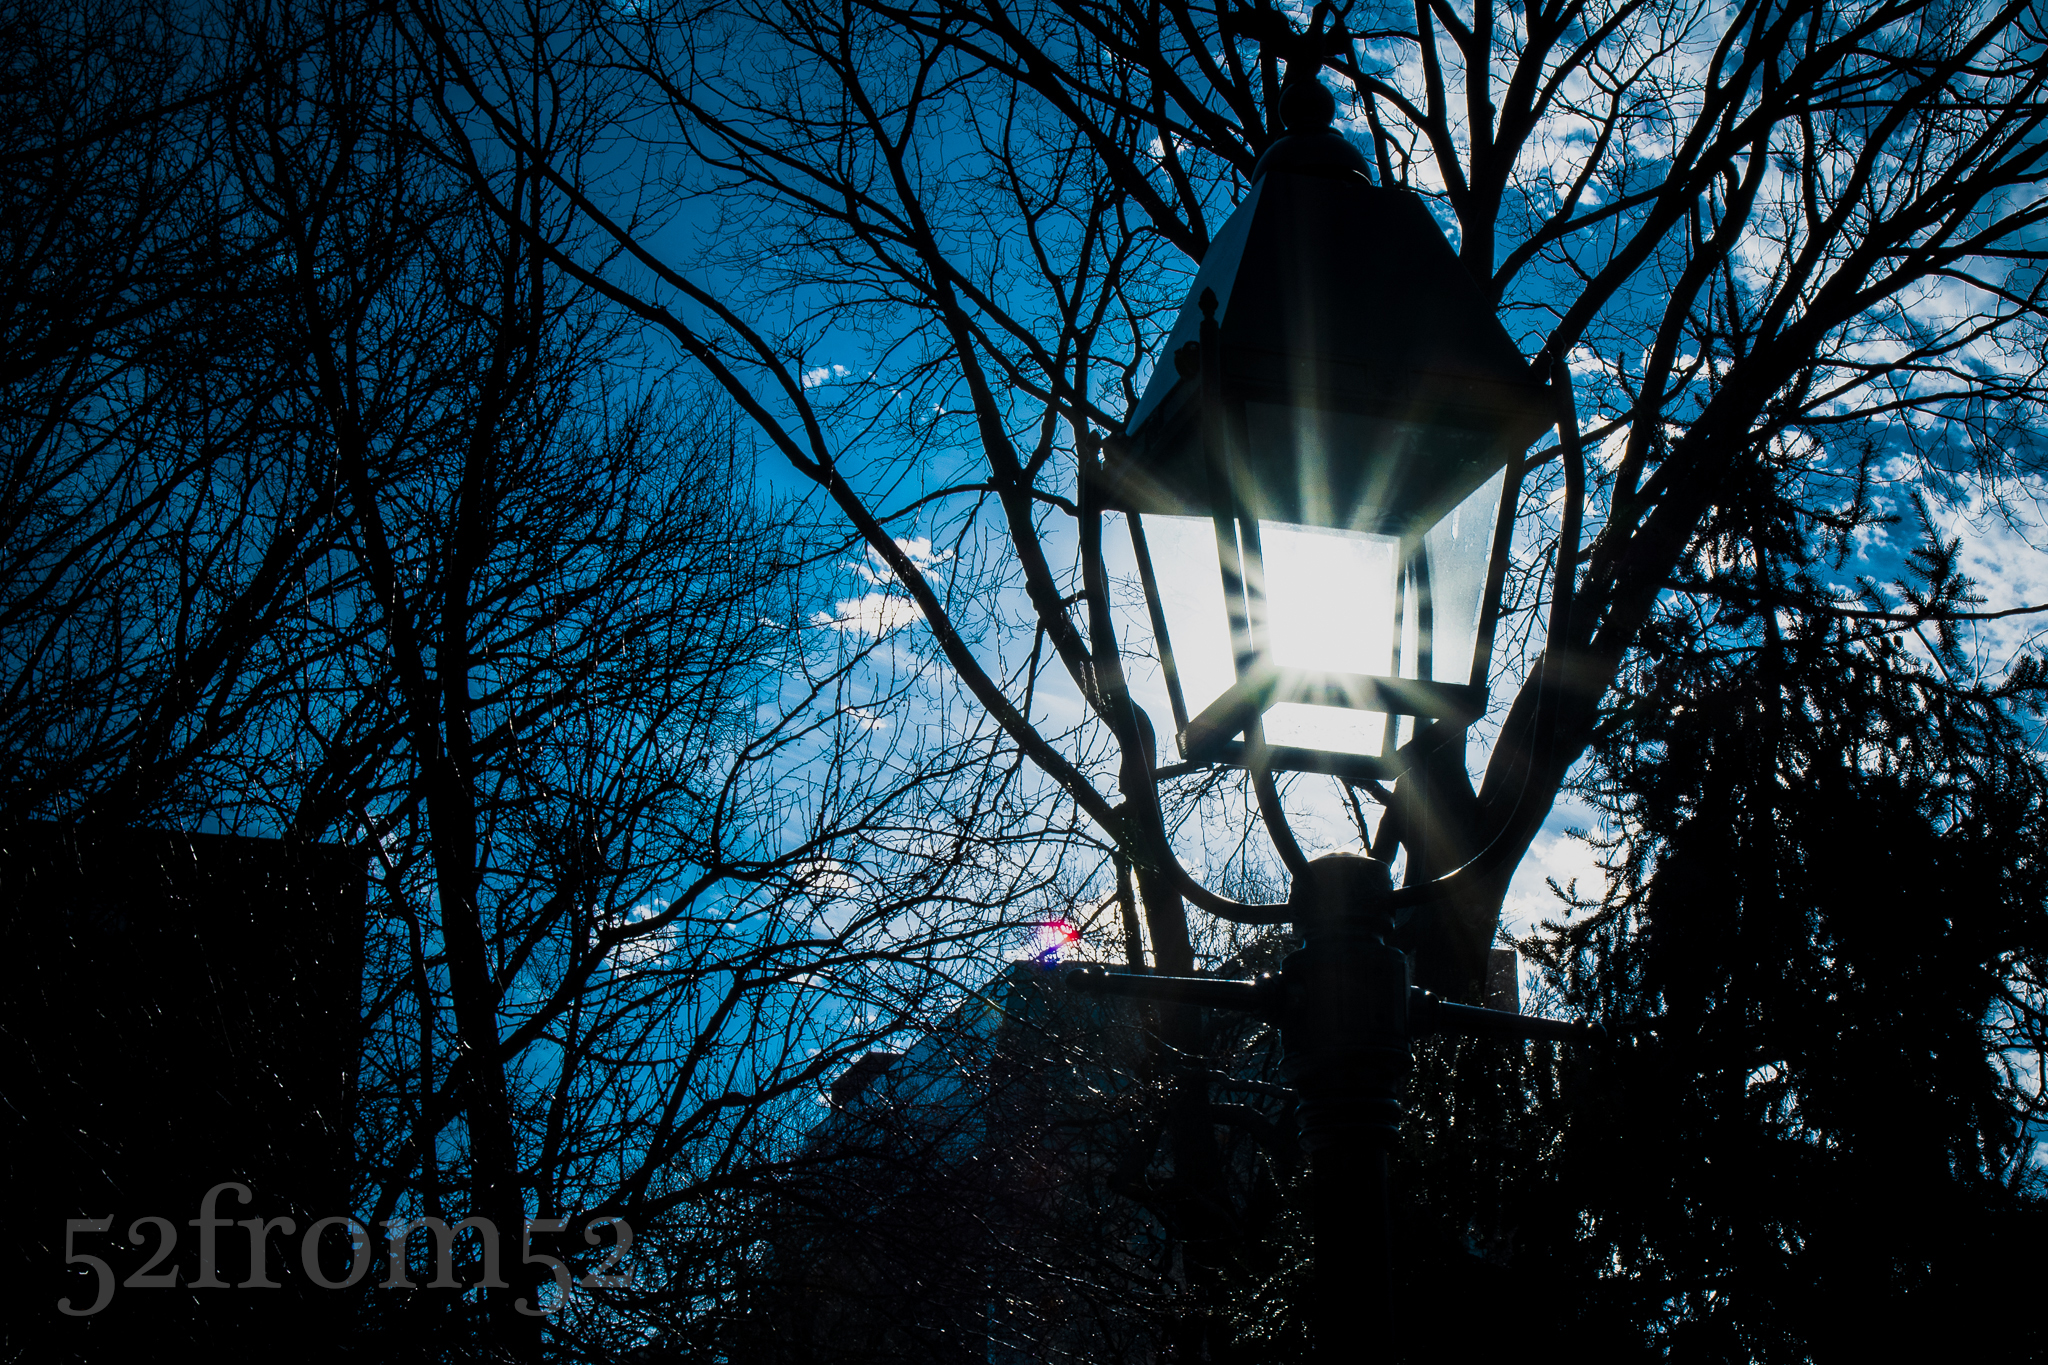
The last two “firsts” worth noting are locations based. This week was the first time that I visited Washington Square park and the nearby Stumptown coffee shop. I’ve been to the Stumptown on 29th street a few times but never the second and smaller location by Washington Square park. It was nice finally checking out the park even if it wasn’t the best time of the day for pictures. The sun was at about 45 degrees and blindingly bright. After walking around the park for a few minutes with my friend that tagged along we decidle split off from one another so we could each focus on finding the best shot. As I moved away from the park’s iconic arch I found a couple ways to use to the sun’s harsh angle. One was to shoot some reflection pictures using the wet ground. The second idea I had was to line the sun up within the street lights that littered the park so it looked like they were glowing in the daylight. Although both were fun ideas, they quickly grew old so I decided to find my friend and search for a better location.
Washington Square Park Light Post
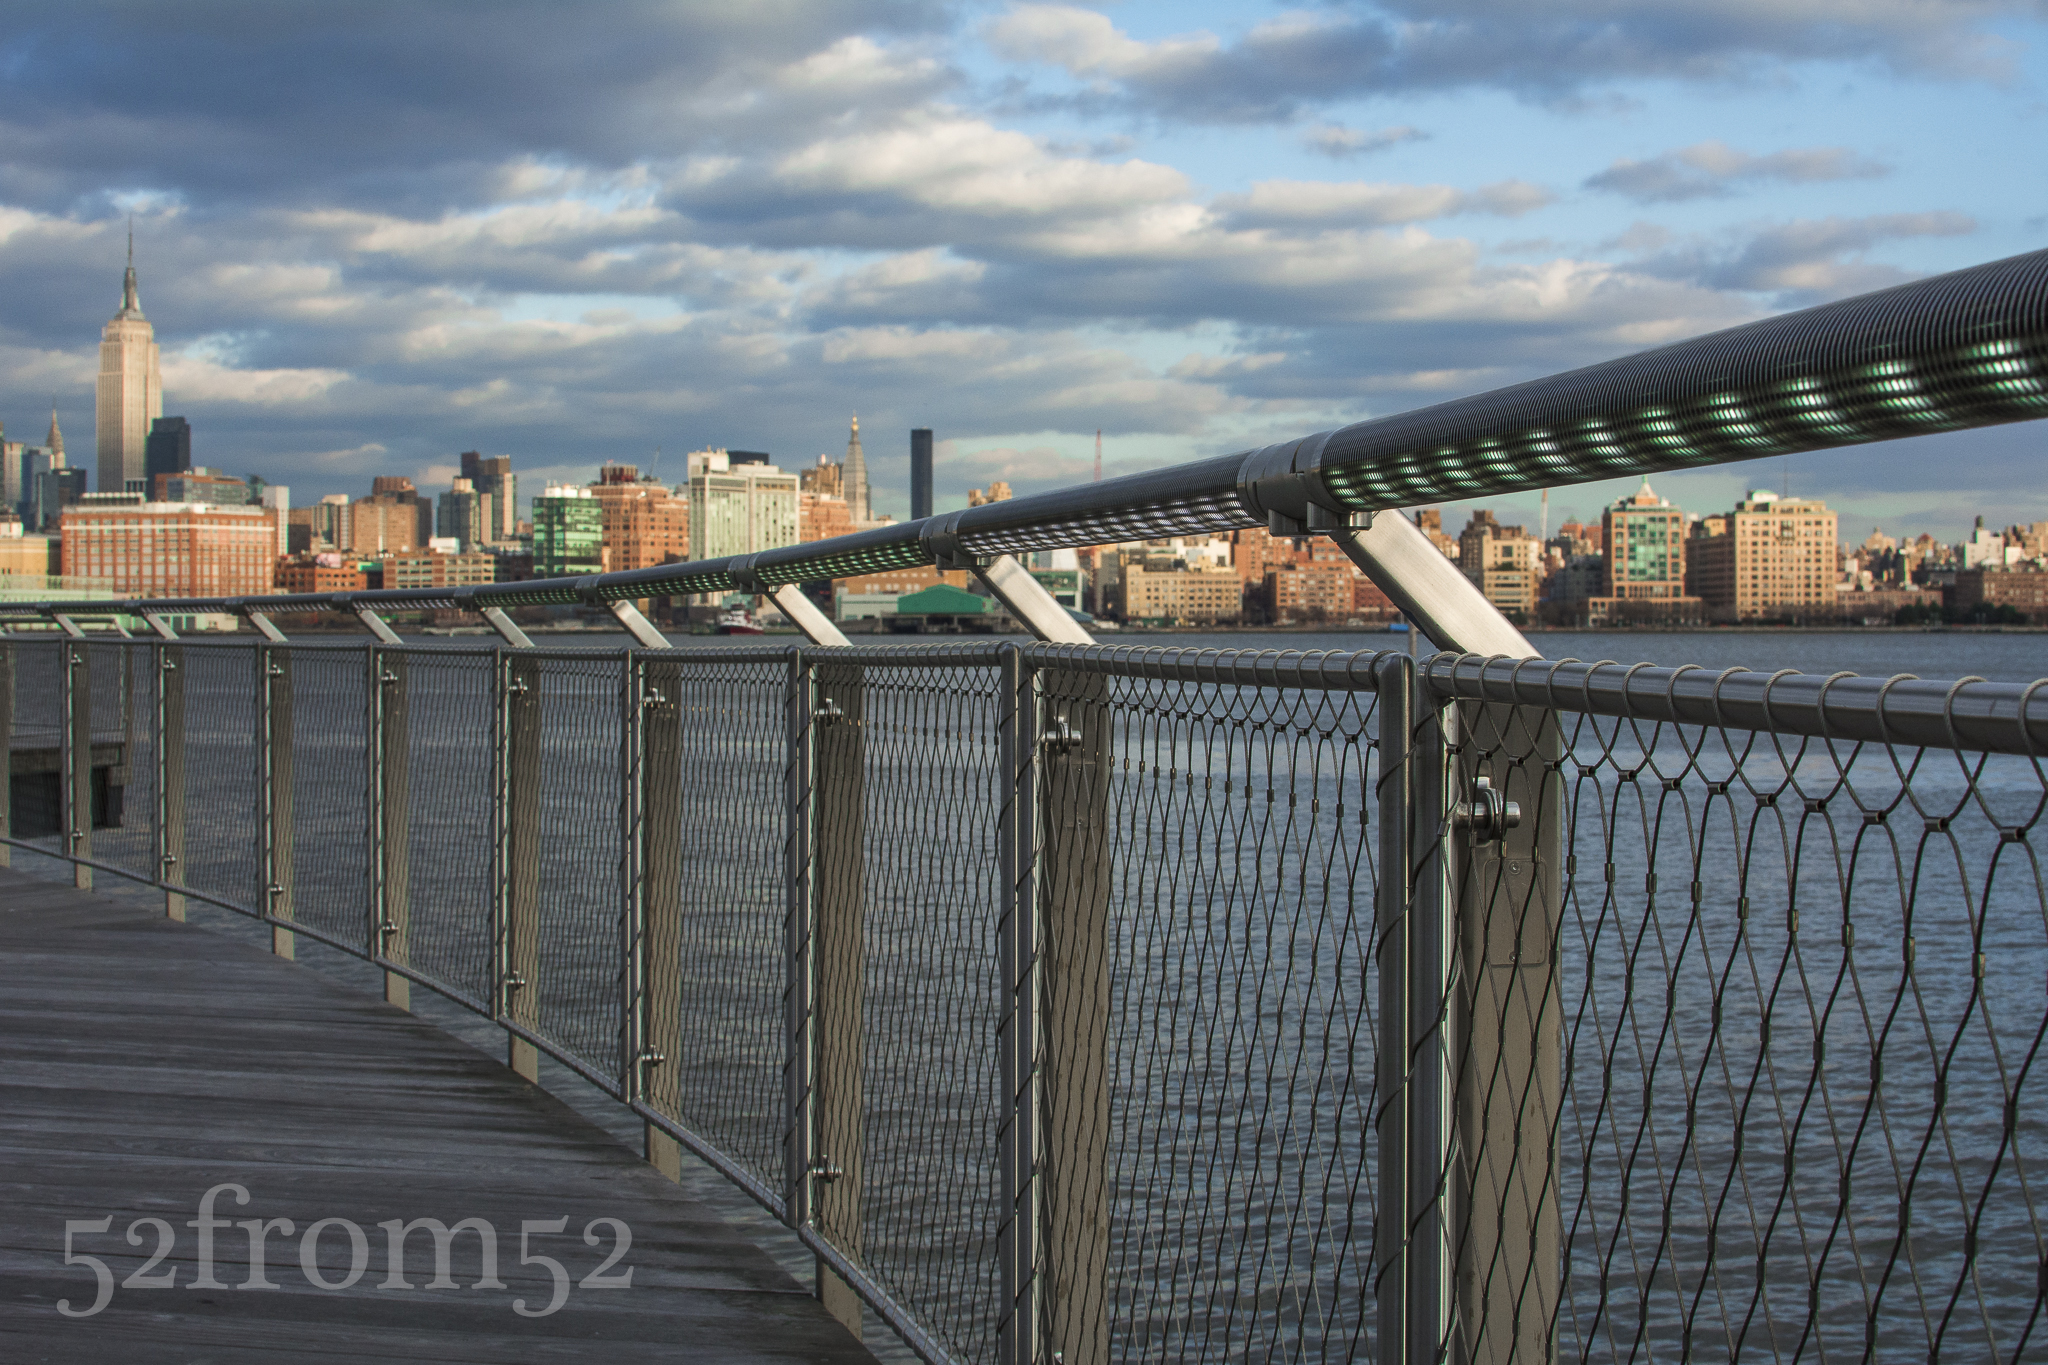
With sunset approaching we decided to head to Wagner Park located at the southern tip of Manhattan. I shot at that location once before during week 16 but since it provides great sunsets, I knew there was no harm in taking a return visit.
While on our way south we seemingly stopped every couple of feet to take pictures. Since the purpose of our trip was to take pictures, frequently stopping wasn’t a problem, but it was threatening our chances of getting to the park at the right time. Eventually we decided to jump on the 1 train to expedite our journey.
Once we got out of the subway we made a beeline towards the park. When we finally cleared the tall buildings of the financial district, I yelled out “boomshakalaka” in excitement once I saw the beautiful evening sky. For the next hour or so my friend and I were treated to one of the better sunsets I’ve seen in a while. We both shuffled around the park trying to find the best shot. I eventually spotted a patch of tall grass which provided me with a good foreground subject and sealed the deal for this week’s picture.
Photography concepts:
Since this week is the first time shooting with my new Sigma lens it makes sense for me to talk about some of the advantages it provides. One of the advantages which benefited this week’s picture is the Sigma’s nice bokeh. As I talked about last week, bokeh is the part of the picture that’s out of focus. One thing I recently learned is that with nicer lenses the bokeh is smoother and although it’s a little bit of an oxymoron, the out of focus images are sharper. The nice bokeh worked well for creating silhouettes of the lamp post, railing and couple walking.
Another advantage the Sigma has is a low fixed aperture of f/2.8. Although the Sigma doesn’t beat my Nikon 35mm’s f/1.8 aperture it’s still large enough to make shooting indoor and night pictures easier. The Nikon beats the Sigma aperture but the Sigma has a 4-stop Anti-Shake feature which allows for slower shutter speeds. This means that although the Nikon can let in more light via a wider aperture, the Sigma can let in more light via slower shutters (without using tripods). The term 4-stops means I can go 4 stops lower than the recommended shutter speed for a specific focal length. When shooting at 35mm (52 with a crop sensor) it’s recommended that I stay at or above 1/100 of a second. Thanks to the anti-shake feature I can hit a shutter speed of 1/40 of a second, and possibly slower if I have any added stabilization. This is a moot point if you’re using a tripod but it’s very relevant when you’re shooting indoors or at night.
The last advantage I’ll quickly mention because it’s not one that can help me during my 52from52 photoblog series is that the Sigma is a zoom. The advantage of having a zoom lens is pretty obvious. With a zoom you’re able to recompose your picture without moving and hit targets that a 35mm prime can’t. Because it’s a zoom I might use my Sigma again in some upcoming posts, not to shoot my picture from another focal length, but so that I have some flexibility for the pictures not meant for this blog. The Sigma’s focal length range 17-50mm ( ~25-75mm) is very versatile. The lens moves from wide angle to a nice focal length for taking pictures of people, especially when I can maintain a f/2.8 aperture. The possibilities this lens has is exciting so stay tuned!
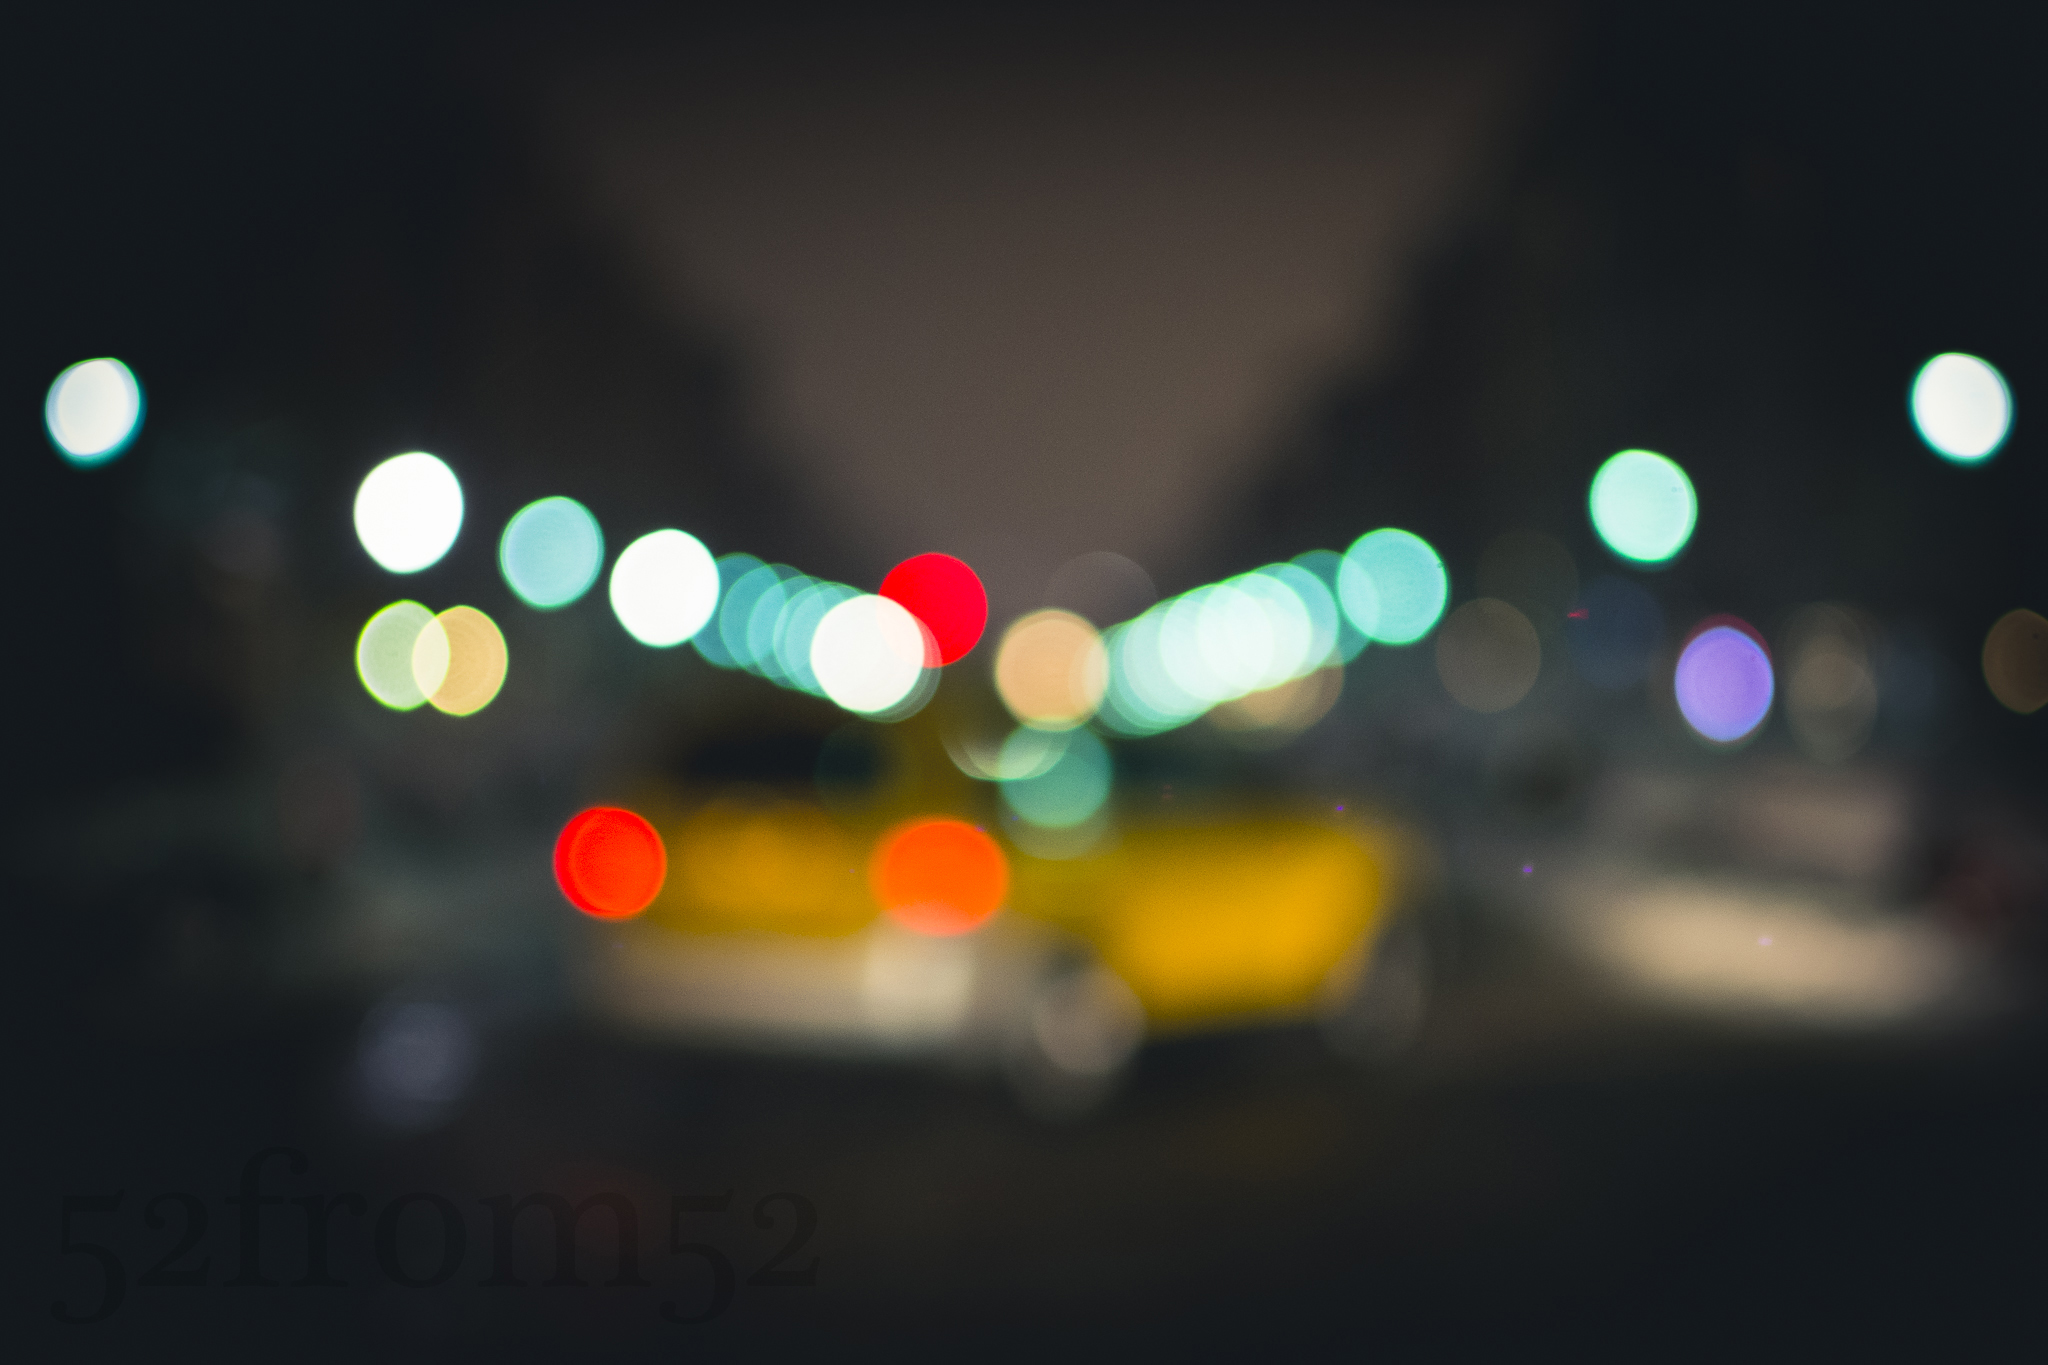
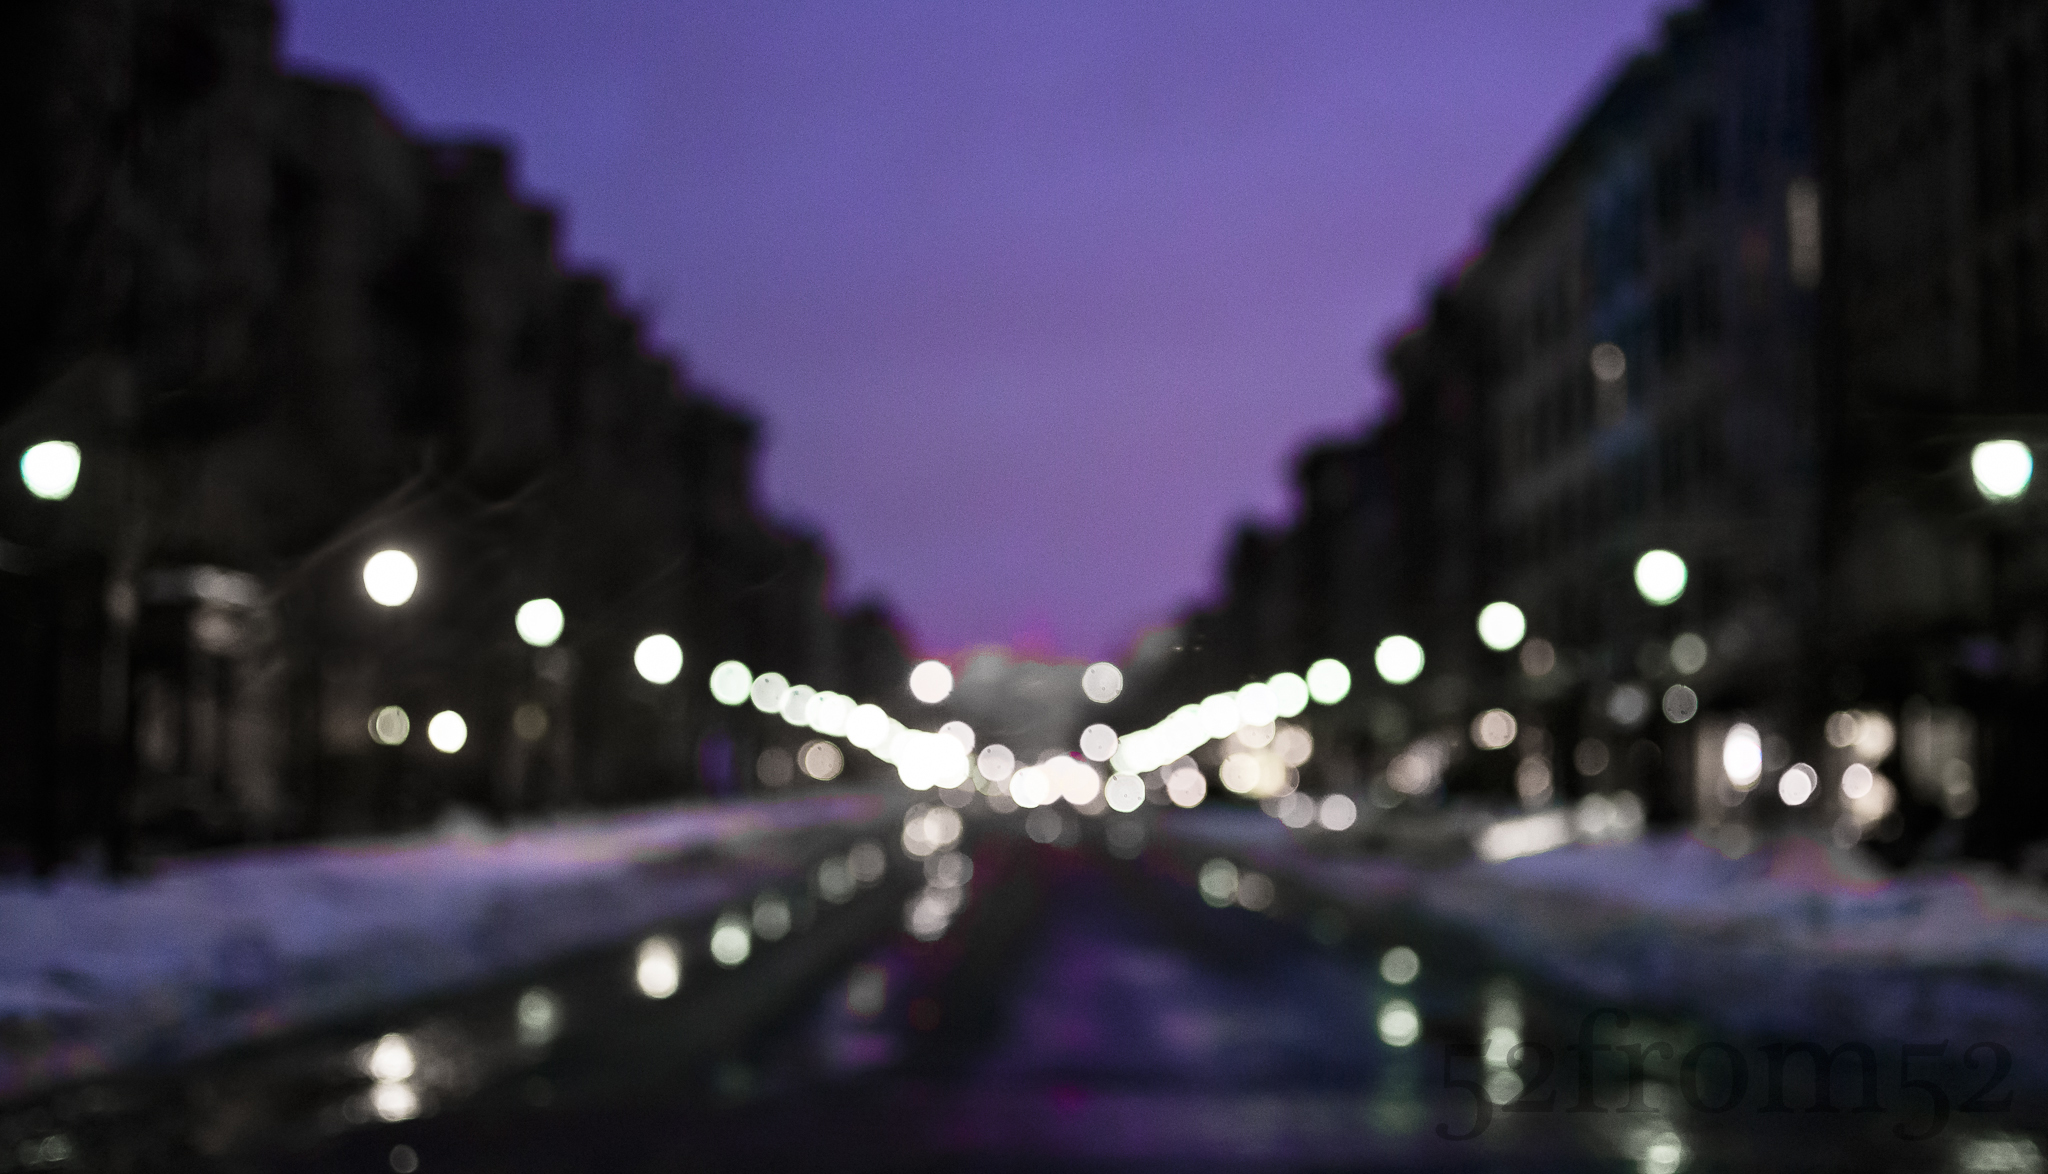
Like many people my age, on a usual Saturday night there is a good chance you’ll find me out at a bar with friends. This past Saturday night however was not my usual evening. This weekend was different because I was providing 24/7 support for work. Working in IT has it’s perks but it also occasionally carries some unique responsibilities, one of those being support coverage. This weekend was the first time I held this role in a long time and it’s not one that I take lightly. While covering support I need to maintain my wits and have a quick response time if I get any calls, therefor going out to a bar isn’t on my social menu.
Original “accidental” picture
Coincidentally this weekend the newest season of “House of Cards” released on Netflix so that provided the perfect means to pass my Saturday night. Though I had a good TV binge in the queue, I decided to pop outside for a little with my camera. Earlier in the week I took a picture which I planned to use as this week’s post. My goal for Saturday night’s picture hunt was to try my hand at recreating and or improving my previous picture. The original picture was shot on Washington street and was more of an accident than a planned image. When you’re attempting to take a picture in the middle of the street you can imagine how one might feel rushed. It could be the possibility of getting hit, or just the fact that people gaze upon you like you’re crazy. Regardless of the reason, while shooting my original picture from the middle of the street I felt rushed and thus fired off some quick pictures, a few of which were not in focus. After reviewing the unfocused batch of pictures, I actually liked the way the blurred imaged looked. Fast forward to Saturday night, my goal was to not leave this round of pictures to chance. My plan was to use the manual focus of my camera to create a “controlled” blurred image.
My chosen spot was at the corner of 13th/Washington. As I stood at the corner waiting for the light to turn red, I fiddled with my focus to get a blurry but clear enough to see image. During one of my practice pictures I accidently got a taxi in frame which triggered the idea of creating an picture that represented how I usually recall Saturday nights. I waited a couple of light cycles until again having a taxi staged for the picture. Once the light turned red I darted out into the street and captured this week’s image.
Photography concepts:
The more I learn about my camera, the more artistic freedom I have to create the images that are in my head. Although this week’s picture wasn’t an exact representation of what I mentally saw, it was close. This is the first time I used manual focus for a featured post and I’m happy with the result. Manual focus gives you the freedom to choose the exact focus you want rather than relying upon the camera to make the decision. It would have been nearly impossible to shoot this picture if I only relied on my camera for focusing. When in autofocus mode your camera needs to focus on something in order to shoot. There is a setting to override requiring focus but it’s easier to put your camera in manual. Putting your camera in manual focus allows you to take a picture no matter what the focus is, blurry or razor sharp. The reason I wanted to achieve an out of focus image was because of the effect it creates. The effect that results from images being out of focused is often referred to as “bokeh.” Most of the time bokeh is used to create separation in a picture between the subject and background. The intensity of the bokeh usually increases as your aperture gets larger. This technique is used a lot in portraits such as head shots. In my picture instead of focusing on one subject and blurring out everything else, I blurred out the entire image. I wanted to use the blurriness to create a sense of disorientation from looking at the picture. I also wanted to use the blurry lights to create the composition of my image in the form of leading lines. All of the lights are pinched inward to pull your focus onto the blurred out taxi. The leading line composition was meant to represent the usual progression of a saturday night, increased blurring over time and ending in a taxi.
As you can see by applying some of the lessons that I’ve learned, I was able to create the image that I wanted. Of course some chance was involved this week, but the lesson to take away is that once you start to build your photography toolbox it’s important you know what concept to take out or apply to achieve the image you’re going for. Your creativity will always be limited to the speed that you’re able to think of your feet and apply your knowledge.
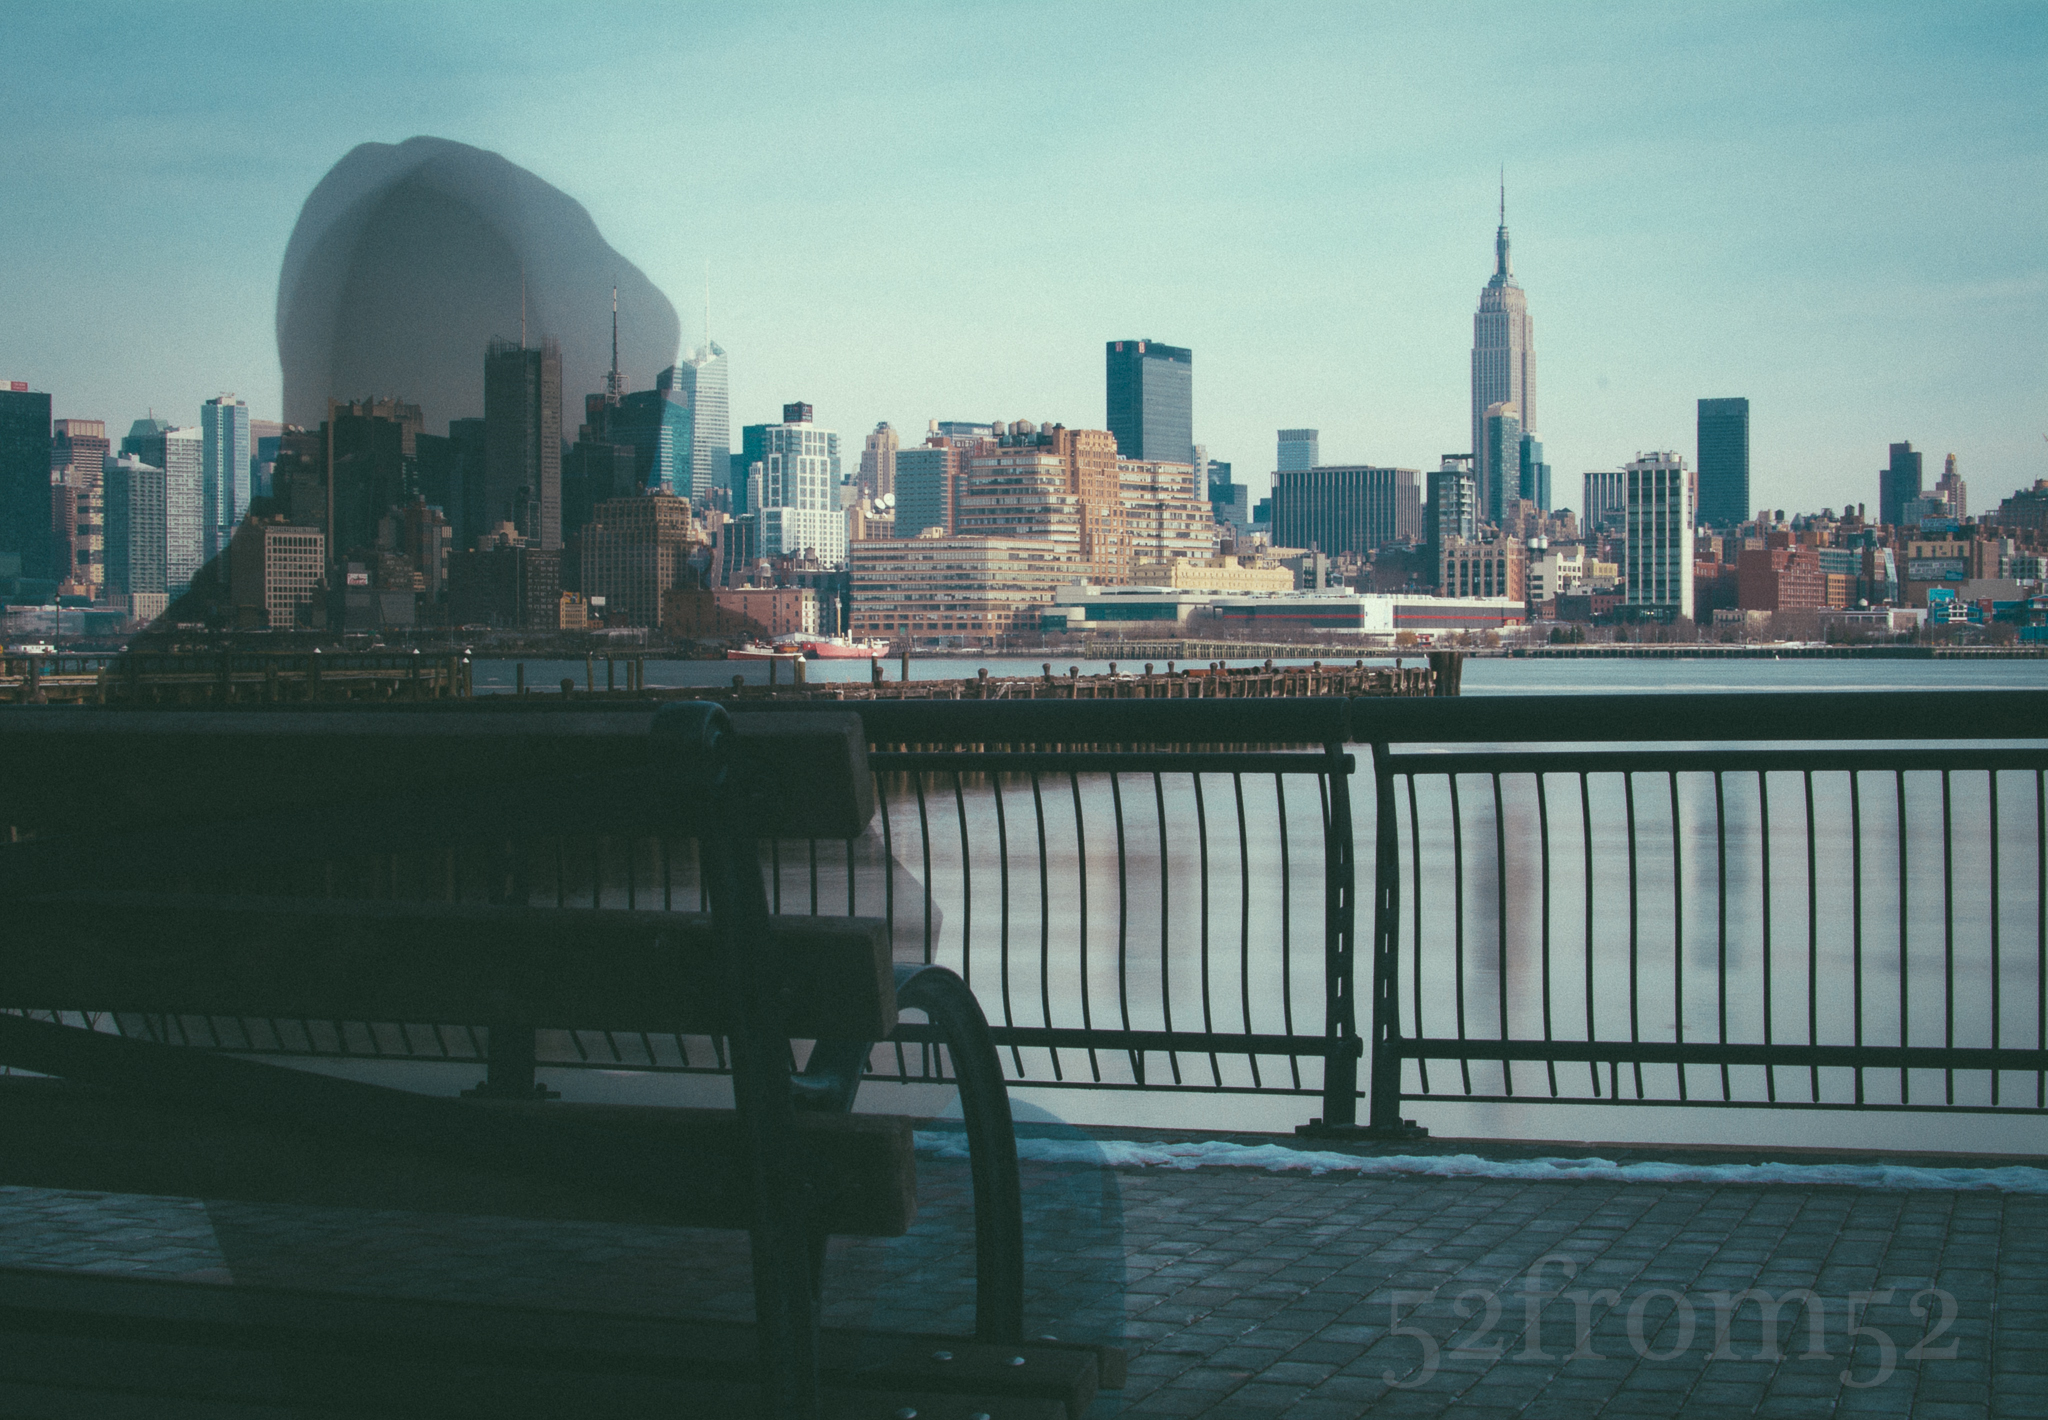
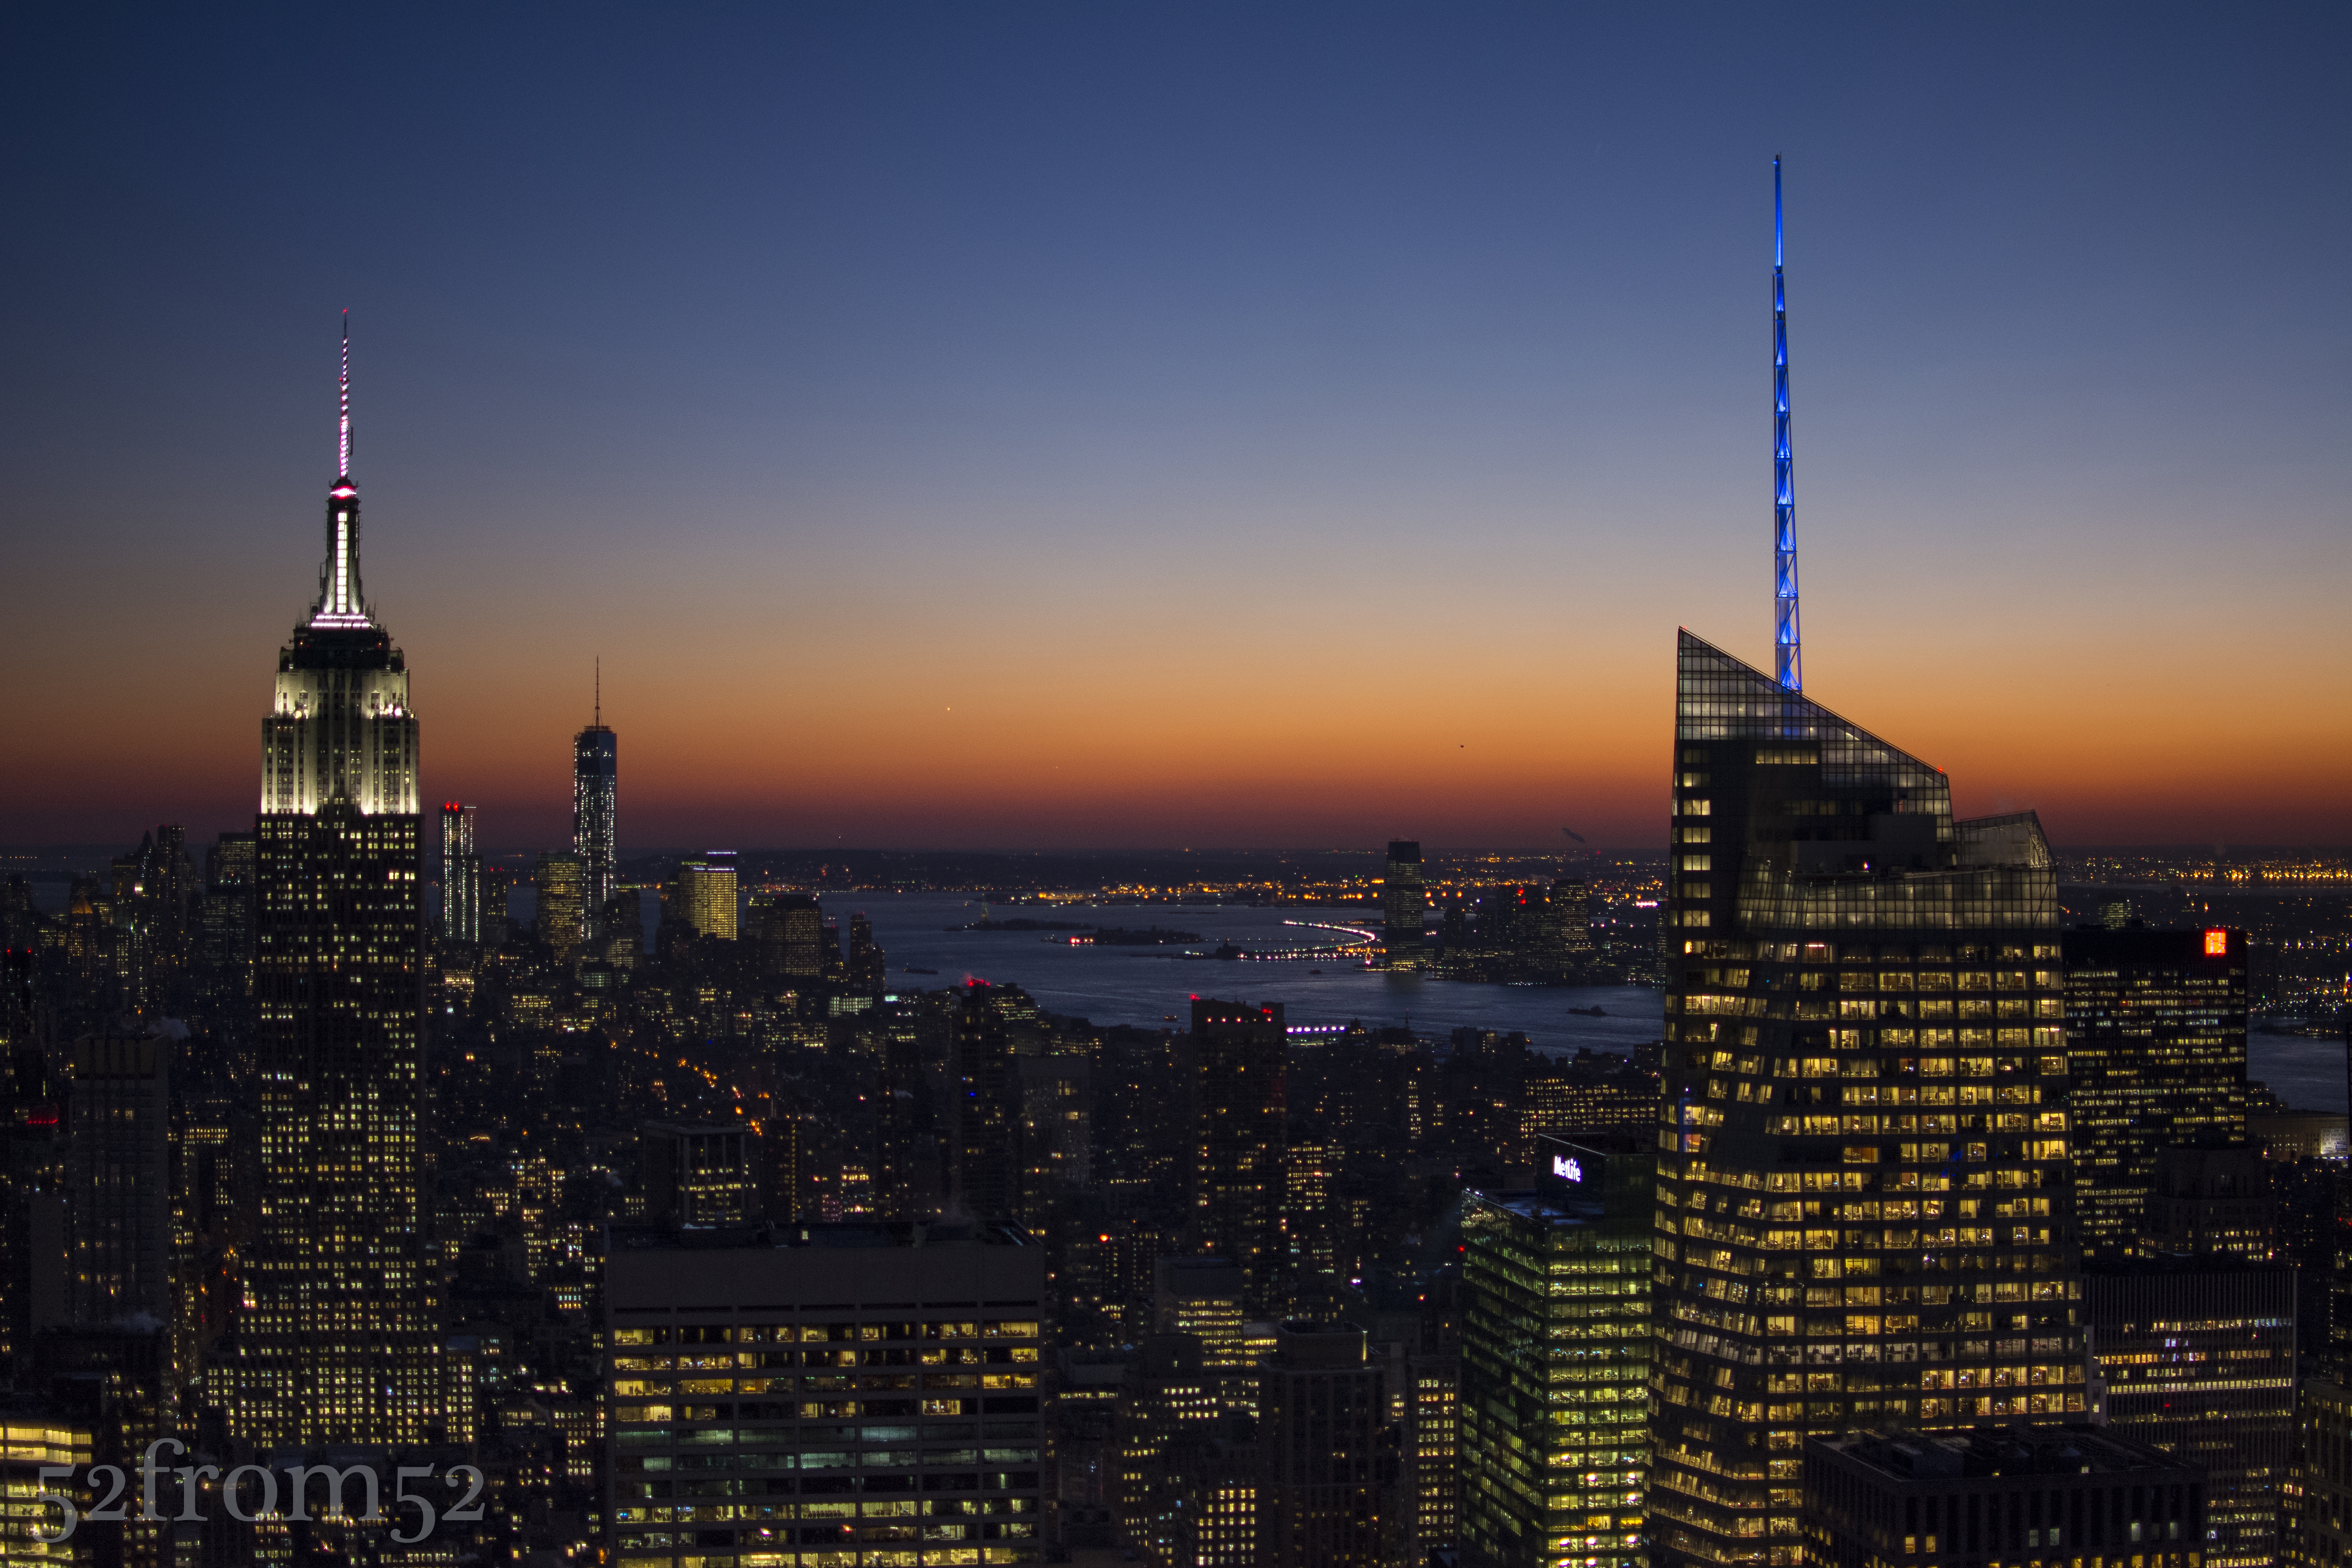
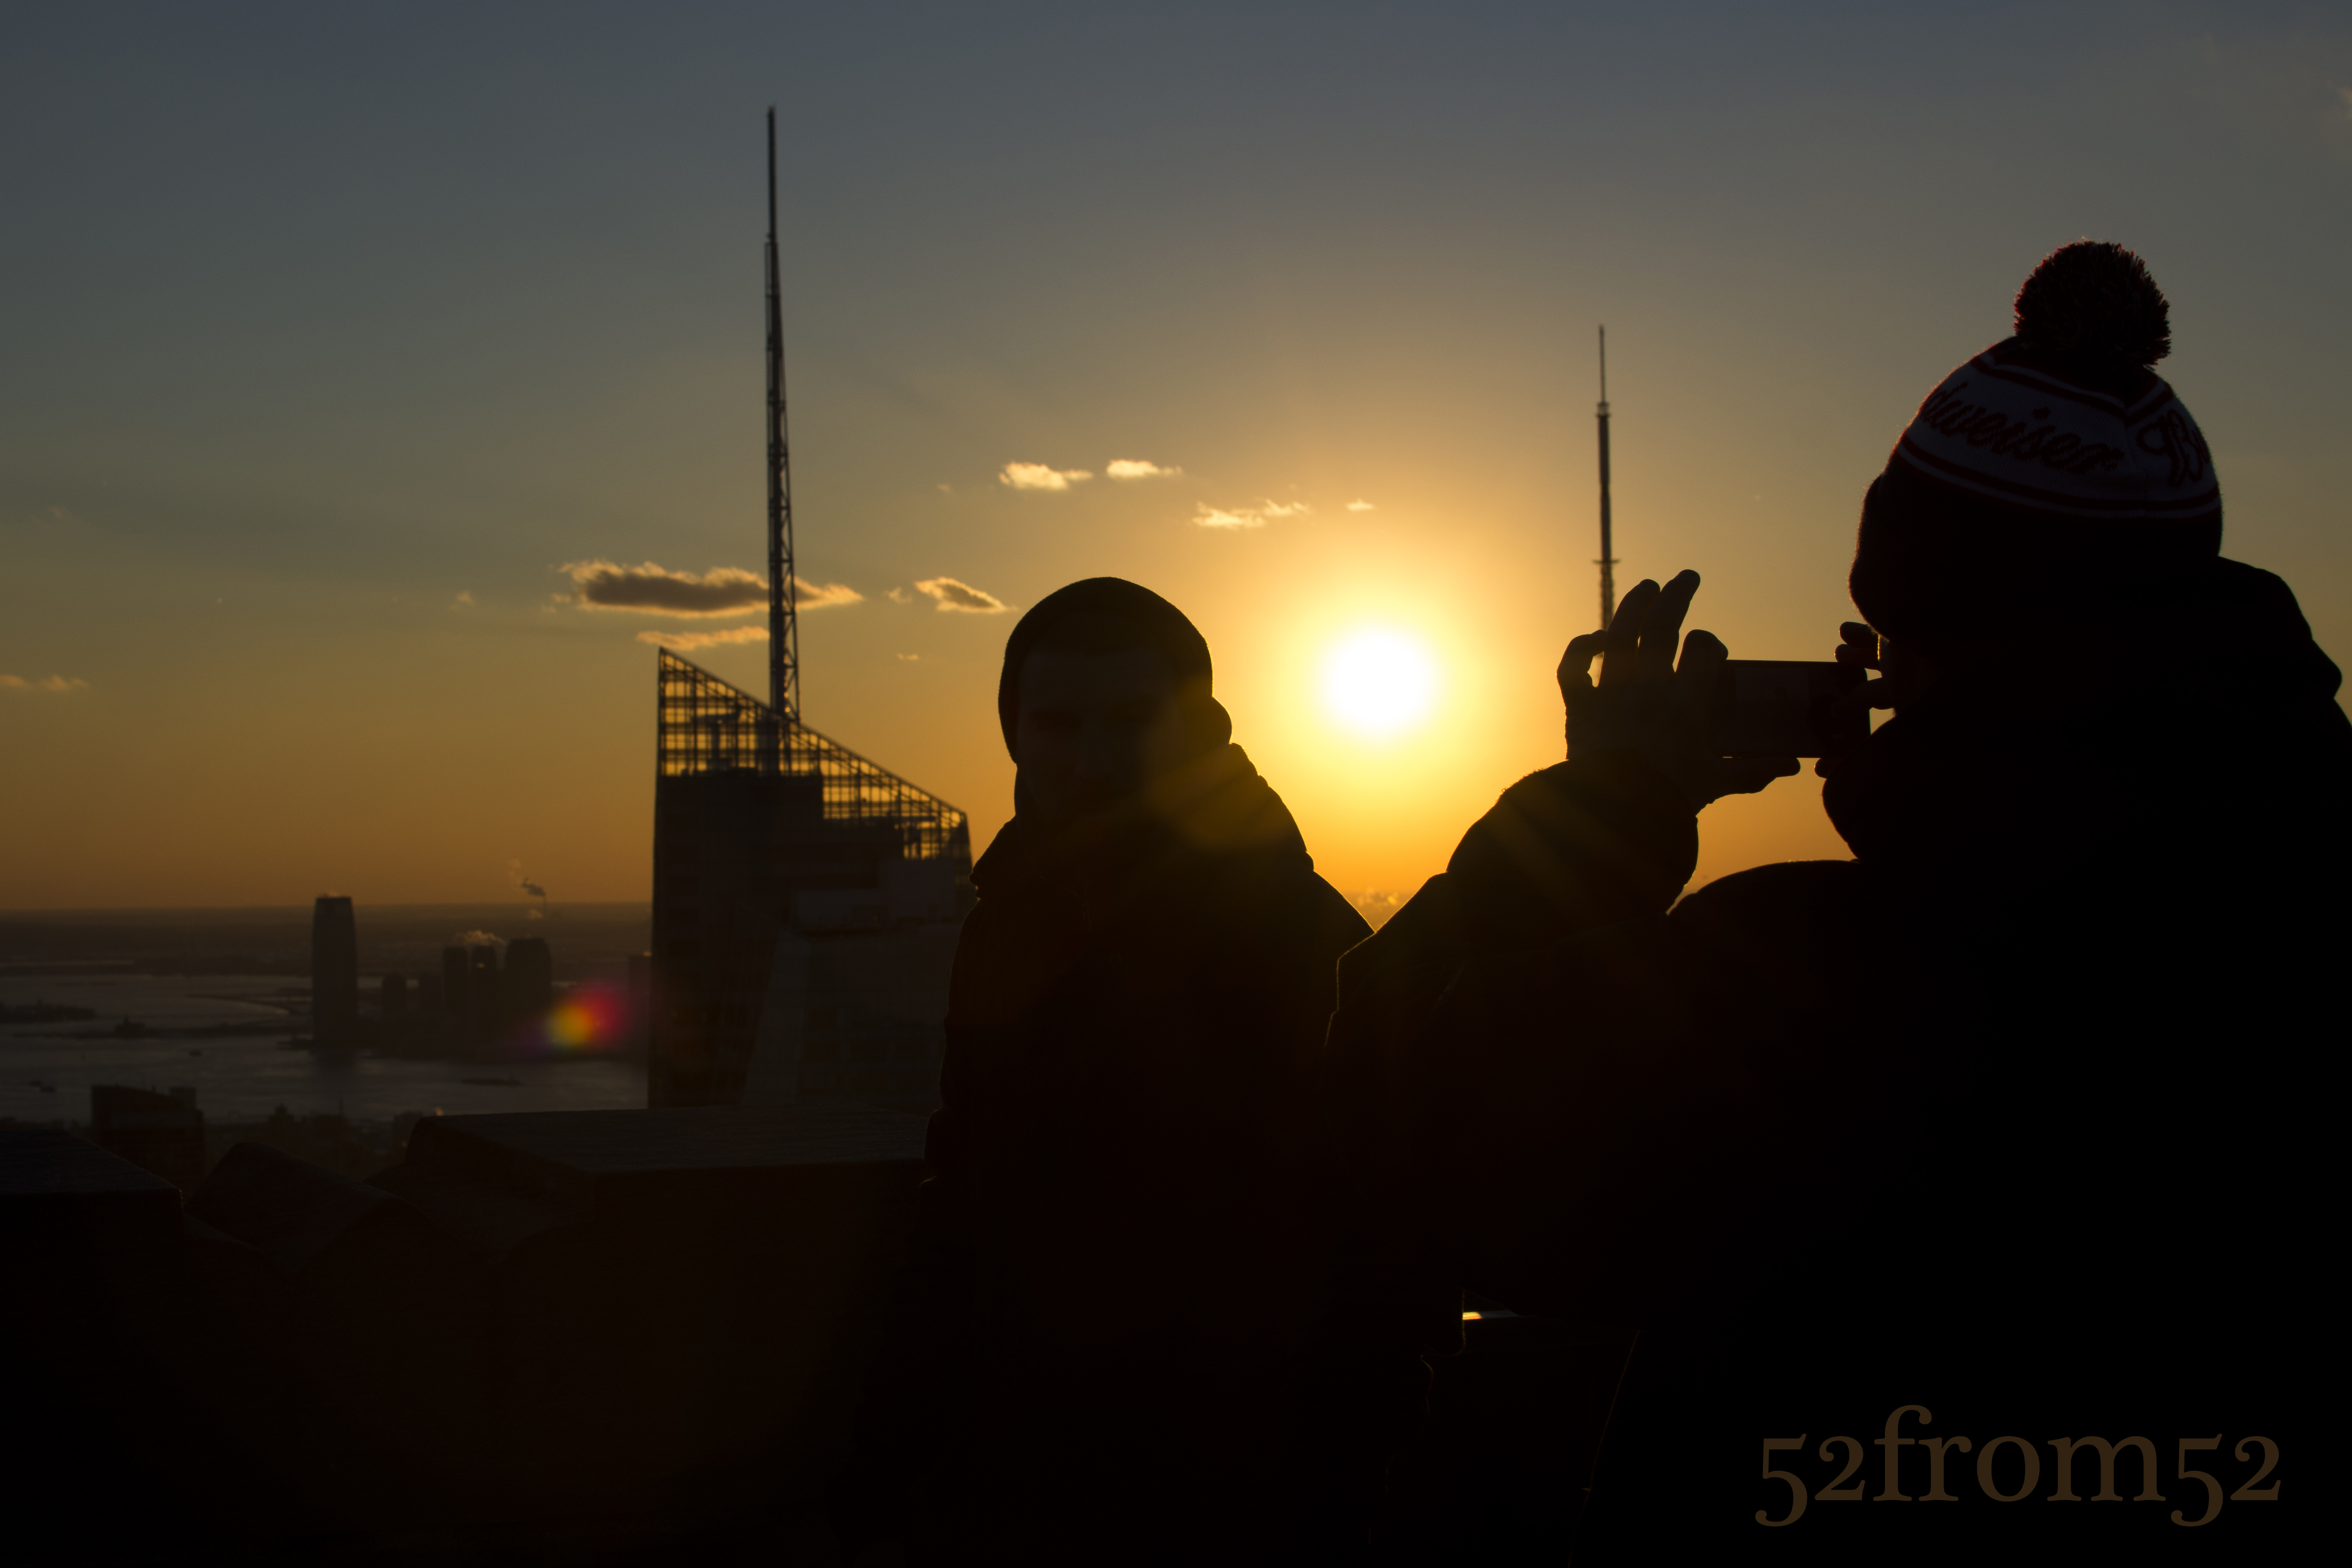
This week marks the halfway point of my fifty two week photoblog series. Throughout the week I jumped back and forth a lot trying to decide what picture/subject to shoot for my twenty sixth post. In the end I decided where better to shoot than where I started twenty six weeks ago? That’s right, I returned to my favorite spot in Hoboken along the uptown waterfront. After I finally submitted to the idea I grabbed a coffee from bwè kafe and sat on “my bench” to think out how I could put a new twist on a picture I’ve taken so many times. As I mentally flipped through the various pictures that I’ve taken at the location I paused on one picture taken with a triple exposure. In the picture a runner zoomed through the frame and gave off a ghost like image. As I sat at my bench dwelling on the ghost image it hit me, what if I used myself to create another “ghost like” image and thus was literally halfway in the picture, or “halfway there.” This seemed like a cleverly fun idea and I’m glad that I was able to pull it off.
Photography concepts:
To pull off the “halfway there” image idea I had two options. My first option was to shoot the picture like the original “ghost like” image using a double or triple exposure. A multiple exposure picture would have been easy, so I decided to go with a more challenging option that utilized more of the skills/knowledge I’ve learned over the past twenty six weeks. What I decided was to shoot my picture using a long exposure and wireless trigger. This sounds straight forward enough too but the challenge was to do this during the day. In daylight long exposures are hard to execute, luckily this is something I’ve done in the past in a few of my posts. With the use of my handy neutral density filters, and a super small aperture of f/22, I was able to hit a shutter speed of four seconds. Four seconds was the perfect amount of time to create a “halfway there’ image. I stayed in the frame for 2 seconds then quickly jumped out of frame for the remaining 2. It took me a couple of attempts but eventually I nailed it!
Challenge number two of this week was how to edit an otherwise boring skyline. When shooting the skyline from Hoboken I typically wait for a day with interesting clouds, or wake up really early to shoot at sunrise. This time I had already missed my sunrise option for the day, and literally had too many clouds to work with. When I shot this picture it was a cloudy overcast day with a slight tint of blue showing up in the clouds. Here is where being able to edit an image in an artistic manner pays off. For this week I went with a dull look with some slight color tints. The way I achieved my final look was by first applying some of my usual edits such as lowering highlights, increasing contrast, clarity and color saturation, along with applying some sharpening. After getting my picture prepped I then applied a VSCO preset filter “Polaroid 669” which gives the image a film look. I also applied some presets to boost the blues and saturation even more in the image. The finishing touch was to add a slight vignette around the edges. As you can see from the before and after comparison, the right editing makes all the difference.
Week 25 (1/20/14 – 1/26/2014): Central Park, New York City
Picture taken on 1/26/2014 at 1:29 PM
Picture description:
It’s hard to believe how quickly the bitter winter cold has snuck up on us here in the Northeast. The cold became more of a chilling reality during this week’s return visit to Central Park. If you recall, roughly one month ago I took a trip to CP while the weather was uncharacteristically warm for the beginning of winter, hence the title of that week’s post “Spring into Winter.” Fast forward one month from my last visit and CP is now painted white with snow. Being from the Northeast I’m no stranger to the cold so the temperature was not enough to deter me from enjoying the snow covered park.
This time around I had a couple of friends join me during my visit to the park. If I had to choose the one thing that I enjoy the most about taking pictures with other people, it’s seeing how each person approaches a shot or what they choose to photograph. Oddly enough during this trip we all seemed to unknowingly steal each others photo ideas. The interesting wrinkle was that although we selected similar subjects we all seemed to shoot the pictures differently. This aspect of creative interpretation has been one of my favorite parts about photography. I enjoy having the opportunity to share with people how I see the world. I’m not really the most open person, but in a way photography has given me a means to let people inside my head and thus helped me share a piece of me. What’s been even more gratifying has been all of the great conversations that have sprouted up from some of my photographs. When I decided to take on photography as a hobby I never would have guessed it would yield so much engagement. As I approach the halfway point of this 52 week journey I’m looking forward to seeing where the next 6 months will take me and who it will lead me to meet.
Photography concepts:
As mentioned in this week’s picture description, to me one of the most enjoyable aspects of photography is sharing the way I see things. The way I translate my “mental image” to reality is done through about fifty percent “in camera” work and fifty percent “post” editing. Everyone has a favorite style in terms composition and editing techniques. If I had to summarize my “in camera” or composition style I’d say that I usually play to symmetry, leading lines, and using reflections to make pictures feel larger. As for my editing style, I tend to use contrast to emphasize the points of the pictures that I want people to focus on and I like to enhance light sources to reflect how I see them. This week’s picture is a prime example of all my preferred styles.
I think that knowing your style is important because it enables you to take pictures quicker and more efficiently. In the beginning of this blog when I ventured out to get a featured picture I would take close to 1000 pictures. Yes 1000 pictures! Now that I’ve gotten a feel for my style I can set up quicker and only fire off about 250 pictures per trip. The way I trimmed the number of pictures down is by knowing that the most important thing “in camera” is to maintain good exposure. Keeping your histogram in range gives you more flexibility during editing and enables you to get the picture to be your style in post. Editing is where you can really tap into your creative side and put a piece of yourself into a picture. Don’t be afraid to get creative with your editing to create an image that is unique and shows people how you see the world.
Week 24 (1/13/14 – 1/19/2014): Hoboken, Maxwell Place Park
Picture taken on 1/18/2014 at 2:41 PM
Picture description:
If you’ve read my last couple of posts you may have noticed that I’ve been alluding to different goals and projects for 2014. One of my 2014 goals is to create a collection of “Hoboken pictures” with the ultimate goal of selling them at the festivals held in town throughout the year. I’ve been to the last couple of art and music festivals, and one thing I’ve look for each time was good (fair priced) Hoboken art and pictures. Unfortunately I’m yet to find a booth that has both good and reasonably priced Hoboken pictures. Knowing that current Hoboken residents, like myself, are looking for local pictures is one of the reasons I decided to take on this project. I think this project will be a good way to take the next step in my photography adventure. Another reason why I decided to take on this challenge is due to all of the positive feedback and encouragement that I’ve been getting from friends and family. You all have motivated me to keep pushing myself forward by continuing to develop my photography skills and for that I thank you!
Although I won’t feature a Hoboken picture each week I’m planning on taking a lot more pictures in Hoboken. As I talked about last week, finding new perspectives will be one of my focal points for taking pictures in 2014. This idea particularly applies to this Hoboken picture project since no one will want to buy pictures they could have taken themselves. The key to being successful in this venture will be getting unique pictures that people will want to feature in their homes.
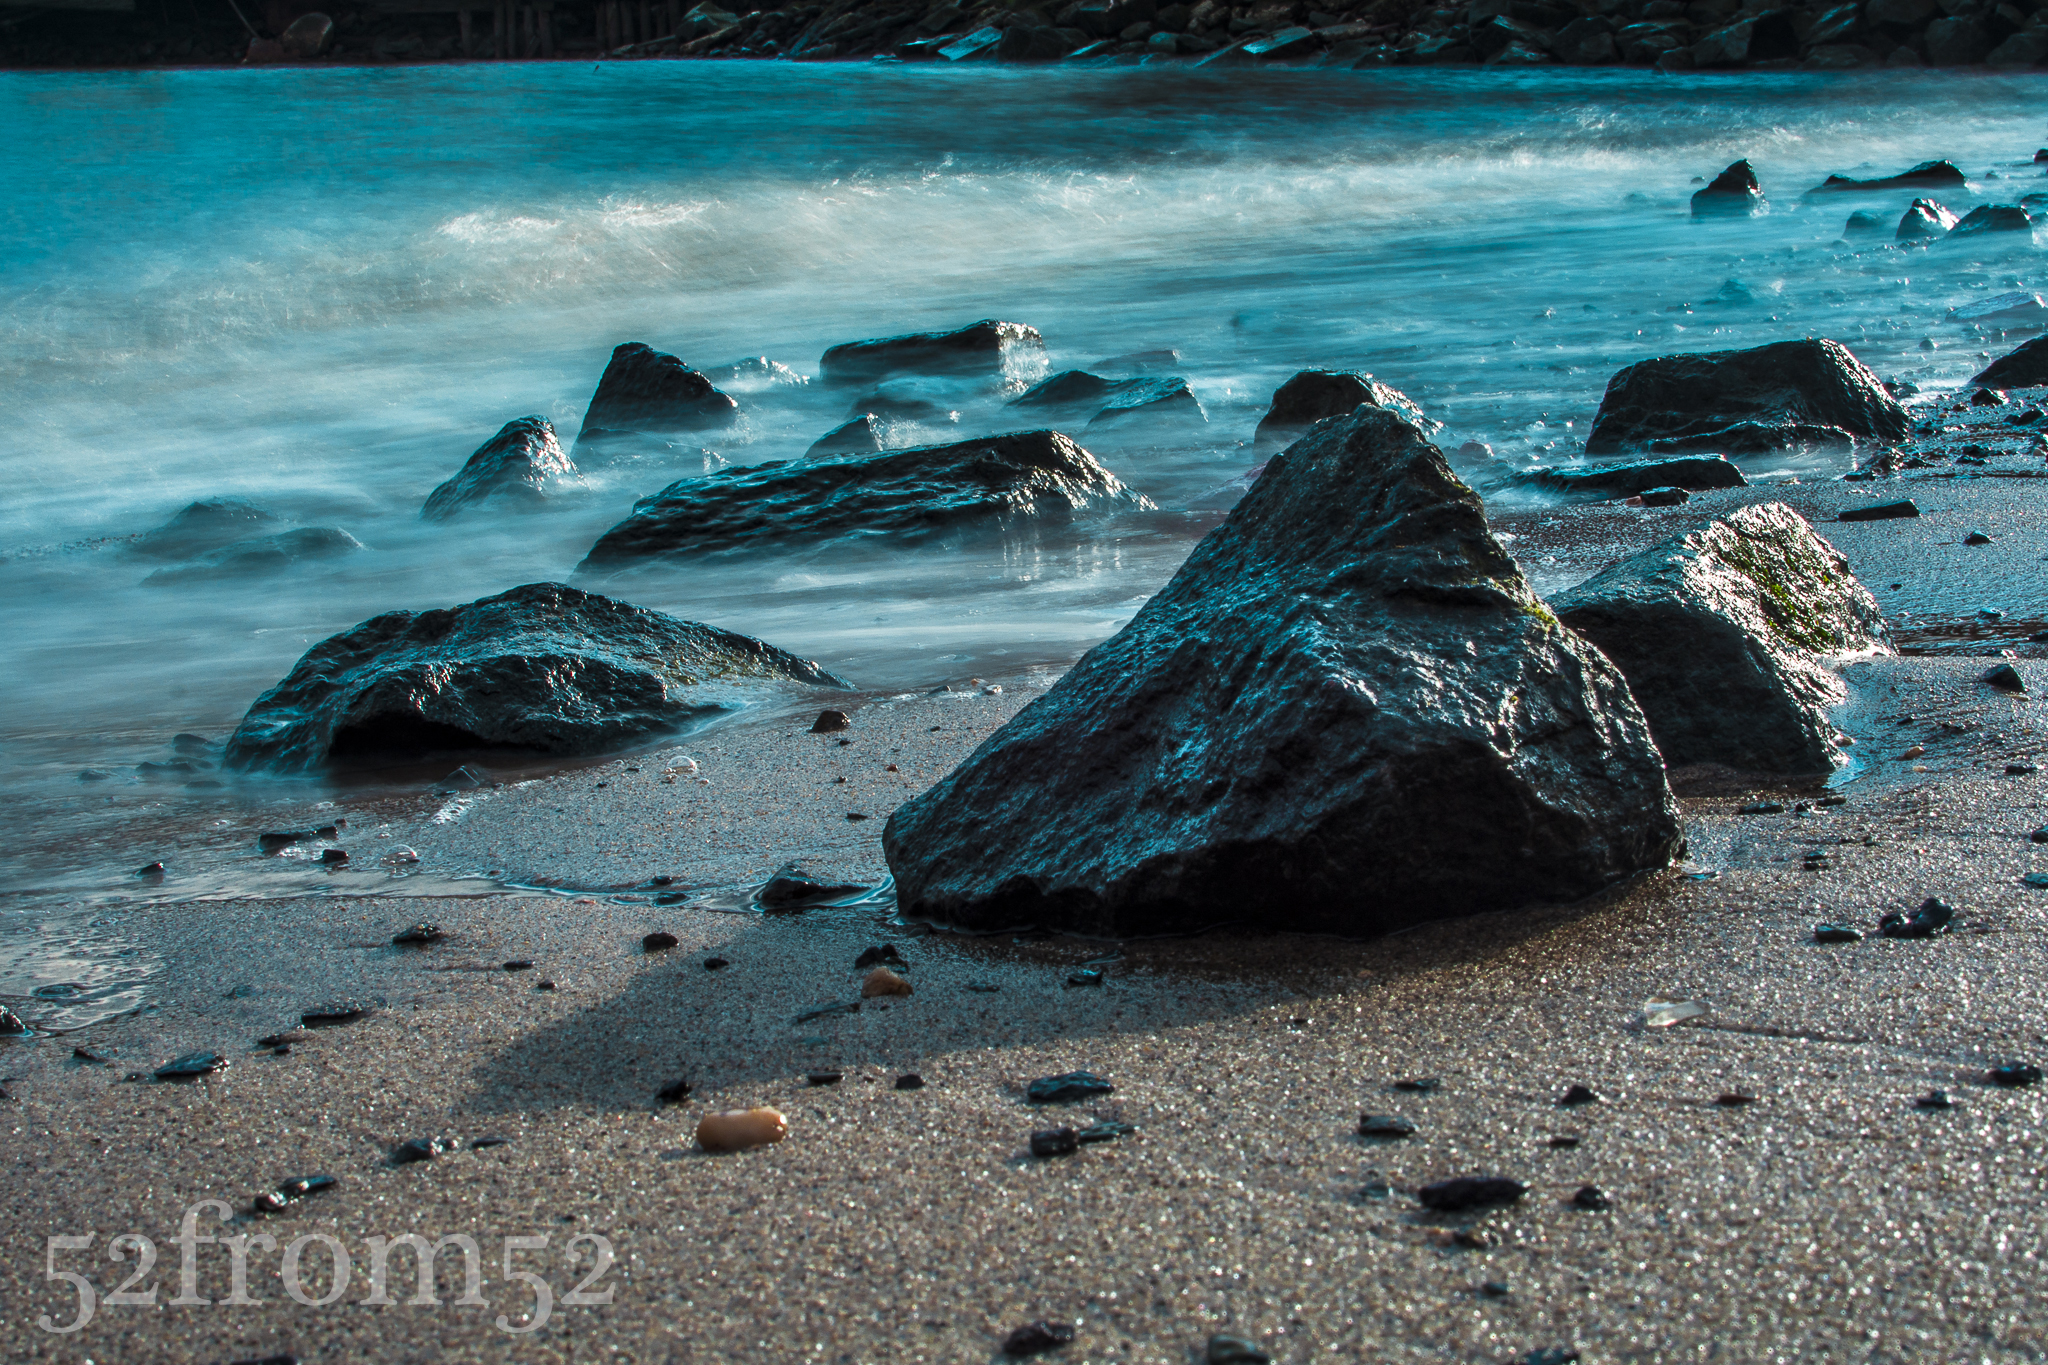
This week’s photograph is an example of finding a unique picture in Hoboken. I’d bet that few Hoboken residents have noticed there is a beachfront in town. During the summer the city hosts kayak and canoe days where they launch the boats from this beachhead. It’s a wonderful location and absolutely one of the secret amenities of living in Hoboken.
20 Second exposure
Photography concepts:
It’s been a couple of weeks since I last experimented with ND filters. Week 17’s post “One Shot” was the first and last time that ND filters played a role in my featured picture. Unlike in week 17, this week’s picture was shot in broad daylight. Getting a long exposure during the day would never have been possible without using ND filters. In this picture I stacked two filters, 0.9 and 1.2, to gain the -2.1 percent neutral density level. In case you missed my week 17 post, ND filters reduce the amount of light that hits your camera’s sensor and thus enables slower shutter speeds.
In addition to using ND filters, shooting this picture at an extremely small aperture of f/20 is also how a 3 second exposure was possible. Taking a long exposure of the ocean or some other body of water that has lots of movement (waves) has been on my bucket list for a while. Since it’s the winter I’m yet to make it to the actual ocean, so until then this will have to do. The crashing of the waves is what created the motion blur effect in the water as it crashed and receding from the shoreline. I love that ghosting look and plan on getting a lot more pictures like this over the summer.
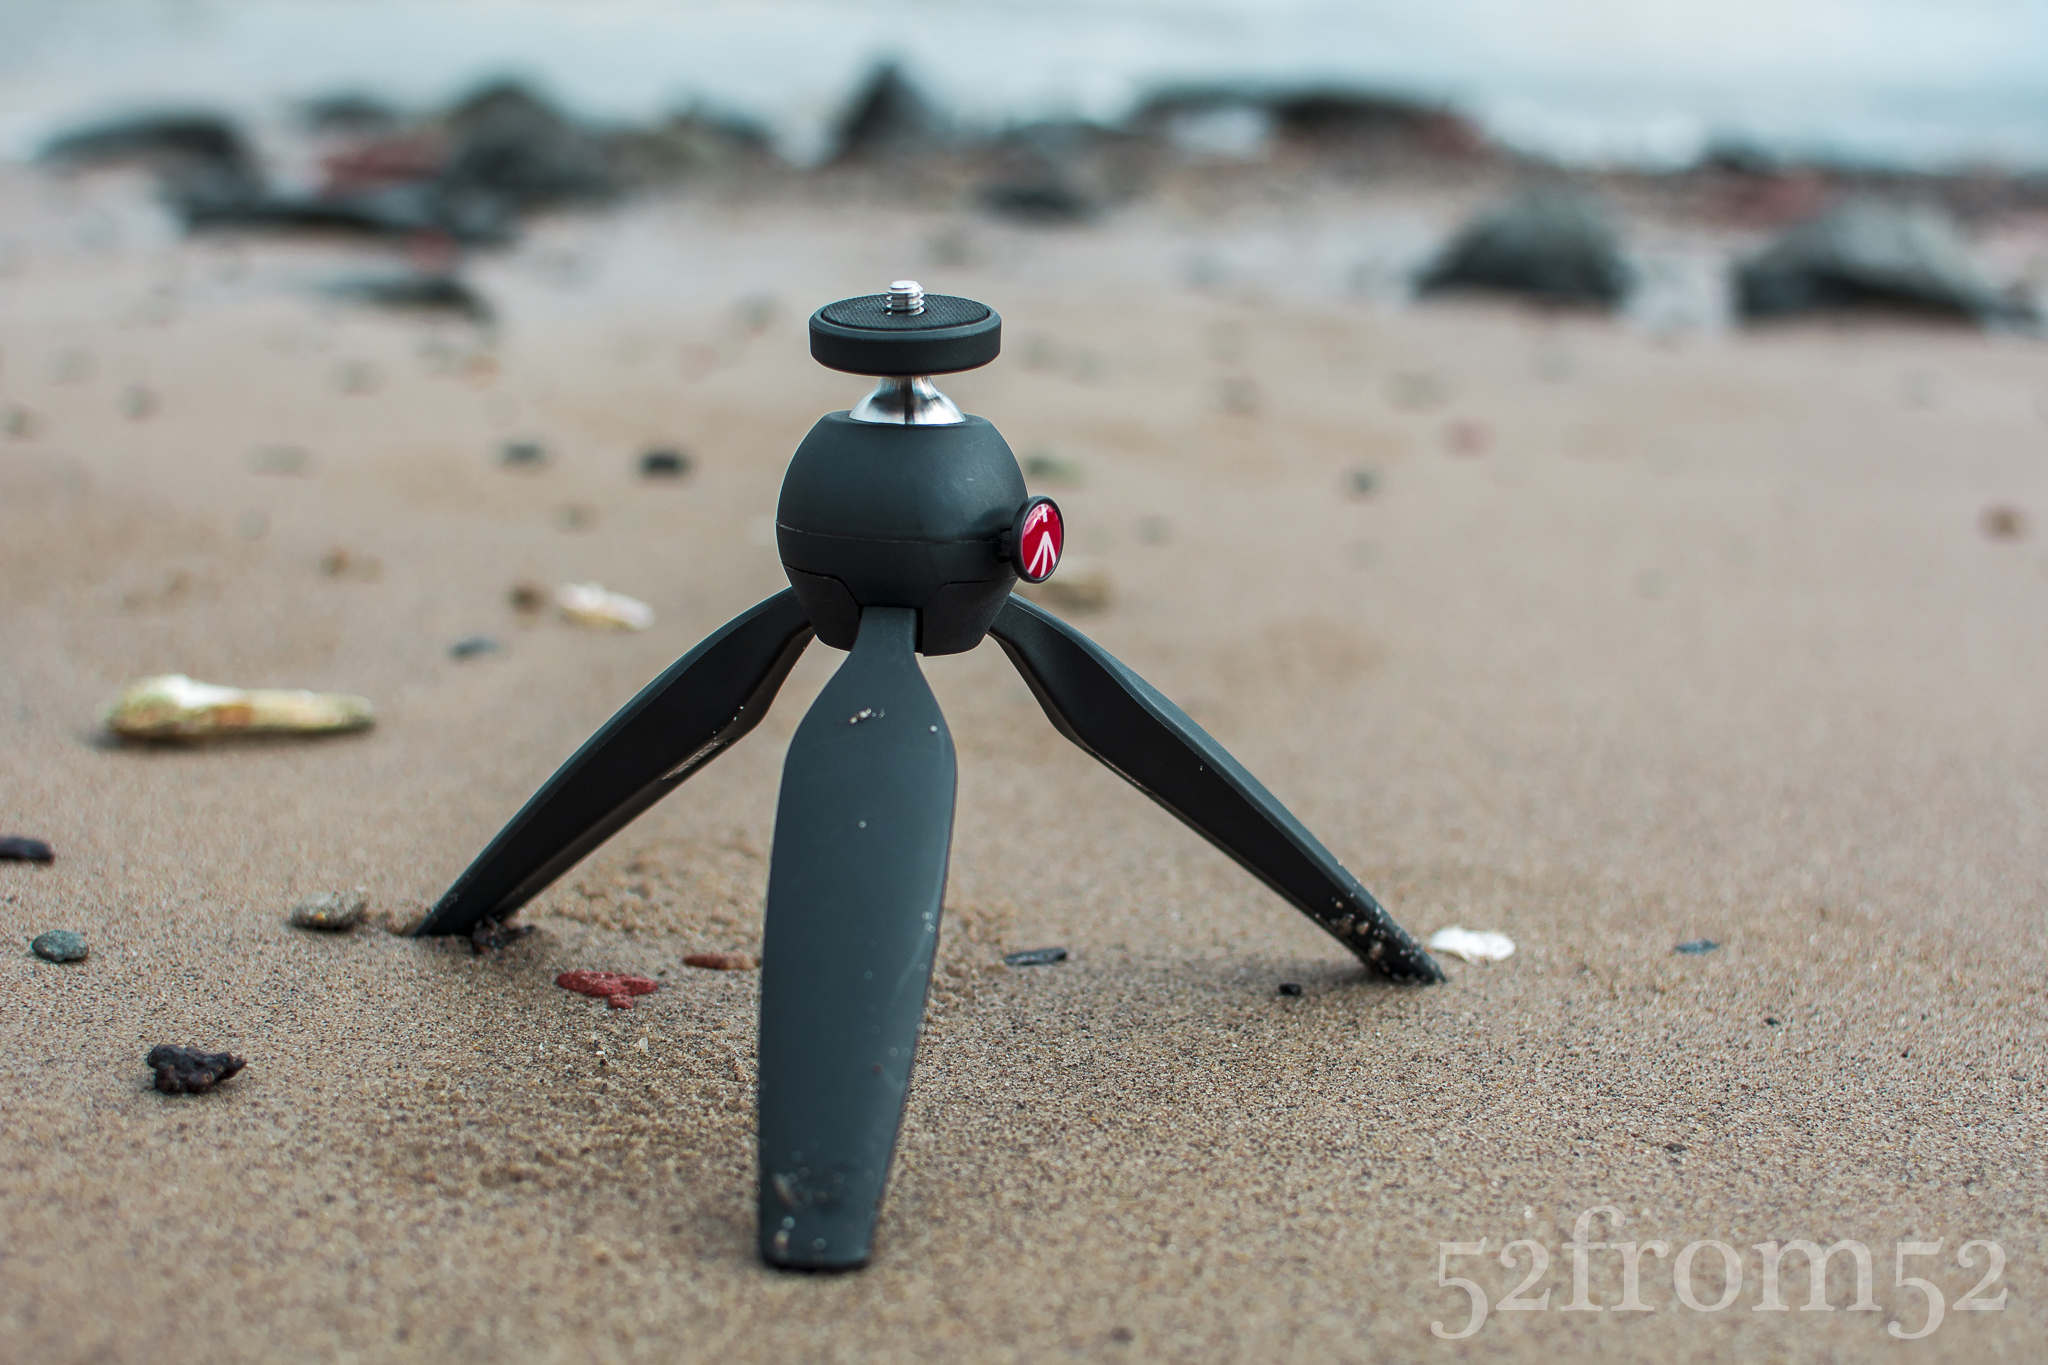
Mini-Tripod used to take photo (link below)
Over the past few weeks I’ve been using Instagram and Facebook to gauge the different editing techniques that people like. Since I’m planning on selling my pictures in the near future it’s important I know what the average person likes. I personally tend to like more dull, low contrast pictures, while I’ve found that more of the people I come into contact with like high contrast, vivid photographs. In an effort to hit the look that people have been liking more, I’ve been editing my photos to have more pop. It’s really hard to describe my editing process verbally, so in the coming weeks look for me to try my hand at creating Lightroom editing videos on YouTube. Expect a follow up edit to this post with a video on how I edited this picture.
A new year and a new perspective. One of the keys to making progress is the idea that only by searching for new ideas and perspectives will you truly grow. Therefore finding new perspectives in life and photography is my goal for 2014. This week I decided a good way to challenge myself would be to set out in Hoboken to find a new perspective on some of the locations I’ve so often photographed over the past year.
Starting out on 4th street I begin working my way towards Pier A park. When I arrived at the park I noticed that there were quite a few puddles still around even though it was a bright blue sunny day. I’m a big fan of puddle pictures, so I set my sights on one rather large puddle at the corner of Pier A. As I crouched down to get a good angle an old man tapped me on the shoulder and asked what I was photographing. I proudly hit my camera’s review button and showed him my most recent shot. He responded with a “Wow” and told me that reminded him of something he did when he was young. Intrigued, I asked him what it was that he did with puddles when he was young? He proceeded to stand over the puddle and intensely look down into the shallow pool of water. I initially thought he was checking himself out but then he explained what he was doing. He was standing at such an angle that he couldn’t see himself, just the reflection of the sky in the puddle. He said I’d stand here and look, look into the puddle, and if you do it long enough you can lose yourself in it’s reflection. Little did this man know he had just in part described my goal for the day. You see as this man stared into the puddle he wasn’t simply looking at the ground, no he was gazing into the deep blue sky but only from a new perspective. As the old man stood there for a few more seconds in silence I could see he was adrift in the skies reflection and found happiness from this new perspective. That’s what I want in 2014, I want to find happiness through the eyes of a new perspective.
The “Old Man”
After my nice interaction with the old man I continued on my quest for this week’s picture. I took pictures looking straight up trees, crouches at ground level, and I even fired off some no look shots while chasing some birds. Although I might have looked like a real oddball to anyone that may have been observing, after they saw my pictures they would understand. Eventually I worked my way back towards 4th street and the took one final detour at Pier C, or as I like to call it, Hoboken island. I’ve attempted to get a picture from the winding entrance of Pier C many times. This time I decided to drop to one knee and see what perspective that brought. What I saw was how the railing of the path was leading directly towards the city skyline. I snapped of a couple pictures until homing in my settings then leaned directly against the railing for what would be my final picture.
Tree Perspective
Photography concepts:
The focus of this week’s picture was finding a new perspective which essentially meant I needed to find a unique composition. In this week’s picture the look that I was going for was one of a focus to blur effect on the railing that led to the city skyline. To get this look I had to set my aperture not too small (f/22) nor too large (f/1.8). A logical approach was to split the two numbers and that’s exactly what I did. I shot my picture with an aperture of f/11 which usually puts mostly everything in focus but because I was so close (actually touching) the railing it gave a good blur to the city skyline. Below is an example of how the closeness of the railing and use of focus points got me the “blur” look I was going for. This picture is identical to my featured picture from a setting (ISO/aperture/shutter speed) standpoint but as you can see the skyline is a lot more in focus. This is the picture that I think most people would take at this low angle. I took this picture first, then to get a “new perspective” leaned into the pole to get a new spin on the view.
Picture Info: ISO 500, 35mm, f/11, 1/320 seco
As I edited the picture in Lightroom, I wanted to emphasize the metallic look of the railing along with the lights that were built into it. To do this I worked with the color sliders but unlike last week, I was actually adjusting the colors not black and white shading. As a result of tweaking the green in the railing you’ll notice all the green in my picture really pops. I wanted the green to stand out so it would first draw your eye to the railing then the green of the railing transitions into the green of the city skyline.
Overall lot of my “new perspective” shots involved getting lower to the ground or closer to my subjects than usual. I encourage you to do the same with some of your pictures this week. After you take a picture pause and ask yourself, without changing your subject how can you adjust your composition to get a new look?
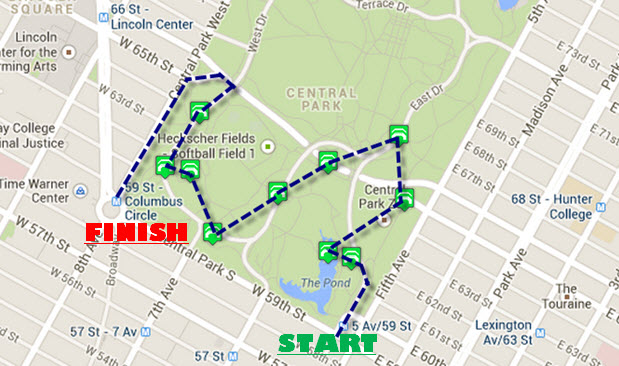
With Christmas less than a week away, New York City is buzzing with holiday festivities. This week I decided to check out the Columbus Circle Holiday Market located at the south west corner of Central Park. As the weekend approached, the weather forecast was calling for a warmer than usual day for December, so I decided to add a visit to Central Park to my agenda. While visiting the Central Park website I noticed that on their map page you’re able to select specific destinations of interest within the park. For weeks I’ve seen lots of great pictures taken of various arches and bridges in the park, which gave me an idea. My idea was to use the map and plot out an “Arch and Bridge Tour” which would bring me to all of the southern arches and bridges, starting with the Gapstow bridge (South/East corner) which is adjacent to the ice rink. With my plan set, all that was left was setting out on my weekend adventure.
Planned Arch/Bridge Tour
My trip started with about an hour of fighting traffic and subway crowds prior to finally popping out of the 59th/5th subway tunnel. Upon emerging from the subway tunnel I was oddly greeted with the smell of spring. If the streets weren’t packed with holiday decorations I would have swore to you that I had traveled back in time to April. Even though I appreciated the nice weather I was a little disappointed, I really wanted to get some pictures of Central Park in the snow. Later on my disappointment was cured by the much appreciated feeling in my fingers and toes I enjoyed throughout the day.
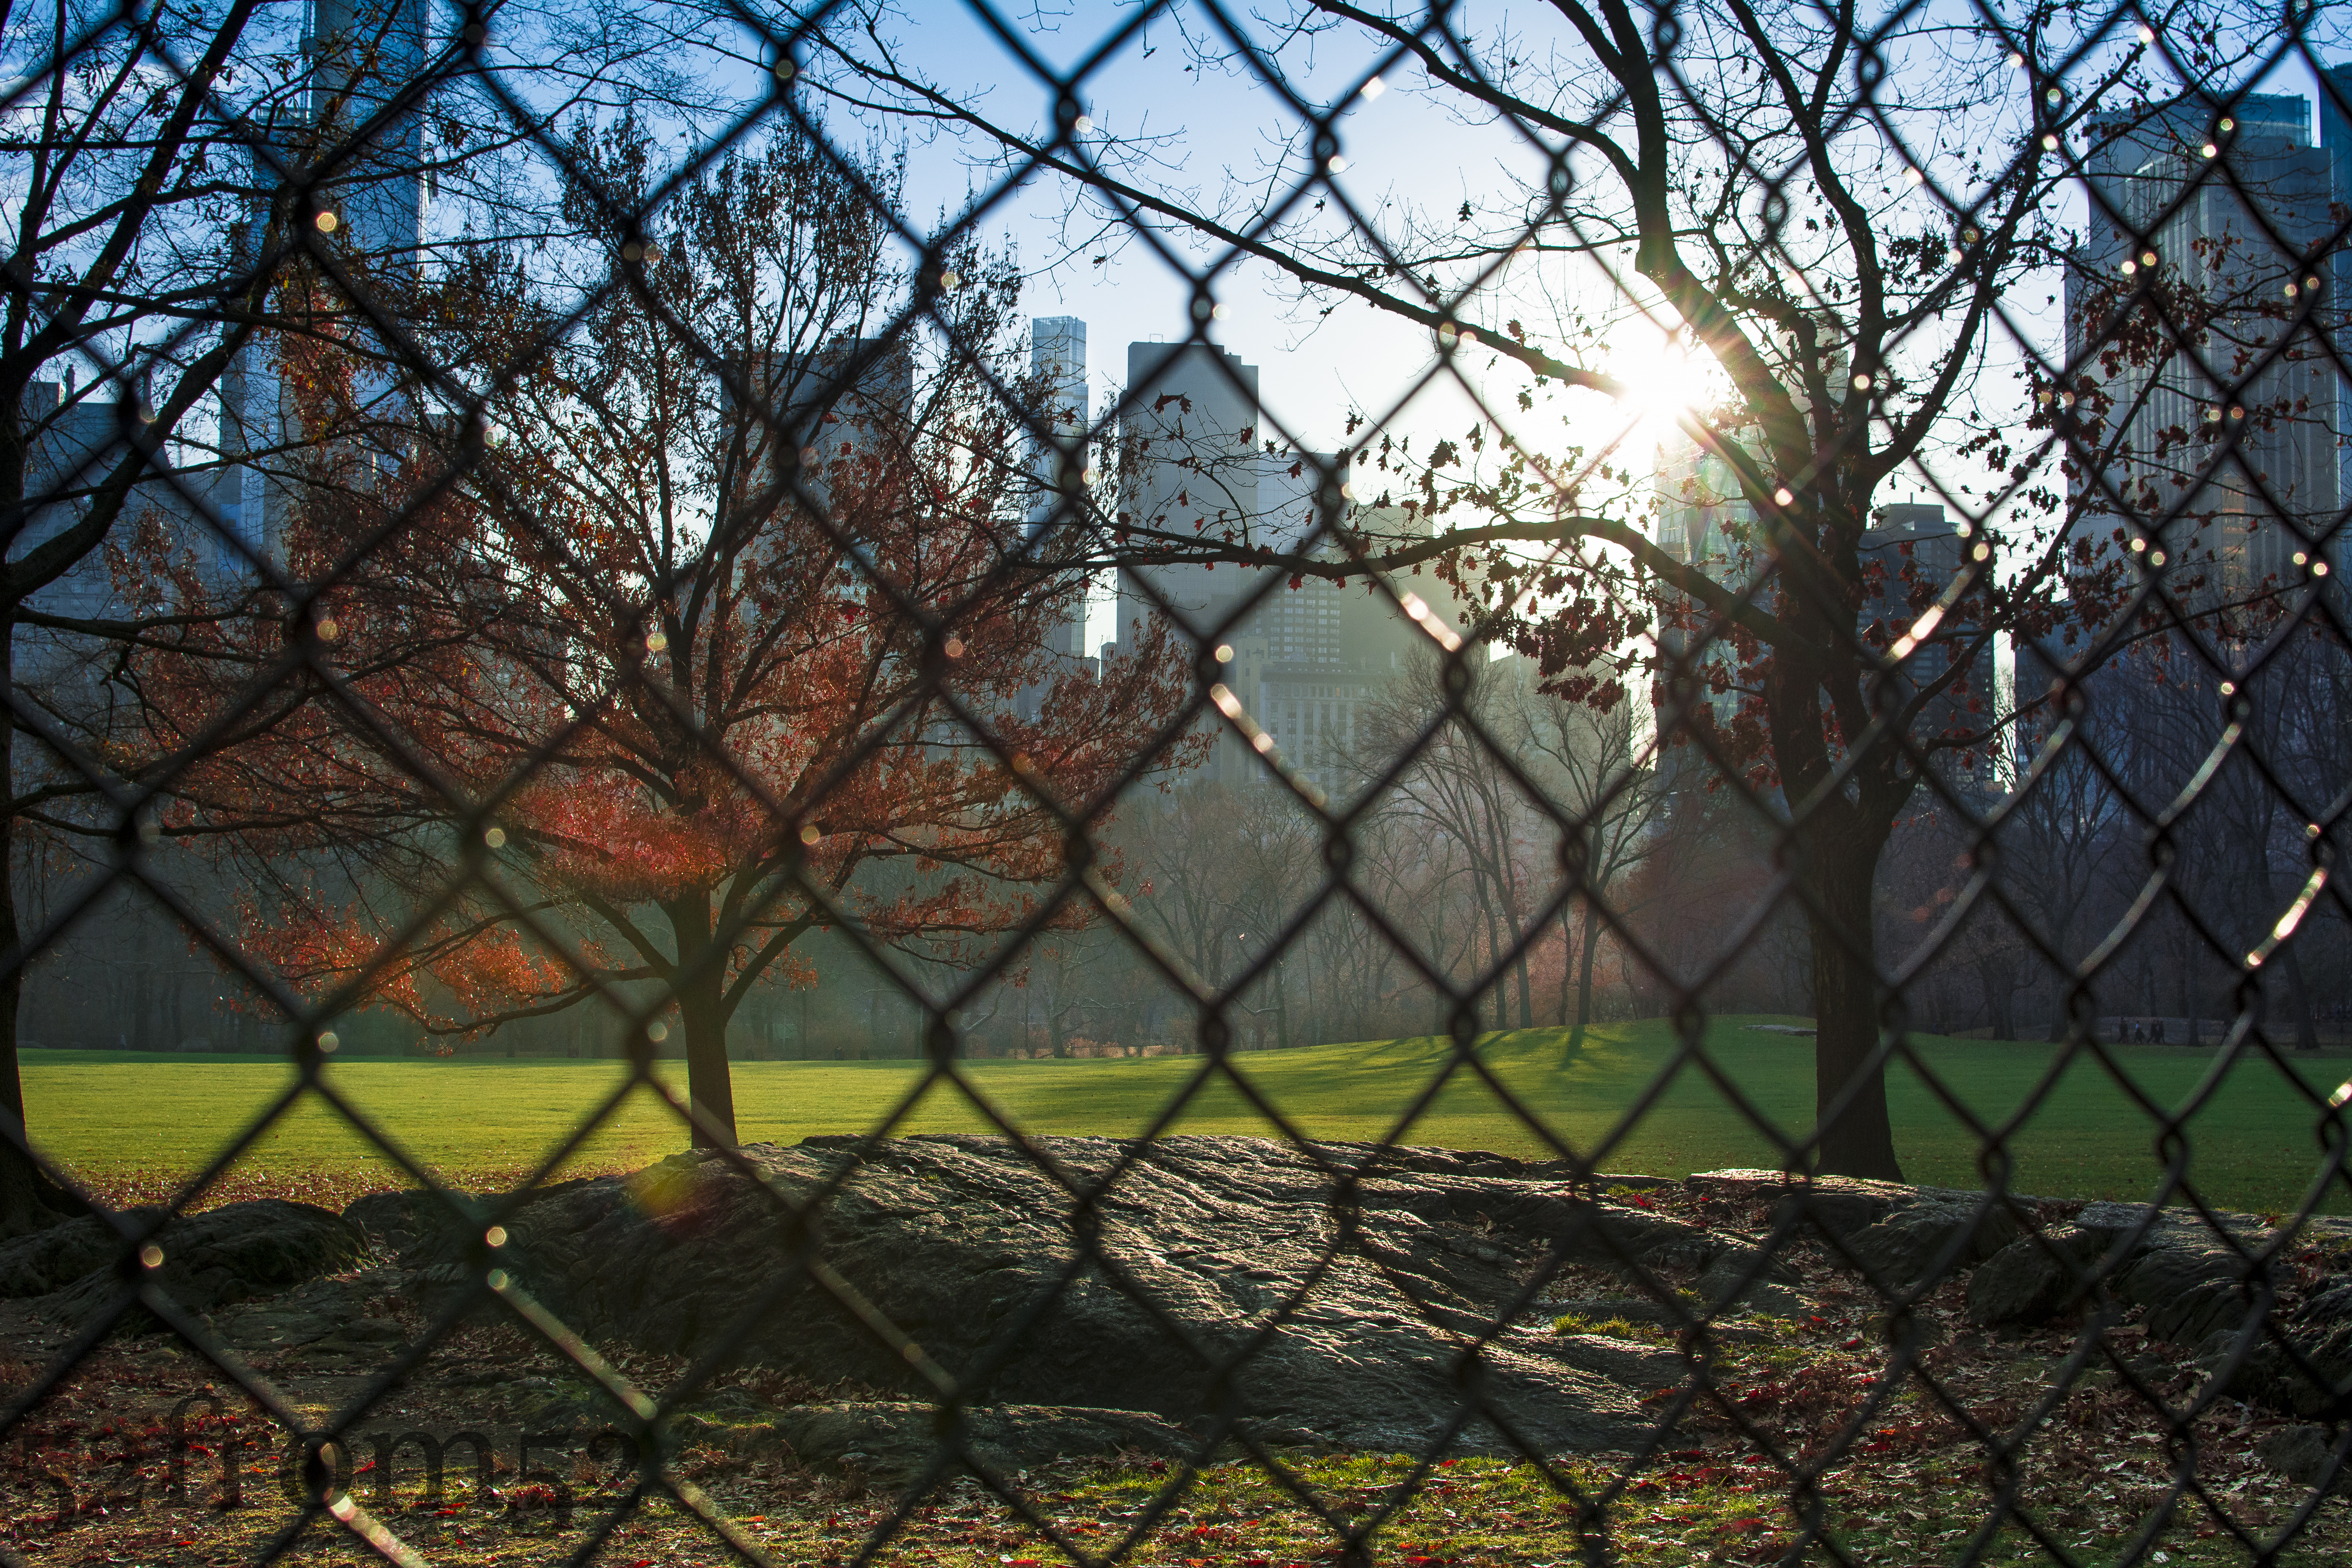
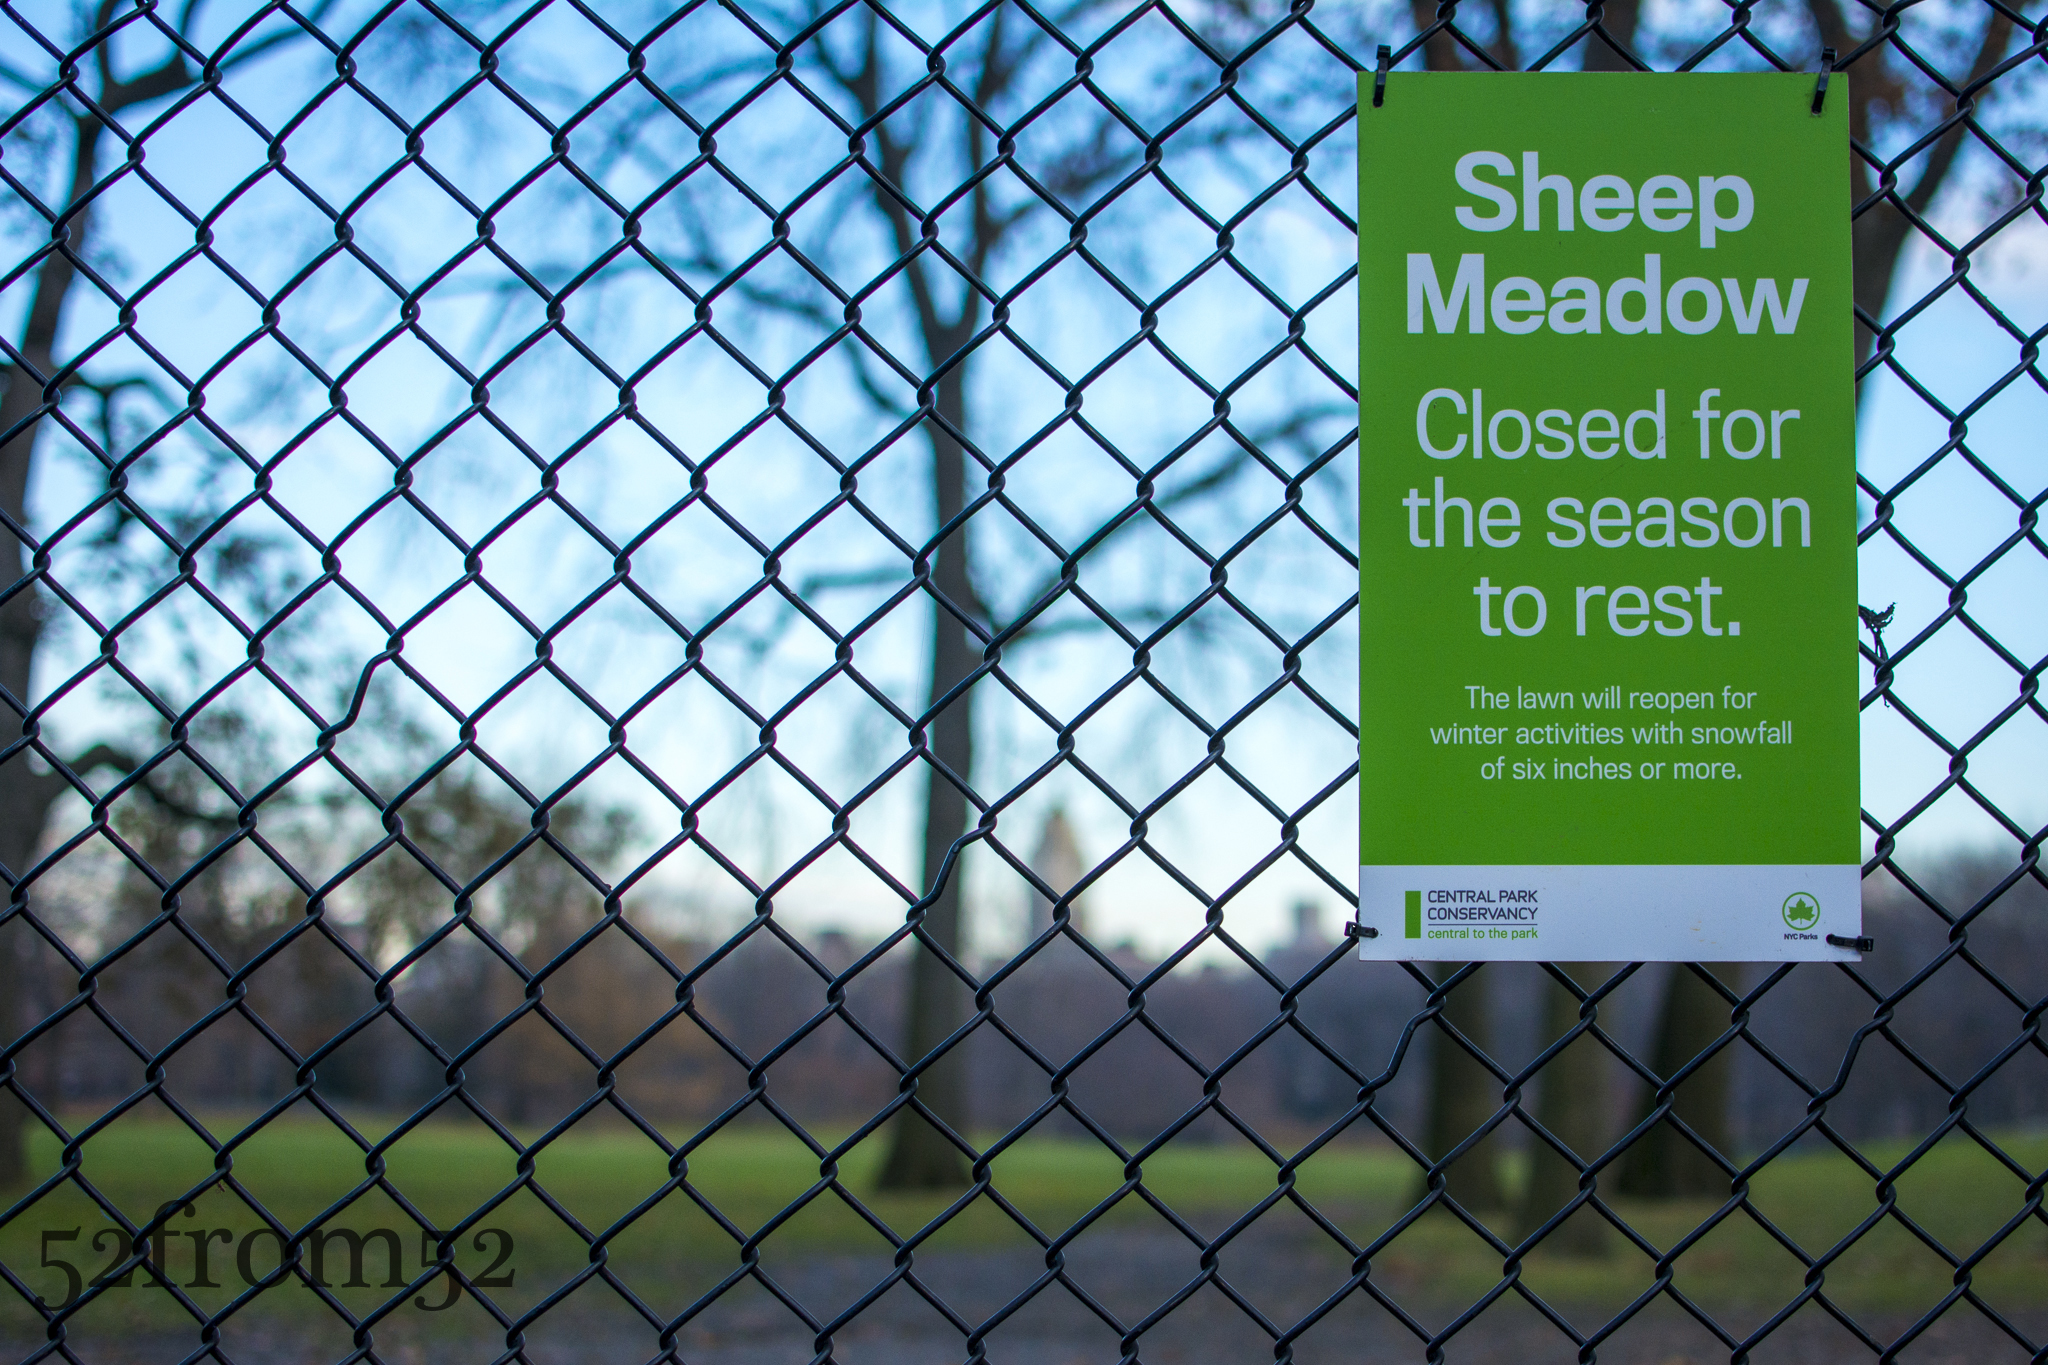
After visiting the first couple of bridges and arches, Gapstow included, I was running into issues with getting good compositions with my D5200. The sky was getting washed out because it was earlier in the day than I usually shoot. I also wasn’t able to fit enough of the landscapes that I was photographing into my 35mm lens frame. Since the bridges weren’t cooperating I decided to cut my tour short and work my way to a part of the park called Sheep Meadow. The large 15 acre “meadow” is special to me because it’s actually where I finally decided to due this blog. Back in July I toured the park and ended up at the Meadow which I photographed and realized how fun it was to set out on photo adventures. July’s trip cemented my idea and I moved forward with this blog, and I haven’t looked back since.
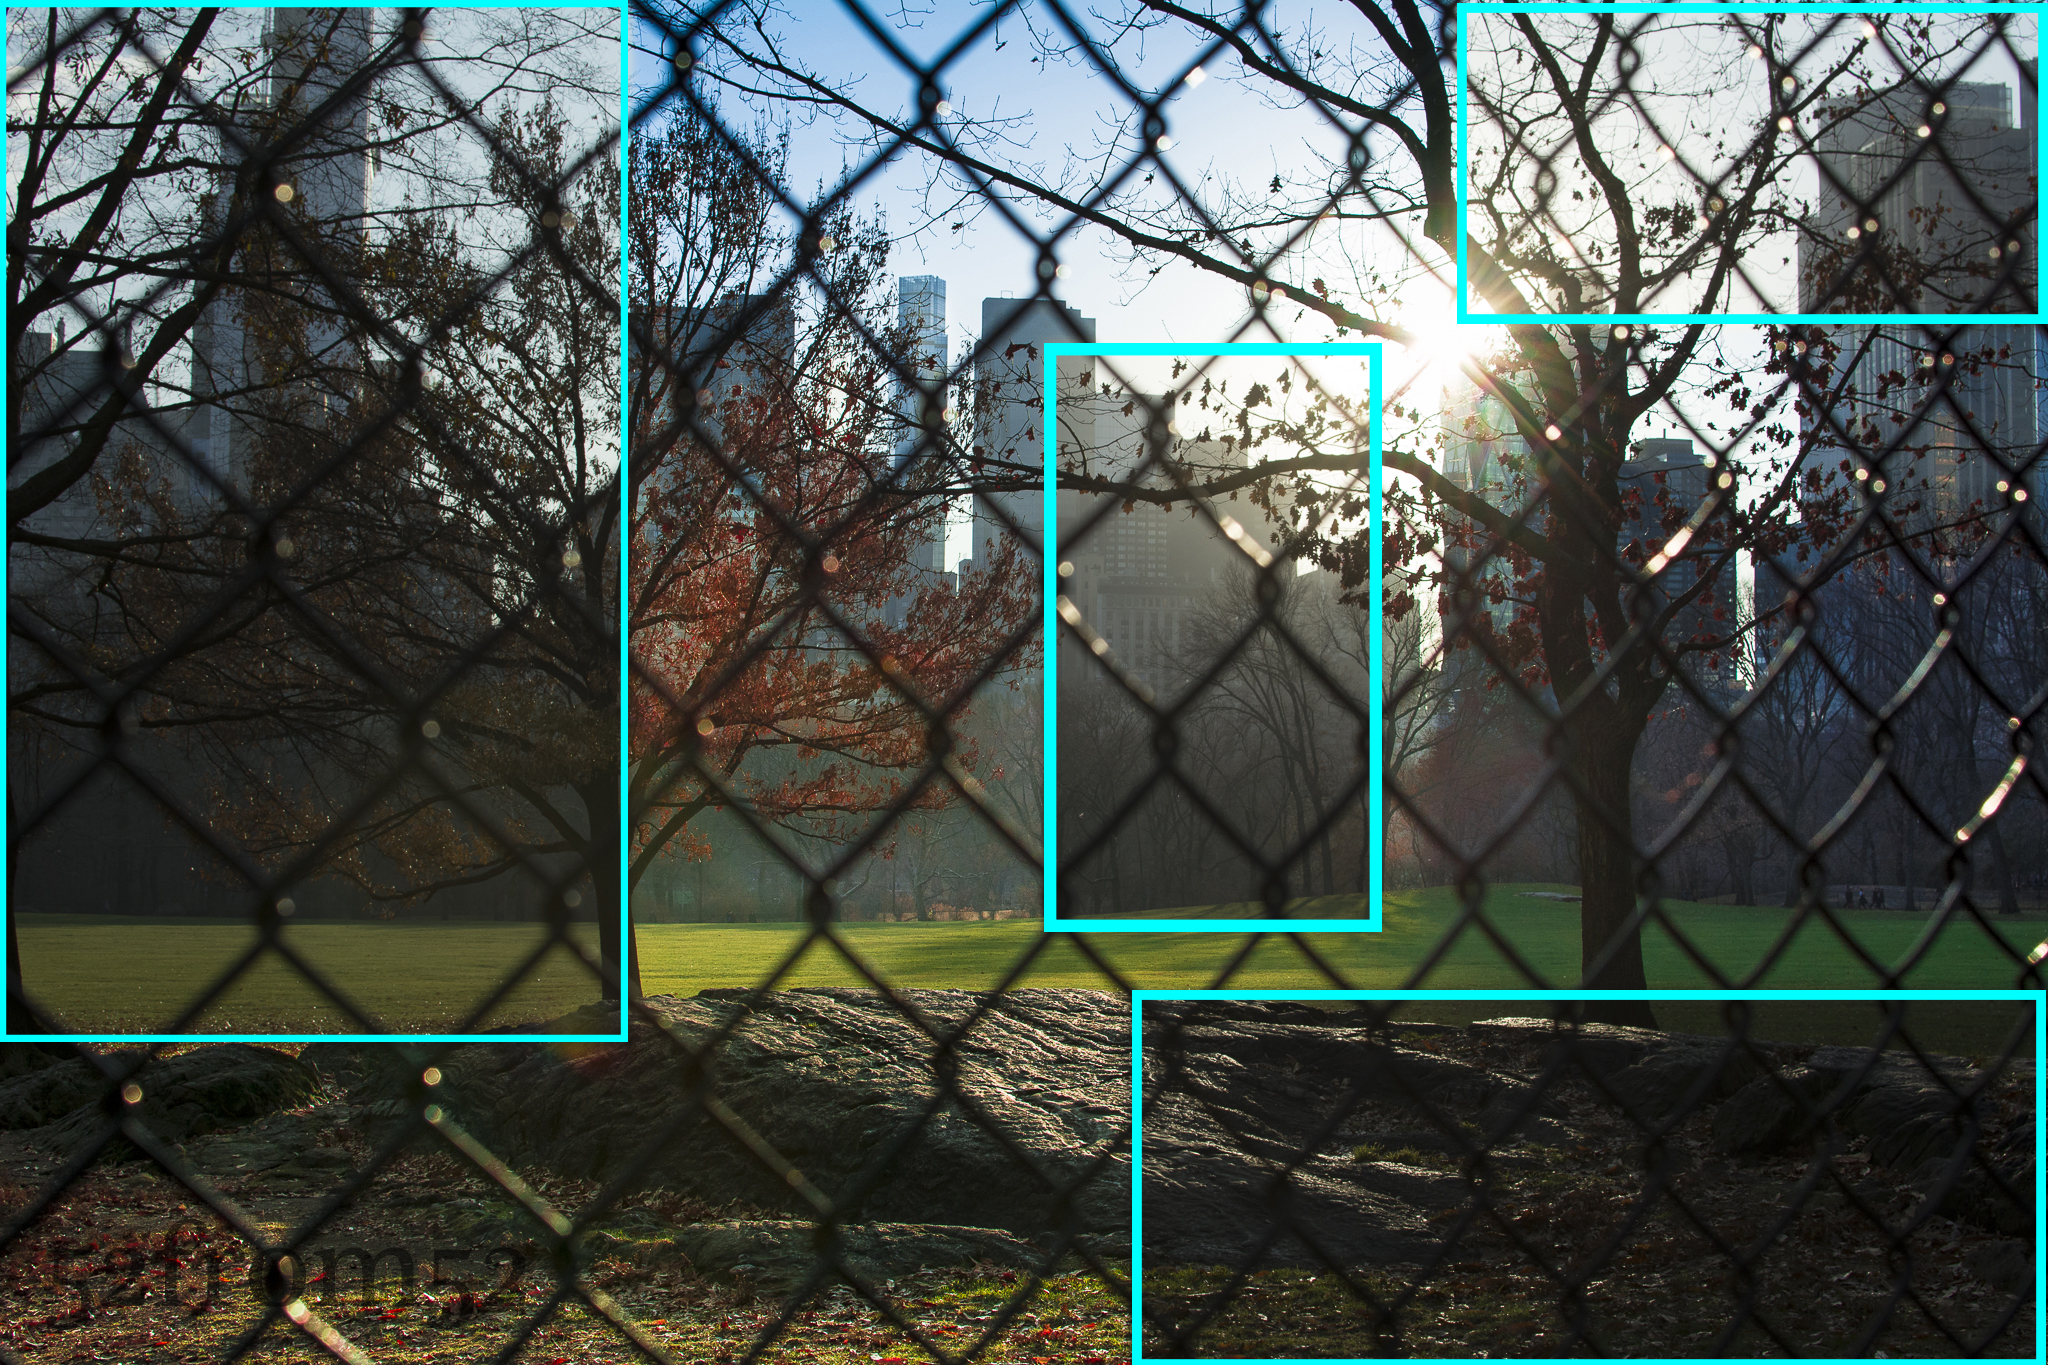
As I got closer to the Meadow I noticed that there were no visitors on the beautifully lush green lawn. When I finally arrived at the fence surrounding the meadow I realized why it was so empty, it was closed for the winter. Although I was disappointed this provided me with an opportunity to photograph the meadow without any visitors crashing my picture. I worked my way around the fenced perimeter shooting pictures above and through the fence. At the end of my trip around the meadow I spotted this week’s picture. The way the rock picked up the sun with the contrasting green meadow really caught my eye. Although the day didn’t turn out as planned, I was very pleased with this picture and really enjoyed my day in Central Park.
Sheep Meadow Closed!
Photography concepts:
Over the past couple of weeks I’ve been experimenting with different editing techniques and applications. I use Lightroom for all of my blog photographs but for Instagram, Facebook and Twitter I use Snapseed and VSCOCAM. The advantage of Snapseed and VSCOCAM is that I’m able to give my pictures a little more “pop” with just a few clicks. The disadvantage of both applications is that they don’t maintain the quality of the original picture, therefore they’re not suitable for editing pictures for this blog or any kind of high quality sharing. All that being said, there is no reason why I can’t create the same type of vibrant images with Lightroom, it just takes a little more work.
Edited Location comparison
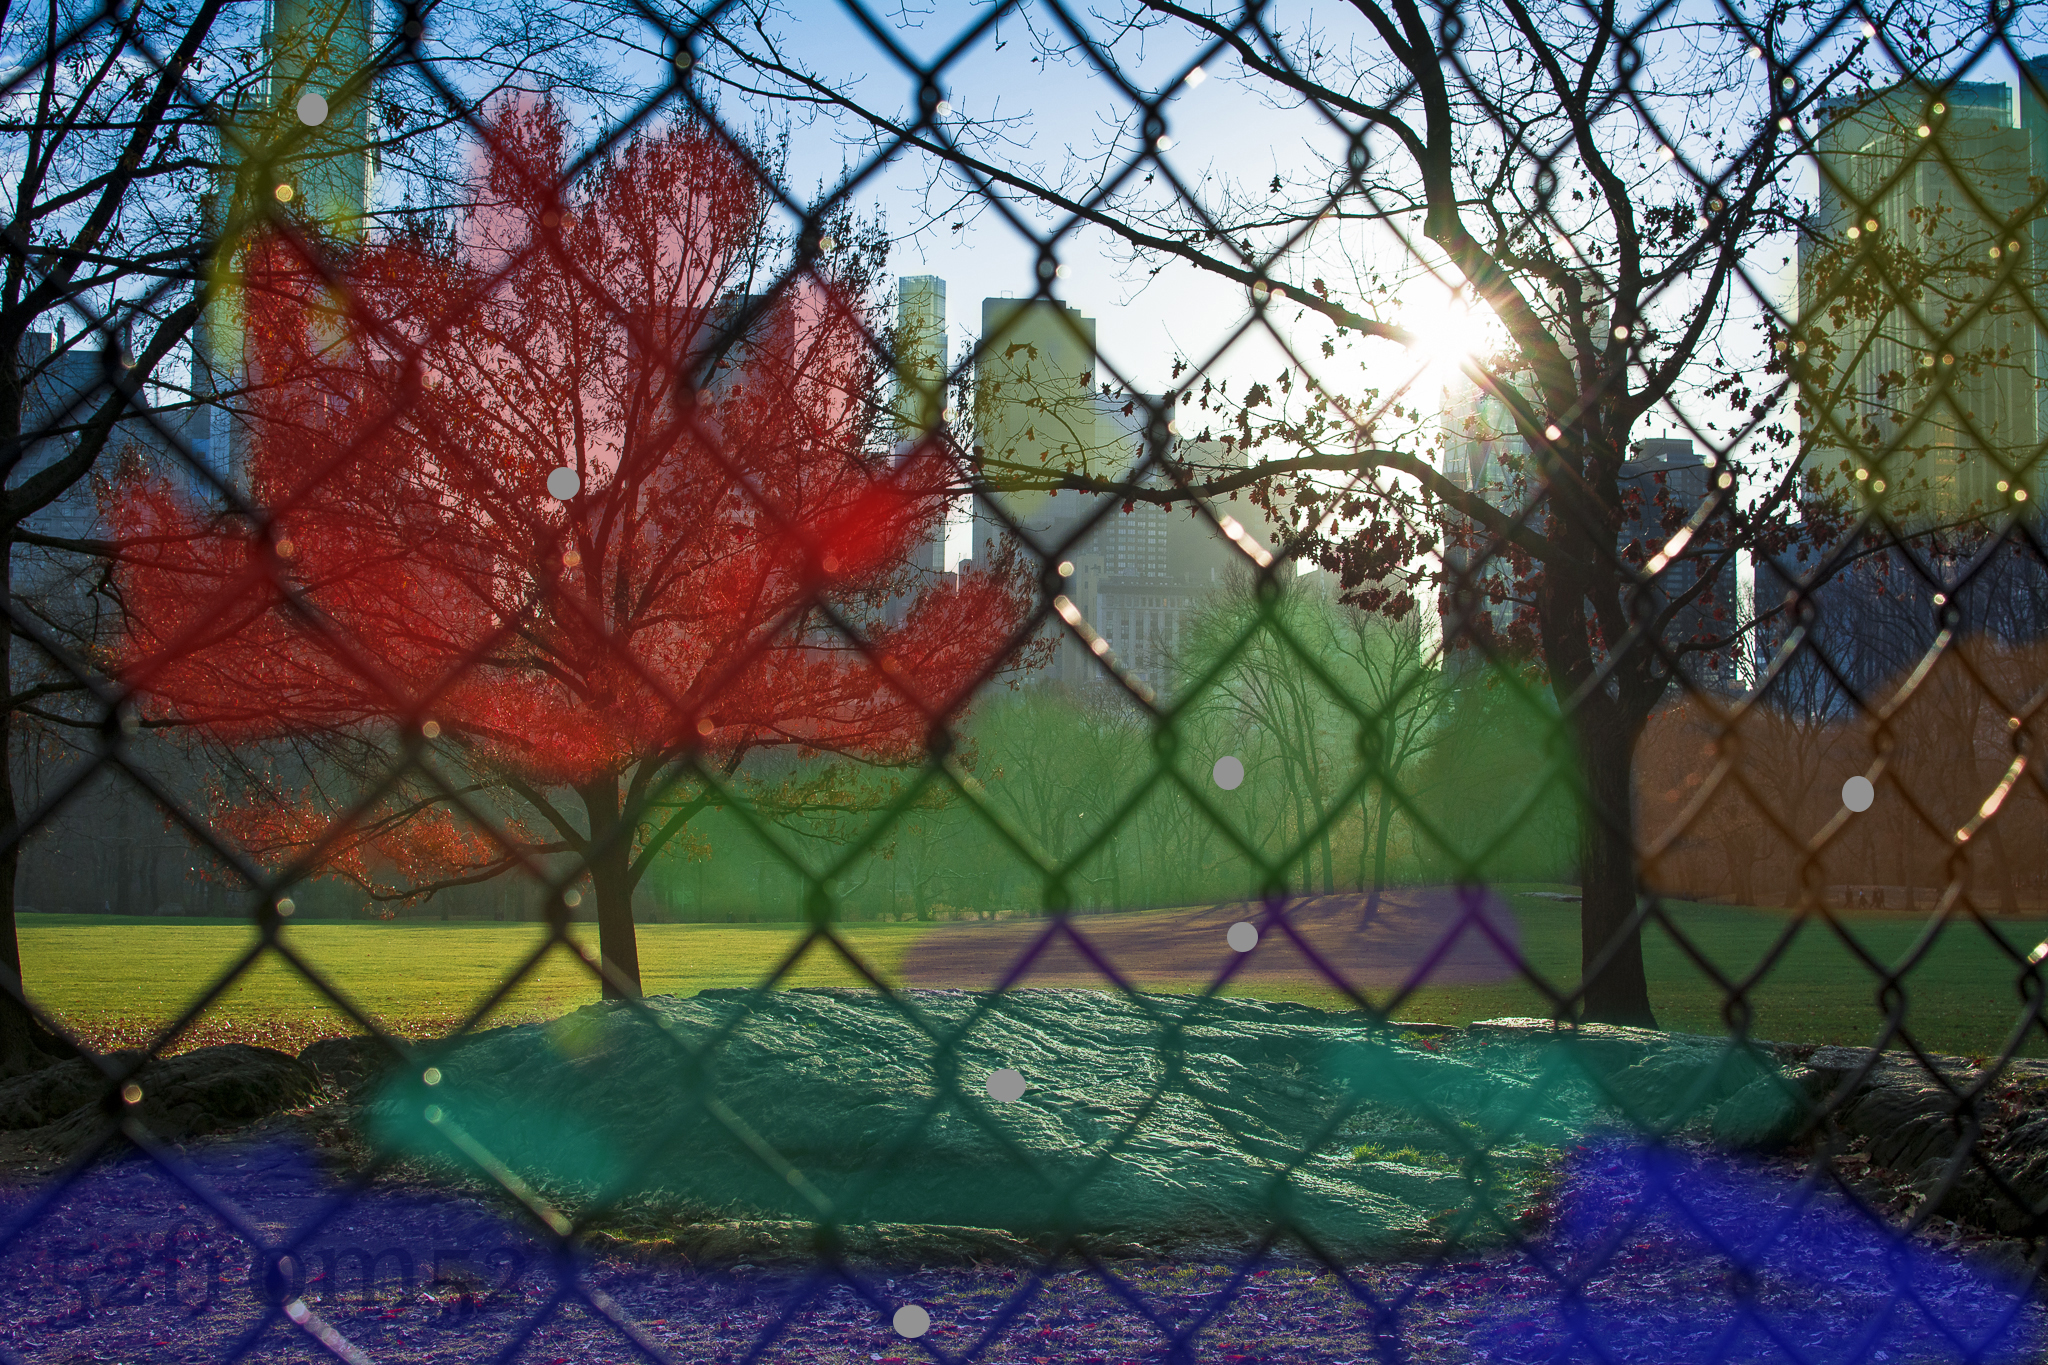
This week I put a lot more effort into editing specific details of my photograph, with the goal of creating a more vibrant picture. I shot my picture straight into the sun which in turn caused a lot of shadows and dulled out the many of the colors in frame. The way I corrected both issues was via Lightroom’s spot correction tool. This tool allows you to do exactly what it sounds like, select certain area’s of your picture and adjust things such as color, exposure, contrast and so on. I usually do these kind of adjustments globally (to the entire picture) or through the use of gradual filters. In the past the issue I’ve run into is gradual filters aren’t good when you have to apply different settings to lots of different small areas. This is where spot editing comes in handy. The challenge that spot editing presents is keeping your picture looking a natural by manually blending your edits seamlessly into the picture. You want to avoid creating obvious edit lines and look for natural breaks in your picture to tie your edits together. Above and below are examples of before and after, along with a representation of the areas I focused in on with the spot edit tool.
Different colors represent different spot edits/localized adjustments
Prior to editing the picture I obviously had to shoot one that was crisp and provided me with flexibility for editing. To do this I underexposed my original picture and made sure I shot with a small aperture to keep more things in focus. The last aspect of this picture I’ll briefly touch on is how lined it up. As I talked about in my week 16 post, framing a picture that’s shot into the sun can be tricky because you’re basically forced to use the live view. I really don’t like taking pictures in the live view so what I do is line up my shot via live view, then switch the camera back to through the lens and fire away. Once I get my first picture I adjust the composition via slight tilt and shift adjustments until I get the picture I want. I used this method to get this picture and I think it worked well.
Picture info: ISO 3200, 35mm, f/1.8, 1/200sec, -1 Exposure step
Week 19 (12/9/2013 – 12/15/2013): Top of the Rock Observation Deck
Picture taken on 12/12/2013 at 5:15 PM
Picture description:
This week I finally got the chance to make a return visit to Top of the Rock. My first visit was six months ago and was only two weeks after I purchased my Nikon. Since my last visit I’ve often looked back at the pictures I took and thought about the many things that I could have done better. I’ve learned many lessons over the past six months, in part because of this blog but also because I’ve immersed myself in photography. Articles, YouTube tutorials and experimenting with different techniques have been my main sources for learning. One other source of learning that might surprise you is instagram. I often flip through different hashtags looking for ideas of what to shoot or to see how people photograph certain subjects or places. Instagram has photographers of every level ranging from the professional to amateur, and or dare I say serial selfie taker. Before and after my trip I looked through the hashtag #topoftherock to see the kind of pictures people took during their visit. Besides the selfies and couple pictures I noticed that nearly all of the pictures looked identical with the exception of changes to the sky or filter the person used on the picture. After seeing how people have been over-sharing the same picture I knew that I had to find some way to differentiate mine from the rest.
During my visit even though my goal was to take an original picture, I couldn’t help myself from taking the classic Top of the Rock picture. I found myself taking the same kind of picture over and over again partially to make sure I got a good one, but also because in person it’s just that hypnotizing of a view. After about an hour of scanning the horizon for a unique view I came to the conclusion that from my vantage point there really was none. It didn’t matter where I aligned the buildings, I had already seen that picture, or one very similar, shared countless times. At that moment I decided to take a step back from my coveted position to see what new perspectives I could find. Within a matter of seconds I was rewarded for my decision. After stepping back I saw that all the people taking pictures were casting silhouettes in front of the very same view I was just photographing. I spent the next couple of minutes wading in and out of the crowd to try and get the a picture that met my satisfaction. Eventually the 20 degree weather got the best of me and I decided to call it a night. On my way home while thinking about my night, I realized the valuable lesson that I just learned. It’s very easy to get drawn into taking the obvious picture. The only way my photography is going to continue to improve or “move forward” is if I regularly remind myself to take a “step back” and find a new perspective on what’s right in front of me.
Photography Concepts:
Although I used the previous section to talk about avoiding the obvious shot, it doesn’t mean the classic Top of the Rock pictures aren’t good ones. For the purpose of this blog I wanted to challenge myself to get something unique but it leaves the question, how do you take a good picture at Top of the Rock? As I mentioned earlier I often look back at the pictures I took during my first visit and dwell on what I could have done better. Let me share with you some of the lessons I learned between my two visits in terms of taking pictures at Top of the Rock.
Example of the classic Top of the Rock Pic
The first thing you have to ask yourself is what kind of picture are you looking to take? Do you want take pictures of only the buildings or are you planning on featuring yourself or friends in the picture with the buildings in the background? Knowing your subject is important to so you can determine the time you’re going to go and where you should set up shop once you’re there. Let’s start with talking about taking pictures of people. If you’re taking pictures that will feature yourself or your friends the location is less critical but the time that you arrive is important. In this case you’ll want to go about an hour before sunset this way you have time to take nice pictures in softer light and without flash. In my opinion flash is the worst when taking pictures at Top of the Rock. Unless you’re an absolute pro and know how to compensate correctly flash tends to wash out the city backdrop, which is one of the main reasons you’re at Top of the Rock right? In order to feature the cityscape behind you, don’t use flash, especially if you’re taking pictures on the 68-69th floor behind the glass. Once you find a nice location play around, take pictures of you subjects looking out towards the buildings or doing some forced perspectives (google it). If you want to get more original, take pictures of your subjects from a distance. Perhaps have your subject stand looking out towards the city and snap your picture focusing on them through the busy crowd? As was the theme of this blog, once you take a step back you’ll be surprised what new perspectives you’ll see.
Example of a unique Top of the Rock Picture
What about the settings to use or not use when taking pictures of people, other than flash? One option is to use the smallest aperture your camera will allow which will give you nice background blur and permit you to use a low ISO. The negatives of this is the exposure of your cityscape background might be overexposed. The solution, shoot your picture in such a way that you’ll be able to only edit the background later to correct the overexposure (don’t forget to shoot in RAW to enable this). Option two in terms of aperture would be to use a small aperture which if you took my advice and came close to sunset, is going to force you to use a high ISO. The negatives, you’ll have a grainer photo but the positive is you will have a more detailed cityscape background. If you’re only looking to share this picture on something like instagram a high ISO image is fine. Even with the wide aperture you still might have an issue with overexposure for the background so compose your picture accordingly. The last setting I mention is try to use a focal length of 50mm+, I won’t go into detail about why but if you want to know why check out the video below from one of my favorite YouTube sources.
Now let me talk about what to do if you’re looking to take pictures of the buildings. First, I recommend going to the 70th floor and trying to lock down a position in the center area where you don’t have the bottom floors jutting into your picture. Getting this prime location is even more important if you’re using a wide angle lens. Just like shooting people, I think the best time to take pictures of buildings is right before and during sunset but you can go any time especially if there are nice mid-day clouds. For now I’ll talk about what to do at sunset. Going at sunset or at night really forces your hand in terms of camera settings. Unlike taking pictures of people, when you use a small aperture there aren’t many positives. Your plane of focus is going to be narrow even with the buildings being far away. What’s going to happen is one building might appear in perfect focus while the others are a little blurry. You can still take a good picture using small apertures but if your goal is to get a crisp image that you can blow up on perhaps a canvas, I don’t recommend using small apertures. What are your options then? Option one, you can boost your ISO but this is going to still leave you with the problem of not having a crisp image for enlarging later. Option two, bring a tripod and shoot with a small aperture and slow shutter speed. This seems simple right? Well tripods are not allowed at Top of the Rock but there are ways around this rule. As you can see in this week’s featured picture people bring tripods. The key is to bring one small enough to fit in your bag, and one that has a small leg spread so it can sit on top of the cement pillars. This is also why getting a good location is critical, there are a limited number of cement pillars and or locations that can facilitate the use of a tripod. I’m not going to go into the all settings specific to tripods because if it’s pretty simple, small aperture, low ISO, slow shutter. Two things I will recommend though is use the multiple focus point setting which will grab more buildings in focus, and underexpose your image. One thing not to do, which believe it or not I saw someone do, don’t use flash while you’re shooting buildings on a tripod. Maybe I’m missing something and if I am please comment and correct me, but I don’t see any positive in using flash on a tripod when you’re not taking pictures of motion or people.
ISO 2500, 35mm, f/7.1, 1/40 sec, no tripod
These are some of the lessons/tips I’ve learned from my two trips to Top of the Rock. I still haven’t gotten what I would consider a great classic Top of the Rock picture, but that’s mainly because I haven’t brought a tripod or wide angle lens. I think I’ll take at least one more trip in a few months and try my hand using more than just my 35mm lens and perhaps a tripod. Until then I hope the lessons I’ve learned and shared so far help you shoot some great pictures at Top of the Rock, have fun and remember take a step back!
Week 10 (10/6/2013 – 10/12/2013): My Apartment, Hoboken NJ
Picture taken on 10/10/2013 at 4:53 PM
Picture description:
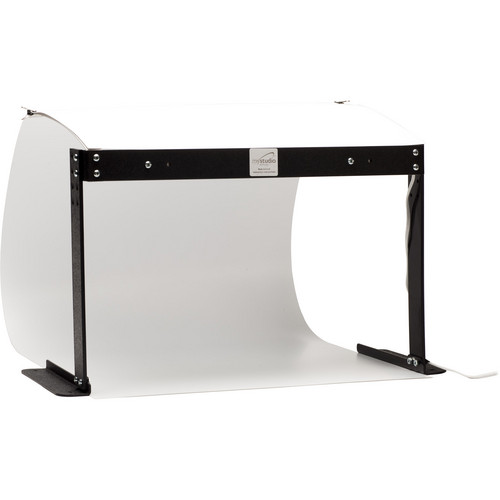
In life it’s always better to get ahead. Getting ahead was the catalyst for this week’s picture/concept. As I’m gaining more experience and exposure in the photography world, more opportunities are presenting themselves. One upcoming project is going to require me to take a lot of indoor pictures and possibly product/macro types of shots. In an effort to prepare (get ahead) for this future project, and to explore more areas of photography I decided to experiment with “studio” photography. Now I don’t have a studio or access to one so the best I could do is purchase an at home alternative to allow me to take some small scale pictures. Luckily one of the best companies to buy photography gear from has a storefront in New York City and not too far from my office. I’m of course talking about B & H. After doing some research online about what I should get I took a trip to B & H to check everything out in person. I spoke to one of the employees who recommended a duel light set up which would have been both bulky and expensive. I decided his suggestion wasn’t the route I wanted to take and ended up settling on the “MyStudio” portable photo studio with built in lighting. It came at a reasonable price and it seemed to be the perfect size to be functional in my apartment.
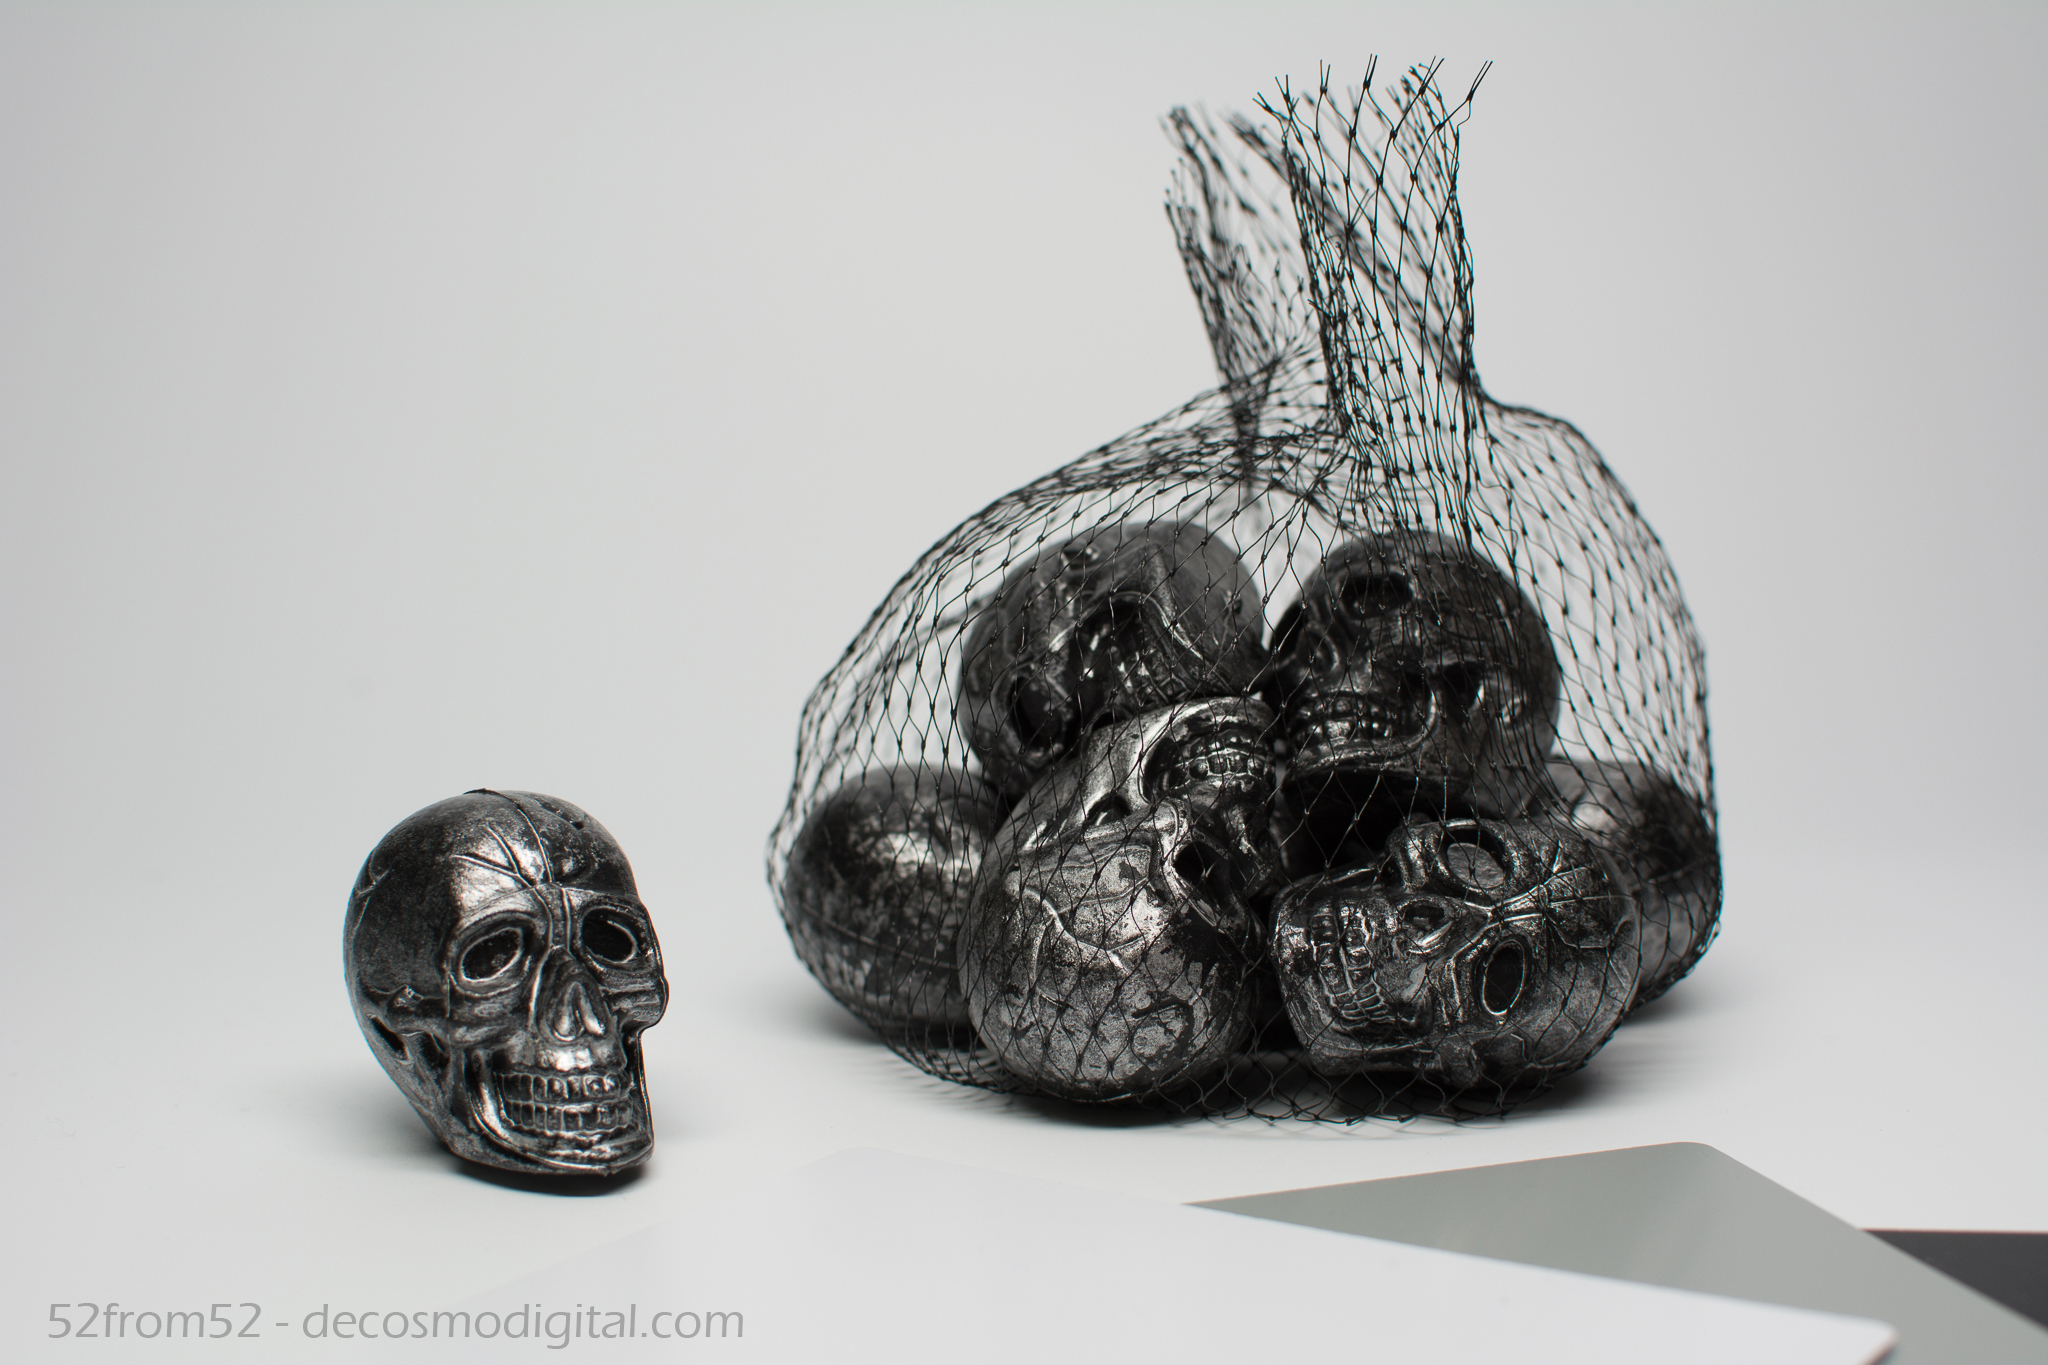
Setting up “MyStudio” was pretty quick and easy. Of course it helps that I’m a handy man (not by trade) but I feel like most people would be able to put everything together in under 10-15 minutes. Once everything was set up it was time for the fun to begin. Per my brother “anything is cool if you’re a good photographer” at least in terms of macro photography so I took that as a challenge. I began going through my room and photographing almost anything that would fit in “MyStudio.” Although my brother was right, not everything that I took a picture of could easily tie into a post. I decided to find something a little more relevant. My “getting ahead” philosophy (along with Halloween being around the corner) is what drew me to skulls (heads) that are featured in this week’s picture.
Photography concepts:
One big difference between this picture and those of past week’s was I needed a decent amount of equipment to make this happen. For starters I needed the “MyStudio” which I would recommend to anyone looking for a small at home studio option (link/picture below). Next I needed a tripod since with macro/studio photography sometimes you have to take longer exposures to capture more light and you really need to line everything up with precision. I probably could have gotten away with not using a tripod but I already had a good one so there was no reason to not. Another key tool you need while doing studio photography and any other indoor shots are white balance cards. I’ve mentioned white balancing before but this week it was really key. When you’re using a white balance card you usually take a reference shot and either tune your camera into that setting or use the reference shot as a guide for setting all your white balance in editing. This week I decided to leave my white balance cards in the picture so you could get an idea about how I used them. The last and most obvious (other than my camera) thing that I needed was a subject. In the past I found real life subjects to photography, while this week I had to find and place my subject. Having the freedom to get creative was nice but also very challenging.
MyStudio; Taken from BH’s site (link to product below)
The main challenge about having “creative freedom” was positioning my subjects and relationally lining up my camera. When you’re working on such a small scale the slightest adjustments to your camera’s angle or the location of your subject changes the entire dynamic of the picture. Using this week’s picture as an example. You’ll notice that the single skull and the bag of skulls are a little offset with the single skull being further up in the picture. I positioned the single skull forward so it was larger in the picture but I had to push the bag back to get it in the full frame. Once I put the two subjects on different planes, in relation to my camera’s lens, it forced me to use a smaller aperture. If I had shot this picture with a f/1.8 instead of f/5 the single skull would have been in focus and the bag blurry. Even with f/5 you can already start to see some of the blur in the back portion of the bag. Based on what I’ve read, along with my own experience with wider apertures (smaller f numbers) the plane of focus becomes very thin. What this means is only the things that are on the same plane as your subject will be in focus. The smaller the aperture the deeper the in focus plane gets. I haven’t done enough reading to explain the mathematics behind this focal plane concept but I feel like this picture was an easy way to demonstrate the concept and it’s challenges.
There is still a lot more to learn about indoor shooting so this topic might get featured again in the coming weeks. Let’s just say for now this is to be continued…